Instructor Guide
Last updated on 2023-11-16 | Edit this page
To Do: Before the lesson
- send the link to the “Episode 1: Getting Started” 2-3 days before the lesson starts.
- prepare group handouts for the first day by including the challenges 2 and 3. You can find a Markdown template here: General Lesson Information - Group Challenges and Handouts
Lesson Schedule
Overview
| Episode | Description | |
|---|---|---|
| — | 1 |
Getting Started This episode is not part of the actual teaching content. It will be sent to the learners prior to the lesson. It contains one brief challenge that encourages the learners to engage with the example data object. The learners’ experience will be shared during the first Episode 0: Housekeeping session. |
Day 1
| Episode | Description | |
|---|---|---|
| 35 min | 0 |
Housekeeping The lesson starts with an introduction by the instructors, and usually the hosting organization, to the learners. The learners introduce themselves briefly and report on their first impressions of the example data object. Scope and schedule of the lesson are outlined. |
| 75 min | 2 |
Data and
Metadata The learners get an introduction to data and metadata in everyday life and research contexts. Descriptive, administrative, and structural metadata are distinguished. The learners conduct a guided online search (URLs are provided) and explore the metadata tagging in selected web pages. Good (enough) and worst practices of metadata annotation will be covered in the final talk of this module. The presentation is complemented by a live demonstration, collaboratively extracting metadata from scientific publications. |
| 100 min | 3 |
Structured
Metadata: From Markup to JSON This episode introduces the concept of semi-structured metadata in the context of machine accessibility and interoperability. After defining the term Markup, the learners will be confronted with XML and JSON as (meta)data exchange formats. In the challenges 2 & 3, the learners will apply the lecture content to the example data object by extracting metadata from an accompanying README file and annotating
the example data object using JSON. Challenges will be tackled in groups
of 4 - 6 learners. Group results are compared and discussed in a plenary
discussion. Ideally, the learners will experience light frustration
during result comparison, realizing, that structuring their metadata
will result in valid machine-interpretable data objects, yet lack
comparability and reusability. |
| 20 min | 0 |
Housekeeping Day 1 concludes with a brief recap on the topics of the first day. Feedback is gathered from the learners and eventually implemented in day 2. An outlook on the content of the second day is presented. |
| To Do: After Day 1 |
Day 2
| Episode | Description | |
|---|---|---|
| 15 min | 0 |
Housekeeping The learners get a brief recap of the contents of day 1 and an outlook on day 2. In the warm-up session, the learners actively apply their knowledge acquired on day 1 by completing a personal JSON object using a provided template. |
| 120 min | 4 |
Enabling
Technologies and Standards The episode starts with a short history of the World Wide Web from a scholarly perspective, highlighting the benefits of this technology for sharing information. Metadata schemas are introduced in depth by lectures and live coding. Learners practice writing a JSON Schema in a group challenge. Subsequently, the written schema is visualized in a web interface, illustrating a possible application. The concept of metadata standards is introduced and distinguished from metadata schemas. Some community-independent standards with wide adoption in the scientific context and beyond are investigated. In the following challenge, the learners are introduced to terminology registries, practice their navigation and get the opportunity to identify metadata terminologies relevant for their fields of research. |
| 60 min | 5 |
(Web)
Location and Identifiers This episode is an introduction to the concept and technology of Persistent Identifiers (PIDs) on the World Wide Web. The learners are familiarized with the technology of client-server communication on the web, learn to differentiate between URN, URL, URI, and PID, and get to know PID services commonly used in the scientific community. Further, the application of (Persistent) Identifiers in metadata records is discussed. |
| 45 min | 0 |
Lightning
Talk An invited speaker presents a real-world research example and demonstrates how applied metadata can shape research. |
| 15 min | 0 |
Housekeeping This module concludes the lesson. A summarizing overview of the past two days is given. The learners provide their feedback on the lesson. The instructors give feedback to the learners. |
| To Do: After the lesson |
Episode 0: Housekeeping
Episode Schedule
| Content type | Title | |
|---|---|---|
| 5 min | Lecture | Instructor introduction |
| 28 min | Group activity | Learner introduction |
| 2 min | Lecture | Lesson scope & structure |
Total time: 35 min
Teaching
methods: direct teaching, group activity, discussion
Learning types: acquisition, collaboration
REMEMBER
- The participants are aware of the tasks and contact information of the hosting organization.
- The learners get to know the teacher and the other participants. An open and collaborative working atmosphere is created.
Description:
The lesson starts with an
introduction by the instructors, and usually the hosting organization,
to the learners. The learners introduce themselves briefly and report on
their first impressions of the example data object. Scope and schedule
of the lesson are outlined.
Talking Points:
Slide set: -
Time estimate: 5 min
- Personal instructor introduction
- Institutional setting, if applicable
Slide set: -
Time estimate: 28 min
Material: whiteboard or shared notes
Guiding questions could be:
- What is your name?
- What is your research topic? (especially helpful when working with a heterogeneous group of learners from diverse research fields.)
- How did you approach the example data object?
- What was easy to identify in the data object?
- What was hard and why?
- What would have helped to understand the data better?
- Based on your experiences, what do you suspect the data to describe?
While the learners share their ideas about the example data object, take notes of their answers. These notes can be retrieved at later stages of the lesson, when the example data object is set in context and better understood by the learners to show the progress.
Slide set: -
Time estimate: 2 min
- Brief overview of the schedule, structure and scope of this lesson.
Episode 2: Data and Metadata
Episode Schedule
| Content type | Title | |
|---|---|---|
| 5 min | Lecture | What is data? |
| 5 min | Lecture | The example data object |
| 5 min | Lecture | What is metadata? |
| 5 min | Lecture | Descriptive, administrative, structural metadata |
| 15 min | Challenge | Real-world metadata |
| 10 min | Lecture | Metadata in the scientific context |
| 15 min | Guided confrontation | Metadata in scientific publications |
| 15 min | ☕ Break ☕ |
Total time: 75 min
Teaching
methods: direct teaching, guided confrontation
Learning types: acquisition, investigation,
discussion
UNDERSTAND
- The learners get familiar with the example data object.
- The learners recognize and describe examples of (meta)data.
- The learners name examples for best / worst practice situations in research (meta)data handling.
Description:
The learners get an introduction to
data and metadata in everyday life and research contexts. Descriptive,
administrative, and structural metadata are distinguished. The learners
conduct a guided online search (URLs are provided) and explore the
metadata tagging in selected web pages. Good (enough) and worst
practices of metadata annotation will be covered in the final talk of
this module. The presentation is complemented by a live demonstration,
collaboratively extracting metadata from scientific publications.
Talking Points:
Slide set: WhatIsData.pdf
Time estimate: 5 min
- What is data? (direct this question to the audience and allow them to just shout in. Wait a little, it might be quiet 😉)
- We start with an example: Imagine a satellite transmitting data back to earth.
- This is what actually arrives at the machine receiving the transmission…
- just a concatenation of signs…
- we call these glyphs. To a human being, this sequence of glyphs is not understandable and it needs some processing by a machine to make it interpretable for humans. And this is data, …
- a potentially informative object.
- If the data is now processed by the receiving machine, it will be converted in this picture. (The satellite image shows the city center of Cologne, Germany. Feel free to substitute it with a place your learners are familiar with and activate them by asking “Does anyone know, what is depicted?”) This processed form allows humans to interpret and analyze the data to gain information, …
- for example, identifying the cathedral on the image and…
- finding the shortest way from the opera to the cathedral.
- Knowledge is internalized information, like navigating through the streets of Cologne from the opera to the cathedral based on the satellite image you have seen.
- The highest level of information content is wisdom, which means putting the acquired knowledge into context, the bigger picture. Let’s say, you have explored Cologne’s city center for a couple of days and you are approached by a person asking you for the shortest way to the main station. You show them the way on a map - that is wisdom. Naturally, as researchers, we strive to reach wisdom with our work.
- We have seen, that the information content increases by adding context, meaning, and insight to data.
- The takeaway message is: Data is potential information and needs to be processed and contextualized to make it accessible for the human audience.
Slide set: TheExampleDataObject.pdf
Time estimate: 5 min
- Now back to the example data you received from us. (Here you can reflect on some of the statements made during the introduction session.) What is actually represented in the data is this…
- (Empty slide: open https://www.youtube.com/watch?v=KeKIBSN2F5c in a new tab or window and play the video. We start the video from 0:30. )
- Shown in the data is the ride time (t)…
- the biomechanical acceleration of a human body during the rollercoaster ride in x, y, and z axis… (Yes, the image of the toy bunny is really taken from a peer-reviewed journal publication.)
- and a boolean value, stating whether a scream of the test person could be detected or not.
- (Allow some time for questions.)
Slide set: WhatIsMetadata.pdf
Time estimate: 5 min
- What is metadata? (Direct this question to the learners and wait for them to reply. They might come up with the generic “Data about data”.)
- Often metadata is described as “data about data”, or - as Merriam Webster puts it - “metadata is data that provides information about other data”. But this is extremely unspecific.
- If you look a bit further, you can find more detailed description of the term “metadata”. Admittedly, these texts are seldomly…
- fun to read.
- Let’s start - again - with an example. Let’s say, you are looking for an informative book about the topic of metadata and decide to look for recommendations online…
- your search will result in about 1.5 million results. But you remember a colleague, that has recently mentioned a very good book on metadata…
- you ask him about it, and he gives you a well-meaning description of said book - “It is black, and the title is ‘metadata’. It was written by Jeff… Jeff… Something.”
- Okay, this is not really precise, but you take this information to your favorite search engine, and it will most likely come back with this …
- book: “Metadata” by Jeffrey Pomerantz, published in the MIT Press Essential Knowledge series. So far, you have absolutely no idea about the content of the book - the actual data it contains. However, with just a few clues on the title, author, and design, you can identify the resource. You did this by using “metadata”. Let’s stay with this example for a bit and take a look inside…
Slide set: DiscriptiveAdministrativeStructuralMetadata.pdf
Time estimate: 5 min
- On one of the first pages, you will find a lot of information about the book…
- You will get information about the author, publisher, relevant keywords and so on, that are descriptive in nature and can help you - or librarians - to successfully identify this specific book. Among these there is a very important descriptor…
- The persistent identifier. In the example of a book, this is the ISBN. Whenever you look up this number, the result will unambiguously point to this specific title.
- Furthermore, you will get information about how the book is administered: How it is distributed, who is responsible for its distribution and which conditions need to apply.
- You can also find information on legal conditions that apply to this resource, such as copyright issues and the terms of distribution. Legal information can be considered as a subset of administrative information.
- And - really important - you will get a precise idea about the book’s structure and how you can navigate it: the chapters, its general content and how it is distributed over the pages. But still: we have not yet read a single word, that actually delivers the content of the book - its data.
- So, metadata - or metainformation - is more or less structured data, that contains information about characteristics of other data (objects).
- Let’s briefly reflect on the types of metadata, that we came across so far, before we apply these concepts in the first challenge for today:
- descriptive metadata holds information about the intellectual content, such as title, author, abstract…
- administrative metadata specifies how a resource is managed. This includes things such as the terms of (re-)distribution and copyright information. This also includes technical information about the data (such as files included in a dataset) or versioning information…
- structural metadata describe, for example, chapters in a book, files in a dataset, or software components.
- (Allow some time for questions.)
Slide set: Challenge1Introduction.pdf
Time: 15 min
Challenge type: guided confrontation, individual investigation, discussion
Objective:
The learners experience a real-world
example of functional metadata applications and practice their acquired
knowledge on metadata types.
We recommend using a pre-structured, collaborative document (whiteboard or notepad) to collect the participants’ results. Allow some time for the learners to navigate the websites and explore the metadata in the source code individually (ca. 8 min). Open the source code of one website in the browser and share the screen. Talking points for the guided confrontation can be:
-
different types of targets (e.g.
twitter:,robots:) -
different contexts (e.g.
dc:,og:); don’t go too deep into this topic, and just give a teaser about the existence of metadata standards and references -
Fun fact: The Guardian regularly uses a
comment in the
headof their HTML documents to advertise IT jobs 😁
Whiteboard: example setup
Slide set: MetadataInScience.pdf
Time estimate: 10 min
- Now let’s shift our focus to metadata annotation in the scientific context.
- I’m sure many of us have been in a similar situation. You start a new project that is based on the work of your predecessor or collaborators and you are supposed to start with reproducing the published results…
- You take a look at the accompanying publication and the data looks neat…
- But as soon as you open the underlying datasets, understanding the process of how this data was acquired is not so straightforward anymore. The variables might be hard to understand, there might be missing values, and the performed data cleaning is not necessarily apparent.
- So you take a look at the experiment’s documentation…
- A study by Monya Baker, which was published in Nature in 2016 was able to show, that more than 70% of researchers have tried and failed to reproduce another scientist’s experiments. And more than half have even failed to reproduce their own experiments.
- The worst practice that you can encounter in your scientific life is surely data, saved under an uninformative file name, with no documentation whatsoever.
- Slightly better practice are lab notes, which are still widely used as the go-to documentation method in experimental scientific areas. Using lab notes as documentation method, you can facilitate the findability…
- by assigning meaningful file names and dates to your data. However…
- lab notes come with various disadvantages. Lab notes are usually taken continuously and over the course of a 3-year contract, several hundred pages of lab notes can accumulate.
- so even though lab notes allow for some kind of documentation, they are largely unstructured and subjective, rarely following templates or guidelines. Continuously taking notes makes the documentation hard to retrieve. The notes are physically separated from the data they describe and remain in the hand of the experimenter or institution hosting the experiments, which makes them hard to share. And let’s admit it - handwriting can be a pain to read.
- One way to store your documentation with your data, is README-style metadata…
- Just like taking lab notes, README-style files can be simple, subjectively written natural text documents.
- You can also find templates for README-style metadata records. Sticking to these templates will allow for increased structure in your documentation records. Now that we document our data digitally, we have increased options to link the metadata to the described dataset, for example by naming them accordingly…
- If you now want to find the results of a specific experiment on your computer, a local keyword search can help you to identify the dataset.
- To sum up, digital documentation of your metadata in form of README-style metadata records, facilitates the linkage of data and metadata, allows for local searchability and increased readability, and the digital nature of the README file simplifies targeted sharing of the documentation. However, these records are still rather unstructured and subjective, and only allow for keyword searches.
- If you want to have a look at a well-designed template for README-style metadata records, a recommended link is provided in the episode description.
- (Allow some time for questions.)
Slide set: -
Time: 15 min
Type: guided confrontation, collaboration
Objective:
The learners apply their acquired
knowledge about metadata identification and types in the context of a
familiar work situation.
- select a scientific journal publication of your liking (could be related to the research field of the learners, if the group is homogeneous in this regard.)
- share the publication on your screen
- with the whole group of learners, find the “hidden” metadata in the publication and sort the findings into the metadata types (descriptive, administrative, structural)
Creator’s recommendation:
Use a whiteboard
application to display the journal publication. This allows for
simultaneous highlighting / annotation of the findings and thus gives a
visual response and documentation of the discussion.
Episode 3: Structured metadata: From Markup to JSON
Episode Schedule
| Content type | Title | |
|---|---|---|
| 5 min | Lecture | Introduction to information transfer |
| 15 min | Lecture | What is Markup, XML and JSON? |
| 7 min | Lecture | JSON step-by-step |
| 3 min | Lecture | Challenge Introduction |
| 15 min | Challenge | Identify metadata in README.txt |
| 20 min | Challenge | Write JSON metadata record |
| 15 min | ☕ Break ☕ | |
| 20 min | Discussion | Challenge reflection |
Total time: 100 min
Teaching
methods: direct teaching, guided confrontation, live
demonstration, group activity
Learning types:
acquisition, discussion, practice, production
UNDERSTAND
- The learners explain the importance of semi-structured metadata for machine readability.
- The learners understand, read, and write basic Markdown / HTML / XML / JSON.
Description:
This episode introduces the concept
of semi-structured metadata in the context of machine accessibility and
interoperability. After defining the term Markup, the
learners will be confronted with XML and JSON as (meta)data exchange
formats. In challenges 2 & 3, the learners will apply the lecture
content to the example data object by extracting metadata from an
accompanying README file and annotating the example data
object using JSON. Challenges will be tackled in groups of 5 - 7
learners. Group results are compared and discussed in a plenary
discussion. Ideally, the learners will experience light frustration
during result comparison, realizing, that structuring their metadata
will result in valid machine-interpretable data objects, yet lack
comparability and reusability.
Talking Points:
Slide set: IntroToInformationTransfer.pdf
Time estimate: 5 min
- With the next episode, we are diving deeper into the topic of structured data and enhancing machine readability of our metadata records.
- So far we have been talking about natural language communication. When the senior doctor gives a status update about a patient’s condition to his colleague, the information is clear. Let’s take this message apart and structure it…
- The message is concerning a subject, namely the specific patient in room 305. It includes a location, the room number and it gives information about the current condition, “unchanged”. Let’s assume that both doctors were machines. Extracting this information from the natural language text wouldn’t be as straightforward…
- And the information needs to be structured in particular ways to make it easily transferrable and accessible for the receiving end. One popular and lightweight format to structure data is JSON, JavaScript Object Notation. We will take an in-depth look at JSON in the upcoming lectures.
Slide set: WhatIsMarkupXmlJson.pdf
Time estimate: 15 min
- The first term that we will come across regularly throughout this lesson is Markup.
- You encounter markup continuously when you read a text. A period, for example, indicates the end of a declarative or imperative sentence, which results in the speaker briefly stopping to talk, if reading out loud. The question mark, on the other hand, declares a question and a speaker will, in many languages, raise their voice before pausing at the end of the sentence. In this sense, the punctuation - or Markup - is not part of the text or information by itself. It rather provides some additional information about the text.
- Essential for functional markup is that the sender, in the case of a text, the writer and the recipient - the reader - agree on the interpretation of the symbols used to markup the text. Shown here is an interrobang, a combination of a question mark and an exclamation point. (You can reactivate the audience by asking them, whether someone is familiar with the definition of the interrobang or if they would know how to interpret it.) The interrobang was proposed in the 1960s as a new punctuation mark to indicate a rhetorical question. As you might have guessed already, the proposal did not come very far.
- Markup can be distinguished into four different types:
- punctuational markup, as seen in the previous examples.
- presentational markup gives information on how the text should be displayed, which includes vertical or horizontal spacing, page breaks, and enumerations of lists. When enclosing text between two asterisks while writing Markdown, a Markdown interpreter will display this text in bold font face.
- descriptive or declarative markup gives information on the type or class the enclosed text belongs to. In this example, the text was enclosed by an H1 opening and closing tag. HTML interpreters will now know, that this sentence is the most important headline on the page, regardless of how it is displayed.
- referential markup refers to entities external to the document. On a website, this marked-up sentence would appear as a link and redirect the user to the specified URL, when activated.
- I’m certain all of us have manually marked up a document in one way or another, using a text marker while reading a journal publication or commenting on a manuscript while reviewing it. These markups give information to the human reader: What is important in this text? What information is missing? Markup in computer files, however, is targeting a machine for interpretation. It declares how the content should be formatted or printed, or give additional information on the written words.
- So from now on in this lecture, the term markup will refer to markup that targets computers, mainly descriptive and referential markup.
- Descriptive and referential markup, used rigorously, is a way to make data and natural text more accessible for computer analysis and can provide additional information for the human user as well. But we will come to that in a bit.
- We will first shift our focus to the importance of the interoperability of the data formats that we want to use to document our data and metadata. In the 1980s, roughly 10 years before the birth of the World Wide Web, the internet was already a thing and national and international data networks were emerging fast. This increased the need for standardized data transfer formats to facilitate data exchange and interpretability on various machines in one network. One of the first industry standards for electronic publishing was the “Standard Generalized Markup Language”, or SGML.
- With the implementation of the World Wide Web, HTML - the HyperText Markup Language - became the standard language for web pages and has its roots in SGML. The markup tags of HTML and their interpretation are well-defined. XML - the eXtensible Markup Language - on the other hand, was developed to transfer and store data on the World Wide Web. The tags are arbitrary, descriptive and can be defined by the user. Let’s take a closer look.
- This XML example stores data in form of natural text (point to the two sentences) and a number (highlight the “1”). Each of these data elements is enclosed in a start and end tag. As mentioned before, these tags can be defined arbitrarily, so we state, that the first sentence is the title, the second sentence is a description and the number one represents a word count. We can now introduce a data hierarchy, declaring that all these data elements describe one example. We could now look for the “title” of the “example” and retrieve the data stored between those tags. XML is software- and hardware-independent and still widely used as a data exchange format. Though XML is human-readable, enclosing the data between start and end tags is quite an effort and meddles with the clarity of this format. So we are leaving the realm of markup languages…
- to introduce another data exchange format, which is recommended as a standard from the W3 consortium: JSON. JSON is short for JavaScript Object notation. It is based on the representation for data objects in JavaScript - the main programming language of the Web - and bears all the advantages XML has shown, such as lightweight data exchange, software and hardware independence, and hierarchical structure - with an increased human readability. For the remainder of this lesson, we will learn how to read, write and standardize JSON object literals.
Slide set: JsonStepByStep.pdf
Time estimate: 7 min
- Let’s have a closer look at the structure and syntax of JSON object literals.
- In this example we have a JSON object, which describes a person named John.
- Objects are enclosed in curly braces.
- Within these objects, data entities are stored in key-value pairs.
- Keys are always of the data type “string”
- Data values can be given as one of the following data types. They can be given as…
- strings.
- String values can contain any kind of characters and are typically enclosed in double quotes. Each string, no matter how long it is, will be interpreted as a single value.
- Numbers…
- can be either integers or floats.
- Booleans…
- Boolean values in JSON have one of two possible values. It is either true or false.
- Null…
- Assigning the data type NULL does not mean the same as zero but
rather that no value was assigned to this variable. You might be
familiar with other representations, such as NA or nan. If you read a
JSON object into Python, for example, NULL will be parsed as
None. - Values in JSON can also be arrays. For example, John has two parents, Anna and Michael.
- An array is a collection of multiple elements and can be understood as a list of values. The data elements within an array can have the same data type or vary in their data types.
- Last but not least, a value can be another object. John has a pet and the value of the key “pet” is an object describing John’s dog Brutus.
- Again, an object contains key-value pairs. These key-value pairs are separated by commas and enclosed by curly braces.
- The separation of data entities by commas in a JSON object literal is crucial.
- JSON is not sensitive to indentations and line breaks. However, indentation and line breaks can significantly increase the human readability of the JSON object literal. Now let’s compare the JSON representation of this object with its XML representation…
- Both representations contain the same information. In XML the data
value is stored between start and end tags, whereas in JSON, the value
is assigned to a property and separated from other entries with a comma.
Both representations allow for hierarchical data storage as seen for the
description of John’s pet. In JSON this is done by nesting objects, in
XML the data entries are enclosed by
<pet>tags. A difference can be seen in the representation for John’s parents. Whereas an array is given in the JSON object literal, comparable lists do not exist in XML. Here the parents’ names are enclosed individually with the same start and end tags. - Besides XML and JSON, the third widely used standard data exchange format is YAML. JSON and YAML can be parsed into one another.
- (Allow some time for questions.)
Slide set: Challenge23Introduction.pdf
Time estimate: 3 min
- In the following challenges, we will apply what we have learned in the lectures so far to our example dataset. 2.You have inspected the data and realized quite rapidly, that you need more information on the data to make sense of it. So you ask your collaborators for additional meta-information.
- They reply by sending you a README-style metadata file.
- However, your funding agency requires that you upload every dataset in your project to their public repository and attach a structured metadata record.
- In challenge 2, you will review the README-style metadata record and highlight all the information that you deem relevant to understand the data and reproduce the experiment.
- In challenge 3, you will then take this information and transform it into a JSON object literal.
- (The challenges are designed as group challenges. We like to add a slide here, on which we list the randomized groups and give additional technical and administrative information.)
The following challenges 2 & 3 will be processed consecutively in groups of 4 - 6 learners.
Total time: 35 min
Implementation:
Prepare shared notes documents
for each group of learners attending the lesson. We have good
experiences with copying the challenges into the documents and adding
space for collaborative working on the tasks.
Try to be present
with as many instructors as there are break-out rooms to moderate the
discussions and answer questions.
Shared notes:
You can find an example Markdown
file for the group handouts
HERE.
This document is optimized for use in a Hedgedoc document.
☕ 15 min Break ☕
Time: 20 min
Implementation:
Display the final JSON object
literals of the different groups next to each other. Allow for some
time, so that the learners can compare the different results and
identify similarities and differences.
Objective:
At this point, the learners should
experience some form of frustration - the metadata is now structured and
machine-readable, yet interoperability and reusability haven’t been
achieved. This frustration is relieved in the next episode
“Enabling Technolgy & Standards”, when schemas and
standards are introduced.
Leading questions:
- What was easy while generating the structured metadata record?
- What was hard? Which points were intensely discussed in the group?
- How did you decide, which information are relevant metadata?
- Which differences do you see between the different JSON metadata records?
- How do you feel after comparing the results?
Creator’s recommendation:
While moderating the
discussion, pay attention to and highlight the following characteristics
of the created JSON object literals:
- (if done correctly) all JSON object literals are valid, functional and machine-readable
- representation of key strings (e.g. camel case vs. snake case, capitalization)
- structure of the JSON object literal (e.g. nested objects vs. flat structure)
- value representation
Episode 0: Housekeeping
Episode Schedule
| Content type | Title | |
|---|---|---|
| 5 min | Lecture | Refelction Day 1 |
| 10 min | Group activity | Feedback Day 1 |
| 4 min | Lecture | Outlook Day 2 |
| 1 min | Farewell |
Total time: 20 min
Teaching
methods: direct teaching, group activity, discussion
Learning types: acquisition, collaboration
REMEMBER
- The learners are familiar with online resources to deepen their knowledge on research (meta)data handling.
- The learners are aware of the content of day 2.
Description:
Day 1 concludes with a brief recap
of the topics of the first day. Feedback is gathered from the learners
and eventually implemented on day 2. An outlook on the content of the
second day is presented.
Talking Points:
Slide set: -
Time estimate: 5 min
In this section, the content and topics of the first day are summarized. Use this opportunity to inform / remind the learners that if they wish to know more about any of the topics, there is a further reading section with references at the end of each episode.
Slide set: -
Time estimate: 10 min
We like to include feedback sessions on each day of the lesson. Of course, you are free to skip this part or design it according to your liking. Nevertheless, we want to share our approach, experiences and feedback questions with you 😄.
Creators’ recommendation:
In order to increase
the response rate and to guarantee that every learner is heard, we
dedicate 10 min at the end of each lesson day to an anonymous and
instantaneous feedback poll. Our preferred online polling tool is AHA slides. We share
the link to the poll with the participants and allow for some time, so
that the learners can navigate the feedback poll in their own pace. We
do not recommend sharing the results (i.e. presentation
mode of the poll) with the learners in order to get individual and
unbiased feedback.
QUESTIONS
-
How do you feel after the first day of scientific
metadata?
- ☹️
- 😕
- 😐
- 🙂
- 😃
-
Please rate the difficulty level of the lecture
content.
- too easy
- fairly easy
- just right
- rather hard
- too hard
-
Please rate the difficulty level of the hands-on
sessions.
- too easy
- fairly easy
- just right
- rather hard
- too hard
(After day 1, the questions 2 and 3 usually result in an average between “fairly easy” and “just right”, which - for us - is the ideal outcome. The first day is intended to get all the participants, regardless of their scientific background, on the same page and prepare everyone for day 2.)
-
I would have liked to learn more about…
[FREE TEXT]
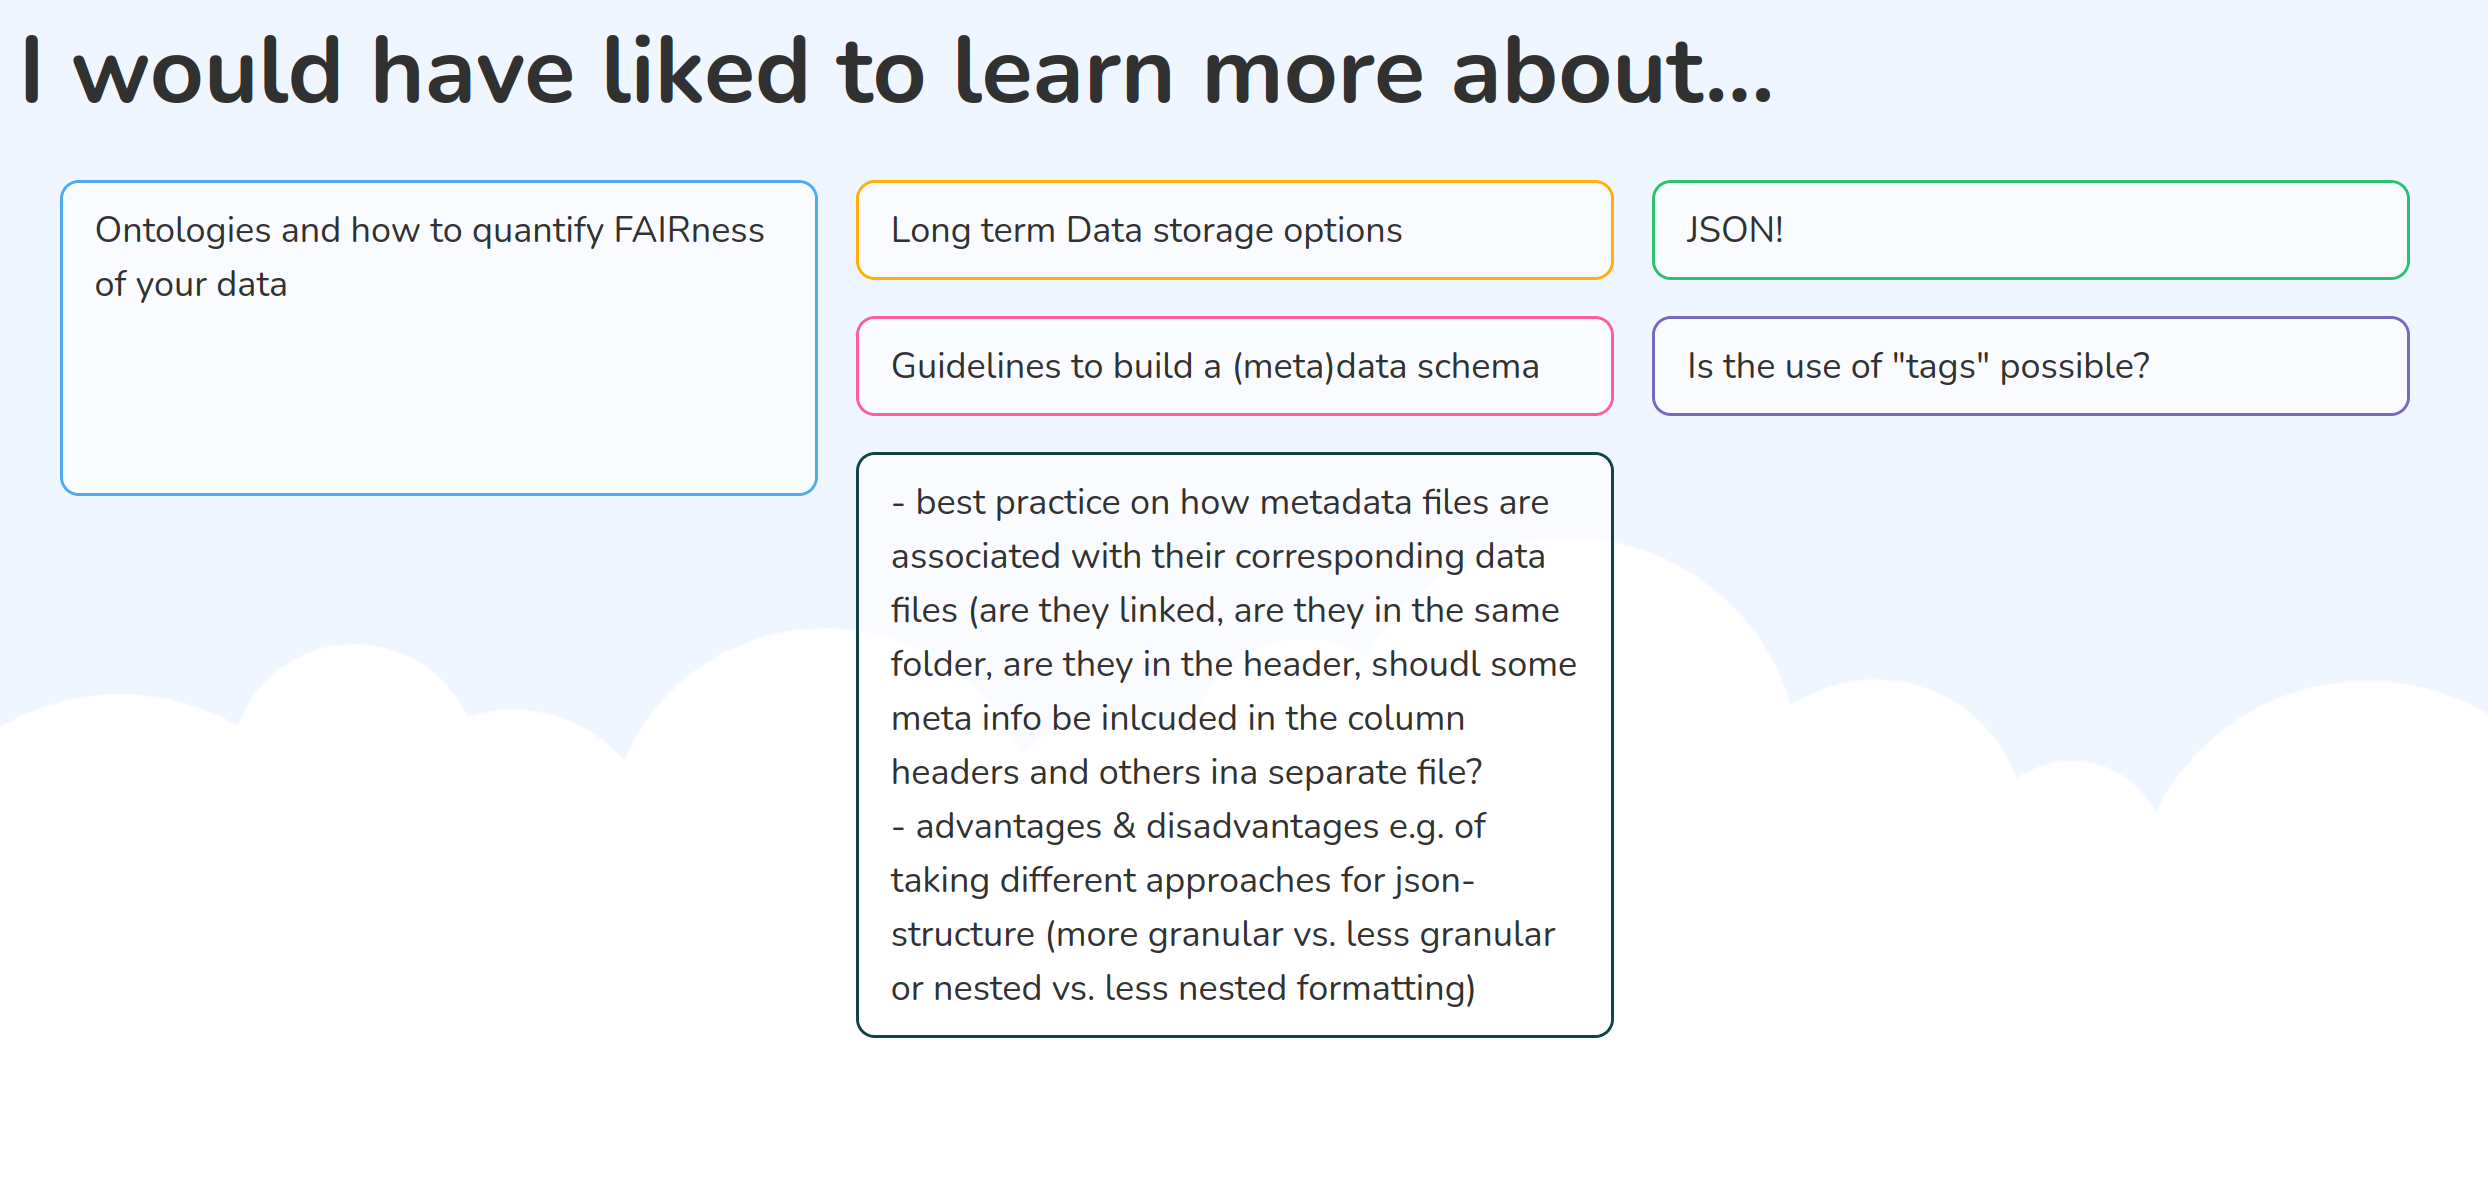
(Question 4 is, in our opinion, the most important question of this feedback session. It gives you an insight, which topics might need to be revisited on day 2 and help you to add additional literature recommendation to the references adressing the specific needs of your group of learners. )
Slide set: -
Time estimate: 4 min
Provide a brief outlook on the topics and schedule of the second day.
Slide set: -
Time estimate: 1 min
You are done for today! But if you like, you can use the last minutes of the first half of the session to take a group picture with the learners 😉.
To Do: After day 1
- prepare group handouts for the second day by adding challenges 4 and 5.
- review the feedback slides and implement the wishes of the learners in the content for the second day as much as possible. Some wishes might lie outside of the scope of the lesson. In this case, we recommend providing informative links for further reading (e.g. in the group handouts).
Episode 0: Housekeeping
Episode Schedule
| Content type | Title | |
|---|---|---|
| 5 min | Lecture | Welcome back |
| 10 min | Group activity | Learners’ Warm-up |
Total time: 15 min
Teaching
methods: direct teaching, group activity
Learning
types: acquisition, practice
REMEMBER
- The learners are warmed up and remember the content of the previous day.
Description:
The learners get a brief recap of
the contents of day 1 and an outlook on day 2. In the warm-up session,
the learners actively apply their knowledge acquired on day 1 by
completing a personal JSON template.
Talking Points:
Slide set: -
Time estimate: 5 min
In this section, the content and topics of the first day are summarized. Take some time to review the wishes collected in the feedback session of day 1. Answer questions that might have come up in the feedback. Give a brief outlook on what lies ahead on day 2.
Slide set: -
Time: 10 min
Challenge type: individual practice
Objective:
The learners are playfully reminded
of the content of day one and practice their knowledge on JSON object
literals by writing a JSON data record about themselves based on a
provided template.
Implementation:
Supply the learners with a JSON
object literal template with pre-defined keys. The learners add their
individual values to this template and share it with the rest of the
group. We like to use the free-text option of AHA slides for this
task and present the incoming results on the shared screen. This adds a
bit to the interactive and gamified nature of this task but you can use
any other collaborative tool (i.e. whiteboard or shared notes) to share
results among the learners. While results are coming in, you can use the
postings to engage the learners in conversations and comment on their
entries. Also, use this opportunity to comment on similarities and
differences between the entries in terms of, e.g. how the “key” was
understood and the chosen data types.
Example JSON object literal:
Episode 4: Enabling technologies and Standards
Episode Schedule
| Content type | Title | |
|---|---|---|
| 10 min | Lecture | A brief history of the World Wide Web |
| 10 min | Lecture | Metadata schemas |
| 8 min | Guided confrontation | Live coding a JSON Schema |
| 2 min | Lecture | Challenge introduction |
| 20 min | Challenge | JSON Schema |
| 10 min | Challenge | Form input & validation with JSON Schema |
| 10 min | Discussion | Challenge reflection |
| 5 min | Lecture | Summary - Annotating the example data |
| 15 min | ☕ Break ☕ | |
| 4 min | Lecture | Metadata standards |
| 1 min | Lecture | Challenge introduction |
| 25 min | Challenge | Metadata standards |
Total time: 120 min
Teaching
methods: direct teaching, group activity
Learning
types: acquisition, practice, collaboration, production
REMEMBER
- The learners memorize the meaning of the World Wide Web as a product of and tool for the scientific community.
- The learners are familiar with online registries for metadata terminologies
- The learners contrast the terms “metadata schema” and “metadata standard.”
- The learners understand, read and write XML and JSON Schema.
- The learners navigate online terminology registries.
Description:
The episode starts with a short
history of the World Wide Web from a scholarly perspective, highlighting
the benefits of this technology for sharing information. Metadata
schemas are introduced in depth by lectures and live coding. Learners
practice writing a JSON Schema in a group challenge.
Subsequently, the written schema is visualized in a web interface,
illustrating a possible application. The concept of metadata
standards is introduced and distinguished from metadata schemas.
Some community-independent standards with wide adoption in the
scientific context and beyond are investigated. In the following
challenge, the learners are introduced to terminology
registries, practice their navigation and get the opportunity to
identify metadata terminologies relevant for their fields of
research.
Talking Points:
Slide set: BriefHistoryOfTheWeb.pdf
Time estimate: 10 min
- Before we dive deeper into the topic of metadata and how we can make it more accessible, we would like to travel a few decades back and have a quick glimpse at the technical advancements, that paved the way for us, to share data across the globe instantaneously: the internet and the world wide web.
- Let’s travel back to the 1960s, when computers still looked like this (point to bottom right corner ). Computers became increasingly common in work environments, especially universities, research institutes and governmental agencies.
- With this advancements, the need to share data between computers arose and local network technologies were developed. Within the institutions, the computers were linked with cables…
- and communication protocols were developed, that allowed the transfer of data between computers in the local area network and controlled the means of data distribution.
- This was a development that naturally occurred on many sites simultaneously and soon the scientific drive to collaborate was aiming to use this new technology to share data quickly across inter-institutional boundaries…
- However, there was a major issue. The individual networks were using different communication protocols, that were largely incompatible with each other.
- To solve this problem, two researchers at the US Defense Advanced Research Projects Agency, Vint Cerf & Bob Kahn, worked hard on a solution. In 1974 they introduced the Transmission Control Protocol / Internet Protocol – TCP / IP, a term you have certainly heard at some point.
- This Internet Protocol Suite finally enabled communication between networks. It was soon declared as the standard for all military computer networking and adopted by research organizations as well as large communication companies. The internet, the network of networks, was born and Vint Cerf and Bob Kahn will become known as the fathers of the internet. That the TCP / IP protocol developed to a global standard for communication between networks, can be attributed…
- to another decision based in academia. In 1989, the University of California, Berkley, decided to share their TCP/IP code with the world and put it under public domain; free for anyone to use.
- And today, computer networks all over the world are connected with each other over uncountable miles of cables…
- Crossing the oceans.
- Now, that communication between networks was secured, the way was free for applications running on top of the Internet Protocol Suite. And scientists love to communicate, right? So again, to researchers at the University of California – Jon Postel and Suzanne Sluizer – developed the Mail Tranfer Protocol. No more letters, no more making appointments for phone calls, but sharing information instantaneously by email.
- Meanwhile in Europe, two computer scientists shared the vision to implement an application for the internet, that “serves as a collaborative space where you can communicate through sharing information”.
- These two were Tim Berners-Lee and Robert Caillau…
- at the CERN research center in Geneva Switzerland. They wrote a joint proposal for the “World Wide Web”, which aimed to “meet the demand for automated information-sharing between scientists in universities and institutes around the world”.So the World Wide Web was, from its beginning, meant to facilitate scientific data exchange.
- So to distinguish the World Wide Web from the internet: The internet is the global network connecting local networks with each other and allowing them to communicate. The World Wide Web is a service, that runs on top of the internet which allows to search, get and share data.
- And this was all established in a very familiar, academic environment. The name of this data sharing application, was discussed at lunch in the cafeteria.
- Based on the early protocols, the building blocks of today’s World Wide Web were developed - HTML, which is still the standard markup language for documents designed to be interpreted by and displayed in web browsers. The HyperText Transfer Protocol, which is an application layer protocol to ensure client-server communication on the Web. And URIs, Uniform Resource Identifiers, which uniquely identify resources on the web and ensure their accessibility and retrievability. We will come back to these technologies…
- tomorrow, when we discuss how data is transferred on the World Wide Web and the importance of web identifiers.
- Coming back to this 1989 picture, we haven’t talked about this young woman sitting next to Tim Berners-Lee.
- Her name is Nicola Pellow and back in 1990 she was still studying Mathematics and Information Science at Leicester Polytechnic. She went to Switzerland for an internship in the research group of Tim Berners-Lee and Robert Caillau and as a student intern…
- she developed the first operation system independent web browser, the Line Mode Browser, making the world wide web accessible on many computers.
- Within the scientific community, the World Wide Web was an immediate success. Already in 1991, the arXiv preprint repository switched from email dissemination of manuscripts to HTTP. The picture on the right gives an insight how scientific article were distributed before the World Wide Web. You couldn’t simply click on any article that you found on Google Scholar and download it - provided it isn’t hidden behind a paywall - and decide later, whether it was helpful or not. You needed to exactly know which article you want to study, contact the archiving repository, wait for an actual human being to retrieve the article, scan it and send it back to you. (To reactivate the learners, you can ask them at this point, who has a folder on their drive for “unread articles” or “articles to read”.). The first German institute to connect a web server to the Web was the “Deutsches Elektronen-Synchrotron DESY. (Well, the lesson was created within the Helmholtz Association in Germany, which makes this a nice Fun Fact for the original audience. Feel free to substitute with some other relevant institution relevant to your learners).
- Today the web hosts so many repositories for research articles and data - global, local, very general or highly domain-specific - that it becomes hard to find the right repository for the resource you want to retrieve or upload. Needless to say that you can find several repositories for repositories online. To sum it up, the World Wide Web was originally created to share data between scientists and scientific institutions, and it succeeded so well, that today it is barely imaginable to conduct research without the Web.
- The take away-message of this brief history lesson is that the World Wide Web was created by scientist for scientist to promote data sharing and collaboration in a scholarly environment across physical borders. And the decision of CERN to put all the components of Web software in the public Domain paved the way for the web as we know it today.
Slide set: MetadataSchemas.pdf
Time estimate: 10 min
- Even though the World Wide Web has provided the means of sharing information with individuals and broad communities easily, we have experienced yesterday and in our daily life as researchers, that simply sharing data does not guarantee the reusability of this information. And we have all experienced the yearning for guidelines on how this information should be provided. So we will now introduce you to metadata schemas. (You can also show a slide with the JSON object literal results from day 1 at this point or learner quotes from the result discussion of Challenge 3.)
- With a metadata schema, it is possible to express requirements on how a metadata record should be structured and even enforce this structure.
- An example of validated and enforced data submission we are probably all familiar with is the classic customer information form that you need to fill out when you are placing an order in an online shop.
- We know these asterisks tell us that these data entries are required. Some entries only allow string values, like the name, or specific formats, like e-mail addresses and will throw an error as soon as you diverge from the expected data type or format. Or you have a fixed subset of values, which you can pick from a drop-down list.
- If you press submit, the data in this form will be validated and, if it passes this validation, stored or used in other applications. This means that it will be stored and transmitted in some suitable common data format such as JSON.
- The names of the fields specify the keys - or properties of the JSON object…
- and below you can find a description of the data values that are supposed to be entered.
- For metadata records in general, these conventions or constraints can be set by metadata schemas. These schemas are defined in the same data format as the expected metadata record, such as XML or JSON. Again, this allows for parsing and automated validation.
- This means, XML schemas are written in XML and JSON schema is written in JSON. So far, we have written JSON object literals and we will be further focusing on JSON…
- so we will take a deeper look at JSON Schema.
- On the right, you see a simple JSON Schema, which is a JSON object that is following the JSON Schema standard. This is indicated by the “$schema”-key, which is used as a version identifier and points to the location of the schema specification. The value of this keyword must be an URI. We will tackle the topic of referencing in metadata records later in this lesson.
- The schema specifies keys - or properties - that require to enter a data value. In this case…
- The superhero property is required and expects an entry of data type: string.
- A second property is defined: power. However, power is not listed in the required properties, so it is optional.
- Coming back to the data types: This schema describes a JSON object in which the superhero-value should be a string and the power-value needs to be of data type integer. And for the human reader, some meaningful descriptions are added to describe the individual properties.
- Based on this example schema, the object on top would be valid. A string value is assigned to the required property. The bottom object, however, does not conform with the schema and would throw an error, as the value data type is not a string. It is important to know, that schema validation only checks for syntactical validity. In this case, it only checks, whether the object contains the required property, the corresponding value and whether the value conforms with the expected data type. To prevent nonsensical values, a meaningful property description can be of great help.”
- (Allow some time for questions.)
- Before we write a JSON schema for our roller coaster experiment data, let’s get back to the customer information form and design a JSON schema together that enforces the data entries for this form.
The concept of a schema can be overwhelming for learners with little to no prior knowledge. To prepare the learners for Challenge 4, we recommend to include an interactive live coding session. The following instructions and suggestions are based on the narrative we follow in our course setup.
Time: 8 min
Instructor material:Creator’s recommendation:
- Introduce a customer information form as an example for data validation / enforcement in your lecture.
- Open the image of the customer information form and an empty JSON file in split-screen view.
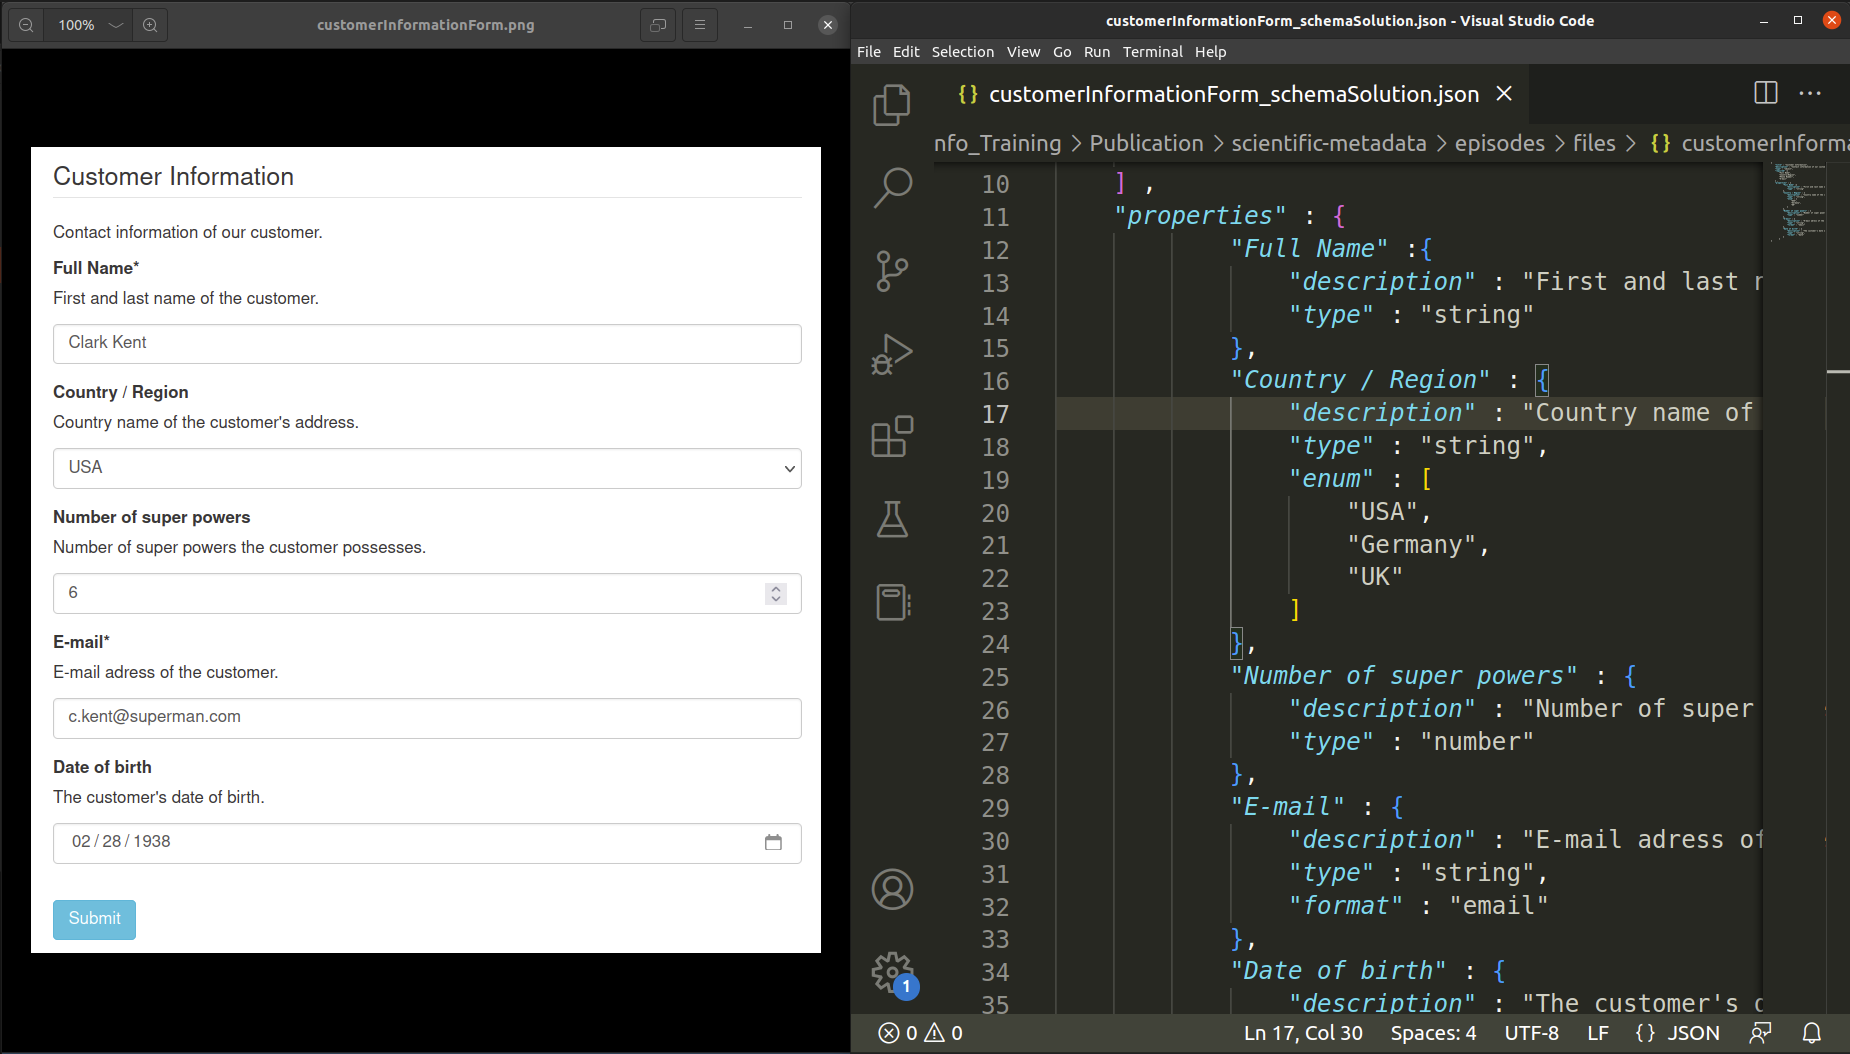
- For live coding, we recommend using an IDE with JSON syntax highlighting (e.g. VS Code)
- start off with 2 indentations
-
demonstrate specifying the first property in the form
"Full Name"by entering a meaningful"description"and"type": "string" - encourage the learners to shout out the values (and keys), that specify the subsequent form properties.
- highlight the following aspects:
-
"Country/Region": to restrict a value to a fixed set of values, the keyword"enum"is used. Fixed values are specified in anarrayof unique elements. -
"Number of super powers": introduce"type": "number" -
"E-mail": introduce the"format"-keyword."format": "email"validates against the correct formatting of an e-mail address (someString-@-sign-domain name). However, it does not check whether the e-mail address exists. -
"Date of birth": specifydate-format. -
The specified keywords represent the
"properties"of thecustomerInformation-object -
the
"properties"-key of a JSON schema object takes a value of data typeobject-> enclose the specified field-objects in curly brackets -
collaboratively define the JSON schema keys
"title","description", and"type" - highlight, that a JSON schema is a JSON object literal -> enclose the schema-object in curly brackets
-
Finally, draw the learners’ attention to the mandatory
fields in the customer information form and introduce the
"required"-keyword
Slide set: Challenge45Introduction.pdf
Time estimate: 5 min
- Let’s briefly recap on the most important characteristics of a JSON schema.
- each of the properties in the schema is described in a separate object.
- the data type of a property is specified by the key
type. - if you want to further specify the format of a data entry, use the
key
format. - mandatory data entries are given by the key
requiredin an array, and not inside thepropertiessection, but parallel to it - for controlled lists, you specify the given values in an array and
the key
enum.
- The complete specifications for JSON schema can be found on json-schema.org.
- If you develop a schema that is supposed to be used by a group of people, the most challenging part can be to have everyone agree on the same expectations.
- (Allow some time for questions.)
- We will now head back to our roller coaster data. In your collaboration you spend some time in discussing your expectations on the metadata, that is necessary to record with the data. But finally you have created an example JSON object, basically the ideal metadata record for the experiment within your collaboration. To enforce this metadata structure, you want to write a JSON schema. As this can get very lengthy…
- you agree to distribute the schema definition among the collaborators.
- We will now head back to the breakout rooms in groups and work on challenges 4 and 5. In challenge 4, you will discuss and develop an excerpt of the roller coaster JSON schema.
- After that, in Challenge 5, you will be introduced to an online tool that shows how you can benefit from the work you invested into writing the schema.
- (Specify the time, when the learners are expected to be back in the lecture setting.)
The following challenges 4 & 5 will be processed consecutively in groups of 4 - 6 learners. In our experience that changing the group composition for these tasks benefits the overall collaborative atmosphere.
Total time: 30 min
Implementation:
As in challenges 2 & 3, we
recommend using a pre-structured shared notes document with the
groups.
Shared notes:
You can find an example Markdown
file for the group handouts
HERE.
This document is optimized for use in a Hedgedoc document.
Challenge 4: JSON Schema
Time: 20 min
Challenge type: group activity, production
Objective:
By writing a short excerpt of a JSON
Schema, the learner gets familiar with the schema syntax, gains the
ability to read and understand a schema, and gets to know some important
JSON Schema keywords. By writing the schema in a group setup, the
learners experience the discussion process as a crucial part of schema
development.
Challenge 5: Form Input and Validation with JSON Schema
Time: 10 min
Challenge type: group activity OR individual exploration
Objective:
By downloading and inspecting the
final JSON Schema, the learners comprehend the complexity a metadata
schema can acquire. With the implementation of the schema in the UI of
the react-jsonschema-form playground, the learners bring
the developed schema into use, get to know a software tool they can
benefit from, and experience relief from the frustration after Challenge
3.
Time: 10 min
Implementation:- share the react-jsonschema-form playground pre-filled with the final schema and metadata values in your browser OR
- share the final JSON schema on your screen OR
-
display the final JSON metadata records
(
exampleDataObject.json){target=“blank”} of each group next to each other
Objective:
The learners are aware of the
advantages of a metadata schema and metadata record validation, pay
attention to interface interpretations in the proposed tool and feel
relieve of the frustration experienced after challenge 3 based on the
metadata record harmonization.
-
How does the browser display lists of pre-defined values (specified as
enumin the schema)? -
How are
arraysandobjectsinterpreted in the form interface? -
What happens if you enter an invalid value (e.g. try to enter a string
for the test person’s
height) -
What happens if you enter a nonsense value (e.g. try to enter a nonsense
string for
rideName) - How does the web service respond if you click on submit without filling out all the “required” fields?
Slide set: AnnotatingTheExampleData.pdf
Time estimate: 5 min
(Challenge 5 concludes the work with the example dataset. At this point we like to give a brief summary about the metadata annotation process)
- Let’s have a last look at our roller coaster data.
- Yesterday morning, we started with a cryptic dataset, that was simply not understandable without further information. We were even guessing the meaning of the chosen variable names…
- after putting the dataset in context, we did not only know, how to read the data…
- but also who recorded the data, the test object and when it was recorded…
- and which conditions applied to this particular experiment.
- By structuring our metadata records as JSON objects…
- we made the information not only findable but also accessible to machines. As we put some effort into developing a schema for the metadata records, we can make sure, that experiments in the same study and collaboration, are recorded and annotated in the same way, which increases its reusability…
- and ensures, that metadata records can be validated.
- (If you like, recommend some tools that support and facilitate metadata annotation and validation. For more information on the examples in the slides, visit the DirSchema and Metador Github repositories.)
- With the metadata schema you have developed, you made sure, that every researcher in the collaboration annotates their data in the same meaningful way. Collaborating in this closed circle was made a lot easier.
- But now imagine that you want to analyse published data by some other scientist in your research field. Someone, who is not part of your collaboration…
- Wouldn’t it be nice, if this data would be annotated in the same way as yours?! We will dive deeper into community-wide metadata schemas and standards after the break.
☕ 15 min Break ☕
Slide set: MetadataStandards.pdf
Time estimate: 4 min
- We have been discussing metadata schemas to enforce, harmonize and validate metadata records. But you might have heard the term metadata standards. So where is the difference?
- Basically, a metadata standard is a metadata schema. A schema can become a standard when it is well-established, endorsed, and widely accepted by its user community.
- One of the best-known, generic, and widely used metadata standard for online resources, is the Dublin Core. The Dublin Core was developed by a consortium of researchers, librarians, and web technologists in 1995 during a meeting in Dublin, Ohio, and was born by the need for a unified description of resources on the web. The design of the Dublin Core was inspired by the library cards as they are still used to catalog book resources in physical libraries.
- When we are talking about online resources, we talk about any information entity that can be retrieved from the web, such as websites, metadata and data files, images, videos, and so on. In the scientific context, “resource” can also refer to experimental data, protocols, or software code. Have you published anything under your name online? Guess what: in terms of the world wide web, you are a resource, too!
- To enhance the identification and findability of these resources, the Dublin Core Initiative has specified a set of 15 metadata elements to describe any type of resource on the Web. These core elements hold information on the creators, format and type, and detailed descriptions of the resource.
- Remember the first challenge we approached yesterday? When looking
up metadata elements in the
<head>-elements of websites… - some properties were given as
dc:, such as - in this example -dc:creator, directly stating, that this entry conforms with thecreatorelement of theDublin Coremetadata standard. - The Dublin Core is just one of many implemented and endorsed metadata standards. On the general online resource description, Facebook’s Open Graph and schema.org became industry metadata standards. But, you guessed it, there are multiple community specific and scientific metadata standards, that describe scientific resources in more detail.
Slide set: Challenge6Introduction.pdf
Time estimate: 1 min
- In the next challenge, we will introduce you to some online metadata standard registries: FAIRsharing.org, the RDA Metadata Directory and the RDA Metadata Standards Catalog. Head over to one or more of these registries and make yourself familiar with their navigation and content. Look specifically for metadata standards that are associated with your field of research and inspect the information that is provided on the standards.
Time: 25 min
Challenge type: individual exploration, guided confrontation
Objective:
The learners are aware of metadata
standard registries and know how to navigate them.
After giving the challenge instructions, allow for some time for the learners to explore the registries (ca. 15 min). Start a screen share of one on the metadata registries and navigate to a metadata standard of your liking. Talking points could be:
- different representations of metadata standards (JSON / XML schema, RDF, SKOS, OWL)
- granularity of representation (e.g. high-level standard vs. application-specific standard)
- terms, properties, specifications
- accompanying journal publications
Transition to “(Web) Locations and Identifiers”:
During the discussion, ask the group of learners, whether someone
encountered a 404 Error while exploring a metadata
standard. If you are working with a heterogeneous group regarding their
scientific background, chances are high, that at least one of the
learners had this experience (-> it is not unusual that the
development of a metadata standard in a specific research field was
concluded and the maintenance of the web representation was terminated
at the end of the funding period.)
Episode 5: (Web) Location and Identifiers
Episode Schedule
| Content type | Title | |
|---|---|---|
| 2 min | Group activity | PID poll |
| 4 min | Lecture | The Web of Today |
| 14 min | Lecture | Identifiers and Web Locations |
| 2 min | Guided confrontation | Error 404 |
| 8 min | Lecture | Persistent Identifier |
| 5 min | Lecture | PIDs and Metadata |
| 5 min | Guided confrontation | DOI Record |
| 5 min | Lecture | Machine-Actionability and Interoperability |
| 15 min | ☕ Break ☕ |
Total time: 60 min
Teaching
methods: direct teaching, group activity
Learning
types: acquisition
REMEMBER
- The learners memorize the technology of resource retrieval and client-server communication on the Web.
- The learners are familiar with PIDs and can name examples relevant for research.
- The learners discover the usage of URLs and PIDs in metadata records.
- The learners explain the difference between URL, URN, URI and PID(s)
- The learners indicate the advantages of assigning Web publications with PIDs in the scientific context.
Description:
This episode is an introduction to
the concept and technology of persistent identifiers (PIDs) on
the World Wide Web. The learners are familiarized with the technology of
client-server communication on the web, learn to differentiate between
URN, URL, URI, and PID, and get to know PID services commonly used in
the scientific community. Further, the application of (persistent)
identifiers in metadata records is discussed.
Talking Points:
Time estimate: 2 min
Up to this point, the lesson followed a consistent silver lining. In the last episode, the learners “finished” annotating the example data. The following episode on (persistent) identifiers might seem somewhat disconnected to the previous lesson content at first before the connection is drawn to PIDs in metadata records. Therefore, we like to start off this episode with a quick live poll on PIDs in the scientific content. Together with the previous discussion on 404 Errors during the search for scientific metadata standards, this will prepare the learner for and engage them in the following content.😄.
Creators’ recommendation:
We use AHA slides for live
polling. Share the link to the poll with the learners and open the
presentation mode of the poll on your shared screen.
QUESTION: Which of these terms do you know? Do any of these ring a bell?
- DOI
- ORCID
- ROR
- URN
- URL
- URI
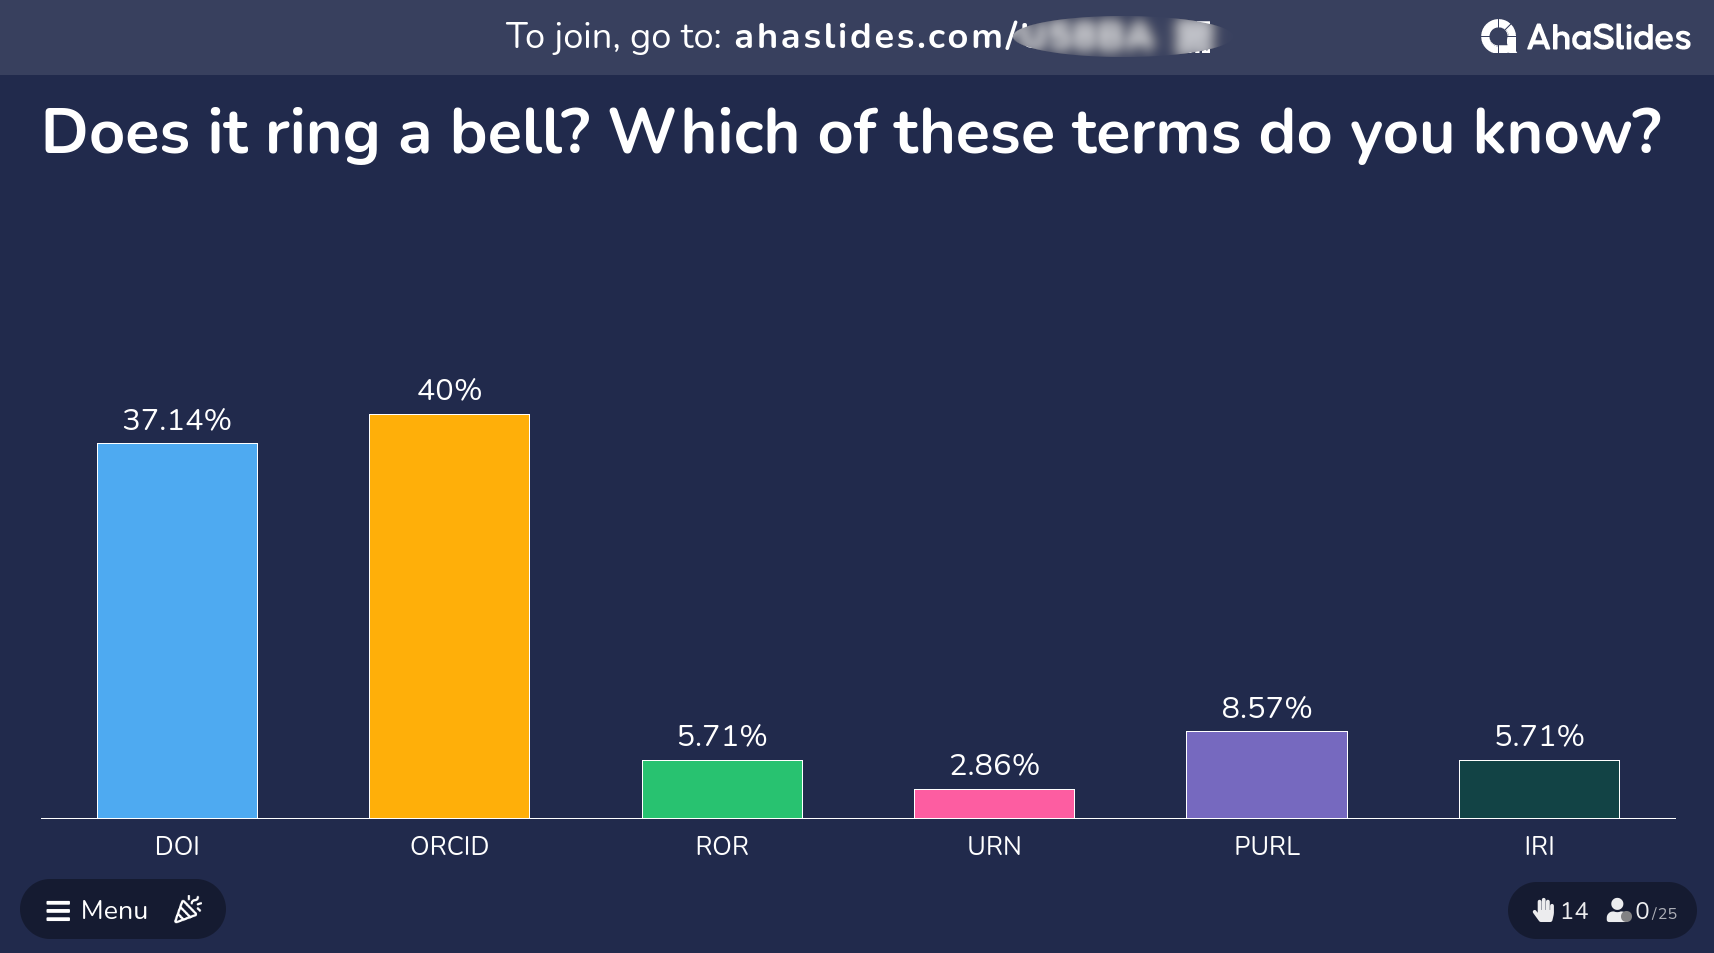
(As you can see in the example image above, DOI and ORCID are usually the best known PIDs among the learners. Take a few moments, to comment and reflect on the polling results.)
Slide set: TheWebOfToday.pdf
Time estimate: 4 min
- Let’s get back to the World Wide Web.
- Today we take a look at the Web and all information stored on it, that we carry in our pockets.
- It accompanies us throughout the day. Streaming your favorite show, looking for recipes, shopping, banking, connecting with friends – the internet and the Web are involved in a large share of our daily activities.
- Going back to the roots of the World Wide Web, it’s original idea was “to be a collaborative space where you can communicate through sharing information”.
- And we are sharing information and communicating more than ever. Everything in the blink of an eye. The World Wide Web is now an essential tool for every researcher. Reading publications, connecting with other scientists, retrieving and publishing data, accessing servers on the other side of the globe, and even attending conferences and meetings with people hundreds and thousands of miles away from you. In the sense of the original idea of the Web, science became faster and communicating information easier. Its means to access information are so manifold, that retrieving relevant and meaningful information comes with new challenges.
- The Web is a hypermedia system, connecting a multitude of resources via hyperlinks. We have already heard the term resource earlier and in the next couple of minutes we will get a bit more technical, talking about data retrieval on the Web and Web resources. So let’s define briefly, what the term Web Resource actually means.
- A Web resource can be digital in nature, such as computer code, documents, videos, and images. These resources can immediately be retrieved or viewed on the Web in a browser.
- But the term Web resource encompasses more than just digital resources. Physical and abstract entities, for example persons, art, buildings, and mathematical concepts are also Web resources once they are somehow represented on the Web.
- Hence, any entity - digital, physical or abstract - that is represented on the Web is a Web resource.
Slide set: IdentifierWebLocations.pdf
Time estimate: 14 min
- In yesterday’s lecture on the origins of the World Wide Web, we had a brief glimpse at the building blocks of the web.
- We have discussed Markup Languages yesterday morning as means to communicate representation and structure of a text document to the machine.
- This lecture will focus on the other two essential building blocks of the web’s technological backbone.
- Remember the first lecture from yesterday? We have had a close look on the metadata in a book. Now if a librarian wants to identify a specific publication…
- they will use its ISBN for unambiguous identification. This ISBN follows a standardized structure, which gives valuable information about the resource, such as the group and publisher of the book. This ISBN is globally unique. Which means it only exists for one specific book and will always lead to the same result, where ever you retrieve it.
- And these uniform resource identifiers also exist in the scientific context. Let me give you an example from molecular biology. Let’s say, this scientist is working on genetics and she is interested in the functions of a specific gene in the model plant…
- Arabidopsis thaliana. Every gene of this plant has an unique identifier assigned, that follows certain representative conventions. In the case of this model plant, the gene identifier holds information on the species, the chromosome, the type of sequence as well as its location on the chromosome.
- To generalize, unique identifiers enable globally unique identification of a resource. The structure of these identifiers is standardized and they are registered centrally, enabling a uniform structure of these identifiers globally or in the user community. This makes unique identifiers unambiguous and dereferencable.
- (Use this slide to collect unique identifiers in the research fields of the learners. We like to do this in a brief plenary discussion, asking the learners to share unique identifiers, they use regularly and what they represent.)
- Now we will take this concept of uniform identifiers to the Web.
- But first, we will need to define and distinguish between a few terms, that come up frequently in this context. The examples we have seen a couple of minutes ago, are - simply put - a series of structurally harmonized characters that uniquely identify a resource…
- The ISBN number we have seen, is basically just a “synonym” for a book. (It acts to the book like a synonym acts to another word). This is, what we call a URN, Uniform Resource Name. We know, what the resource is called.
- This name under a certain namespace, is uniform and unique. But the name gives no clue, on how we can retrieve the information stored behind this name. We do not know it’s location and the technical necessities to access it.
- To do so on the web, we need the address…
- where we can find the resource with a specific resource. The address alone is not enough, though. We also need information on how we can retrieve the resource…
- This is specified by the communication protocol. We will focus on this technology in a minute. These information are given as a Uniform Resource Locator, URL: a series of characters, that specify the address of a resource and the protocol necessary to retrieve this resource.
- Both, URN and URL, can be used to identify a specific resource. You either need the name or the location, to identify data on the Web. So URN and URL are Uniform Resource Identifiers.
- We will further focus on URLs and the technology hidden behind this string of characters, that we enter to open a resource on the Web.
- And for this we take the URL that retrieves the information for our gene example from couple of minutes ago. So let’s decode this character set: The resource we are looking for, is…
- provided on a specific server, the host. To explain which resource we want to get, the path in the URL gives a kind of “location address” to the server, so it knows where to find what we are looking for. The final resource might be stored in a database structure. So the necessary query parameter are specified that lead to the database entry for the requested resource. For now, this is just a “nice to know” and we will disregard these specifications in our examples. Don’t forget, we will need to follow a specific protocol, in this case HTTPS, in order to communicate with the host server. HTTPS is an extension of the Hypertext Transfer Protocol, that uses encryption technology for secure communication on the network.
- So here we have reached the third and final building block of the World Wide Web.
- If we now enter this URL in our browser, the browser sends a HTTP request to the server.
- This request specifies, that the browser wants to GET a resource stored under a specific path from the host and follows the specific HTTP protocol that is used for communication, which is also expected by the browser of the server response.
- The host server then looks up the specified file path locally. Finds the requested file and…
- sends back the HTTP response, with the requested resource.
- The response also includes a status code. The code “200: ok” tells the client-server, that sends the request, “I have found the file you requested. Here you go!”. There are various status codes for server-client communication, but for now, we will focus on the most common ones. The client, your browser, receives the response with the resource attached and…
- displays it.
- But I’m fairly sure, we have all experienced this situation: You are looking for publications online, be it data or a journal article. The abstract is super promising and you want to retrieve the PDF…
- but instead of the publication, you are faced with an Error 404. We speak of rotten links.
- So what happened here? You click on the link and the familiar HTTP request is sent by your browser to the host server.
- Again, the host server follows the file path but it is leading into the void. No file with this path.
- And this is, what the host server communicates back to your browser. The HTTP response now contains the status code 404: Not Found.
- Let’s take a look at this client-server communication in action.
- Simplified, there could be two reasons why you end up with a 404 status code: either you can’t spell correctly, or the path to the resource is broken.
- How do paths break.
- The URL you want to retrieve points to a specific resource, which are stored on another server. But within the life cycle of a Web resource, several events can take place.
- The file path on the host server might change, the resource might be migrated to a different host server, or the resource might simply be deleted. In any of these cases, the URL does not specify the exact location of the resource any longer and will no longer be retrievable following the GET request you send from your browser. This process is also referred to as “link rot”. Remember, that we classified the URL as a form of Uniform Resource Identifier? This means, that link rot results in the resource losing a very important identifier!
Time: 2 min
Narrative / Teaching script:
- Share an empty browser tab on your screen.
- Open the network editor.
- Open any desired website in your browser. This might be a good point to share your organizational, institutional, or personal homepage with the learners for some “hidden” marketing. 😉
- You can witness all the requests and responses in the network editor, while the page is loading.
- Highlight that each element - HTML documents, images, etc -
require individual requests in order to build the website and the
200: okstatus codes that are send back with the resources. - Optional: Take a closer look at the different status codes or the HTTP responses.
- Enforce an Error 404, e.g. by deleting one character in the file path. The status code 404 will appear in the status code column of the network editor.
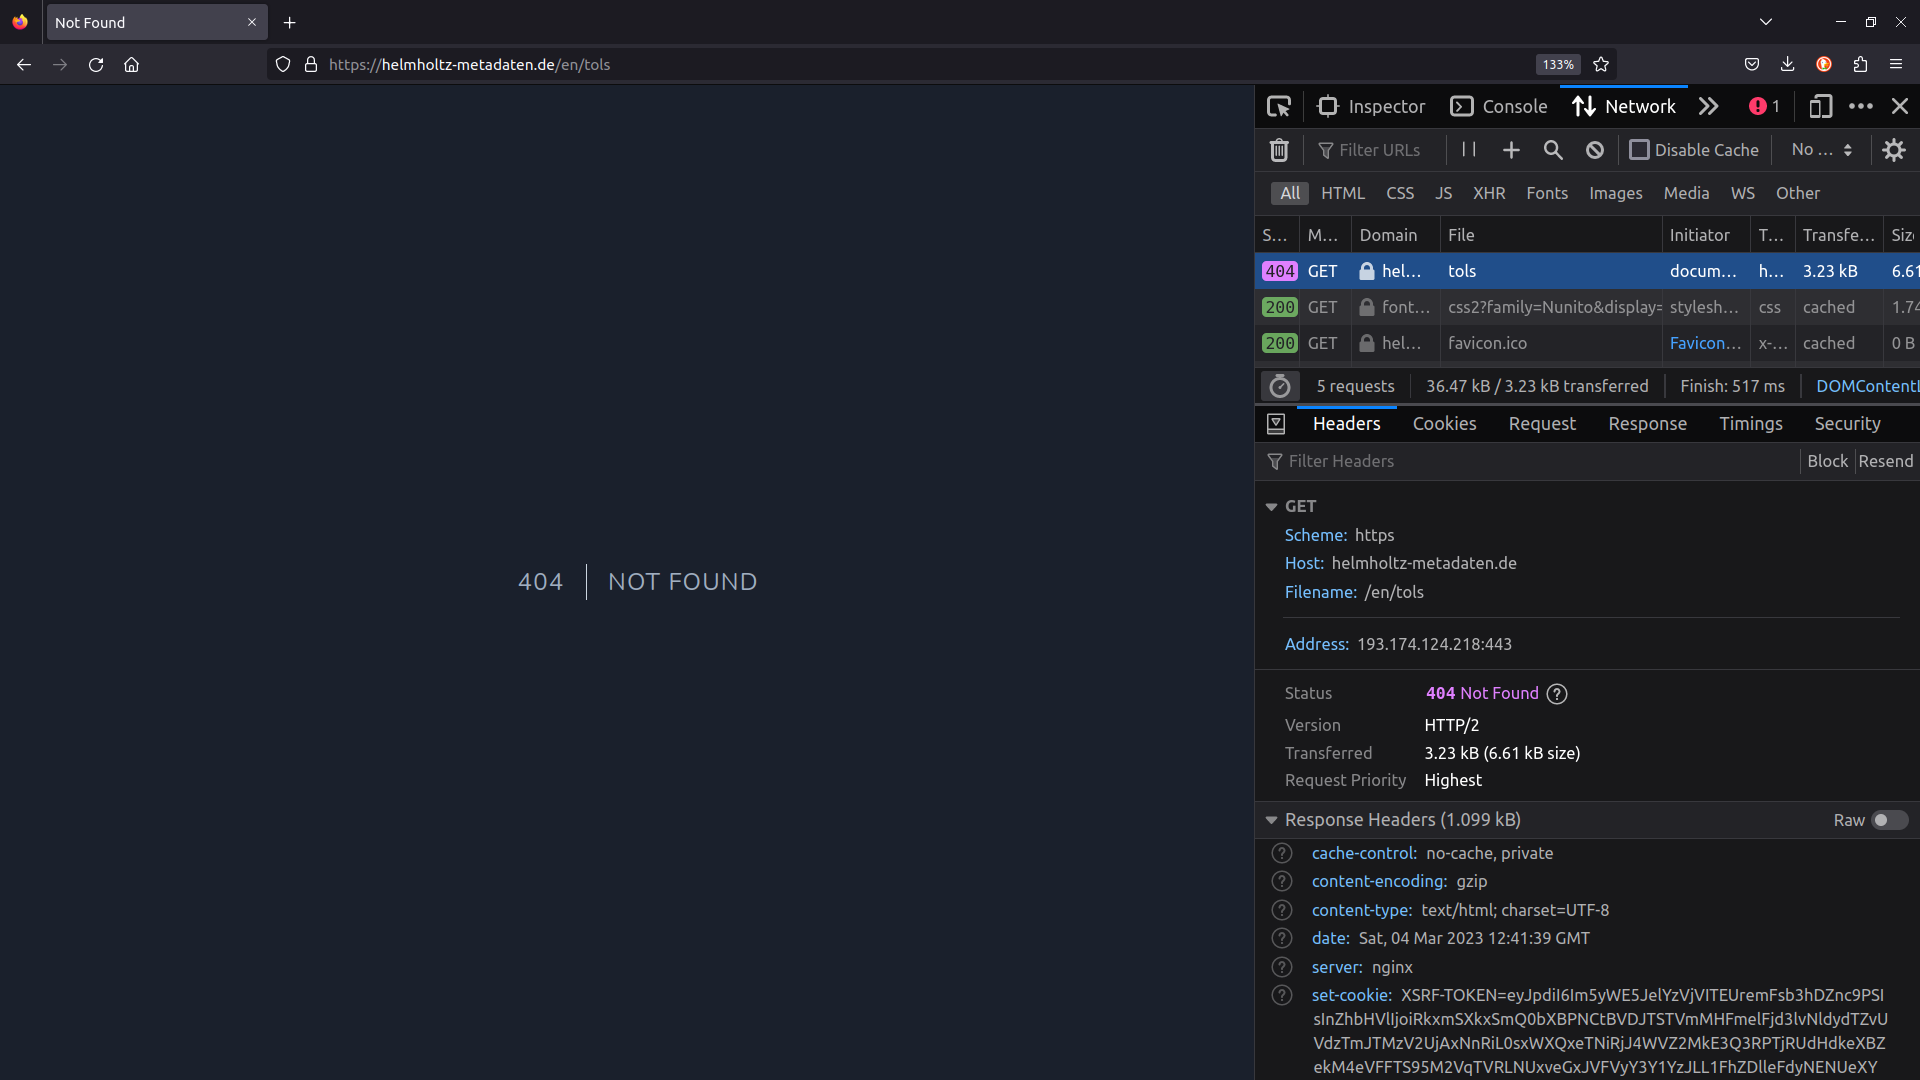
Slide set: PersistentIdentifier.pdf
Time estimate: 8 min
- Web technology has a solution for this issue: Persistent Identifiers or short, PIDs.
- Like our other persistent and unique identifiers, such as ISBNs, PIDs are long-lasting references to digital objects on the Web. Any resource that has a representation on the web - articles, datasets, persons, instruments - can have a PID assigned. These PIDs remain constant over time, lead indirectly to the resource - so they also give information on the location and protocol - and, thus, ensure permanent identifiability, referenceabilty and retrievability of online resources.
- The technology behind PIDs is fairly simple. In essence a PID service resembles the basic functionality of a phone book, where the PID identifies the resource in question, like a name in a phone book but unique. The PID is associated with an URL, that locates the resource.
- In PID databases, a PID is mapped to a URL, that retrieves a resource. Even though the URL changes, due to server migration or changes in the file path, the PID remains consistent.
- If you activate a hyperlink in your browser to retrieve a resource without a PID service included, your browser will directly communicate with the host server to retrieve a resource.
- If the requested resource is identified by a PID, the underlying PID service will be contacted by the browser. The PID service will then query its database for the PID, identify the current URL of the resource and redirect the request to the host server.
- So when the location of the resource changes…
- a PID will not lead to unretrievable resources and rotten links…
- as the new URL is stored in the PID resolver service and the activated link will redirect the request to the new location.
- It is important to know, that the PID service only provides the technical infrastructure for redirections. The registrar of the requested resource - which could be a private person, a journal that published an article or a repository that holds a dataset - is responsible for updating the URL. For example: You publish an article and one of the journals assigns a PID to this article. If the journal now changes the digital location of your article on their server, the journal is responsible to inform the PID provider about the changes and update the location.
- PID technology, however, comes with a significant challenge.
- If the PID provider discontinues it’s services, it would lead to a huge amount of broken links and irretrievable resources. Therefore it is important, to choose well-established and sustainable PID service.
- In the scientific environment, we daily deal with various resources represented on the Web.
- Non-profit services have been established in the scholar world, to provide sustainable PIDs for academic Web resources. Researchers can register an ORCiD ID, short for Open Researcher and Contributor ID. Academic institutions and funding agencies can be identified by their Research Organization Registry handle, short ROR. And once you look for scientific publications, you will inevitably get in contact with a DOI.
- The Digital Object Identifier is a digital identifier of an object, any object – physical, digital, or abstract. It is not exclusively used for academic Web resources but can be used to register and identify any resource represented on the Web.
- In the academic environment, it is largely used to identify research articles, data objects, metadata records, code, and software.
- For these academic Web resources, DOIs can be issued by different DOI providers, most commonly Data Cite and Crossref. Many repositories and scientific journals assign published resources with a DOI, often in collaboration with DataCite or Crossref. These providers guarantee long-lasting retrievability of any data object in their database.
- Allow some time for questions.
Slide set: PidsAndMetadata.pdf
Time estimate: 5 min
- So, where is the link between PIDs and Metadata?
- For this, we will have a closer look on the ORCiD. If you resolve an ORCiD on the Web, you will get to a website that contains all the information of a researcher, that this person has provided about themself. You can specify employments, education, publications, awards, and grants as well as location details, keywords, and external links. In other words, your ORCiD comes with all the necessary metadata about your professional life. Plus, it is unique but your name may not be. Imagine, you are looking for a publication by John Smith. Without additional information, it would be almost impossible to find a publication by the exact John Smith on arXiv or Google Scholar in a reasonable amount of time. Even if you look up Bruce Wayne on Google Scholar, you will find more than one author with this name.
- An ORCiD ID is an unique and persistent identifier for researchers.
- The ORCiD service comes with more than an unique, persistent identifier. It comes with an ORCiD record, in other words a metadata record, that connected to each ORCID ID. And the service also provides technical tools, with which this metadata can be retrieved.
- So all the information that is visible on this page…
- is connected with a metadata object, that looks somewhat like this. A structured metadata object including all the information about your person, that you like to share. [side note: the JSON object is based on the original ORCID schema. However, ORCiD uses XML.]
- Now, let’s say, you want to publish a dataset or journal paper and attach all the necessary metadata. In order to add all the bibliographical information to unambiguously identify you as the author, you might need to include many details. And you might have been one of many authors. So you need to repeat this process for your co-authors as well. If you have an ORCiD, you can just use the PID as an identifier for your name and your information can be retrieved automatically.
- And if your information changes – for example you got married and your name changed, or you started a new job and your contact information was updated – you only need to include the update in your ORCiD record.
- Your ID stays the same, thus you do not have to touch your dataset metadata records again. Your ORCiD ID will automatically resolve to the updated personal information.
- Similarly, when you register a DOI – let’s say for a dataset or a journal publication – you will give metadata on this data object, that will be saved with the DOI. So whenever you reference this exact resource, for example if you publish several papers referring to the same data, you need the DOI as an identifier and further meta information about the data set can be retrieved automatically.
- To sum it up, PIDs ensure sustainable retrievability of any kind of web resource, they can be used to unambiguously identify resources on the Web and PIDs are connected to metadata records, which describe the resource in question.
- These are certainly benefits for any human interactor with the resource.
- But let’s stay with the DOI a bit longer.
- Remember the journal paper we examined yesterday?
- One crucial metadatum we found was the DOI.
- Let’s see what happens, when we retrieve this DOI in a Browser. (Switch to a browser window and continue with “Guided confrontation: DOI Record”)
- Optional slide to discuss the structure of the PID record
- PID records are stored with the PID resolver service. They are targeted especially at machines and hold machine-readable information. These information support machine-actionability for interoperability. We will take a closer look on this in the next section.
- Allow some time for questions.
Time: 5 min
Narrative / Teaching script:
- Share an empty browser tab on your screen.
- Open the DOI of the journal publication you presented in “Guided confrontation: Metadata in scientific publications” (if the publication is not Open Access, make sure to login in advance 😉).
- Guide the audience through the information stored on the landing page (i.e. authors, abstract, references, etc.). Highlight the human-friendly representation.
- Copy the DOI and open https://www.crossref.org/.
- Retrieve the corresponding Crossref entry for the publication using the metadata search box.
-
To retrieve the metadata record associated with the DOI (Kernel
Information Profil), click on
Actionsand selectMetadata as JSON. - Reflect the metadata record with the participants.
Slide set: MachineActionabilityInteroperability.pdf
Time estimate: 5 min
- Going back to our journal paper example.
- Humans are trained to scan these representations for information. If we are looking for a specific publication, e.g. on a certain topic, published by a specific author, or in a certain journal, we can easily scan this page and decide in a short amount of time, whether the article suits our requirements or not.
- As we have discussed yesterday, the machine only sees glyphs, formats, structure, etc. In order to extract information from such an article automatically, sophisticated algorithms - like natural language processing - would be required. In other words: automatically retrieving key information from resources that are targeted at a human audience, is slow and costly. To speed up this process, machine-actionable and interoperable representations of the resource are necessary.
- And this leads us back to PIDs and specifically the PID Records. We have seen previously, how the PID resolver service stores the current location of a resource and redirects client requests for a resource. Additionally, the PID resolver stores the PID record - metadata that describes the resource.
- This enables new possibilities for requests made by the client. Instead of asking for a redirect to the actual resource, the machine can now request the PID record…
- and even specify the format in which the metadata is supposed to be presented. This makes the client-PID resolver interaction much faster and accessed data…
- is delivered in a light-weight and machine-readable format. This allows the machine to access the information about the resource immediately without any costly and lengthy workarounds.
- By now it might not surprise you, that PID services request metadata that conform to a certain schema with every resource that is registered. Here you see a snippet of the PID Record Schema from Crossref written in XSD. Whenever a publication, data set, or any other resource is registered with Crossref to get a DOI, Crossref will request meta-information that validate against this schema.
- Just a little nice-to-know: Should you come across the term “Kernel Information Profile” while researching metadata - it is just another name for a PID Record Schema.
- One more thing. When you were researching domain specific standards in Challenge 6, you might have come across PIDs in the standards you examined. Let me show you an example.
- “Allosteric molecule” is a term defined in the “Molecular Interactions” controlled vocabulary.
- In the documentation of the term, you can find an identifier - MI,
which stands for the Molecular Interactions Standard, 1159. Associated
with this term is also a location, that starts with
purl. - A PURL or Persistent URL is a form of PID. Requesting this location will lead to a redirect to the current location - URL - of the resource.
- If we follow the PURL of the “allosteric molecule” term…
- we will be redirected to this record on the Ontobee Web service. This record holds the same definition as seen on the previous page and additional annotation information.
- The persistent URL is here specified as
Term IRI. - IRI stands for Internationalized Resource Identifier. The IRI technology essentially extends the Uniform Resource Identifier (URI), allowing for a greater set of characters. In other words, it serves the same function as the URI. However, URIs can only consist of ASCII characters, whereas IRIs allow for a wide variety of characters, including Chinese, Japanese, Korean, and Cyrillic characters.
- Associating (metadata) terms with a PID in such a way enables the machine to unambiguously and persistently identify the term. This opens up advanced information technologies. Different terms can be put into relations with each other…
- In this example the term “allosteric molecule” is specified to be a subclass of “biological role”. Hence, a relational connection of the type “sublass of” is formed between the terms “allosteric molecule” and “biological role”.
- Based on the associated PIDs the machine is now able to assign meaning to a specific term.
- The study of meaning, reference, or truth is called Semantics. By formally describing concepts, relationships between different (meta)data entities, and categories, we add meaning to the information. This technology is known as the Semantic Web.
- In the words of Tim Berners-Lee and his peers: “The Semantic Web is an extension of the current Web in which information is given well-defined meaning, better enabling computers and people to work in cooperation.”
- In this course we have been focusing on data formats such as JSON, XML and Markdown to describe our data. Adding meaning to these data object calls for enhanced describtive technologies and the W3C has well-defined and endorsed the standards of the Semantic Web…
- but this is another story and shall be told in another course.
- Allow some time for questions.
Episode 0: Lightning Talk
Episode Schedule
| Content type | Title | |
|---|---|---|
| 30 min | Lecture | Lightning Talk |
| 15 min | Group activity | Q&A with invited speaker |
Total time: 45 min
Teaching
methods: direct teaching, group activity
Learning
types: acquisition
REMEMBER
- The learners discover a real-world example of a research metadata topic.
- The learners feel motivated to improve their (meta)data handling.
Description:
An invited speaker presents a real
world research example and demonstrates how applied metadata can shape
research.
Talking Points:
Time estimate: 45 min (30 min lecture + 15 min Q&A)
Suitable topics:- Metadata and Machine Learning / AI
- Metadata Schema / Standard development
- Knowledge Graphs and the Semantic Web
For more information go to the Lightning talk section in our General Lesson Information.
Episode 0: Housekeeping
Episode Schedule
| Content type | Title | |
|---|---|---|
| 5 min | Lecture | Reflection |
| 5 min | Group activity | Feedback poll |
| 5 min | Feedback | Instructor feedback and farewell |
Total time: 15 min
Teaching
methods: direct teaching, group activity
Learning
types: acquisition, reflection
REMEMBER
- The learners reflect on the lesson and give their feedback.
- The learners voice thir wishes for future lessons.
Description:
This module concludes the lesson.
An summarizing overview of the past two days is given. The learners
provide their feedback on the lesson. The instructors give feedback to
the learners.
Talking Points:
Slide set: not provided in slide set
Time estimate: 5 min
In this section, the content and topics of the lesson are summarized. Use this opportunity to inform / remind the learners of the references / further reading section as well as - if applicable - contact information.
Slide set: - Time estimate: 5 min
Creators’ recommendation:
see also Feedback Day 1
QUESTIONS
-
How do you generally feel about the lesson “Fundamentals of Scientific Metadata”?
- ☹️
- 😕
- 😐
- 🙂
- 😃
-
Please rate the difficulty level of the lecture content.
- too easy
- fairly easy
- just right
- rather hard
- too hard
-
Please rate the difficulty level of the hands-on sessions.
- too easy
- fairly easy
- just right
- rather hard
- too hard
I really liked about this training…
[FREE TEXT]This could be improved:
[FREE TEXT]I would have liked to learn more about…
[FREE TEXT]Dear Instructors…
[FREE TEXT]
Slide set: - Time estimate: 5 min
We do believe, that giving feedback is important for instructors as well as learners. So we would like to encourage you to reflect on your experiences with the closing lesson and communicate them to your group of learners ☺️ .
To Do: After the lesson
- If you used shared documents during the lesson, restrict editing rights in these documents.
- Feel free to share the slides with the learners.
- Internally evaluate the event (all instructors and teaching supports). If you like, you can use our Internal Evaluation Form as a guideline.
And as we are already talking about feedback and evaluation, your lesson feedback and contributions are most welcome! You can get in touch via the channels provided in the General Lesson Information.