All in One View
Content from Running commands with Snakemake
Last updated on 2024-10-07 | Edit this page
Overview
Questions
- How do I run a simple command with Snakemake?
Objectives
- Create a Snakemake recipe (a Snakefile)
- Use Snakemake to count the lines in a FASTQ file
Looking at the sample data
You should have the sample data files unpacked already (if not, refer
back to the lesson setup). Under yeast/reads you’ll see a
number of FASTQ files (extension .fq). These represent
short paired RNA-seq reads from an experiment on yeast cultured under
three experimental conditions. For now we’ll just look at one single
file, ref1_1.fq.
In the terminal:
Files in FASTQ format have 4 lines for each sequence.
- Header line, beginning with
@ - Sequence
+- Encoded quality per base
Let’s count the number of lines in the file with wc -l.
Again, in the shell:
We can redirect this result to a file like so:
BASH
$ wc -l reads/ref1_1.fq > ref1_1.fq.count
$ head -v *.count
==> ref1_1.fq.count <==
58708 reads/ref1_1.fqThe sample dataset
The sample dataset represents a transcriptomics experiment in brewer’s yeast (Saccharomyces cerevisiae) under three conditions:
- etoh60 - Treated with 60% ethanol
- temp33 - Treated at 33 degrees celsius
- ref - Untreated
For each condition there are 3 repeats, making 9 total samples. For
each, total RNA (or rather, cDNA) was sequenced on an Illumina HiSeq
instrument. For each repeat there is a pair of files as the sequencing
is double-ended, so for example reads/etoh60_3_2.fq
contains the second of the read pairs from the third ethanol-treated
sample.
Don’t worry about the biological meaning of this set-up. In the course, we’re only going to get as far as assessing the quality of the data and a very preliminary analysis. The data has been subsampled to a fraction of the original size to make filtering and alignment operations fast, so any deeper analysis is not going to yield meaningful results.
As well as the reads, we have a transcriptome for the yeast. This comes in a single FASTA file (as opposed to the cDNA reads which are in FASTQ format) which has been GZip compressed.
Making a Snakefile
Within the yeast directory, edit a new text file named
Snakefile.
Contents of Snakefile:
rule countlines:
    output: "ref1_1.fq.count"
    input:  "reads/ref1_1.fq"
    shell:
"wc -l reads/ref1_1.fq > ref1_1.fq.count"Key points about this file
- The file is named
Snakefile- with a capitalSand no file extension. - Some lines are indented. Indents must be with space characters, not tabs. See the setup section for how to make your text editor do this.
- The rule definition starts with the keyword
rulefollowed by the rule name, then a colon. - We named the rule
countreads. You may use letters, numbers or underscores, but the rule name must begin with a letter and may not be a keyword. - The keywords
input,output,shellare all followed by a colon. - The file names and the shell command are all in
"quotes". - The output filename is given before the input filename. In fact, Snakemake doesn’t care what order they appear in but we give the output first throughout this course. We’ll see why soon.
Back in the shell we’ll run our new rule. At this point, if there were any missing quotes, bad indents, etc. we may see an error.
For these early examples, we’ll always run Snakemake with the
-j1, -F and -p options. Later
we’ll look more deeply at these and other available command-line options
to Snakemake.
Running Snakemake
Run snakemake --help | less to see the help for all
available options. What does the -p option in the
snakemake command above do?
- Protects existing output files
- Prints the shell commands that are being run to the terminal
- Tells Snakemake to only run one process at a time
- Prompts the user for the correct input file
Hint: you can search in the text by pressing /, and
quit back to the shell with q
- Prints the shell commands that are being run to the terminal
This is such a useful thing we don’t know why it isn’t the default!
The -j1 option is what tells Snakemake to only run one
process at a time, and we’ll stick with this for now as it makes things
simpler. The -F option tells Snakemake to always recreate
output files, and we’ll learn about protected outputs much later in the
course. Answer 4 is a total red-herring, as Snakemake never prompts
interactively for user input.
Counting sequences in a FASTQ file
FASTQ files contain 4 lines per sequence, as noted above. We can get
BASH to divide the output of wc by 4 to get the number of
sequences:
OUTPUT
$ echo $(( $(wc -l <reads/ref1_1.fq) / 4 ))
14677
Note that the input filename is now preceeded by <.
This is a little trick to get wc to print only the number
of lines, and not the filename. The $( ... ) syntax
captures this output value and the $(( ... )) syntax
encloses an arithmetic expression, which needs to be printed with
echo. Don’t worry if this is unfamiliar - you just need to
know that this is a shell command you can copy and use to count the
sequences.
Counting sequences in Snakemake
Modify the Snakefile to count the number of
sequences in reads/ref1_1.fq, rather than
the number of lines.
- Rename the rule to “countreads”
- Keep the output file name the same
- Remember that the result needs to go into the output file, not just be printed on the screen.
rule countreads:
    output: "ref1_1.fq.count"
    input:  "reads/ref1_1.fq"
    shell:
"echo $(( $(wc -l <reads/ref1_1.fq) / 4 )) > ref1_1.fq.count"Counting sequences in Snakemake (continued)
Add a second rule to count the sequences in
reads/etoh60_1_1.fq. Add this to the same Snakefile you
already made, under the “countreads” rule, and run your rules in the
terminal. When running the snakemake command you’ll need to
tell Snakemake to make both the output files.
You can choose whatever name you like for this second rule, but it can’t be “countreads” as rule names need to be unique within a Snakefile. So in this example answer we use “countreads2”.
rule countreads2:
  output: "etoh60_1_1.fq.count"
  input:  "reads/etoh60_1_1.fq"
  shell:
    "echo $(( $(wc -l <reads/etoh60_1_1.fq) / 4 )) > etoh60_1_1.fq.count"
Then in the shell…
If you think writing a separate rule for each output file is silly, you are correct. We’ll address this next!
For reference, this is the full Snakefile we should have by the end of this episode.
- Before running Snakemake you need to write a Snakefile
- A Snakefile is a text file which defines a list of rules
- Rules have inputs, outputs, and shell commands to be run
- You tell Snakemake what file to make and it will run the shell command defined in the appropriate rule
Content from Placeholders and wildcards
Last updated on 2024-10-07 | Edit this page
Overview
Questions
- How do I make a generic rule?
- How does Snakemake decide what rule to run?
Objectives
- Use Snakemake to count the sequences in any file
- Understand the basic steps Snakemake goes through when running a workflow
- See how Snakemake deals with some errors
For reference, this is the Snakefile you should have to start the episode.
Trimming and counting reads
In the previous episode we used Snakemake to count the sequences in two FASTQ files. Later in this episode we will apply a filtering operation to remove low-quality sequences from the input files, and the ability to count the reads will show us how many reads have been discarded by the filter.
We have eighteen input files to process and we would like to avoid writing eighteen near-identical rules, so the first job is to make the existing read-counting rule generic - a single rule to count the reads in any file. We will then add a filtering rule which will also be generic.
Wildcards and placeholders
To make a rule that can process more than one possible input file we
need placeholders and wildcards. Here
is a new rule that will count the sequences in any of
the .fq files.
# New generic read counter
rule countreads:
    output: "{myfile}.fq.count"
    input:  "reads/{myfile}.fq"
    shell:
"echo $(( $(wc -l <{input}) / 4 )) > {output}"As a reminder, here’s the non-generic version from the last episode:
# Original version
rule countreads:
    output: "ref1_1.fq.count"
    input:  "reads/ref1_1.fq"
    shell:
        "echo $(( $(wc -l <reads/ref1_1.fq) / 4 )) > ref1_1.fq.count"
The new rule has replaced explicit file names with things in
{curly brackets}, specifically {myfile},
{input} and {output}.
{myfile} is a wildcard
Wildcards are used in the input and output
lines of the rule to represent parts of filenames. Much like the
* pattern in the shell, the wildcard can stand in for any
text in order to make up the desired filename. As with naming your
rules, you may choose any name you like for your wildcards, so here we
used myfile. If myfile is set to
ref1_1 then the new generic rule will have the same inputs
and outputs as the original rule. Using the same wildcards in the input
and output is what tells Snakemake how to match input files to output
files.
If two rules use a wildcard with the same name then Snakemake will treat them as different entities
- rules in Snakemake are self-contained in this way.
{input} and {output} are
placeholders
Placeholders are used in the shell section of a rule,
and Snakemake will replace them with appropriate values -
{input} with the full name of the input file, and
{output} with the full name of the output file – before
running the command.
If we had wanted to include the value of the myfile
wildcard directly in the shell command we could have used
the placeholder {wildcards.myfile} but in most cases, as
here, we just need the {input} and {output}
placeholders.
Running the general-purpose rule
Modify your Snakefile to incorporate the changes described above, using the wildcard and input/output placeholders. You should resist the urge to copy-and-paste from this workbook, but rather edit the file by hand, as this will stick better in your memory.
You should delete the now-redundant second rule, so your Snakefile should contain just one rule named countreads.
Using this new rule, determine: how many reads are in the
temp33_1_1.fq file?
Choosing the right wildcards
Our rule puts the sequence counts into output files named like
ref1_1.fq.count. How would you have to change the
“countreads” rule definition if you wanted:
the output file for
reads/ref1_1.fqto becounts/ref1_1.txt?the output file for
reads/ref1_1.fqto beref1_counts/fq.1.count(forreads/ref1_2.fqto beref1_counts/fq.2.count, etc.)?the output file for
reads/ref1_1.fqto becountreads_1.txt?
In all cases, there is no need to change the shell part
of the rule at all.
output: "counts/{myfile}.txt"
input:  "reads/{myfile}.fq"
This can be done just by changing the output: line. You
may also have considered the need to mkdir counts but in
fact this is not necessary as Snakemake will create the output directory
path for you before it runs the rule.
output: "{sample}_counts/fq.{readnum}.count"
input:  "reads/{sample}_{readnum}.fq"
In this case, it was necessary to introduce a second wildcard,
because the elements in the output file name are split up. The names
chosen here are {sample} and {readnum} but you
could choose any names as long as they match between the
input and output parts. Once again, the output
directory will be created for us by Snakemake, so the shell
command does not need to change.
This one isn’t possible, because Snakemake cannot determine which input file you want to count by matching wildcards on the file name “countreads_1.txt”. You could try a rule like this:
output: "countreads_{readnum}.count"
input:  "reads/ref1_{readnum}.fq"
…but it only works because “ref1” is hard-coded into the
input line, and the rule will only work on this specific
sample, not the other eight in our sample dataset. In general, input and
output filenames need to be carefully chosen so that Snakemake can match
everything up and determine the right input from the output
filename.
Snakemake order of operations
We’re only just getting started with some simple rules, but it’s worth thinking about exactly what Snakemake is doing when you run it. There are three distinct phases:
- Prepares to run:
- Reads in all the rule definitions from the Snakefile
- Plans what to do:
- Sees what file(s) you are asking it to make
- Looks for a matching rule by looking at the
outputs of all the rules it knows - Fills in the wildcards to work out the
inputfor this rule - Checks that this input file is actually available
- Runs the steps:
- Creates the directory for the output file, if needed
- Removes the old output file if it is already there
- Only then, runs the shell command with the placeholders replaced
- Checks that the command ran without errors and made the new output file as expected
For example, if we now ask Snakemake to generate a file named
wibble_1.fq.count:
OUTPUT
$ snakemake -j1 -F -p wibble_1.fq.count
Building DAG of jobs...
MissingInputException in line 1 of /home/zenmaster/data/yeast/Snakefile:
Missing input files for rule countreads:
reads/wibble_1.fq
Snakemake sees that a file with a name like this could be produced by
the countreads rule. However, when it performs the wildcard
substitution it sees that the input file would need to be named
reads/wibble_1.fq, and there is no such file available.
Therefore Snakemake stops and gives an error before any shell commands
are run.
Dry-run (-n) mode
The amount of checking may seem pedantic right now, but as the workflow gains more steps this will become very useful to us indeed.
Filtering the reads for quality
Adding a rule for filtering the reads
Here is a command that will trim and filter low quality reads from a FASTQ file.
Add a second rule to your Snakefile to run this trimmer. You should make it so that valid outputs are files with the same name as the input, but in a subdirectory named ‘trimmed’, for example:
- trimmed/ref1_1.fq
- trimmed/temp33_1_1.fq
- etc.
# Trim any FASTQ reads for base quality
rule trimreads:
    output: "trimmed/{myfile}.fq"
    input:  "reads/{myfile}.fq"
    shell:
        "fastq_quality_trimmer -t 20 -l 100 -o {output} <{input}"
Bonus points if you added any comments to the code!
And of course you can run your new rule as before, to make one or more files at once. For example:
About fastq_quality_trimmer
fastq_quality_trimmer is part of the FastX toolkit and
performs basic trimming on single FASTQ files. The options
-t 20 -l 100 happen to be reasonable quality cutoffs for
this dataset. This program reads from standard input so we’re using
< to specify the input file, and the -o
flag specifies the output name.
For reference, this is a Snakefile incorporating the changes made in this episode.
- Snakemake rules are made generic with placeholders and wildcards
- Snakemake chooses the appropriate rule by replacing wildcards such the the output matches the target
- Placeholders in the shell part of the rule are replaced with values based on the chosen wildcards
- Snakemake checks for various error conditions and will stop if it sees a problem
Content from Chaining rules
Last updated on 2025-02-25 | Edit this page
Overview
Questions
- How do I combine rules into a workflow?
- How can I make a rule with multiple input files?
Objectives
- Use Snakemake to filter and then count the sequences in a FASTQ file
- Understand how rules are linked by filename patterns
- Add a rule that calculates the number of reads filtered out
For reference, this is the Snakefile you should have to start the episode.
A pipeline of multiple rules
Our goal at this point is to apply a quality filter to our reads and to see how many reads are discarded by that filter for any given sample. We are not quite there yet, but we do have a countreads rule and a trimreads rule. Following the previous chapter, the contents of the Snakefile should be:
# New generic read counter
rule countreads:
    output: "{myfile}.fq.count"
    input:  "reads/{myfile}.fq"
    shell:
        "echo $(( $(wc -l <{input}) / 4 )) > {output}"

# Trim any FASTQ reads for base quality
rule trimreads:
    output: "trimmed/{myfile}.fq"
    input:  "reads/{myfile}.fq"
    shell:
        "fastq_quality_trimmer -t 20 -l 100 -o {output} <{input}"
The missing piece is that there is no way to count the reads in the trimmed file. The countreads rule only takes input reads from the reads directory, whereas the trimreads rule puts all results into the trimmed directory.
To fix this, we could move the trimmed reads into the reads directory, or add a second read-counting rule, but the most elegant solution here is to make the countreads rule even more generic, so it can count everything.
# New even-more-generic read counter
rule countreads:
    output: "{indir}.{myfile}.fq.count"
    input:  "{indir}/{myfile}.fq"
    shell:
        "echo $(( $(wc -l <{input}) / 4 )) > {output}"
Now, the rule no longer requires the input files to be in the “reads”
directory. The directory name has been replaced by the
{indir} wildcard. We can request Snakemake to create a file
following this new output pattern:
Look at the logging messages that Snakemake prints in the terminal. What has happened here?
- Snakemake looks for a rule to make
trimmed.ref1_1.fq.count - It determines that “countreads” can make this if
indir=trimmedandmyfile=ref1_1 - It sees that the input needed is therefore
trimmed/ref1_1.fq
- Snakemake looks for a rule to make
trimmed/ref1_1.fq - It determines that “trimreads” can make this if
myfile=ref1_1 - It sees that the input needed is therefore
reads/ref1_1.fq
- Now Snakemake has reached an available input file, it runs both steps to get the final output
Here’s a visual representation of this process:
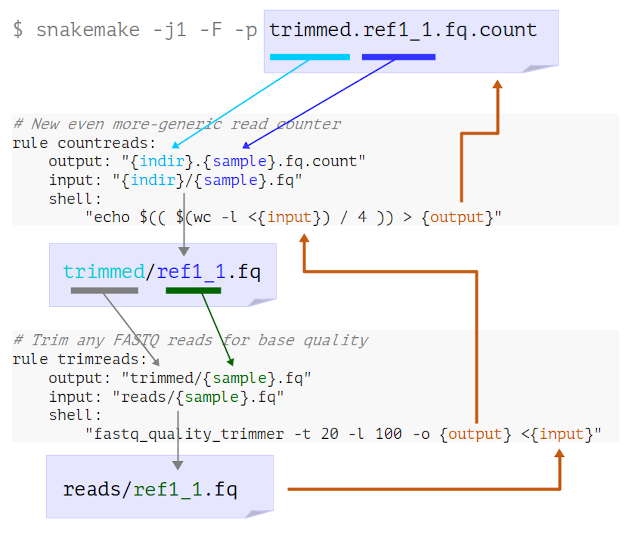
This, in a nutshell, is how we build workflows in Snakemake.
- Define rules for all the processing steps
- Choose
inputandoutputnaming patterns that allow Snakemake to link the rules - Tell Snakemake to generate the final output files
If you are used to writing regular scripts this takes a little getting used to. Rather than listing steps in order of execution, you are always working backwards from the final desired result. The order of operations is determined by applying the pattern matching rules to the filenames, not by the order of the rules in the Snakefile.
Choosing file name patterns
Chaining rules in Snakemake is a matter of choosing filename patterns that connect the rules. There’s something of an art to it, and most times there are several options that will work, but in all cases the file names you choose will need to be consistent and unabiguous.
Seeing how many reads were discarded
How many reads were removed?
How many reads were removed from the ref1 sample by the filtering step?
After generating both the trimmed and untrimmed .count
files we can get this information.
BASH
$ snakemake -j1 -F -p reads.ref1_1.fq.count trimmed.ref1_1.fq.count
$ head *.ref1_1.fq.count
==> reads.ref1_1.fq.count <==
14677

==> trimmed.ref1_1.fq.count <==
14278
Subtracting these numbers shows that 399 reads have been removed.
To finish this part of the workflow we will add a third rule to
perform the calculation for us. This rule will need to take both of the
.count files as inputs. We can use the arithmetic features
of the Bash shell to do the subtraction.
Check that this command runs in your terminal. Take care to get the symbols and spaces all correct. As with the original countreads rule, this shell syntax may well be unfamiliar to you, but armed with this working command we can simply substitute the names of any two files we want to compare.
We can put the shell command into a rule.
rule calculate_difference:
    output: "ref1_1.reads_removed.txt"
    input:
        untrimmed = "reads.ref1_1.fq.count",
        trimmed = "trimmed.ref1_1.fq.count",
    shell:
        "echo $(( $(<{input.untrimmed}) - $(<{input.trimmed}) )) > ref1_1.reads_removed.txt"
Note that:
- The above rule has two inputs, trimmed and untrimmed
- We can choose what to call the individual inputs, so use descriptive names
- There is a newline after
input:and the next two lines are indented - The
=and,symbols are needed - You can leave off the final comma, but it’s generally easier to just put one on every line
- We refer to the input file names as
{input.untrimmed}and{input.trimmed} - There is only one output, but we can have multiple named outputs too.
Making this rule generic
Alter the above rule to make it generic by adding suitable wildcards. Use the generic rule to calculate the number of reads removed from the etoh60_1_1.fq input file.
rule calculate_difference:
    output: "{myfile}.reads_removed.txt"
    input:
        untrimmed = "reads.{myfile}.fq.count",
        trimmed = "trimmed.{myfile}.fq.count",
    shell:
        "echo $(( $(<{input.untrimmed}) - $(<{input.trimmed}) )) > {output}"
Here, I’ve chosen to use the wildcard name {myfile}
again, but you can use any name you like. We do also need to ensure that
the output file is referenced using the {output}
placeholder.
Processing all the inputs
It would be nice to have Snakemake run this automatically for all our samples. We’ll see how to do this later, in episode 6.
Outputs first?
The Snakemake approach of working backwards from the desired output
to determine the workflow is why we’re putting the output
lines first in all our rules - to remind us that these are what
Snakemake looks at first!
Many users of Snakemake, and indeed the official documentation,
prefer to have the input first, so in practise you should
use whatever order makes sense to you.
For reference, this is a Snakefile incorporating the changes made in this episode.
- Snakemake links up rules by iteratively looking for rules that make missing inputs
- Careful choice of filenames allows this to work
- Rules may have multiple named input files (and output files)
Content from Complex outputs, logs and errors
Last updated on 2025-02-25 | Edit this page
Overview
Questions
- How can we start to analyse the sample data?
- What can cause a job in Snakemake to fail?
Objectives
- Add an RNA quantification step in the data analysis
- Learn about adding log outputs to rules
- Understand why and how Snakemake deals with missing outputs
For reference, this is the Snakefile you should have to start the episode.
Adding a transcript counting step to the pipeline
Thinking about your own workflows
Think about any data processing task you have done yourself, and write down three or four steps from that workflow.
What were the inputs to, and outputs from, each step?
How did the steps connect up, in terms of data going from one to the next? You may want to sketch this out and use arrows to indicate the linkages between the steps.
Introducing Kallisto
Let’s add another rule to our Snakefile. The reads we have are from a yeast RNA-seq experiment so we might reasonably want to quantify transcript abundance using the kallisto program. The command to do so looks like this:
This command has three input files:
- The transcriptome index
- The first of the paired FASTQ files
- The second of the paired FASTQ files
And it produces a directory of output files. According to the Kallisto manual this directory will have three output files in it:
- abundance.h5
- abundance.tsv
- run_info.json
We’ll not worry about what the contents of these files mean just now,
or how Kallisto generates them. We just know that we want to run the
kallisto quant command and have it make the output files,
and the output files are going to be useful once we add later steps in
the analysis.
Making a rule with multiple inputs and outputs works much like we previously saw.
rule kallisto_quant:
    output:
        h5   = "kallisto.{sample}/abundance.h5",
        tsv  = "kallisto.{sample}/abundance.tsv",
        json = "kallisto.{sample}/run_info.json",
    input:
        index = "Saccharomyces_cerevisiae.R64-1-1.kallisto_index",
        fq1   = "trimmed/{sample}_1.fq",
        fq2   = "trimmed/{sample}_2.fq",
    shell:
        "kallisto quant -i {input.index} -o kallisto.{wildcards.sample} {input.fq1} {input.fq2}"
There are many things to note here:
- The individual input and output files are all given names.
- We’ve used the wildcard name
{sample}rather than{myfile}because this will match only the sample name, egref1, notref1_1. Snakemake doesn’t care what name we use, but carefully chosen names make for more readable rules. - Because
kallisto quantonly takes the output directory name, we’ve used the placeholder{wildcards.sample}rather than{output}which would expand to the full file names. - We’ve chosen to only quantify the trimmed version of the reads.
- We don’t actually have the
{input.index}file yet. This will need to be created using thekallisto indexcommand.
Even though the rule is not going to work without the index, we can still run it to check that Snakemake is happy with the rule definition.
Running Kallisto on all replicates
If you are previously familiar with the Kallisto software, you may be thinking about running Kallisto on all replicates of the condition at once. We’ll look at this later in the course, but for now we will be running Kallisto once per sample, ie. once for each pair of FASTQ files.
Running the kallisto_quant rule
Given that the index input is missing, what would you expect Snakemake to do if the new rule was run now?
Try it by telling Snakemake to run the new rule on the files
ref1_1.fq and ref1_2.fq. Since the rule
defines multiple outputs, asking for any one of the output files will be
enough.
Building the index
Instruct Snakemake how to build the genome index as part of the pipeline by adding another rule. The command we need to run is:
The file to be indexed is
transcriptome/Saccharomyces_cerevisiae.R64-1-1.cdna.all.fa.gz.
As there is only one input to the rule you don’t have to give it a name,
but you may do so if you prefer.
Make it so that the terminal messages printed by the program are
captured to a file, and therefore your rule will have two separate
outputs: the index file and the messages file. Note
that the program prints messages on stderr, so you will need to
use >& rather than > to capture that
output.
The rule you write could look something like this, but there are many
variations that will work just as well. Since there is only one
transcriptome in the project, you may feel that use of the
{strain} wildcard is overkill, but who’s to say we might
not want to use another in future?
rule kallisto_index:
    output:
        idx = "{strain}.kallisto_index",
        messages = "{strain}.kallisto_stderr",
    input:
        fasta = "transcriptome/{strain}.cdna.all.fa.gz"
    shell:
        "kallisto index -i {output.idx} {input.fasta} >& {output.messages}"
Log outputs in Snakemake
All being well, our new rules are now ready to run Kallisto, and we can analyse any sample we like.
BASH
$ snakemake -j1 -F -p kallisto.ref3/abundance.h5
...lots of output...
4 of 4 steps (100%) done
Complete log: /home/zenmaster/data/yeast/.snakemake/log/2021-04-23T142649.632834.snakemake.log
There is one particular improvement we can make, since Snakemake has a dedicated rule field for outputs that are log files. These are mostly treated the same as regular outputs except that log files are always kept even if the job produces an error, so you can look at the log to help diagnose the error.
For an output to be treated as a log file, list it under
log: instead of output: and then within the
shell command use the placeholder {log} instead of
{output}.
Using an explicit log output
Modify the solution to the previous challenge so that it uses the
log keyword to capture the terminal output from
kallisto quant.
rule kallisto_index:
    output:
        idx = "{strain}.kallisto_index",
    input:
        fasta = "transcriptome/{strain}.cdna.all.fa.gz"
    log:
        messages = "{strain}.kallisto_stderr",
    shell:
        "kallisto index -i {output.idx} {input.fasta} >& {log.messages}"
The order of the log:, output: and
input: parts can be however you like. In this case since
there is now a single input file, a single output file, and a single log
file, you may feel that there is no point naming them all.
rule kallisto_index:
    output: "{strain}.kallisto_index"
    input:  "transcriptome/{strain}.cdna.all.fa.gz"
    log:    "{strain}.kallisto_stderr"
    shell:
        "kallisto index -i {output} {input} >& {log}"
Dealing with a missing files error
We’ll end the chapter by looking at a common problem that can arise
if you mistype a file name in a rule. Remember that we wrote the rule
based on the expected output filenames given in the Kallisto manual. In
an older version of this manual there was a typo where the file names
were incorrectly given as abundances.h5 and
abundances.tsv, with the extra s on each.
It may seem silly to break the workflow when we just got it working, but it will be instructive, so edit the Snakefile and change these names to the incorrect versions.
rule kallisto_quant:
    output:
        h5   = "kallisto.{sample}/abundances.h5",
        tsv  = "kallisto.{sample}/abundances.tsv",
        json = "kallisto.{sample}/run_info.json",
...
To keep things tidy, this time we’ll manually remove the output directory.
And re-run. Note that the output file name you’ll need to use on the
command line must match the edited Snakefile, or you will get a
MissingRuleException.
OUTPUT
$ snakemake -j1 -F -p kallisto.ref1/abundances.h5

...
kallisto quant -i Saccharomyces_cerevisiae.R64-1-1.kallisto_index -o kallisto.ref1 trimmed/ref1_2.fq trimmed/ref1_2.fq

[quant] fragment length distribution will be estimated from the data
...more Kallisto output...
[   em] the Expectation-Maximization algorithm ran for 265 rounds

Waiting at most 5 seconds for missing files.
MissingOutputException in line 24 of /home/zenmaster/data/yeast/Snakefile:
Job Missing files after 5 seconds:
kallisto.ref1/abundances.h5
kallisto.ref1/abundances.tsv
This might be due to filesystem latency. If that is the case, consider to increase the wait time with --latency-wait.
Job id: 0 completed successfully, but some output files are missing. 0
  File "/opt/python3.7/site-packages/snakemake/executors/__init__.py", line 583, in handle_job_success
  File "/opt/python3.7/site-packages/snakemake/executors/__init__.py", line 259, in handle_job_success
Removing output files of failed job kallisto_quant since they might be corrupted:
kallisto.ref1/run_info.json
Shutting down, this might take some time.
Exiting because a job execution failed. Look above for error message
Complete log: /home/zenmaster/data/yeast/.snakemake/log/2021-04-23T142649.632834.snakemake.log
There’s a lot to take in here. Some of the messages are very informative. Some less so.
- Snakemake did actually run kallisto, as evidenced by the output from kallisto that we see on the screen.
- There is no obvious error message being reported by kallisto.
- Snakemake complains some expected output files are missing:
kallisto.ref1/abundances.h5andkallisto.ref1/abundances.tsv. - The third expected output file
kallisto.ref1/run_info.jsonwas found but has now been removed by Snakemake. - Snakemake suggest this might be due to “filesystem latency”.
This last point is a red herring. “Filesystem latency” is not an
issue here, and never will be since we are not using a network
filesystem. We know what the problem is, as we deliberately caused it,
but to diagnose an unexpected error like this we would investigate
further by looking at the kallisto.ref1 subdirectory.
Remember that Snakemake itself does not create any output files. It
just runs the commands you put in the shell sections, then
checks to see if all the expected output files have appeared.
So if the file names created by kallisto are not exactly the same as
in the Snakefile you will get this error, and you will, in this case,
find that some output files are present but others
(run_info.json, which was named correctly) have been
cleaned up by Snakemake.
Errors are normal
Don’t be disheartened if you see errors like the one above when first testing your new Snakemake pipelines. There is a lot that can go wrong when writing a new workflow, and you’ll normally need several iterations to get things just right. One advantage of the Snakemake approach compared to regular scripts is that Snakemake fails fast when there is a problem, rather than ploughing on and potentially running junk calculations on partial or corrupted data. Another advantage is that when a step fails we can safely resume from where we left off, as we’ll see in the next episode.
Finally, edit the names in the Snakefile back to the correct version and re-run to confirm that all is well. Assure yourself that that the rules are still generic by processing the temp33_1 sample too:
For reference, this is a Snakefile incorporating the changes made in this episode.
- Try out commands on test files before adding them to the workflow
- You can build up the workflow in the order that makes sense to you, but always test as you go
- Use log outputs to capture the messages printed by programs as they run
- If a shell command exits with an error, or does not yield an expected output then Snakemake will regard that as a failure and stop the workflow
Content from How Snakemake plans its jobs
Last updated on 2025-02-25 | Edit this page
Overview
Questions
- How do I visualise a Snakemake workflow?
- How does Snakemake avoid unecessary work?
- How do I control what steps will be run?
Objectives
- View the DAG for our pipeline
- Understand the logic Snakemake uses when running and re-running jobs
For reference, this is the Snakefile you should have to start the episode.
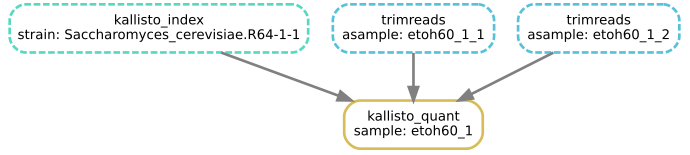
The DAG
You may have noticed that one of the messages Snakemake always prints is:
OUTPUT
Building DAG of jobs...A DAG is a Directed Acyclic Graph and it can be pictured like so:

The above DAG is based on our existing rules, and shows all the jobs Snakemake would run to trim, count and quantify the ref1 sample.
Note that:
- A rule can appear more than once, with different wildcards (a rule plus wildcard values defines a job)
- A rule (here, calculate_difference) may not be used at all, if it is not required for the target outputs
- The arrows show dependency ordering between jobs
- Snakemake can run the jobs in any order that doesn’t break dependency - for example kallisto_quant cannot run until both kallisto_index and trimreads have completed, but it may run before or after countreads
- This is a work list, not a flowchart, so there are no if/else decisions or loops - Snakemake runs every job in the DAG exactly once
- The DAG depends both on the Snakefile and on the requested target outputs, and the files already present
- When building the DAG, Snakemake does not look at the shell part of the rules at all - only when running the DAG will Snakemake check that the shell commands are working and producing the expected output files
How many jobs?
If we asked Snakemake to run kallisto_quant on all three of the reference samples (ref1, ref2, ref3), how many jobs would that be in total?
10 in total:
- 3 * kallisto_quant
- 6 * trimreads
- 1 * kallisto_index
- 0 * countreads
- 0 * calculate_difference
Snakemake is lazy, and laziness is good
For the last few episodes, we’ve told you to run Snakemake like this:
As a reminder, the -j1 flag tells Snakemake to run one
job at a time, and -p is to print out the shell commands
before running them.
The -F flag turns on forceall mode, and in
normal usage you don’t want this.
At the end of the last chapter, we generated some kallisto results by running:
Now try without the -F option. Assuming that the output
files are already created, you’ll see this:
BASH
$ snakemake -j1 -p kallisto.temp33_1/abundance.h5
Building DAG of jobs...
Nothing to be done.
Complete log: /home/zenmaster/data/yeast/.snakemake/log/2021-04-23T172441.519500.snakemake.log
In normal operation, Snakemake only runs a job if:
- A target file you explicitly requested to make is missing
- An intermediate file is missing and it is needed in the process of making a target file
- Snakemake can see an input file which is newer than an output file
- A rule definition or configuration has changed since the output file was created
The last of these relies on a ledger that Snakemake saves into the
.snakemake directory.
Let’s demonstrate each of these in turn, by altering some files and
re-running Snakemake without the -F option.
This just re-runs kallisto_quant - the final step.
“Nothing to be done” - some intermediate output is missing but Snakemake already has the file you are telling it to make, so it doesn’t worry.
The touch command is a standard Linux command which sets
the timestamp of the file, so now the transcriptome looks to Snakemake
as if it was just modified.
Snakemake sees that one of the input files used in the process of
producing kallisto.temp33_1/abundance.h5 is newer than the
existing output file, so it needs to run the kallisto index and
kallisto quant steps again. Of course, the kallisto
quant step needs the trimmed reads which we deleted earlier, so now
the trimming step is re-run also.
Explicitly telling Snakemake what to re-run
The default timestamp-based logic is really useful when you want to:
- Change or add some inputs to an existing analysis without re-processing everything
- Continue running a workflow that failed part-way
In most cases you can also rely on Snakemake to detect when you have edited a rule, but sometimes you need to be explicit, for example if you have updated an external script or changed a setting which Snakemake doesn’t see.
The -R flag allows you to explicitly tell Snakemake that
a rule has changed and that all outputs from that rule need to be
re-evaluated.
Note on -R
Due to a quirk of the way Snakemake parses command-line options, you
need to make sure there are options after the -R ...,
before the list of target outputs. If you don’t do this, Snakemake will
think that the target files are instead items to add to the
-R list, and then when building the DAG it will just try to
run the default rule.
The easiest way is to put the -p flag before the target
outputs. Then you can list multiple rules to re-run, and also multiple
targets, and Snakemake can tell which is which.
BASH
$ snakemake -j1 -R trimreads kallisto_index -p kallisto.temp33_1/abundance.h5 kallisto.temp33_2/abundance.h5The reason for using the -p flag specifically is that
you pretty much always want this option.
The -f flag specifies that the target outputs named on
the command line should always be regenerated, so you can use this to
explicitly re-make specific files.
This always re-runs kallisto_quant, regardless of whether
the output file is there already. For all intermediate outputs,
Snakemake applies the default timestamp-based logic. Contrast with
-F which runs the entire DAG every time.
Visualising the DAG
Snakemake can draw a picture of the DAG for you, if you run it like this:
Using the --dag option implicitly activates the
-n (dry-run) option so that Snakemake will not actually run
any jobs, it will just print the DAG and stop. Snakemake prints the DAG
in a text format so we use the gm command to make this into
a picture and show it on the screen.
Note on gm display
The gm command is provided by the GraphicsMagick toolkit. On
systems where gm will not display an image directly, you
may instead save it to a PNG file. You will need the dot
program from the GraphViz package
installed.
The boxes drawn with dotted lines indicate steps that are not to be run, as the output files are already present and newer than the input files.
Visualising the effect of the -R
and -f flags
Run kallisto_quant on the first of the
etoh60 samples, then use the --dag option
as shown above to check:
How many jobs will run if you ask again to create this output with no
-f,-For-Roptions?How many if you use the
-foption?How many if you use the
-R trimreadsoption?How many if you edit the Snakefile so that the
qual_thresholdfortrimreadsis “22”, rather than “20”?
This is a way to make the Kallisto result in the first place:
- This command should show four boxes, but all are dotted so no jobs are actually to be run.
The
-fflag re-runs only the job to create the output file, so in this case one box is solid, and only that job will run.With
-R trimreads, the two trimreads jobs will re-run, and Snakemake sees that this also requires re-running kallisto_quant, so the answer is 3.
If you see a message like the one below, it’s because you need to put
an option after trimreads or else Snakemake gets confused
about what are parameters of -R, and what things are
targets.
ERROR
WorkflowError:
Target rules may not contain wildcards.- Editing the Snakefile has the same effect as forcing the trimreads rule to re-run, so again there will be three jobs to be run from the DAG.
With older versions of Snakemake this would not be auto-detected, and
in fact you can see this behaviour if you remove the hidden
.snakemake directory. Now Snakemake has no memory of the
rule change so it will not re-run any jobs unless explicitly told
to.
Removing files to trigger reprocessing
In general, getting Snakemake to re-run things by removing files is a
bad idea, because it’s easy to forget about intermediate files that
actually contain stale results and need to be updated. Using the
-R flag is simpler and more reliable. If in doubt, and if
it will not be too time consuming, keep it simple and just use
-F to run the whole workflow from scratch.
For the opposite case where you want to avoid re-running particular
steps, see the ‑‑touch option of Snakemake mentioned later in the course.
- A job in Snakemake is a rule plus wildcard values (determined by working back from the requested output)
- Snakemake plans its work by arranging all the jobs into a DAG (directed acyclic graph)
- If output files already exist, Snakemake can skip parts of the DAG
- Snakemake compares file timestamps and a log of previous runs to determine what need regenerating
Content from Processing lists of inputs
Last updated on 2025-02-25 | Edit this page
Overview
Questions
- How do I define a default set of outputs for my Snakefile?
- How do I make rules which combine whole lists of files?
- How do I process all available input files at once?
Objectives
- Use Snakemake to process all our samples at once
- Make a summary of all read counts
For reference, this is the Snakefile you should have to start the episode. We didn’t modify it during the last episode.
Defining a list of samples to process
So far, we’ve told Snakemake what output files to generate by giving the names of the desired files on the command line. Often you want Snakemake to process all the available samples. How can we do this?
The yeast/reads directory contains results from three
conditions: ref, etoh60 and
temp33. There are three replicates for each condition.
There is minor inconsistency in the naming convention, as the
ref files do not have an underscore before the replicate
number. Consistent naming is important for Snakemake, so let’s fix up
the names before we go any further.
A good way to do this is by making symlinks, because that way you don’t lose sight of the original file names.
BASH
$ mv reads original_reads
$ mkdir reads
$ cd reads
$ ln -s ../original_reads/* .
$ rename -v -s ref ref_ *
$ cd ..File renaming
The rename command here is the one provided by Bioconda. Other Linux systems may have a different rename command installed by default.
Having harmonized the file names we’ll tell Snakemake about our conditions and replicates. To do this, we can define some lists as Snakemake global variables.
Global variables should be added before the rules in the Snakefile.
# Input conditions and replicates to process
CONDITIONS = ["ref", "etoh60", "temp33"]
REPLICATES = ["1", "2", "3"]- Unlike with variables in shell scripts, we can put spaces around the
=sign, but they are not mandatory. - The lists of quoted strings are enclosed in square brackets and comma-separated. If you know any Python you’ll recognise this as Python list syntax.
- A good convention is to use capitalized names for these variables, but this is not mandatory.
- Although these are referred to as variables, you can’t actually change the values once the workflow is running, so lists defined this way are more like constants.
Using a Snakemake rule to define a batch of outputs
We’ll add another rule to our Snakefile. This special target rule
will have an input section but no output or
shell sections (yet).
rule all_differences:
    input: expand("{cond}_{rep}_1.reads_removed.txt", cond=CONDITIONS, rep=REPLICATES)
The expand(...) function in this rule generates a list
of filenames, by taking the first thing in the parentheses as a template
and replacing cond with all the CONDITIONS
and {rep} with all the REPLICATES. Since there
are 3 of each, this will yield 9 combinations - ie. 9 files we want to
make.
This list goes into the input section of the rule. You might think that since these filenames are outputs that we want from our workflow they should go into the output section. However, remember that outputs of a rule are things the rule can make itself, and this rule doesn’t actually make anything. It’s just a placeholder for a bunch of filenames.
We now tell Snakemake to make all these files by using the target rule name on the command line:
Here, Snakemake sees that all_differences is the name of a
rule in the Snakefile, so rather than trying to make a file literally
named all_differences it looks at all the input files for
the rule and tries to make them. In this case, all of the inputs to
all_differences can be made by the
calculate_difference rule, and all of the inputs for those jobs
are made by trimreads and countreads. The resulting
workflow is the same as if we had typed out all 9 of the filenames on
the command line.
If you don’t specify a target rule name or any file names on the command line when running Snakemake, the default is to use the first rule in the Snakefile as the target. So if all_differences is defined at the top, before the other rules, you can simply say:
Rules as targets
Giving the name of a rule to Snakemake on the command line only works when that rule has no wildcards in the outputs, because Snakemake has no way to know what the desired wildcards might be. You will see the error “Target rules may not contain wildcards.” This can also happen when you don’t supply any explicit targets on the command line at all, and Snakemake tries to run the first rule defined in the Snakefile.
Counting all the reads
Check that the all_differences rule is working. Now adapt
the Snakefile so that it makes all the reads_removed.txt for
both of the pairs of reads (_1.fq and _2.fq).
So you should end up with 18 output files in total.
This will work.
# Input conditions and replicates to process
CONDITIONS = ["ref", "etoh60", "temp33"]
REPLICATES = ["1", "2", "3"]
READ_ENDS  = ["1", "2"]

# Rule to make all reads_removed.txt files at once
rule all_differences:
    input: expand("{cond}_{rep}_{end}.reads_removed.txt", cond=CONDITIONS, rep=REPLICATES, end=READ_ENDS)
Alternatively you can put the list directly into the
expand() function rather than declaring more variables. To
aid readability of the code it’s also possible to split the function
over more than one line, but note that this only works if you put a
newline after the input: line too.
# Input conditions and replicates to process
CONDITIONS = ["ref", "etoh60", "temp33"]
REPLICATES = ["1", "2", "3"]

# Rule to make all reads_removed.txt files at once
rule all_differences:
    input:
        expand( "{cond}_{rep}_{end}.reads_removed.txt", cond = CONDITIONS,
                                                        rep  = REPLICATES,
                                                        end  = READ_ENDS )
Rules that combine multiple inputs
Our all_differences rule is a rule which takes a list of
input files. The length of that list is not fixed by the rule, but can
change based on CONDITIONS and REPLICATES. If
we want to perform some combining operation on the whole list of files,
we can add output and shell sections to this
rule.
In typical bioinformatics workflows, the final steps will combine all the results together into some big report. For our final workflow we’ll be doing this with MultiQC, but as a simple first example, let’s just concatenate all the text files. In the shell this would be:
In the Snakemake rule we just say:
Within a rule definition you can combine named inputs and list inputs
- any named input can be list of files rather than just a single file.
When you use the {input.name} placeholder in the shell
command it will expand to the full list.
Combining the inputs of the all_differences rule
- Make it so that the all_differences rule concatenates all
the
.reads_removed.txtfiles into a single output file namedall_reads_removed.txt. - Adapt the rule further so that there are two outputs named
all_read1_removed.txtandall_read2_removed.txt, and the respective counts go into each.
Hint: you can put two commands into the shell part,
separated by a semicolon ;.
rule all_differences:
input:
expand( "{cond}_{rep}_{end}.reads_removed.txt", cond = CONDITIONS,
rep = REPLICATES,
end = READ_ENDS )
output:
"all_reads_removed.txt"
shell:
"cat {input} > {output}"And for the version with separate output files.
rule all_differences:
    input:
        read1 = expand( "{cond}_{rep}_1.reads_removed.txt", cond  = CONDITIONS,
                                                            rep   = REPLICATES ),
        read2 = expand( "{cond}_{rep}_2.reads_removed.txt", cond  = CONDITIONS,
                                                            rep   = REPLICATES ),
    output:
        read1 = "all_read1_removed.txt",
        read2 = "all_read2_removed.txt",
    shell:
        "cat {input.read1} > {output.read1} ; cat {input.read2} > {output.read2}"
This works, but may more elegantly be broken down into two rules, so
that once again the target rule has only input and no
outputs. There is a quirk where we need to put extra braces
around {{end}} in the place where this is a wildcard, and
not to be expanded out.
rule all_differences:
    input: expand("all_read{end}_removed.txt", end=["1","2"])

rule all_differences_per_end:
    input:
        expand( "{cond}_{rep}_{{end}}.reads_removed.txt", cond  = CONDITIONS,
                                                          rep   = REPLICATES )
    output:
        "all_read{end}_removed.txt"
    shell:
        "cat {input} > {output}"
To run any version of the rule:
Dynamically determining the inputs
In the shell we can match multiple filenames with glob
patterns like original_reads/* or
reads/ref?_?.fq. Snakemake allows you to do something
similar with the glob_wildcards() function, so we’ll use
this in our Snakefile.
CONDITIONS = glob_wildcards("reads/{condition}_1_1.fq").condition
print("Conditions are: ", CONDITIONS)
Here, the list of conditions is captured from the files seen in the
reads directory. The pattern used in glob_wildcards() looks
much like the input and output parts of rules, with a wildcard in {curly
brackets}, but here the pattern is being used to search for matching
files. We’re only looking for read 1 of replicate 1 so this will return
just three matches
Rather than getting the full file names, the function yields the
values of the wildcard, which we can assign directly to a list. The
print() statement will print out the value of
CONDITIONS when the Snakefile is run (including dry-run
mode, activated with the -n option as mentioned in Episode 2), and reassures us that the
list really is the same as before.
BASH
$ snakemake -j1 -F -n -p all_differences
Conditions are:  ['etoh60', 'temp33', 'ref']
Building DAG of jobs...
Job stats:
job                        count
-----------------------  -------
all_differences                1
all_differences_per_end        2
calculate_difference          18
countreads                    36
trimreads                     18
total                         75
...
Using glob_wildcards() gets a little more tricky when
you need a more complex match. To refine the match we can quickly test
out results by activating the Python interpreter. This saves editing the
Snakefile and running Snakemake just to see what
glob_wildcards() will match.
PYTHON
$ python3
>>> from snakemake.io import glob_wildcards, expand
>>> glob_wildcards("reads/{condition}_1_1.fq")
Wildcards(condition=['etoh60', 'temp33', 'ref'])
This is the result we got before. So far, so good.
The Python interpreter
The Python interpreter is like a special shell for Python commands, and is a familiar to anyone who has learned Python. Because Snakemake functions are actually Python functions they can be run from the interpreter after being imported.
Note that >>> is the Python interpreter prompt,
and not part of the command to be typed. You can exit back to the
regular shell prompt by typing exit(). If you do exit and
then restart the interpreter, you will need to repeat the
import line.
‘Globbing’ the list of samples
Staying in the Python interpreter, use glob_wildcards()
to list the names of all nine samples, that is the three replicates of
each condition.
‘Globbing’ the list of samples (continued)
Still in the Python interpreter, use the expand()
function in combination with the glob_wildcards() to make a
list of all the count files, and then all the kallisto_quant
output files that would be generated for all the nine samples.
Remember you can save the result of glob_wildcards() to
a variable - this works the same way in the Python interpreter as it
does in the Snakefile.
Glob with multiple wildcards
If there are two or more wildcards in the glob pattern, dealing with the result becomes a little more tricky, but it does work.
Here is one way to re-combine two wildcards using
expand() and zip (demonstrated in the Python
interpreter as above).
PYTHON
$ python3
>>> from snakemake.io import glob_wildcards, expand
>>> DOUBLE_MATCH = glob_wildcards( "reads/{condition}_{samplenum}_1.fq" )
>>> DOUBLE_MATCH
Wildcards(condition=['temp33', 'temp33', 'etoh60', 'etoh60', 'ref', 'temp33', 'etoh60', 'ref', 'ref'],
          samplenum=['3', '2', '1', '3', '2', '1', '2', '1', '3'])
>>> SAMPLES = expand(
...     "{condition}_{samplenum}",
...     zip,
...     condition = DOUBLE_MATCH.condition,
...     samplenum = DOUBLE_MATCH.samplenum )
>>> SAMPLES
['temp33_3', 'temp33_2', 'etoh60_1', 'etoh60_3', 'ref_2', 'temp33_1', 'etoh60_2', 'ref_1', 'ref_3']
>>> sorted(SAMPLES)
['etoh60_1', 'etoh60_2', 'etoh60_3', 'ref_1', 'ref_2', 'ref_3', 'temp33_1', 'temp33_2', 'temp33_3']Rules that make multiple outputs
If we can have rules that combine lists of files, can we do the opposite and have a rule that produces a list of outputs?
The answer is yes, but the situation is not completely symmetrical. Remember that Snakemake works out the full list of input and output files to every job before it runs a single job in the workflow. For a combining step, Snakemake will know how many samples/replicates are being combined from the start. For a splitting step, it may or may not be possible to predict the number of output files in advance. For cases where you really do need to handle a dynamic list of outputs, Snakemake has things called checkpoint rules.
In practise these are very rarely needed, so we’ll not be covering them here in the course.
For reference, this is a Snakefile incorporating the changes made in this episode.
- Rename your input files if necessary to maintain consistent naming
- List the things you want to proces as global variables, or discover
input files with
glob_wildcards() - Use the
expand()function to generate lists of filenames you want to combine - These functions can be tested in the Python interpreter
- Any
{input}to a rule can be a variable-length list - (But variable lists of outputs are trickier and rarely needed)
Content from Handling awkward programs
Last updated on 2024-10-07 | Edit this page
Overview
Questions
- How do I handle tools which don’t let me specify output file names?
- How do I define a rule where the output is a directory?
Objectives
- Add the FastQC tool to the pipeline
- Understand some different choices available when defining a rule
- Learn about the
directory()function - Add multiple command lines to the
shellsection of a rule
For reference, this is the Snakefile you should have to start the episode.
Introducing FastQC
FastQC is a popular tool for scanning FASTQ files and producing a selection of quality plots. It’s “fast” in that it runs quickly, and also in that you can normally use the default options so there is no configuration needed.
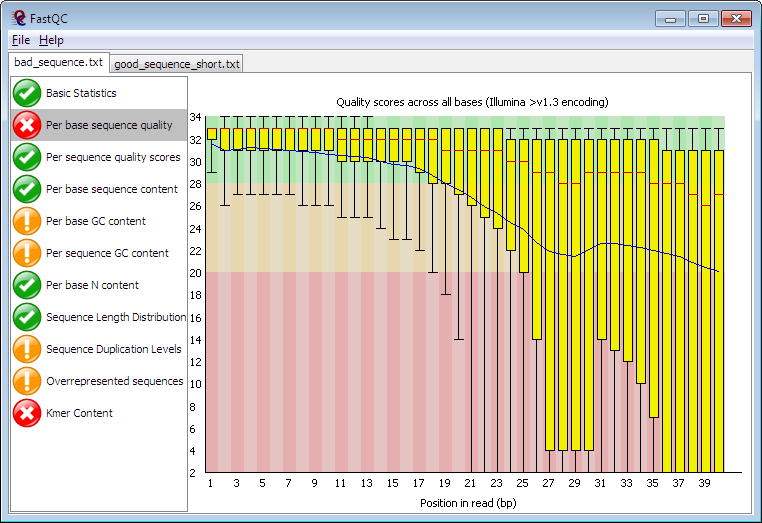
The program can be run interactively or in batch mode, where it saves out results as an HTML file plus a ZIP file. We’ll obviously need to use the batch mode to include it as part of our workflow, and we’ll see shortly that this presents a minor problem.
In general, real bioinformatics programs like FastQC can have quirks like:
- Not allowing you to specify input or output file names
- Outputting a whole directory of files
- Creating temporary files in various places
- Not supporting robust error handling
With a little care we can handle all these problems while still keeping our workflow tidy.
Adding a FastQC rule
We’ll first run FastQC on a single input file and see what is produced.
BASH
$ fastqc reads/ref_1_1.fq
$ ls -ltr reads
...
-rw-r--r-- 1 zenmaster  users   464852 Jun  9 14:31 ref_1_1_fastqc.zip
-rw-r--r-- 1 zenmaster  users   654810 Jun  9 14:31 ref_1_1_fastqc.html
It’s possible to supply multiple input files, but the resulting
output is exactly the same as if processing the files one at a time. Two
files are produced for each FASTQ file, and these files appear in the
same directory as the input file. The fastqc command does
not let us choose the output filenames, but we can set an alternative
output directory.
BASH
$ fastqc --help
...
   -o --outdir     Create all output files in the specified output directory.
                   Please note that this directory must exist as the program
                   will not create it.  If this option is not set then the
                   output file for each sequence file is created in the same
                   directory as the sequence file which was processed.
...
For the countreads rule we wrote earlier (see episode 4), we chose our preferred
output file name pattern so as to allow us to effectively link rules.
This gives us a rule that can count both trimmed and
untrimmed reads.
# Our existing countreads rule, for reference...
rule countreads:
    output: "{indir}.{myfile}.fq.count"
    input:  "{indir}/{myfile}.fq"
    shell:
        "echo $(( $(wc -l <{input}) / 4 )) > {output}"
To do the same with FastQC, to report on both the trimmed and untrimmed reads, we have various options:
- Work with the default file names produced by FastQC and leave the reports in the same directory with the FASTQ files.
- Make the outputs in a new directory named, eg. “reads.fastqc.ref_1_1/” (similar to what we did with Kallisto).
- Do this, but tell Snakemake that the directory itself is the output.
- Force our preferred naming convention by renaming the FastQC output files within the rule.
We’ll try all four, and see where this gets us.
Option 1: Working with the default FastQC output files
Adding a FastQC rule using the default output file names
Fill in the ??? to make a working rule for FastQC where
indir may be “reads” or “trimmed”. Do not change the shell
command or input pattern at all. Remember FastQC always makes two output
files, so add two named outputs.
rule fastqc:
    output:
        ???
    input:  "{indir}/{myfile}.fq"
    shell:
"fastqc {input}"Since the shell command is not to be changed, the output
names will be dictated by FastQC as we saw when running the command
directly in the terminal.
rule fastqc:
    output:
        html = "{indir}/{myfile}_fastqc.html",
        zip  = "{indir}/{myfile}_fastqc.zip",
    input:  "{indir}/{myfile}.fq"
    shell:
        "fastqc {input}"
This rule contains wildcards, so in order to run it you specify one or more target output files:
This rule is fine, but maybe we don’t want to put the reports in with the sequences. As a general principle, when writing Snakemake rules, we want to be in charge of output file names. FastQC lets us specify the output directory, so we can use that…
Option 2: Using the default output filenames in a new directory
A FastQC rule where the output files go into a new directory
Modify the rule so that the output files go into a new directory.
This will be very similar to the rule for kallisto quant
added in episode 3.
For example, when running on the file “trimmed/ref_1_1.fq” the outputs should be
OUTPUT
trimmed.fastqc.ref_1_1/ref_1_1_fastqc.html
trimmed.fastqc.ref_1_1/ref_1_1_fastqc.zipThis involves using the {myfile} wildcard twice and then constructing
the output directory name to place in the -o option to
fastqc.
rule fastqc:
    output:
      html = "{indir}.fastqc.{myfile}/{myfile}_fastqc.html",
      zip  = "{indir}.fastqc.{myfile}/{myfile}_fastqc.zip",
    input: "{indir}/{myfile}.fq"
    shell:
        "fastqc -o {wildcards.indir}.fastqc.{wildcards.myfile} {input}"
Option 3: Using a directory() output
Our next option is to tell Snakemake not to worry about the individual files at all, and just say that the output of the rule is a whole directory. This makes the rule definition simpler.
We’ll amend the fastqc rule like so:
rule fastqc:
    output: directory("{indir}.fastqc.{myfile}")
    input:  "{indir}/{myfile}.fq"
    shell:
"fastqc -o {output} {input}"Only use directory() on outputs,
not inputs
You only use the directory() declaration for outputs.
Any input to a rule may be a directory without the need for any special
syntax.
On running this, we get an error.
BASH
$ snakemake -j1 -p reads.fastqc.ref_1_1
...
Specified output directory 'reads.fastqc.ref_1_1' does not exist
...
This error is being printed by FastQC. FastQC requires that the
output directory must exist. (Other programs might insist that the
output directory does not already exist.) The error can be
rectified by making the directory explicitly in the shell
code.
rule fastqc:
    output: directory("{indir}.fastqc.{myfile}")
    input:  "{indir}/{myfile}.fq"
    shell:
"mkdir {output} ; fastqc -o {output} {input}"The rationale for making output directories
Remember that in most cases it is not necessary to manually create
directories because Snakemake will auto-create the directory for every
output file listed by a rule. When using a directory()
output, Snakemake will not create the directory itself but most
applications will make the directory for you. FastQC is an exception.
The best approach is to only add a mkdir command if you
first test the rule without it and see an error.
The modified rule works because the shell part of the
rule can contain a whole script, with multiple commands to be run. Above
we used a semicolon to split the commands on one line. For putting
multiple lines into a shell section there is a special
quoting syntax.
rule fastqc:
    output: directory("{indir}.fastqc.{myfile}")
    input:  "{indir}/{myfile}.fq"
    shell:
        """mkdir {output}
           fastqc -o {output} {input}
        """
The “triple quoting” syntax comes from Python. Not only does it allow
multiple lines to be added within the quotes but it also allows you to
embed both single and double quotes into the shell commands. For a
further discussion of string quoting and a way to disable the
interpretation of “backslash escapes” like \n and
\t see the extra
episode on quoting
This rule is also fine, but because the individual files are not explicitly named as outputs we may have problems chaining later rules. Also consider that some applications won’t give you any control at all over the output filenames. The most powerful solution is to use shell commands to move and/or rename the files to exactly the names you want.
Option 4: Insisting on our own file names
Fixing FastQC to use our own output file names
Complete the rule below so that the output filenames are correctly
produced. You will need to add extra commands to the shell
part after running fastqc. Do not alter the
output or input parts of the rule.
rule fastqc:
    output:
        html = "{indir}.{myfile}_fastqc.html",
        zip  = "{indir}.{myfile}_fastqc.zip"
    input:  "{indir}/{myfile}.fq"
    shell:
        """???
"""This is one solution, using -o . to tell FastQC to
produce the files in the current directory, then explicitly renaming
them to match the declared rule outputs. Remember that, after Snakemake
runs all the commands in the shell block, it checks to see
that all the expected output files are present, but within
the block you can run any commands and make any files you like.
rule fastqc:
    output:
        html = "{indir}.{myfile}_fastqc.html",
        zip  = "{indir}.{myfile}_fastqc.zip"
    input:  "{indir}/{myfile}.fq"
    shell:
        """fastqc -o . {input}
           mv {wildcards.myfile}_fastqc.html {output.html}
           mv {wildcards.myfile}_fastqc.zip  {output.zip}
"""One problem with making intermediate outputs
There is actually a problem with the above solution which only starts
to matter when we allow Snakemake to run multiple jobs in parallel.
Right now we are always using -j1, but if we used, eg.
-j2, then potentially Snakemake may try to make
“reads.ref_1_1_fastqc.html” and “trimmed.ref_1_1_fastqc.html” in
parallel, and both instances would be trying to write to the same
temporary files at the same time. Snakemake has an elegant solution to
this, in the form of shadow rules, but we’re getting ahead
of ourselves. For now we’re running one job at a time, and this will
work.
Altering the Kallisto rule to have a directory()
output
We saw above that the output of a rule can be a directory and saw the
directory() function which declares this. If you remember
the rule for kallisto quant you may be thinking that this
could have been written with the whole directory as the output, and you
would be right.
# Existing rule for kallisto_quant
rule kallisto_quant:
    output:
        h5   = "kallisto.{sample}/abundance.h5",
        tsv  = "kallisto.{sample}/abundance.tsv",
        json = "kallisto.{sample}/run_info.json",
    ...

# Alternative rule with directory() output
rule kallisto_quant:
    output:  directory("kallisto.{sample}")
    ...
Make the change in your Snakefile now. In other workflows this might not be the right approach but in this case it works fine and makes the Snakefile neater. It will also make sense in the next chapter where we add the remaining rules and finish the workflow.
For reference, this is a Snakefile incorporating the changes made in this episode.
- Different bioinformatics tools will have different quirks
- If programs limit your options for choosing input and output filenames, you have several ways to deal with this
- Use triple-quote syntax to make longer shell scripts with multiple commands
Content from Finishing the basic workflow
Last updated on 2025-02-25 | Edit this page
Overview
Questions
- What does the full sample workflow look like?
- How can we report some initial results from this analysis?
Objectives
- Finish the sample workflow to produce a final MultiQC report
- See more ways to handle awkward software by adding extra setup shell commands
For reference, this is the Snakefile you should have to start the episode.
We’ve seen how to link rules in a pipeline and how to merge all the
results at the final step. This is the basic pattern for many analysis
workflows. For simplicity, in episode 6, we just used the
cat command to combine all the .txt files but
now we’ll use MultiQC to combine the results from Kallisto and
FastQC into a single report for all samples. We’ll also add in an
alternative quantification tool called Salmon and this will
complete the pipeline.
The full workflow we are constructing
- fastq_quality_trimmer is part of the FastX toolkit and removes low-quality basecalls from the raw reads. We first used it in episode 2.
- FastQC calculates a variety of metrics on a FASTQ file and produces an HTML report and a ZIP file. We introduced this in episode 7.
- Kallisto performs pseudo-alignment of the reads to a reference transcriptome and produces a table of transcript abundance. We first used it in episode 4.
- Salmon is a alternative to Kallisto, using a different transcript quantification algorithm. We’ve not used it yet.
- MultiQC combines the reports from various tools, including FastQC, Kallisto, and Salmon, into a single HTML report over all samples. This is by no means a full RNA-Seq analysis report but today it completes our Snakemake pipeline.

At this point we have everything we need, in terms of Snakemake knowledge, to add the two remaining tools and complete the Snakefile. As with FastQC, some quirks in the way the new tools work will need to be accounted for.
Adding Salmon as an alternative to Kallisto
At the end of the previous episode we modified the kallisto rule by declaring that the output of the rule was a directory, rather than explicitly listing the three files that Kallisto writes in that directory. You should ensure that you are working with this new version of the kallisto rule as it will be a template for adding a salmon rule.
Adding Salmon as an alternative to Kallisto
An alternative application for transcript quantification is Salmon. The procedure is virtually identical, to Kallisto, having an indexing step and a quantification step. Note that in real usage you are advised to prepare and add decoy sequences to the transcriptome index, but for the purposes of this tutorial we’ll just keep things as simple as possible.
Based upon the following command templates:
BASH
$ salmon index -t <transcriptome as fasta> -i <index name> -k 31
$ salmon quant -i <index name> -l A -1 <fastq1> -2 <fastq2> --validateMappings -o <output path>
Add a pair of rules to index and quantify the reads with Salmon. Note that:
- Unlike Kallisto, the index produced by Salmon is a directory of files, not a single file - so both of these new rules will produce a directory as output.
- As noted in the last episode, you only need the
directory()marker on the outputs of rules, not the inputs.
rule salmon_quant:
    output: directory("salmon.{sample}")
    input:
        index = "Saccharomyces_cerevisiae.R64-1-1.salmon_index",
        fq1   = "trimmed/{sample}_1.fq",
        fq2   = "trimmed/{sample}_2.fq",
    shell:
        "salmon quant -i {input.index} -l A -1 {input.fq1} -2 {input.fq2} --validateMappings -o {output}"

rule salmon_index:
    output:
        idx = directory("{strain}.salmon_index")
    input:
        fasta = "transcriptome/{strain}.cdna.all.fa.gz"
    shell:
        "salmon index -t {input.fasta} -i {output.idx} -k 31"
If you copied the kallisto_index rule and logged the output of salmon_index to a file this is fine. Just make sure when copying and pasting that you change all the parts that need to change!
Combining the outputs with MultiQC
MultiQC scans for analysis report files in a given directory and all subdirectories, then makes a report of everything it finds. It knows about FastQC, Salmon and Kallisto outputs so we should be able to compile a report on all these. To try this out and scan the current directory, simply run:
Adding a MultiQC rule
Earlier, in episode 6, we made a basic summary-type rule called all_differences. Now make a multiqc rule that gathers up all the FastQC, Salmon and Kallisto reports.
Considerations:
- Your rule is going to have several named inputs, and these inputs
will be lists of files generated with
expand()functions. - Ensure that both kallisto_quant and salmon_quant are run on all 9 samples, that is all three repeats of all three conditions.
- Run FastQC on the untrimmed reads only, and note that MultiQC
specifically uses the
.zipfiles for input, not the.html. - Since multiqc scans for input files, the input names don’t have to
be explicitly mentioned in the
shellpart.
rule multiqc:
    output: directory('multiqc_out')
    input:
        salmon =   expand("salmon.{cond}_{rep}", cond=CONDITIONS, rep=REPLICATES),
        kallisto = expand("kallisto.{cond}_{rep}", cond=CONDITIONS, rep=REPLICATES),
        fastqc =   expand("reads.{cond}_{rep}_{end}_fastqc.zip", cond=CONDITIONS, rep=REPLICATES, end=["1","2"]),
    shell:
        "multiqc . -o multiqc_out"
Since the rule has no wildcards, you can run it by giving either the rule name or the output directory name as a target.
Fixing Kallisto
You may notice that MultiQC is not capturing any Kallisto output when making the reports. The reason for this is given in the MultiQC manual here:
Note - MultiQC parses the standard out from Kallisto, not any of its output files (abundance.h5, abundance.tsv, and run_info.json). As such, you must capture the Kallisto output to a file when running it for use with MultiQC.
Fix the Snakefile so that Kallisto terminal output is redirected to a file and can be collected by MultiQC.
-
Hint 1: The manual above is not quite right - you need to
capture both stdout and stderr, so use
>&rather than>, as we did with the indexing step. - Hint 2: MultiQC does not mind what you call the file, so choose your own sensible name.
# Kallisto quantification of one sample, with log capture.
rule kallisto_quant:
    output: directory("kallisto.{sample}")
    input:
        index = "Saccharomyces_cerevisiae.R64-1-1.kallisto_index",
        fq1   = "trimmed/{sample}_1.fq",
        fq2   = "trimmed/{sample}_2.fq",
    shell:
        """mkdir {output}
           kallisto quant -i {input.index} -o {output} {input.fq1} {input.fq2} >& {output}/kallisto_quant.log
        """
There are several perfectly good ways of structuring this, so don’t worry if your answer is different.
A gotcha with the above version is that the output directory needs to
be created before kallisto quant is run, much like with FastQC.
Remember that Snakemake deletes any existing outputs, including outputs
that are directories, before the job is run, and while Kallisto will
create the directory for you this is too late for the shell to make the
log file and without the mkdir command it will report “No
such file or directory”.
Another option is to make the log file outside of the directory, or stick with declaring the individual files as outputs, as when we first made the rule, in which case the directory will be made by Snakemake. It’s also possible to declare both the directory and a file within that directory as separate outputs, which is unusual but may be a good approach here.
Making the MultiQC rule more robust
Because MultiQC scans for suitable input rather than taking an explicit list of files, there is a risk that it picks up unwanted reports if you leave old files sitting in the directory. To make the rule fully explicit, one idea is to make a temporary directory and symlink all the files into it, and then tell MultiQC to look in there. Amend the multiqc rule so it does this.
-
Hint 1: When making links, use
ln -snr -t <target_dir> <src>to avoid link relativity issues. - Hint 2: If you feel that tweaking some other rules would make this easier, feel free to do that.
This solution will work with the version of kallisto_quant in the solution above.
rule multiqc:
    output:
        mqc_out = directory('multiqc_out'),
        mqc_in  = directory('multiqc_in'),
    input:
        salmon =   expand("salmon.{cond}_{rep}", cond=CONDITIONS, rep=REPLICATES),
        kallisto = expand("kallisto.{cond}_{rep}", cond=CONDITIONS, rep=REPLICATES),
        fastqc =   expand("reads.{cond}_{rep}_{end}_fastqc.zip", cond=CONDITIONS, rep=REPLICATES, end=["1","2"]),
    shell:
        """mkdir {output.mqc_in}
           ln -snr -t {output.mqc_in} {input}
           multiqc {output.mqc_in} -o {output.mqc_out}
        """
To see the actual MultiQC report, open the file multiqc_out/multiqc_report.html in a web browser. You can do this directly from the command line, assuming you have a default browser configured.
On Linux environments:
For MacOS:
The report has a few issues, but we’ll not get distracted by the details of how to configure MultiQC to resolve them.
Use Snakemake Wrappers to handle your awkward programs
In the last two chapters we’ve shown some tactics for incorporating tools into workflows using standard shell rules, but given how commonly these pieces of software are used there is no point in you, as a workflow author, having to re-invent these fixes each time. It’s easier to copy a working rule from an existing workflow. In fact, Snakemake provides something a little more sophisticated in the form of the Snakemake wrappers collection.
Using a wrapper, instead of writing your own shell code, allows you to apply a best-practise approach, supported by the Snakemake developer community, for a large number of common tools. There are additional advantages, like integration with Bioconda (see episode 11).
You will see that wrappers are available for several of the tools used in this workflow. We will not cover the details here in this course, but for reference we provide an equivalent Snakefile using the four available wrappers to make the same MultiQC report.
Converting the workflow to use wrappers was mostly straightforward, but here are some caveats:
The wrappers are designed for the specific versions of the tools specified in their Conda requirements. It took some trial an error to find the right version of the Kallisto wrapper to work with our older version of Kallisto (which was chosen for CPU compatibility).
All tool wrappers have sample code, but it’s not necessarily obvious what you may change (normally any wildcard names) and what you can’t (input and output names).
Some wrappers use lists of inputs and outputs while others use named inputs and outputs. This course has urged that outputs should always be named, but with wrappers you as the user must use whatever setup the wrapper used.
For reference, this is a Snakefile incorporating the changes made in this episode. You may now proceed to any later episode in the lesson using this workflow as a starting point.
- Once a workflow is complete and working, there will still be room for refinement
- This completes the introduction to the fundamentals of Snakemake
Content from Configuring workflows
Last updated on 2025-02-25 | Edit this page
Overview
Questions
- How do I separate my rules from my configuration?
Objectives
- Add parameters to rules
- Use configuration files and command line options to set the parameters
For reference, this is the final Snakefile from episodes 1 to 8 you may use to start this episode.
Adding parameters (params) to rules
So far, we’ve written rules with input,
output and shell parts. Another useful section
you can add to a rule is params.
Consider the “trimreads” rule we defined earlier in the course.
rule trimreads:
    output: "trimmed/{myfile}.fq"
    input:  "reads/{myfile}.fq"
    shell:
        "fastq_quality_trimmer -t 20 -l 100 -o {output} <{input}"
Can you remember what the -t 20 and -l 100
parameters do without referring back to the manual? Probably not! Adding
comments in the Snakefile would certainly help, but we can also make
important settings into parameters.
rule trimreads:
    output: "trimmed/{myfile}.fq"
    input:  "reads/{myfile}.fq"
    params:
        qual_threshold = "20",
        min_length     = "100",
    shell:
        "fastq_quality_trimmer -t {params.qual_threshold} -l {params.min_length} -o {output} <{input}"
Now it is a little clearer what these numbers mean. Use of parameters doesn’t give you extra functionality but it is good practise put settings like these into parameters as it makes the whole rule more readable.
Adding a parameter to the
salmon_index rule
Modify the existing salmon_index rule so that the -k
setting (k-mer length) is a parameter.
Change the length to 29 and re-build the index with the amended rule.
rule salmon_index:
    output:
        idx = directory("{strain}.salmon_index")
    input:
        fasta = "transcriptome/{strain}.cdna.all.fa.gz"
    params:
        kmer_len = "29"
    shell:
"salmon index -t {input.fasta} -i {output.idx} -k {params.kmer_len}"Notes:
- You can choose a different parameter name, but it must be a valid identifier - no spaces or hyphens.
- Changing the parameters doesn’t automatically trigger Snakemake to
re-run the rule so you need to use
-f(or-Ror-F) to force the job to be re-run (but, as mentioned in episode 5, this behaviour is changed in recent Snakemake versions).
Making Snakefiles configurable
It’s good practise to break out parameters that you intend to change into a separate file. That way you can re-run the pipeline on new input data, or with alternative settings, but you don’t need to edit the Snakefile itself.
We’ll save the following lines into a file named config.yaml.
salmon_kmer_len: "31"
trimreads_qual_threshold: "20"
trimreads_min_length: "100"
This file is in YAML format. This format allows you to capture complex data structures but we’ll just use it to store some name+value pairs. We can then reference these values within the Snakefile via the config object.
rule trimreads:
    output: "trimmed/{myfile}.fq"
    input:  "reads/{myfile}.fq"
    params:
        qual_threshold = config["trimreads_qual_threshold"],
        min_length     = config.get("trimreads_min_length", "100"),
    shell:
        "fastq_quality_trimmer -t {params.qual_threshold} -l {params.min_length} -o {output} <{input}"
In the above example, the trimreads_qual_threshold value must be supplied in the config, but the trimreads_min_length can be omitted, and then the default of “100” will be used.
If you are a Python programmer you’ll recognise the syntax here. If
not, then just take note that the first form uses square
brackets and the other uses .get(...) with regular
brackets. Both the config entry name and the default value should
be in quotes.
Using config settings with params
Strictly speaking, you don’t have to use config in conjunction with params like this, but it’s normally a good idea to do so.
The final step is to tell Snakemake about your config file, by referencing it on the command line:
Making the parameter of a rule configurable
Fix the salmon_index rule to use
salmon_kmer_len as in the config file sample above. Use a
default of “29” if no config setting is supplied.
Run Snakemake in dry run mode (-n) to check
that this is working as expected.
Rule is as before, aside from:
params:
    kmer_len = config.get("salmon_kmer_len", "29")
If you run Snakemake with the -n and -p
flags and referencing the config file, you should see that the command
being printed has the expected value of 31.
Note that if you try to run Snakemake with no config file you will now get a KeyError regarding trimreads_qual_threshold. Even though you are not using the trimreads rule, Snakemake needs a setting for all mandatory parameters.
Before proceeding, we’ll tweak the Snakefile in a couple of ways:
- Set a default
configfileoption so we don’t need to type it on every command line. - Get Snakemake to print out the config whenever it runs.
Add the following lines right at the top of the Snakefile.
configfile: "config.yaml"
print("Config is: ", config)
Finally, as well as the --configfile option to Snakemake
there is the --config option which sets individual
configuration parameters.
BASH
$ snakemake --configfile=config.yaml --config salmon_kmer_len=23 -p -nf Saccharomyces_cerevisiae.R64-1-1.salmon_index/This is all getting quite complex, so in summary:
- Snakemake loads any
configfile:set in the Snakefile. You should put this right at the top. - Snakemake loads the
--configfilesupplied on the command line, which overrides any values in the one named in the Snakefile. - Individual
--configitems on the command line always take precedence over settings in the config file. - You can set multiple
--configvalues on the command line and the list ends when there is another parameter, in this case-p. - Use the
config.get("item_name", "default_val")syntax to supply a default value which takes lowest precedence. - Use
config["item_name"]syntax to have a mandatory configuration option.
Making the conditions and replicates into configurable lists
Modify the Snakefile and config.yaml so that you are setting the CONDITIONS and REPLICATES in the config file. Lists in YAML use the same syntax as Python, with square brackets and commas, so you can copy the lists you already have. Note that you’re not expected to modify any rules here.
Re-run the workflow to make a report on just replicates 2 and 3. Check the MultiQC report to see that it really does have just these replicates in there.
In config.yaml add the lines:
conditions: ["etoh60", "temp33", "ref"]
replicates: ["1", "2", "3"]
In the Snakefile we can reference the config while setting the global variables. There are no params to add because these settings are altering the selection of jobs to be added to the DAG, rather than just the shell commands.
CONDITIONS = config["conditions"]
REPLICATES = config["replicates"]
And for the final part we can either edit the config.yaml or override on the command line:
Note that we need to re-run the final report, but only this, so only
-f is necessary. If you find that replicate 1 is still in
you report, make sure you are using the final version of the
multiqc rule from the previous episode, that symlinks the
inputs into a multiqc_in directory.
For reference, this is a Snakefile incorporating the changes made in this episode.
To run it, you need to save out this file to the same directory.
- Break out significant options into rule parameters
- Use a YAML config file to separate your configuration from your workflow logic
- Decide if different config items should be mandatory or else have a default
- Reference the config file in your Snakefile or else on the command
line with
--configfile - Override or add config values using
--config name1=value1 name2=value2and end the list with a new parameter, eg.-p
Content from Optimising workflow performance
Last updated on 2024-10-07 | Edit this page
Overview
Questions
- What compute resources are available on my system?
- How do I define jobs with more than one thread?
- How do I measure the compute resources being used by a workflow?
- How do I run my workflow steps in parallel?
Objectives
- Understand CPU, RAM and I/O bottlenecks
- Understand the threads declaration
- Use standard Linux tools to look at resource usage
For reference, this is the final Snakefile from episodes 1 to 8 you may use to start this episode.
Processes, threads and processors
Some definitions:
- Process - A running program (in our case, each Snakemake job can be considered one process)
- Threads - Each process has one or more threads which run in parallel
- Processor - Your computer has multiple CPU cores or processors, each of which can run one thread at a time
These definitions are a little simplified, but fine for our needs. The operating system kernel shares out threads among processors:
- Having fewer threads than processors means you are not fully using all your CPU cores
- Having more threads than processors means threads have to “timeslice” on a core which is generally suboptimal
If you tell Snakemake how many threads each rule will use, and how many cores you have available, it will start jobs in parallel to use all your cores. In the diagram below, five jobs are ready to run and there are four system cores.

Listing the resources your Linux machine
Find out how many CPU cores you have on your machine with the
lscpu command.
Likewise find out the amount of RAM available:
And finally disk space, on the current partition:
(or df -h without the . to show all
partitions)
Parallel jobs in Snakemake
You may want to see the relevant part of the Snakemake documentation.
We’ll force all the trimming and kallisto steps to re-run by using
the -F flag to Snakemake and time the whole run using the standard
/usr/bin/time -v command. You have to type the command like
this because time is a built-in command in BASH which takes
precedence, so eg:
Measuring how concurrency affects execution time
What is the wallclock time reported by the above command? We’ll work out the average for the whole class, or if you are working through the material on your own repeat the measurement three times to get your own average.
Now change the Snakemake concurrency option to -j2 and
then -j4.
- How does the total execution time change?
- What factors do you think limit the power of this setting to reduce the execution time?
The time will vary depending on the system configuration but
somewhere around 30 seconds is expected, and this should reduce to
around 25 secs with -j2 but higher -j will
produce diminishing returns.
Things that may limit the effectiveness of parallel execution include:
- The number of processors in the machine
- The number of jobs in the DAG which are independent and can therefore be run in parallel
- The existence of single long-running jobs like kallisto_index
- The amount of RAM in the machine
- The speed at which data can be read from and written to disk
There are a few gotchas to bear in mind when using parallel execution:
- Parallel jobs will use more RAM. If you run out then either your OS will swap data to disk, or a process will crash
- Parallel jobs may trip over each other if they try to write to the
same filename at the same time (this can happen with temporary files,
and in fact is a problem with our current
fastqcrule definition) - The on-screen output from parallel jobs will be jumbled, so save any output to log files instead
Multi-thread rules in Snakemake
In the diagram at the top, we showed jobs with 2 and 8 threads. These
are defined by adding a threads: part to the rule
definition. We could do this for the kallisto_quant rule:
rule kallisto_quant:
    output:
        outdir = directory("kallisto.{sample}"),
    input:
        index = "Saccharomyces_cerevisiae.R64-1-1.kallisto_index",
        fq1   = "trimmed/{sample}_1.fq",
        fq2   = "trimmed/{sample}_2.fq",
    threads: 4
    shell:
        "kallisto quant -t {threads} -i {input.index} -o {output.outdir} {input.fq1} {input.fq2}"
You should explicitly use threads: 4 rather than
params: threads = "4" because Snakemake considers the
number of threads when scheduling jobs. Also, if the number of threads
requested for a rule is less than the number of available processors
then Snakemake will use the lower number.
We also added -t {threads} to the shell command. This
only works for programs which allow you to specify the number of threads
as a command-line option, but this applies to a lot of different
bioinformatics tools.
Getting other programs to run with multiple threads
Find out how to set the number of threads for our salmon_quant and fastqc jobs. Which of the options below would need to be added to the shell command in each case?
-t {threads}-p {threads}-num_threads {threads}- multi-threaded mode is not supported
Hint: use salmon quant --help-alignment and
fastqc --help, or search the online documentation.
Make the corresponding changes to the Snakefile.
For salmon_quant, -p {threads} or equivalently
--threads {threads} will work.
For fastqc, it may look like -t {threads} is
good but this only sets “the number of files which can be processed
simultaneously”, and the rule we have only processes a single file per
job. So in fact the answer is that, for our purposes, multi-threading is
unsupported.
Fine-grained profiling
Rather than timing the entire workflow, we can ask Snakemake to benchmark an individual rule.
For example, to benchmark the kallisto_quant step we
could add this to the rule definition:
rule kallisto_quant:
    benchmark:
        "benchmarks/kallisto_quant.{sample}.txt"
    ...
The dataset here is so small that the numbers are tiny, but for real data this can be very useful as it shows time, memory usage and IO load for all jobs.
Running jobs on a cluster
Learning about clusters is beyond the scope of this course, but for modern bioinformatics they are an essential tool because many analysis jobs would take too long on a single computer. Learning to run jobs on clusters normally means writing batch scripts and re-organising your code to be cluster-aware. But if your workflow is written in Snakemake, it will run on a cluster will little to no modification. Snakemake turns the individual jobs into cluster jobs, then submits and monitors them for you.
To run Snakemake in this way, someone will need to determine the right parameters for your particular cluster and save them as a profile. Once this is working, you can share the profile with other users on the cluster, so discuss this with your cluster sysadmin.
Instructions for configuring the SLURM executor plugin can be found in the Snakemake plugin ctalog, along with the drmaa, cluster-generic and cluster-sync plugins which can support PBS, SGE and other cluster schedulers.
We have some specific suggestions for Eddie, the University of Edinburgh cluster
Cluster demo
A this point in the course there may be a cluster demo…
For reference, this is a Snakefile incorporating the changes made in this episode.
- To make your workflow run as fast as possible, try to match the number of threads to the number of cores you have
- You also need to consider RAM, disk, and network bottlenecks
- Profile your jobs to see what is taking most resources
- Snakemake is great for running workflows on compute clusters
Content from Conda integration
Last updated on 2024-10-10 | Edit this page
Overview
Questions
- How do I install new packages with Conda?
- How do I get Snakemake to manage software dependencies?
Objectives
- Understand how Snakemake works with Conda and Bioconda
- Modify a package in the workflow with Conda integration
For reference, this is the final Snakefile from episodes 1 to 8 you may use to start this episode.
The basics of Conda
You may already have some familiarity with the basics of Conda and Bioconda.
Some key terms:
- Conda is a system for installing software packages into self-contained directories called environments.
- Conda finds new packages in on-line repositories which are known as channels.
- The Bioconda project maintains a channel with many open source bioinformatics packages available.
- Old versions of these packages are available, as well as the latest builds.
- Any environment may have multiple packages, but to install two versions of the same package, or two packages which conflict, you need to put them in separate environments.
- You can switch between environments using the conda activate command.
- An environment may be exported, which simply means getting Conda to print all the packages in that environment, as well as the channels where those packages are available, in a YAML format.
Assuming you are running throught this course in the recommended setup, Conda is already set up on the systems we are using.
Some key conda commands:
- Make a new environment and give it a name
$ conda create -n my-environment
- List the environments currently known to conda
$ conda env list
- Switch to a named environment in the current shell session
$ conda activate my-environment
- Configure Conda to enable the Bioconda channel (the new settings
will apply to all environments)
$ conda config --add channels bioconda$ conda config --add channels conda-forge
- Install the latest version of a single package into the current
environment
$ conda install snakemake
- Install a specific version of a single package into the current
environment
$ conda install snakemake=5.14.0
- Save a list of all packages in one environment in YAML format, then
recreate an identical environment from that information.
$ conda env export -n my-environment > my-environment.yaml$ conda env create -n cloned-environment -f my-environment.yaml
Channel configuration and conda-forge
For advanced usage, there are many ways you might want to configure your Conda channels. It’s even possible to have specific channel settings for each environment. For our purposes, we just want to have the bioconda channel working, and as noted on the Bioconda website this involves a dependency a second channel named conda-forge, which provides some supporting tools and libraries.
To be sure all is well, check your channel settings:
OUTPUT
channels:
  - conda-forge
  - bioconda
solver: libmamba
channel_priority: strict
You may have other channels listed after “bioconda” but you should have these two at the top, and the other settings. Once this configuration is right you won’t need to do anything else regarding the channel configuration in this course.
Querying and installing Conda packages
Find out what version of fastx_toolkit is installed in the current conda environment.
Create a new conda environment named new-env and install the cutadapt package from Bioconda into it.
- There are several ways of doing this, but one using the commands above is:
- Conda should already be configured to install Bioconda packages (see the callout above) so we can do this:
It’s also possible to install packages at the same time as creating the environment, though this wasn’t shown in the examples above.
You’ll still need to activate the new environment in order to run cutadapt.
Using Conda with Snakemake
Up to now, the shell commands you have been running via
Snakemake have called programs in your default PATH. The
commands may have been installed with conda, or with the system package
manager, or installed manually. If you move your Snakefile to another
machine, or share it with a colleague, you will need to make sure all
the dependencies are installed. If the versions of the packages are not
the same on the two systems, you may discover that the workflow breaks,
or produces different results.
Once you are familiar with Conda, you may think to install the
dependencies for your workflow into a Conda environment, then
conda env export that into a YAML file, which you can use
to quickly set up the same environment on any other machine.
Snakemake takes this one step further by integrating directly with Conda. This brings some nice features…
Firstly it allows you to specify different environments to use for different rules. This is really useful if different rules need mutually incompatible packages.
To configure this, add a conda declaration to a
rule:
rule a_conda_rule:
    conda:  "new-env.yaml"
    shell:
        "which cutadapt"
Note that the declaration refers to the exported YAML file, not any
existing environment. Snakemake will create the environment for you. We
can now run the above rule, even though it doesn’t produce any outputs.
We need to add the --use-conda option when running
Snakemake.
OUTPUT
$ snakemake -j1 --use-conda a_conda_rule
Building DAG of jobs...
Creating conda environment new-env.yaml...
Downloading and installing remote packages.
Environment for new-env.yaml created (location: .snakemake/conda/d7df5e24)
Using shell: /bin/bash
Provided cores: 1 (use --cores to define parallelism)
Rules claiming more threads will be scaled down.
Job counts:
    count   jobs
    1       a_conda_rule
    1
Select jobs to execute...

[Tue Sep 21 16:57:59 2021]
rule a_conda_rule:
    jobid: 0

Activating conda environment: /home/zenmaster/carpentries/nextflow_rnaseq_training_dataset/.snakemake/conda/d7df5e24
/home/zenmaster/carpentries/nextflow_rnaseq_training_dataset/.snakemake/conda/d7df5e24/bin/cutadapt
[Tue Sep 21 16:58:00 2021]
Finished job 0.
1 of 1 steps (100%) done
Complete log: /home/zenmaster/carpentries/nextflow_rnaseq_training_dataset/.snakemake/log/2021-09-21T165713.679409.snakemake.log
This takes some time, because Snakemake is (as the log says) creating
the new environment and installing the packages. But if we run it a
second time it’s much quicker. This brings us to a second feature of
Snakemake+Conda integration: as long as the YAML file is unchanged,
Snakemake will re-use the same environment, but if the file is edited or
replaced Snakemake will detect the change and make a new environment.
This happens because the environment that Snakemake made is stored under
./.snakemake/conda/d7df5e24, and the last part of this name
is a hash of the contents of the new-env.yaml file.
Also, it may seem very inefficient to create the environment twice, but Conda employs file de-duplication so you don’t actually end up with two copies of all the software.
We’ll do something useful with cutadapt in the next episode.
Using an older version of Salmon
Going back to our RNA-Seq workflow, imagine we want to try running the analysis with an older version of Salmon, to see if the results are different. We’ll use Salmon 1.2.1 which is available in Bioconda.
This particular package happens to need a dependency,
tbb=2020.2, which is not installed by default but we can
explicitly install it into the environment with Salmon. Without this
Salmon 1.2.1 will crash out with the message error while loading
shared libraries.
We don’t want to mess with the version of Salmon that’s currently
installed, or change any parts of the workflow other than adding
directives to salmon_index and salmon_quant. Define a
new Conda environment that includes the packages
salmon=1.2.1 and tbb=2020.2 and then use this
for the two rules by adding appropriate conda: directives.
Then run your amended workflow.
The first thing that we need is an appropriate YAML file. It’s possible to write one from scratch in a text editor, but for this answer we’ll follow the process shown above, that is to conda create an environment, install the required packages and then export it.
BASH
$ conda create -n salmon-1.2.1
$ conda activate salmon-1.2.1
$ conda install salmon=1.2.1 tbb=2020.2
$ conda env export -n salmon-1.2.1 > salmon-1.2.1.yaml
As an aside, having done this, we could delete the environment as we just need the exported YAML file.
Next add the same conda declaration to both the salmon_index and salmon_quant rules.
conda: "salmon-1.2.1.yaml"And when running the workflow, we need to give the
--use-conda option as well as telling Snakemake that these
two rules have changed and must be re-run.
Note on the environment files
If you look into a YAML file created with
conda env export you will see that Conda lists every single
package dependency and the list is quite large. You may prefer to write
your own YAML file where you can be as precise as you like about which
packages are needed and which version or versions are acceptable. Conda
will fill in the blanks to ensure all dependencies are met.
A file for an environment with cutadapt could be as simple as this.
name: cutadapt-env
channels:
  - conda-forge
  - bioconda
dependencies:
  - cutadapt=3.4
In this case, Conda will install version 3.4 of Cutadapt, but will
meet the required dependencies by installing the newest packages found
in the channels, so the exact environment will not be the same each
time. This may make the workflow more compatible if, for example, you
try to switch from Linux to a Mac, but it may also cause problems if the
newer packages somehow don’t work properly with Cutadapt 3.4, as happens
with the tbb package above. Sadly, while Conda is a great
tool for installing and managing software it does have quirks and
shortcomings, and software setup continues to be a perennial headache
for bioinformaticians.
Using Conda with Snakemake Wrappers
Tool wrappers in the Snakemake
wrappers collection include recommended Conda environments. It’s not
strictly necessary to run a workflow with --use-conda in
order to use the wrappers, but this is the intended way. Snakemake will
then install the tools and run the jobs within the environment specified
by the wrapper, just as if the environment had been set by an explicit
conda: directive in the rule.
For reference, this is a Snakefile incorporating the changes made in this episode.
- Conda is a system for managing software packages in self-contained environments
- Snakemake rules may be associated with specific Conda environments
- When run with the
--use-condaoption, Snakemake will set these up for you - Conda gives you fine control over software versions, without modifying globally-installed packages
- Workflows made this way are super-portable, because Conda handles installing the correct versions of everything
Content from Constructing a whole new workflow
Last updated on 2024-10-07 | Edit this page
Overview
Questions
- How do I approach making a new workflow from scratch?
- How do I understand and debug the errors I see?
Objectives
- Apply what you have learned so far in a new example
- Understand how to diagnose errors in a workflow
A script to assemble the sequences
This episode comprises a longer challenge to build a workflow from scratch, using the Snakemake concepts we’ve learned through the course. A partial solution is provided as a Bash script, which we will re-write in Snakemake and then extend it to get a full solution.
The script performs a de-novo assembly of the RNA sequences in the demo dataset. Note that this does not produce a biologically meaningful assembly, but nevertheless this is the basis for a nice example workflow, so we will go ahead and try.
The following shell script can also be downloaded here:
BASH
#!/bin/bash

# This script needs the following Bioconda packages:
#   cutadapt
#   velvet
#   bbmap

#  Use cutadapt to remove adapters. Note that cutadapt works on the paired sequences
mkdir cutadapt
cutadapt -a AGATCGGAAGAGC -A AGATCGGAAGAGC -o cutadapt/ref_1_1.fq -p cutadapt/ref_1_2.fq reads/ref_1_1.fq reads/ref_1_2.fq
cutadapt -a AGATCGGAAGAGC -A AGATCGGAAGAGC -o cutadapt/ref_2_1.fq -p cutadapt/ref_2_2.fq reads/ref_2_1.fq reads/ref_2_2.fq
cutadapt -a AGATCGGAAGAGC -A AGATCGGAAGAGC -o cutadapt/ref_3_1.fq -p cutadapt/ref_3_2.fq reads/ref_3_1.fq reads/ref_3_2.fq

# Combine all the samples. We still want to keep the read pairs separate.
mkdir concatenate
cat cutadapt/ref_1_1.fq cutadapt/ref_2_1.fq cutadapt/ref_3_1.fq > concatenate/ref_1.fq
cat cutadapt/ref_1_2.fq cutadapt/ref_2_2.fq cutadapt/ref_3_2.fq > concatenate/ref_2.fq

# Assemble the concatenated files with Velvet. This is a 2-step process: velveth then velvetg
kmer_len=21
velveth velvet_tmp_ref_${kmer_len} ${kmer_len} -shortPaired -fastq -separate concatenate/ref_1.fq concatenate/ref_2.fq
velvetg velvet_tmp_ref_${kmer_len}
mv velvet_tmp_ref_${kmer_len}/contigs.fa contigs.fa

# Find the longest contig using the BBMap stats script
stats.sh contigs.fa | grep 'Max contig length:' > max_contig.txt
head -v max_contig.txt
Steps in the assembly process
The following figure presents the steps involved in the above script,
when run on the ref samples. You will see it already looks
a little like a Snakemake DAG.

-
Cutadapt removes adapter sequence from the reads. Normally
this should not be present but any that is left in will hinder the
assembly. The
AGATCGGAAGAGCsequence relates to the library prep kit used when preparing this cDNA for sequencing. - Velvet is a simple (and old) short read assembler which attempts to piece together the raw short reads into longer sequences, known as contigs. More powerful de-novo assemblers exist, but for the purpose of this lesson Velvet does what we need. Velvet handles the type of paired short reads provided in the sample data.
-
velvethandvelvetgare components of the Velvet software which must be run one after the other to obtain a file of contigs (contigs.fa). - When running
velvethone must specify a kmer length parameter. We’re not going to go into the theory of what this does, but the final Snakemake pipeline will help us explore the effect of changing this value. -
stats.shis a handy program provided by the BBMap package, used here to tell us the longest contig. - Note that we run Cutadapt on each
refsample separately, but then make a Velvet assembly of all therefreads in one go.
Running the Bash script
Run the script as-is. In order to make it work, you should make a new conda environment named “assembly-env” with the three packages installed.
How long is the longest contig found in the assembly that is produced?
The commands to build and activate the Conda env can be found in the “Conda Integration” chapter.
BASH
$ conda create -n assembly-env --channel bioconda --channel conda-forge cutadapt velvet bbmap
$ conda activate assembly-env
Now, after saving the script above into a text file, make it executable and run it.
BASH
$ chmod +x assembly_script.sh
$ ./assembly_script.sh
$ cat max_contig.txt
Max contig length:        655
Don’t worry if you get a slightly different number. We’ve not specified the exact version of the Velvet assembler so the final assembly may be slightly different if the software has been updated.
General tips for designing a Snakemake workflow
Design phase
- Start out with pen and paper. Sketch how many rules you will have and how you expect the DAG to look.
- List any parameters or settings that might need to be adjusted.
- Work out which rules (if any) aggregate or split inputs (these may need input functions).
- Get the
inputandoutputparts of your Snakemake rules right before worrying about theshellsections. Remember that Snakemake builds the DAG before actually running theshellcommands so you should--dryrunthe workflow before running it for real, or even before you put all theshellcommands in. - Snakemake starts matching rules from the final target file to the input files, so you might prefer to work on your rules in this same order, starting by writing the last rule first.
- Choose the names for your inputs, outputs and {wildcards} carefully to make your Snakefile as readable as possible.
Debugging a Snakemake workflow
As with all programming jobs, you will inevitably see bugs and errors the first time you try to run a new Snakefile, because it’s very easy to make typos. Sometimes Snakemake will give you a very useful and precise error report, but other times less so. When trying to diagnose a problem, remember that you need to establish which phase of execution failed, then look at the most common error causes for that phase.
-
Parsing phase failures (before Snakemake says ‘Building
DAG of jobs’):
- Syntax errors
- Missing commas or colons
- Unbalanced quotes or brackets
- Wrong indentation
- …etc
- Failure to evaluate expressions
- Any Python logic or you added outside of rules
- Problems in functions (eg.
expand()) in rule inputs or outputs
- Other problems with rule definitions
- Invalid rule names or declarations
- Invalid wildcard names
- Mismatched wildcards
- Syntax errors
-
DAG building failures (before Snakemake tries to run any
jobs):
- Failure to determine target output files
- Multiple rules can make the same output
- No rule to make a target file
- Sometimes it is not clear why Snakemake wants to make that particular file
- Circular dependency found (violating the “acyclic” property of a DAG).
- An output file is write-protected
-
DAG running failures (–dry-run works as expected, but a
real run fails):
- If a job fails, Snakemake will report an error, delete all output files for that job, and stop.
- Steps can fail if:
- A placeholder in {curlies} is not a valid variable.
- Any shell commands return non-zero status.
- You reference any $shell_variable which has not been set.
- Any expected output file is missing after the commands have run.
If you get syntax errors, look out for unexpected or missing text colouring in GEdit which might hint at the problem. Punctuation errors are very common: brackets, quotes, colons, line indentation and commas all need to be just right. If you can’t see the problem, ask a demonstrator for help. Often just having a second pair of eyes on your code is all that is needed to spot a problem.
Challenge - building a full Snakemake workflow
Design a Snakemake workflow based upon the above script which will assemble all reads from each of the three conditions (ref, etoh60 and temp33) and will do so at four different kmer lengths (19, 21, 25 and 27), so twelve assemblies in total. Use your workflow to discover the length of the longest contig in each of the twelve assemblies.
A sample solution to this exercise is available here, along with a suitable Conda environment spec. However, there is no single “correct” answer, so don’t worry if your approach looks different. Hopefully we will have time in the course to look through and compare some different answers.
- By now, you are ready to start using Snakemake for your own workflow tasks
- You may wish to replace an existing script with a Snakemake workflow
- Don’t be disheartened by errors, which are normal; use a systematic approach to diagnose the problem
Content from Cleaning up
Last updated on 2024-10-07 | Edit this page
Overview
Questions
- How do I save disk space by removing temporary files?
- How do I isolate the interim files created by jobs from each other?
Objectives
- Understand how Snakemake manages temporary outputs
- Learn about running in --touch mode
- Learn about shadow mode rules
For reference, this is the final Snakefile from episodes 1 to 8 you may use to start this episode.
Temporary files in Snakemake
Analyses in bioinformatics inevitably generate a lot of files. Not all of these need to be kept, if they are intermediate files produced during the workflow. Even if the files might be needed again, knowing that you can regenerate them again with a single Snakemake command means you may well want to clean them up. This way you save disk space and reduce clutter.
Remember that Snakemake only re-generates intermediate files if it needs them to make a target, so simply deleting intermediate files manually is fine. Assuming you already made the multiqc report, and have not edited the rules in the Snakefile since:
OUTPUT
$ rm trimmed/ref*.fq
$ snakemake -j1 -p multiqc_out
...
Nothing to be done.
To get Snakemake to clean up files for you, mark them with the
temporary() function. Much like the
directory() function, this is applied only on the outputs
of rules. Any file marked as temporary will be removed by
Snakemake as soon as it is no longer needed.
To provide a plausible example, lets say we decide to compress the trimmed reads with gzip. It’s very common to store FASTQ files in this compressed format, and most software will read the Gzipped files directly, so there is no need to keep the uncompressed files. This includes Salmon and Kallisto. Add a new rule like so:
rule gzip_fastq:
    output: "trimmed/{afile}.fq.gz"
    input:  "trimmed/{afile}.fq"
    shell:
        "gzip -nc {input} > {output}"
Now we can tell Snakemake not to keep the uncompressed files, but
remember we can only add the temporary() marker to outputs,
not inputs, so we need to modify the existing trimreads
rule.
rule trimreads:
    output: temporary("trimmed/{myfile}.fq")
    input:  "reads/{myfile}.fq"
    shell:
        ...
Snakemake will only run our gzip_fastq rule if we have a
consumer for the Gzipped files, so modify both the salmon_quant
and kallisto_quant rules to work on the compressed files. In
both cases, you just need to add .gz to the fq1
and fq2 input filenames.
rule salmon_quant:
    output: directory("salmon.{sample}")
    input:
        index = "Saccharomyces_cerevisiae.R64-1-1.salmon_index",
        fq1   = "trimmed/{sample}_1.fq.gz",
        fq2   = "trimmed/{sample}_2.fq.gz",
    shell:
        ...

rule kallisto_quant:
    output: directory("kallisto.{sample}")
    input:
        index = "Saccharomyces_cerevisiae.R64-1-1.kallisto_index",
        fq1   = "trimmed/{sample}_1.fq.gz",
        fq2   = "trimmed/{sample}_2.fq.gz",
    shell:
        ...
And now re-run the workflow. Since we modified the trimreads rule, Snakemake should see that it needs to be re-run, and will also re-run any downstream rules, which now includes gzip_fastq. Snakemake will remove the uncompressed trimmed reads once no jobs in the DAG require them, and so at the end we are left with just the Gzipped versions.
OUTPUT
$ snakemake -j1 -p multiqc_out
...
$ ls trimmed/
etoh60_1_1.fq.gz  ref_1_1.fq.gz  temp33_1_1.fq.gz
etoh60_1_2.fq.gz  ref_1_2.fq.gz  temp33_1_2.fq.gz
etoh60_2_1.fq.gz  ref_2_1.fq.gz  temp33_2_1.fq.gz
etoh60_2_2.fq.gz  ref_2_2.fq.gz  temp33_2_2.fq.gz
etoh60_3_1.fq.gz  ref_3_1.fq.gz  temp33_3_1.fq.gz
etoh60_3_2.fq.gz ref_3_2.fq.gz temp33_3_2.fq.gzRemoving the HTML reports from FastQC
We have no use for the HTML reports produced by FastQC. Modify the Snakefile so that Snakemake will automatically remove them.
Amend the html output of the fastqc rule to mark it
as temporary():
html = temporary("{indir}.{sample}_fastqc.html"),Since the files are already there, Snakemake will not normally remove them unless the jobs are re-run, so you could re-run the workflow as was done for trimreads above. However, there is also a --delete-temp-output option which forces all temporary files in the DAG to be removed, and this provides the cleanest way to remove the files after modifying the Snakefile.
Running in --touch mode
One annoying thing about Snakemake is that, in moderately complex workflows, it may seem determined to re-run a job for reasons that are unclear to you. For example, after adding the gzip_fastq rule above we re-ran all of the kallisto and salmon quantifications, but with real data this could take hours or even days.
Let’s pretend we just decided to gzip all the trimmed reads manually, ouside of Snakemake. This results in files with new timestamps, so to simulate this we can just touch all the existing files.
BASH
$ touch trimmed/*
$ snakemake -n -p multiqc_out
...
Job counts:
    count   jobs
    1       multiqc
    9       salmon_quant
    10
Snakemake wants to re-run all the salmon_quant jobs (and the kallisto_quant jobs, if you completed the exercise above), which makes sense. However, we know the results are good, and don’t want to waste time re-making them, so we can fudge the timestamps using the --touch option. In the words of the Snakemake manual, “This is used to pretend that the rules were executed, in order to fool future invocations of snakemake.”
Protecting specific files
A related feature is the protected() function. This is
rather like the opposite of the temporary() function and
says that once an output has been produced it must not be overwritten.
In practise, Snakemake does this by revoking write permissions on the
files (as in chmod -w {output}).
We can do this for the Salmon and Kallisto indexes, for example, as these should only ever need to be generated once.
This works, but can be annoying because Snakemake will refuse to run if it believes it needs to re-create a file which is protected. An alternative suggestion is, once you have generated an important output file, move or copy the file away from your working directory. That way it will be harder to accidentally clobber it (which is remarkably easy to do!).
Shadow mode rules
Setting your rules to run in shadow mode helps clean up
temporary files that are only used within the job. The Snakemake
manual describes the shadow directive very nicely, so
refer to that for more details.
Briefly, in shadow mode, Snakemake links the input files into a temporary working directory, then runs the shell command and finally copies the outputs back. If you have ever used NextFlow this idea will be familiar as NextFlow runs all workflow steps this way.
This test rule serves to demonstrate the operation of rules using the
shadow directive. The file temp_file.txt will not
be there after the job has run, but the shadow_out.txt file
will be there because Snakemake sees that it is an output file and moves
it back to the real working directory,
rule shallow_rule:
    output: "shadow_out.txt"
    shadow: "minimal"
    shell:
        """echo minimal shadow mode
           touch shadow_out.txt
           touch temp_file.txt
           tree `pwd`
        """
Advantages of using shadow rules are:
- Any temporary files created by applications do not require explicit
removal (as with
temp_file.txtin the above example). - When running jobs in parallel (eg.
-j2) certain conflicts related to temporary files will be avoided by not ever running multiple jobs in the same directory at once - we’ve already seen a case back in Episode 07 where the final version of the fastqc rule has this problem.
Disadvantages are:
- It can be confusing when error messages reference the shadow directory.
- Symlinks to subdirectories do not always work the way you expect.
- Shadow directories are not always removed cleanly if Snakemake exits with an error.
You may want to test your rules in normal mode first, then add
shadow: "minimal" before you run the workflow for real.
Removing the HTML reports (again)
Amend the fastqc rule once more so that the HTML reports are not even mentioned in the rule, and will not appear in the working directory.
The shadow: "minimal" directive will do the job nicely.
You also need to remove mention of the .html file from the
list of outputs and the shell commands.
rule fastqc:
    shadow: "minimal"
    output:
        zip  = "{indir}.{myfile}_fastqc.zip"
    input:  "{indir}/{myfile}.fq"
    shell:
        """fastqc -o . {input}
           mv {wildcards.myfile}_fastqc.zip {output.zip}
        """
In this case, marking the html output as
temporary() or simply removing the file within the
shell part does work fine, but the good thing about the
shadow approach is you do not need to deal with or mention the
unwanted file at all.
For reference, this is a Snakefile incorporating the changes made in this episode.
- Cleaning up working files is good practise
- Make use of the
temporary()function on outputs you don’t need to keep - Protect outputs which are expensive to reproduce
- Shadow rules can solve issues with commands that produce unwanted files
Comments in Snakefiles
In the above code, the line beginning
#is a comment line. Hopefully you are already in the habit of adding comments to your own scripts. Good comments make any script more readable, and this is just as true with Snakefiles.