Getting familiar with JupyterLab
Overview
Teaching: 35 min
Exercises: 25 minQuestions
What is JupyterLab?
How do I move around in JupyterLab?
How can I set up twarc on JupyterLab?
What’s a good way of running twarc in our Jupyter environment?
Objectives
Become acquainted with the Jupyter Lab tools
Set up directory and data folder
Set up twarc with your keys and tokens
Brief Intro to JupyterLab
JupyterLab is a web interface for creating Python scripts with Jupyter Notebooks. For this workshop, we will be using a hosted instance of JupyterLab pre-configured with all of the Python tools you will need to follow along with the lesson.
JupyterLab is an Integrated Development Dnvironment (IDE) that enables us to write and run programs. JupyterLab runs in one tab on your browser. In this episode, we will learn to upload and download files from your computer to your storage space on JupyterLab, create and navigate the directory structure, and use the built-in BASH terminal.
Thank you UCSB Letters & Science IT
This workshop, is written for a JupyterLab environment with twarc preinstalled. At our first workshop with this environment, we had many fewer installation and path issues than in other workshops.
Examples should all work with locally installed Jutpyter / Python 3+ environments.
Thanks to UCSB Letters & Sciences IT for setting up our JupyterLab server :)
If you have a fully configured version of Python, you can also install and run twarc on your own computer. The documentation for installing twarc is found at this repository. For this workshop, follow along in the provided environment.
Data Moment: Where are your files?
If you are using an online Jupyter environment you will need to put copies of your data files into that environment.
If you are running your own Jupypter on your laptop, make sure to move the data files someplace under your local control. Do NOT use a DropBox or Google Drive.
If your data files are ‘in the cloud,’ when the files attempt to syncronize, you might encounter unanticipated issues in your R environment.
Starting up JupyterLab
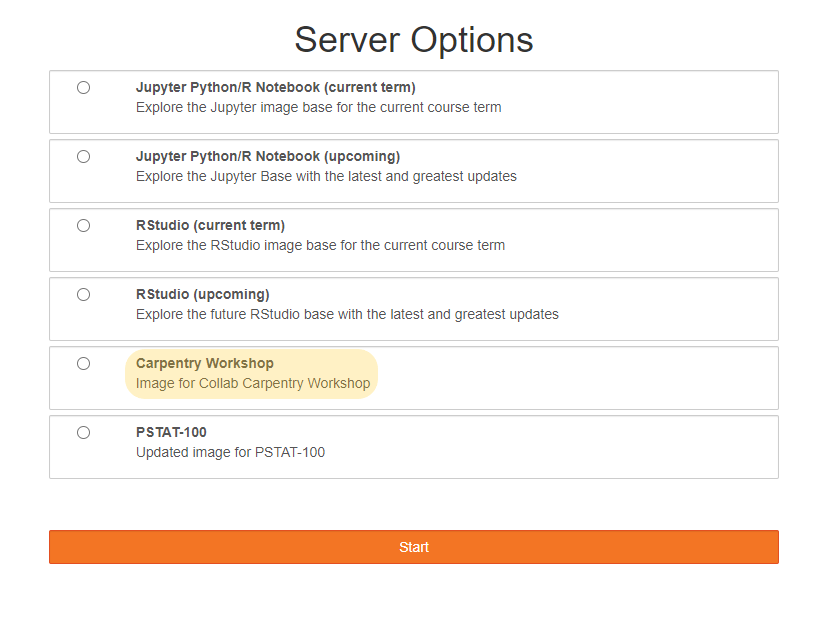
Open our LSIT JupyterLab in a fresh web browser window.
Select ‘Carpentry Workshop’ under the server options. It will take a few minutes to fire up your virtual machines.
Navigating the JuptyerLab interface
When you first open JupyterLab, you will find a file browser tab on the far left side of the screen. This is where we can manage our files and navigate in-and-out of directories. The window that is labeled “Launcher” contains options for what to start up. For this workshop, we will be using Python 3 Notebook and Terminal.
Next, note the toolbar found at the top on the screen. There, you will find options that are needed to run and save programs you write.
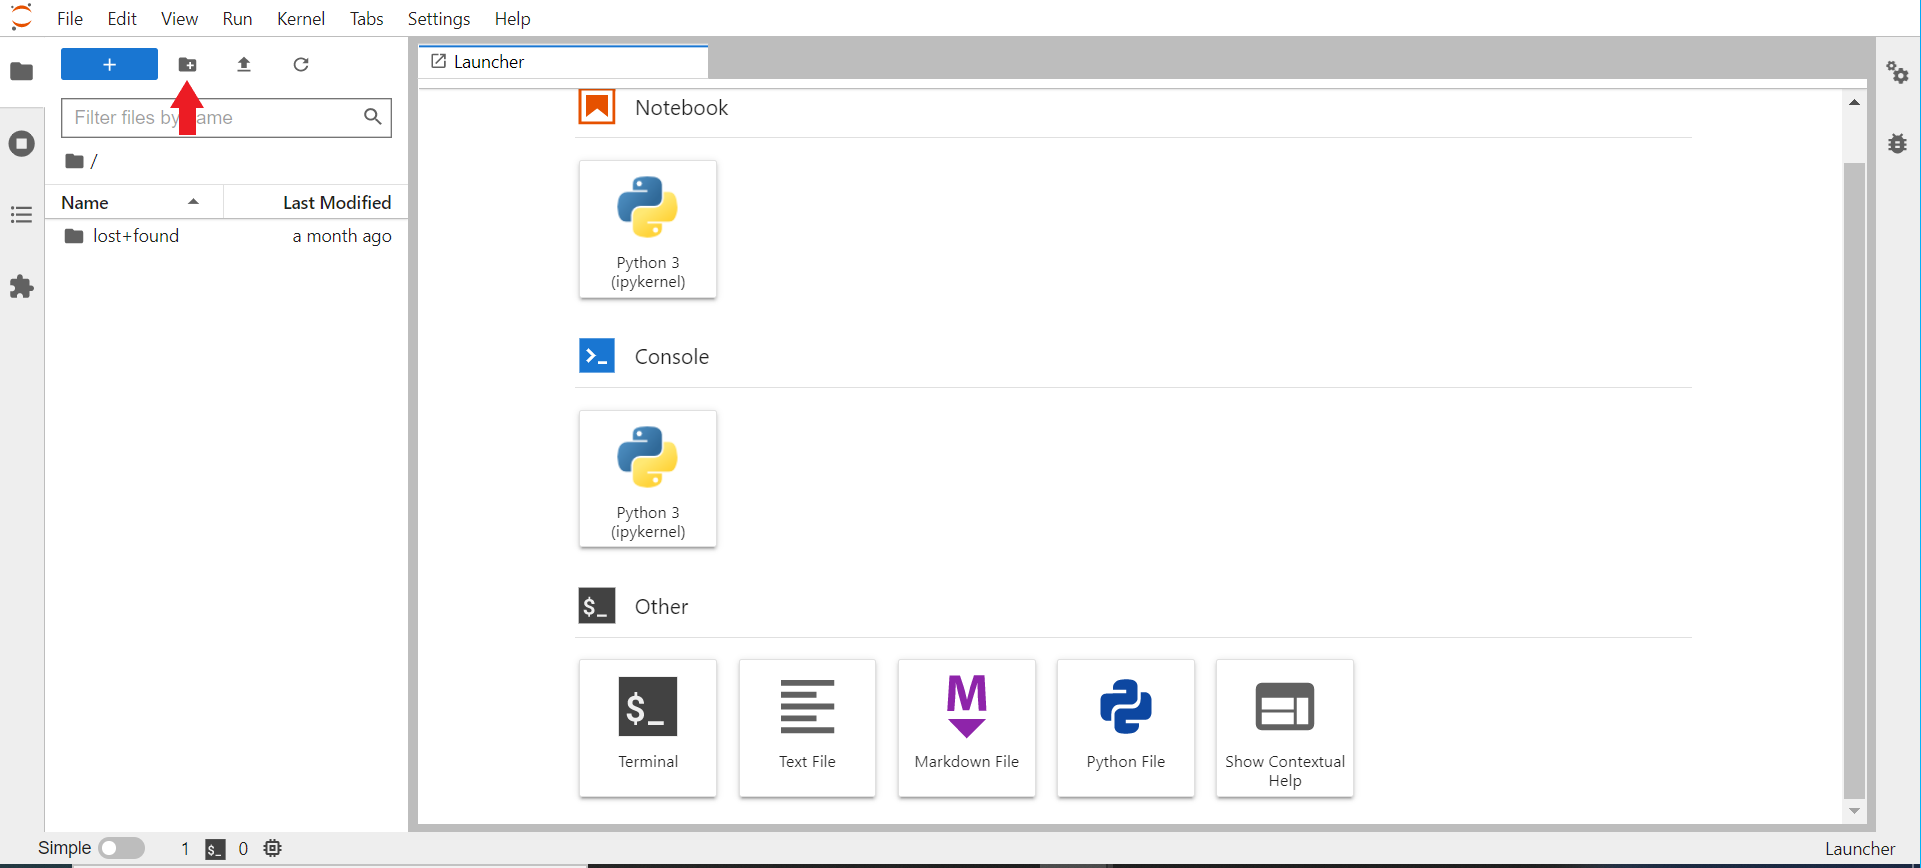
To start off, we need to create some directories that we will be working in. Open the
file browser and create a folder to store all of your workshop files in (e.g. python
notebooks, data folders, etc). To create a folder, select the icon that is highlighted
in the above image. We have chosen to name the folder twarc_run. We will
organize all of our files in this folder, and this folder will be our working
directory.
Inside of twarc_run, let’s make three more folders. Please create one folder that is
named raw, and create a second folder named output. raw is
where we will store our original data. The output folder
is where we will store Twitter data tah we process. output should not be inside
of raw, and vice versa. Instead, both folders should be inside of twarc_run.
Since raw is where we will store our original data files, please open this data folder
and upload all of the datafiles:
hashtag_gas.jsonltweets that use #gasprices collected May 22, 2022.one_tweet.jsonla single tweetriot_weets.txtTweetIDs from the January 6, 2021 insurrection.
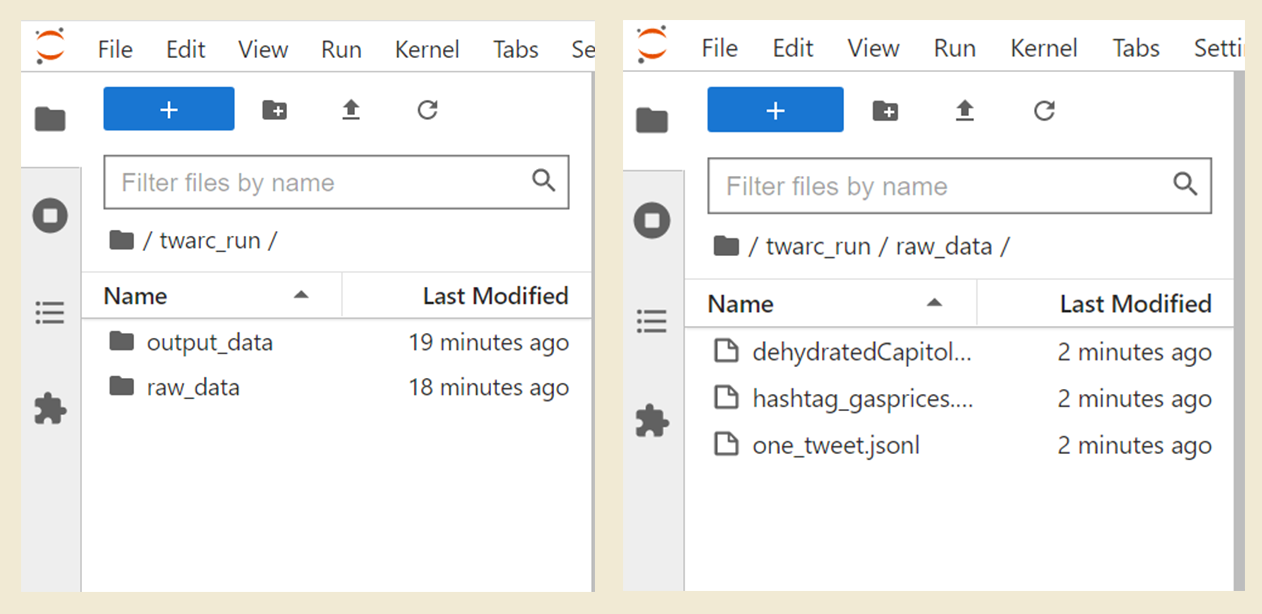
In total you should now have two folders within twarc_run: raw and output.
If you have not downloaded the data, please
do so now from the Setup Page
instructions. Once the data files are uploaded, navigate back to our project
directory twarc_run. Once you are done, your file organization should look like the
below image.
Using the Terminal and Nano Editor in Jupyterlab
Now, let’s start up the terminal. In your Launcher tab, select the Terminal icon under “Other”. We will be using the terminal to sign into your twitter developer account. You will see that the launcher screen is replaced by the terminal window. You may open the launcher tab by selecting the large rectangular button with the plus (+) sign. When you open the launcher in this way, the terminal window will not close.
The shell or terminal, is a program where users can type in commands. The terminal window is all about the keyboard–you cannot mouse around in there. The terminal window is running a lightweight version of BASH, so you can use all of the common Linux/Unix file system commands:
| Git command | Command operation |
|---|---|
pwd |
print working directory |
cd |
change directory |
ls |
list contents of a directory |
mkdir |
make new directory, a folder |
In our JupyterHub environment, we have the standard Juputer built-in text and csv
viewer/editors. We have also pre-configured the nano text
editor to work from the terminal. We are using nano in this workshop
because it is one of the least complex text editors. There are many other editors such as
Notepad++ or VIM, which you can configure to use on your own device.
Let’s move around our directories in the Terminal to get comfortable.
Print your working directory using pwd and make sure you are in the
directory twarc_run. If you are not in the proper directory, please
change directories using cd to move into twarc_run. Your current working
directory in BASH is separate from the current working directory of you
Jupyter notebook.
Remember:
You can only type where the cursor is blinking. And you can’t move the cursor with your mouse.
Configuring twarc in the Terminal
Continuing in the terminal window, we will configure twarc so that it is connected to your Twitter developer account and to your app. If you do not have a twitter developer account, please complete the Setup Page instructions. Take a moment to gather the following keys and tokens:
Tokens and Keys
- Bearer Token
- API Key
- API Key Secret
- Access Token
- Access Token Secret
Let’s start configuring twarc by sending typing in the command twarc2 configure. You
should get the output below:
twarc2 configure
👋 Hi I don't see a configuration file yet, so let's make one.

Please follow these steps:

1. visit https://developer.twitter.com/en/portal/
2. create a project and an app
3. go to your Keys and Tokens and generate your Keys

Please enter your Bearer Token (leave blank to skip to API key configuration):
We will be entering in all of our keys and tokens and should not have to leave any of the prompts blank. You may copy/ paste the keys and tokens you were asked to save. At this step, please enter your bearer token.
Copy and Paste keyboard shortcuts
Windows and Linux:
ctrl + cto copy,ctrl + vto pasteMac:
command + cto copy,command + vto paste
Please enter your Bearer Token (leave blank to skip to API key configuration): xxxxxxxxxxxxxxxxxxxxxxxxx
(Optional) Add API keys and secrets for user mode authentication [y or no]?
After you enter your bearer token, please enter y for the following question. This is so we can add the API key and API secret.
(Optional) Add API keys and secrets for user mode authentication [y or no]? y
Please enter your API key: xxxxxxxxxxxxxxxxxxxxxxxxx
Please enter your API secret: xxxxxxxxxxxxxxxxxxxxxxxxx
How would you like twarc to obtain your user keys?
At this step, please select the option to manually input your user tokens.
Please enter your choice [1 or 2] 2
Enter your Access Token: xxxxxxxxxxxxxxxxxxxxxxxxx
Enter your Access Token Secret: xxxxxxxxxxxxxxxxxxxxxxxxx
After you have entered your Access Token Secret, you will see the following message.
Your keys have been written to /home/xxxx/.config/twarc/config

✨ ✨ ✨  Happy twarcing! ✨ ✨ ✨
All of the information you just entered is saved in a configuration file. Next time you start up twarc on this JupyterLab, you will not need to configure twarc.
If you try to run a twarc command without configuring twarc, you may see this message:
Incomplete credentials provided.

Please run the command "twarc2 configure" to get started.
Test our twarc configuration from the Notebook
We should confirm that twarc was configured correctly and that you are ready to continue using twarc. To test the twarc configuration, we will harvest tweets from a twitter account. At the same time, we will learn how to send bash commands from a Jupyter Notebook.
Please Open a new launcher (select the blue rectangular button with the plus sign) and open a Python 3 Notebook (do not open a Python 3 Console). You will see the following window open:
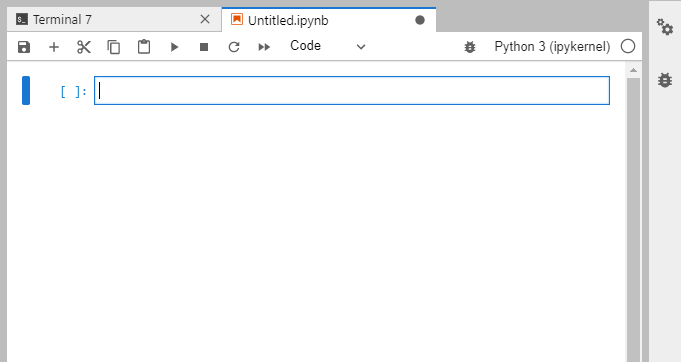
At the top of the Notebook tab, notice that there is a new toolbar. Each of the buttons
has a shortcut key. We will mostly use b to add a cell, shift + enter to execute
whatever code is inside the current cell.
You can type either Python code or Markdown into a cell. We will be doing both. We are using this notebook so that we can save our work along the way. At the end of the day, you can save your notebook file and try to run it later on your own installation of twarc.
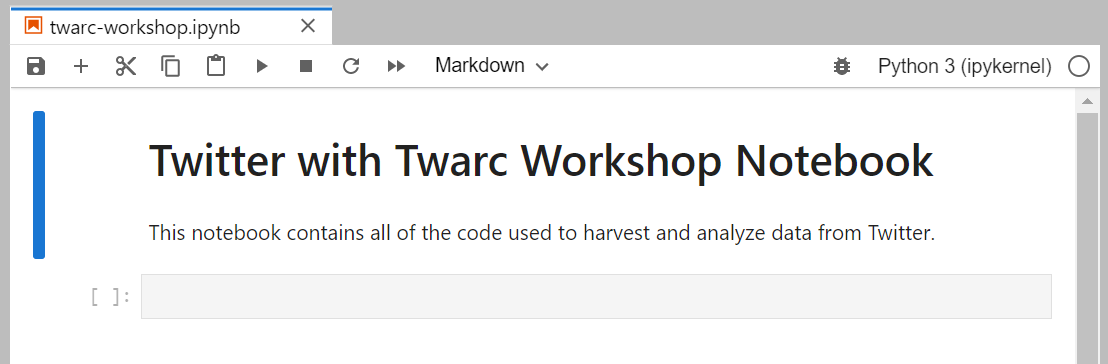
Let’s put some effort into formatting it nicely by putting a Markdown cell at the top:
# Twitter with twarc Workshop Notebook

This notebook contains all of the code used to harvest and analyze data from Twitter.
If you run that line, Jupyter will render that markdown into something that looks like this:
In another cell, we will write some code:
#hashtages are not only used in Twitter
#they indicate a python comment
print('Hello World!')
Hello World!
Inside code cells, we can write comments or commands. Comments written with the hashtag # will not be ran. Other lines in the cell will be read as code.
In another code cell, use the command pwd to check whether we are in the directory twarc_run. Use the command cd if you are not in twarc_run. Now, let’s call twarc2 from inside of our notebook.
BASH Commands in JupyterLab
We can run twarc from the terminal window in JupyterLab, or we can send BASH commands from our Jupyter Notebook.
Because we will be using a mix of Python code and BASH commands, it’s important to keep in mind which is which. When we use JupyterLab to run BASH commands, we need to start each line with an exclamation point (!). For example: if a twarc command is
twarc2 timeline, then the line to run the twarc command in JupyterLab is:!twarc2 timeline
The twitter account that we will collect tweets from is Bergis Jules, an archivist and scholar working in digital humanities. He is the Community Lead for Documenting the Now (DocNow), the project behind twarc’s development. To retrieve Jules’ recent tweets, please run the following command in a Python Notebook:
!twarc2 timeline BergisJules > 'raw/bjules.jsonl'
API limit of 3200 reached: 18%|█▉ | 3141/17680 [00:34<02:37, 92.23it/s]
If the twarc configuration was successful, you will see a loading bar at the bottom of the cell.
After the cell has completed running the line, there
will be a file called “bjules.jsonl” inside of raw on your file browser. This file
contains the data of tweets under the username “@BergisJules”.
Twarc: twitter and archiving
Documenting the Now
“Documenting the Now develops open source tools and community-centered practices that support the ethical collection, use, and preservation of publicly available content shared on web and social media. Documenting the Now responds to the public’s use of social media for chronicling historically significant events as well as demand from scholars, students, and archivists, among others, seeking a user-friendly means of collecting and preserving this type of digital content.”
The Documenting the Now Project started in 2014, in the aftermath of the killing of Michael Brown Jr. in St. Louis, Missouri (U.S.). A group of archivists got together, recognizing that protest and activism surrounding this had initially happened on twitter and other social media. There was also a consideration of how this content would be recorded as a part of history, starting with this idea of how these events would be remembered as they transpired on social media. Bergis Jules and Ed Summers collected tweets that contained the key word ‘ferguson’ (the suburb of St. Louis where Brown was killed), collecting 13 million tweets. In the process of doing so, they developed a utility named twarc, short for twitter and archiving.
A large part to DocNow is commitment to ethical social media collection. Activists and protesters had not consented to be part of an archive, with their content that were on twitter and other places online. They were never consulted on if they wanted their content to be remembered long from now. A large part of the DocNow was how to build an archive of social media content for the long term, with consent from the content creators. For us in the workshop, we will be discussing practices for ethical twitter harvesting before going over instruction on using twarc.
Using the Help
By using the –help command, you can pull up the syntax guidance and available tools with twarc. You may find this useful as you go through the lessons to learn how to use different tools, or at the end of the workshop as a summary of the tools you have learned. Let’s run it from our notebook so that we can view it at our convenience.
Twarc2 is a program, not a line of code. To run the twarc bash command, we start the line with an exclamation point !.
!twarc2 --help
Usage: twarc2 [OPTIONS] COMMAND [ARGS]...

  Collect data from the Twitter V2 API.

Options:
  --consumer-key TEXT         Twitter app consumer key (aka "App Key")
  ...
  --help                      Show this message and exit.

Commands:
  compliance-job  Create, retrieve and list batch compliance jobs for...
  configure       Set up your Twitter app keys.
  conversation    Retrieve a conversation thread using the tweet id.
  conversations   Fetch the full conversation threads that the input...
  counts          Return counts of tweets matching a query.
  dehydrate       Extract tweet or user IDs from a dataset.
  flatten         "Flatten" tweets, or move expansions inline with tweet...
  followers       Get the followers for a given user.
  following       Get the users that a given user is following.
  hydrate         Hydrate tweet ids.
  liked-tweets    Get the tweets liked by a specific user_id.
  liking-users    Get the users that liked a specific tweet.
  lists           Lists API support.
  mentions        Retrieve max of 800 of the most recent tweets...
  places          Search for places by place name, geo coordinates or ip...
  quotes          Get the tweets that quote tweet the given tweet.
  retweeted-by    Get the users that retweeted a specific tweet.
  sample          Fetch tweets from the sample stream.
  search          Search for tweets.
  searches        Execute each search in the input file, one at a time.
  stream          Fetch tweets from the live stream.
  stream-rules    List, add and delete rules for your stream.
  timeline        Retrieve recent tweets for the given user.
  timelines       Fetch the timelines of every user in an input source of...
  tweet           Look up a tweet using its tweet id or URL.
  user            Get the profile data for a single user by either...
  users           Get data for user ids or usernames.
  version         Return the version of twarc that is installed.
These are all of the commands that you can send via twarc2. You can also view all the help for twarc 1.0!
Challenge 1: Timelines
- Can you find the file called “bjules.jsonl”?
- Download a timeline for one of the twitter accounts from this list:
- NCEAS “@ucsb_nceas”
- EcoDataScience “@ecodatasci”
- R-Ladies Santa Barbara “@RLadiesSB”
- spatial@ucsb “@spatialUCSB”
- UCSB Collaboratory “@libratorybot”
- What do you notice about the file that was created from using the timeline command?
Solution
Remember, we ran the following code a little earlier in the episode:
!twarc2 timeline BergisJules > 'raw/bjules.jsonl'Our output tag
raw/bjules.jsonlindicates that our filebjules.jsonlis located in the folderraw.To put that generically:
!twarc2 timeline twitter_handle path/to/filename.jsonlNote: if you included the @ sign, you probably got an error
Some observations on the files we created:
- they’re all jsonl.
- Most of them are fairly small (around 300 tweets), apart from
ucsb_nceas_tweetswhich reached the API timeline limit of 3200 tweets.
Working from Your Notebook
The
main reason to use Jupyter Notebooks is to write code and leave ourselves notes
in Markdown. This includes BASH commands that we designate with a !
(often prounoucned ‘bang)
Because the tool twarc_csv is a plugin, we need to install it each time our JupyterLab server restarts. We also need emojis.py, so go ahead and put that in a cell at the top of your notebook:
! pip install twarc_csv
! pip install emojis
Next we load the Python libraries we will be using today, and then load our Bergis Jules data into a Pandas dataframe. You may need to run the import lines in individual cells.
No bangs, because this is Python code:
import pandas as pd
import twarc_csv
import textblob
import nltk
import os
Flattening Twitter Data
Twitter Timelines, and other files we harvest using twarc, need to be ‘flattened’
before we use them. Flatten will ensure that each line of the file is 1 tweet.
We can use ! wc to see how many tweets we have after we create the flattened
file.
Before flattening:
! wc raw/bjules.jsonl
We might think there are 32 tweets in Jules’ timeline.
!twarc2 flatten 'raw/bjules.jsonl' > 'output/bjules_flat.jsonl'
After flattening:
! wc output/bjules_flat
Converting between file types: jsonl to csv to dataframe
csv’s are convenient for reading and better for analyzing tweets outside of twarc because of it’s data format. csv’s are better in comparison to jsonl, because it organizes our collected tweets’ attributes (e.g. “id”, “text”, and “lang”) into easy to read columns.
We will almost always convert our files to .csv format.
!twarc2 csv 'raw/bjules.jsonl' > 'output/bjules.csv'
And Pandas dataframes are useful structures for later analysis, so you may as well make one of those too:
bjules_df = pd.read_csv('output/bjules.csv')
Check the file browser to make sure your file was created where you expected it to be. We will also get in the habit of making dataframes out of our csv’s, because dataframes are a convenient format for manipulating data in Pandas.
Now that we have flattened our data and made a csv, we can see how
many tweets we harvested from Jules’s timeline using wc in the terminal.
We don’t have to remember what twarc told us.
!wc 'output/bjules.csv'
Check how many Tweets we got from Bergis by looking at:
- word count
- the length of the dataframe
- looking at the csv in jupyter
Challenge: Compare and prepare two timelines
- Now we will do the same transformation on tweets from the twitter user
ecodatasci. (or whoever’s timeline you downloaded)- How many tweets did you get from the timeline that you downloaded?
Solution
- Flatten your collected tweets
!twarc2 flatten 'raw/ecodatasci.jsonl' > 'output/ecodatasci_flat.jsonl'
- Convert to csv format
!twarc2 csv 'output/ecodatasci_flat.jsonl' > 'output/ecodatasci.csv'
- Convert to pandas dataframe
ecodatasci_df = pd.read_csv('output/ecodatasci.csv')
Remember, if you get an error, you can correct it in the cell, and then run the cell again.
Key Points
Navigating Python in a JupyterLab environment
Configuring an application to work with an API
Arranging a directory structure and loading libraries