All in One View
Content from Navigation
Last updated on 2026-07-14 | Edit this page
Estimated time: 25 minutes
Overview
Questions
- What is GitLab?
- How can I find my way around GitLab?
Objectives
- State the primary entity of organization.
- Use GitLab’s interface to find a project.
- State one purpose of groups.
- Use GitLab’s interface to find group.
Introduction
GitLab is a web application for managing software projects. However, the features it provides can also be used for related purposes; for example, issue or task management, document management or project management in general.
GitLab is open source software and can be run by anyone on their own hardware. The company behind the software runs one instance under https://gitlab.com where anyone (resident in a country or territory not sanctioned by the USA) can create an account and use it within certain limits for free. But there are also instances run by diverse people and institutions from hobbyists, over small NGOs, to large organizations (e.g. https://gitlab.dlr.de/). Those are not necessarily publicly accessible.
GitHub is a direct competitor to, and probably an inspiration for, GitLab. Unlike GitLab, GitHub is not open source software, but large customers can run their own instances. With respect to the content covered by this lesson GitLab and GitHub are very similar and only differ in details. So, if you are already familiar with using GitHub, all this lesson can probably teach you is how concepts already familiar to you from GitHub are called in GitLab.
Finding Projects
Log in to GitLab
Navigate to to GitLab.com’s sign in page and log in to your account.
This exercise should take about 1 minute.
When we log into GitLab for the first time, we are greeted by a welcome page, offering us four ways to move forward:
- “Create a project”
- “Create a group”
- “Explore public projects”
- “Learn more about GitLab”
We will cover how to create a project and a group in the next episode. For now, we want to learn how to navigate GitLab.
For that we select “Explore public projects”. This leads us to an overview page of projects that are visible to us. The project is the main organizational unit of GitLab.
Homepage
The welcome page is only shown as long as you are not a member of any project yet. On instances other than GitLab.com it might also not be shown. In those cases the configured homepage is shown.
The project dashboard page is the default homepage. However, the homepage is a configuration option for GitLab instances as well as individual users; the latter overriding the former. You may have changed that setting or an administrator might have changed the global configuration of the instance.
You can always navigate to the project dashboard page by clicking on the GitLab logo in the upper left corner.
Explore Projects
On the “Explore projects” page, have a look at what projects you can see in the first three tabs (“All”, “Most starred”, and “Trending”). Play around with the filters and sort settings.
This exercise should take about 5 minute.
The “Explore projects” page looks like this:
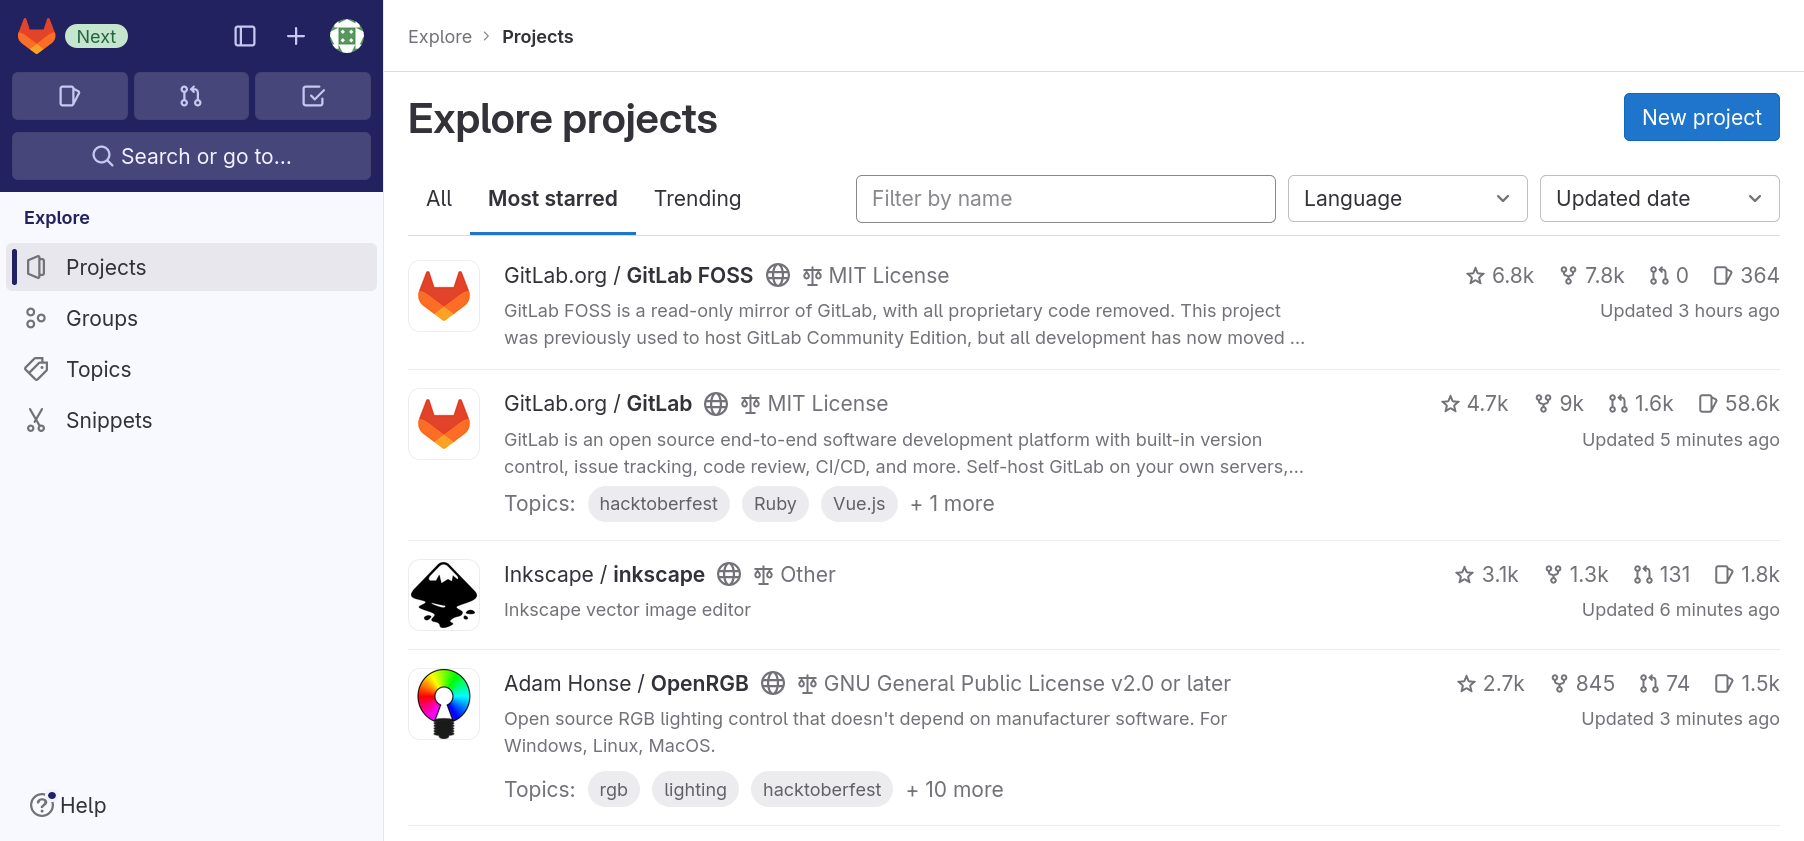
The first tab, “All”, lists all projects that are visible to you in most recently updated order.
The second tab, “Most starred projects”, also lists all projects, but this time ordered most starred first. Users of a GitLab instance can “star” a project, which is the equivalent of bookmarking them, as we will see shortly.
The third tab, “Trending”, lists all projects again, but this time ordered by activity during the previous months.
You can use the filter field next to the tab names to search through all projects that are visible to you.
Finding a project
Use the search method we just told you about to find the project page for the software “Inkscape”.
This exercise should take about 5 minutes.
The project page is located at https://gitlab.com/inkscape/inkscape. If you found yourself at https://gitlab.com/inkscape you found the group page of the Inkscape community.
Finding Groups
The second organizational entity, next to projects, are groups. Groups can contain projects and other groups and can therefore be used to structurally organize multiple projects. In a later episode, when we talk about members of groups and projects, we learn about another use for groups.
Groups and projects work somewhat similar to directories and files in the file system. Every group and every project can be contained in only one group and a group cannot contain itself.
To make our lives easier later on, we introduce two terms regarding a group’s position in this system:
- A group not contained in another group is called top-level group.
- A group contain in another group is called a subgroup of that group.
Top-level groups and Subgroup
On the group page https://gitlab.com/inkscape identify the top-level group’s name and one subgroup and contained project of that group.
Hint: Note that groups cannot be starred.
This exercise should take about 5 minutes.
- The top-level group’s name is Inkscape as it is written at the top of the main content.
- Any entry in the list “Subgroups and projects” is a subgroup or a contained project. First subgroups are listed prefixed by a three dot symbol, followed by the projects prefixed by a folder symbol.
Similar as for projects, GitLab provides an “Explore groups” page. You can navigate there by clicking on the GitLab logo in the upper right corner, selecting “Groups” in the menu on the left and then clicking on “Explore groups” near the upper right corner.
You will only find one list of groups that is searchable and sortable using the widgets at the top right of the list.
- Projects are GitLab’s primary entity of organization.
- You can explore projects visible to you on the “Explore projects” page.
- You can search for projects on the “Explore projects” page.
- On some instances a visibility class is disabled.
- Groups can contain projects and other groups.
- A top-level group is a group not contained in another.
- A subgroup is a group contained in another.
- You can explore groups visible to you on the ”Explore groups” page.
- You can search for groups on the “Explore groups” page.
Content from GitLab Projects
Last updated on 2026-07-14 | Edit this page
Estimated time: 36 minutes
Overview
Questions
- How can I create, modify and archive a GitLab project?
Objectives
- Create a project.
- Change name, description, visibility, and avatar of a project.
- Archive (or delete) a project.
Creating a Project
After knowing how to find groups and projects we want to go from passively browsing GitLab to actively using it. We are going to create a project and connect a local Git repository to it.
To create a project, we click on the button with the “+” symbol near the top of the side menu on the right and select “New project/repository”.
Multiple options are presented for how to create the new project. In this lesson we will only look at, and use, the first option: “Create blank project”. So click on that.
This leads to the following page:
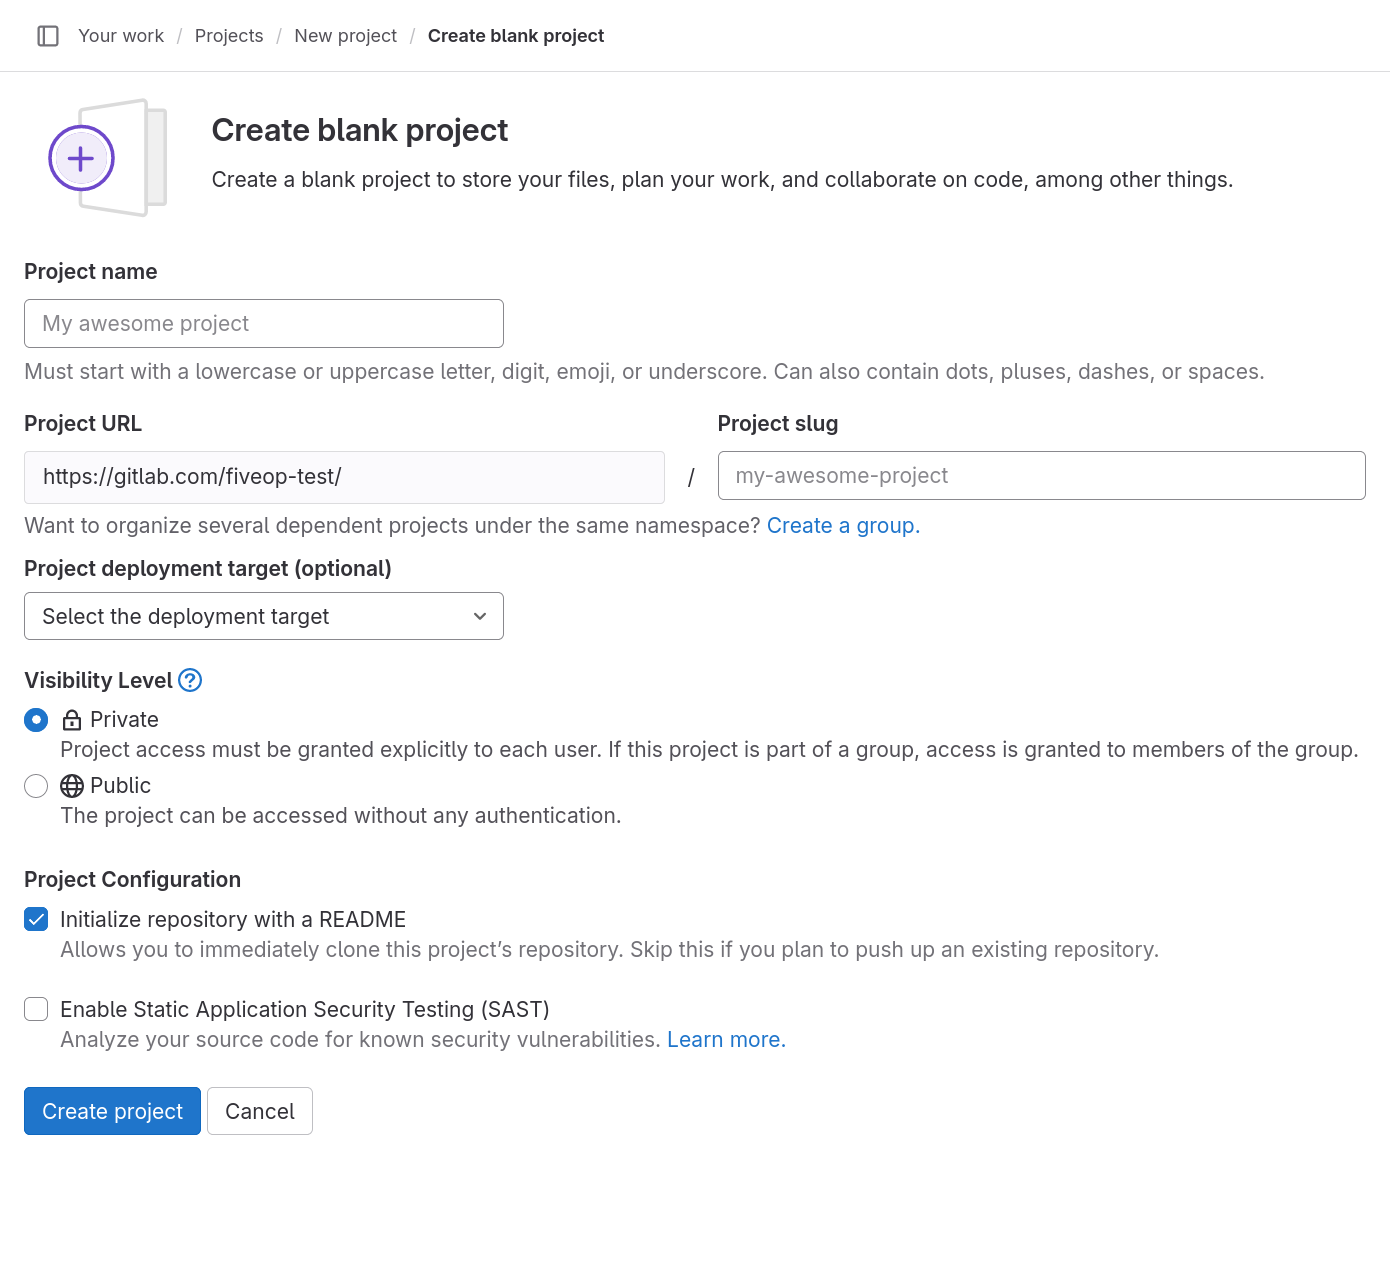
The “Project name” field is for just that, the project name. Its value has no other purpose and can be changed at anytime without indirect consequences (the direct consequence being, that its name will be different). We will call it “Research Diary”.
As we fill in the project name, a project slug gets suggested in the respective field. The project slug is the last part of the project’s, and the associated Git repository’s, URL or web address.
If the user belongs to at least one group, the URL’s middle part can be chosen in the drop-down field labeled “Project URL”, which defaults to the current user’s username. The default, indicated by the user’s name, is the location for a user’s projects (and groups). Other options in the drop-down list are the groups in which the current user may create projects.
Project URL and Project Slug
The two fields under labels “Project URL” and “Project slug” are the only fields in this form for which changing the value later might cause problems. They determine the URL under which the project’s pages and the project’s Git repository can be found, so changing them later might brake links and bookmarks as well as connections from Git repositories on other systems, for example on contributors’ machines.
We ignore the field labeled “Project deployment target (optional)”.
The choice under label “Visibility Level” determines the project’s visibility.
Visiblity
GitLab offers three settings for the visibility of a project: public, internal, and private. Publicly visible projects can be looked at by anyone that can access the GitLab instance, projects with internal visibility can be looked at by anyone logged in to the instance, while projects with private visibility can only be looked at by its members.
On GitLab.com the visibility “internal” is disabled. Everyone can create an account, log in to the instance, and thus could look at any project of internal visibility anyway.
Self-hosted instances might also disable some visibility types. For example, the public visibility might be disabled, to prevent users from publishing something to the whole internet.
We choose “Private” for our project’s visibility.
If, as per default, the checkbox “Initialize repository with a
README” is checked, the project’s repository will be initialized with a
commit that adds a file called README.md. Otherwise, the
project will start with an empty repository. We will add such a file
later ourselves, so we uncheck the box.
README
A project’s README file usually contains basic information about the project: what it contains, how it can be used (for example built or installed, if it is a software project), how to contribute, how to get help, and licensing information.
It is common to write README files in Markdown format, indicated by
the filename suffix .md.
Platforms like GitLab show the contents of a project’s README file on its homepage; if it is in Markdown format, in its rendered form.
We will ignore any other fields that may be visible depending on the GitLab instances configuration.
After clicking the “Create project” button, GitLab creates the project and redirects us to the project’s homepage, which looks similar to this:
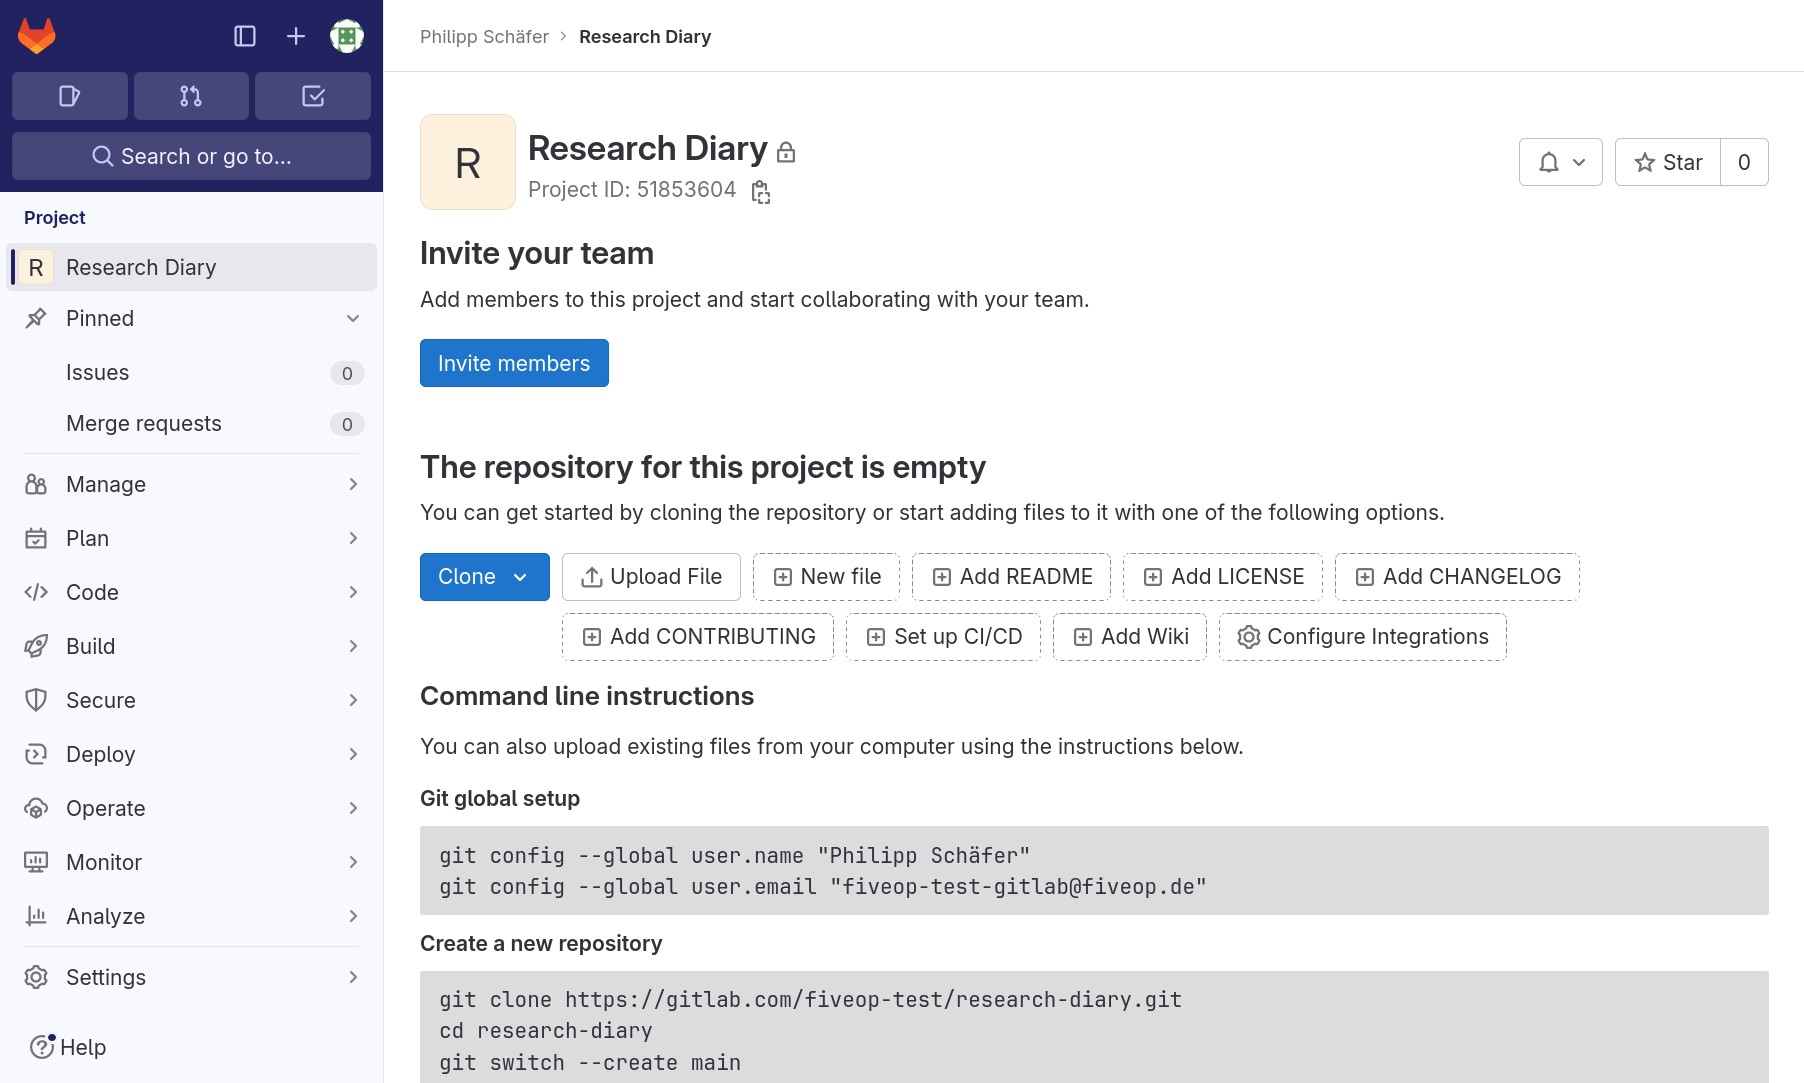
The page is split into the menu on the left and the project overview on the right.
The menu leads to pages related to various properties, processes, and content of the project. It is visible on each of these pages. The number of menu entries may seem overwhelming, in particular when one notices that the entries have subentries. However, it is not necessary to know what hides behind all these entries to use GitLab. Following this lesson, we will get to know parts of what lies behind the entries “Manage”, “Plan”, “Code”, “Build”, and “Settings”.
The project overview shows (from the top): The project’s avatar (or icon) and name; a prompt to invite team members (we will cover members later on); a statement that our repository is currently empty with buttons for several options to add content to it; and finally the beginning of the instructions on how to push a local repository to this project’s repository to fill it with content. We will follow them in just a bit.
The project overview page will look slightly different, once we have content in its repository. We will have another look at the page then.
Change Name, Description, Visibility, or Avatar
Click on the “Settings” sub-menu and select its “General” entry. Set the description to “My research diary, a collection of Markdown files”.
The project description appears in many lists and on some pages under the project’s name.
Then change any of the project’s name, visibility, or avatar. Do not forget to click the “Save changes” button once you are done.
This exercise should take about 5 minutes.
Markdown
Markdown is a markup language like HTML, on which the World Wide Web is based, or wikitext, which is used to write Wikipedia’s content. Its markup directives, indicating for example that something is a headline or a list item, are such that they serve their purpose even in the plain text form.
There are many variants (or flavors) of Markdown and GitLab has its own. Other than for rendering Markdown files in repositories on its web interface, GitLab allows for Markdown input in many of its interface’s text fields, such as issue descriptions or comments.
This will be pointed out as we get to use these fields during the lesson.
The project overview page presents us with many options to add content to the project’s repository directly in GitLab. We will add our first file to the project repository in the next episode.
Archiving a Project
We just went through the beginning of a GitLab project’s life cycle. At its end, if it has one, a project gets archived (or deleted). We will now go through the process of archiving a project, without completing the procedure.
Using the menu on the left, we navigate to the project’s “General” settings.
At the bottom of the page, we find a section named “Advanced”. We click on the “Expand” button right next to it and scroll down the page.
Notice that some of buttons here are not the usual blue or white, but rather red. This indicates that we should be careful about clicking them. Things might break or get deleted.
Scrolling back up, we find a section labeled “Archive Project”. Clicking the button will not delete the project. Instead it will be placed in a read-only mode. Everything will be preserved but nothing can be changed anymore. In addition, the project no longer shows up in search results and on the page for exploring projects.
Most of the time archiving a project is preferable to deleting it, in particular when it comes to research projects. Do not archive the project now! We will work with it throughout this lesson.
At the bottom of the page is also a section for deleting a project, in case you ever think that is the right thing to do.
- Creating a GitLab project requires not more than a few clicks and providing a name.
- Changing the name or description of a GitLab project after creation has no indirect consequences.
- A project’s visibility can be set to either private, internal, or public.
- You can archive a project (and you can delete a project, but often should not.)
Content from Adding Files to a Project Repository
Last updated on 2026-07-14 | Edit this page
Estimated time: 0 minutes
Overview
Questions
- How can I add files to my GitLab project?
Objectives
- Alternative Git: Push local Git repository to newly created project.
- Alternative NoGit: Add file to project repository using GitLab’s web interface.
Two Alternative Episode Versions
This episode consists of two alternative parts.
The first alternative shows how to push a local Git repository to the
project that was created as part of the previous episode. It consists of
the first three sections and the last, which is part of both
alternatives. As part of the process a README.md file will
be added.
The second alternative adds the README.md file using
GitLab’s web interface, thus obviating the use of Git itself. It
consists of the last two sections.
Configuring Git
Before we initialize a local Git repository, we make sure that Git is properly configured.
To check for our name and email address, We run
$ git config --global --get user.nameand
$ git config --global --get user.emailIf both return sensible values, we are good to go. Otherwise we provide the missing values, for example:
$ git config --global user.name "Some Novice"
$ git config --global user.email "some.novice@example.com"
It is now common to name the default branch main, rather
than master as is still the default in Git. For more
information see, for example, the announcement
of GitLab to change the default branch Since the discussion on this
topic has started, Git has introduced a configuration value for the
initial branch created by the git init command. We will use
this, to make sure that all future repositories created locally start
with a branch called main:
$ git config --global init.defaultBranch mainCreating a Local Repository
Research Diary’s Initial Content (Required)
Create a Git repository anywhere on your computer. Add a README file in markdown format that describes the repository’s future contents.
Remember to use a good commit message for your commit.
This exercise should take about 10 minutes.
We start by creating and navigating to a new directory,
research-diary. There we initialize a git repository.
$ mkdir research-diary
$ cd research-diary
$ git init
Next we create a file called README.md with the
following content using our preferred text editor.
# Research Diary

This repository contains our research diary.
Each day gets its own file.
We use the Markdown format for our files.
Finally, we stage the added file using and create a commit.
$ git add README.md
$ git commit -m "Add README.md"
Checking the status of the git repository, we should see that it exists and that there are no changes in the working directory or in the stating area:
$ git statusOn branch main
nothing to commit, working tree cleanThere is one file, README.md:
$ lsREADME.mdConnecting Local and Remote Repository
Having thus created our local repository, we want to save it to our repository in GitLab. To that end, we have a look at the project overview page again; this time at the instructions toward the bottom of the page. They read:
Git global setup
git config --global user.name "Some Novice"
git config --global user.email "some.novice@example.com"
Create a new repository
git clone https://gitlab.com/somenovice/research-diary.git
cd test
git switch --create main
touch README.md
git add README.md
git commit -m "add README"
git push --set-upstream origin main
Push an existing folder
cd existing_folder
git init --initial-branch=main
git remote add origin https://gitlab.com/somenovice/research-diary.git
git add .
git commit -m "Initial commit"
git push --set-upstream origin main
Push an existing Git repository
cd existing_repo
git remote rename origin old-origin
git remote add origin https://gitlab.com/somenovice/research-diary.git
git push --set-upstream origin --all
git push --set-upstream origin --tags
We already covered the global setup.
The next three sets of instructions are mutually exclusive. The first is not for us, because we already created a repository. Neither is the second, because although we have a directory with contents, its already a Git repository. That leaves us with the third option, which is the one applicable to our situation: “Push an existing Git repository.”
Transferring our changes to a remote repository is called pushing, because we are sending the changes from us, the local repository, to somewhere else, a remote repository. Later on we will “pull” changes from a remote repository, completing the analogy.
Going back to the shell, we configure our project’s repository as a remote in our local repository:
$ git remote add origin https://gitlab.com/somenovice/research-diary.githttps:// vs git@
We assume throughout this lesson that the user has no SSH key configured, because we do not want to make the setup of such a key a prerequisite.
If however, a user has configured an SSH key for their account, GitLab would default to showing links to repositories in the form for Git over SSH instead.
For example, without a configured key GitLab shows
https://gitlab.com/somenovice/research.git
for our example repository, whereas with a configured key it would show
git@gitlab.com:somenovice/research.git.
The HTTPS link still works if a SSH key is configured, it is only no longer shown by default.
We instruct Git to add a remote called origin with the
address https://gitlab.com/somenovice/research-diary.git.
Make sure to copy that URL from the project overview page, because it
represents the Git address of your project’s repository on GitLab. It
will be different for everyone.
Note also, that we skipped the second line of the instructions. It
renames an existing remote origin to
old-origin, but we have no existing remote.
Names for remotes
Apart from the restrictions that Git puts on remote names, which can be adhered to without much thought by using only letters, numbers, underscores, and hyphens, we should choose meaningful names for remotes, in particular, when we add multiple remotes to a local repository.
In most examples, origin is used as the name for a
remote, because it is the name of the remote created when cloning a
repository. It is a meaningful name for the main remote repository, if
there is one. This together with its ubiquitous use make it a very good
name.
In other cases, we might call a remote to a private copy of the main
repository after our username or server it is located on, for example
uni for a university GitLab instance.
Finally, we push our changes to the remote repository. The command will prompt for our user name and password:
$ git push --set-upstream origin --allEnumerating objects: 3, done.
Counting objects: 100% (3/3), done.
Writing objects: 100% (3/3), 250 bytes | 250.00 KiB/s, done.
Total 3 (delta 0), reused 0 (delta 0), pack-reused 0
To https://gitlab.com/somenovice/research-diary.git
* [new branch] main -> main
branch 'main' set up to track 'origin/main'.Having successfully pushed our commit to the GitLab repository, we change to our browser and navigate to the project (or reload it, if we still have it open).
Adding a File to the Project
We are now going to add a file to our project. To do this, we first navigate to the project’s homepage, unless we are already on that page. Below the heading “The repository for this project is empty” there are several buttons. We click the one labeled “New file”, which brings us to a new page, the so called WebIDE.
The WebIDE shows a list of files on the left and a tabbed environment for open files on the right. When we first open it, it shows a Welcome page, which we can safely close by clicking the “x” labeled button on the Welcome page’s tab at the top.
Changing the WebIDE Theme
GitLab’s WebIDE uses a dark theme by default. To change it, click on the gear icon in the lower left corner and select “Themes”, then “Color Theme” from the opening menu. This opens a dialog to select a color theme for the IDE. Light themes are listed at the top and dark themes at the bottom. “GitLab Light” is GitLab’s own light theme. Select a theme by clicking on its name.
To actually create a new file, we click on the button labeled with an
icon representing a sheet of paper with a plus sign in the lower right
corner. Note thate this button is only visible, if you mouse hovers over
the list of files, which is currently empty, on the left. An text input
field appears below the button, which prompts us for a filename. We type
README.md into the field and confirm by pressing the return
key.
The list of files should only have one entry: README.md.
The text editor itself shows the contents of the file
README.md: nothing so far. We see the filename at the top
in a tab, which indicates that we can open multiple files and switch
between them using the tabs at the top.
Markdown Headlines
In Markdown, headlines are marked by one up to six #
characters followed by a space character in front of the text. The
number of # characters indicates the heading’s level, with
1 being the most significant.
For example, a level 3 headline:
### Interesting Section TitleResearch Diary’s Initial Content 2 (Required)
Describe the repository’s future contents in the README.md.
This exercise should take about 2 minutes.
To save the changes, the creation of the file and the text we entered, we need to create a so called commit. A commit packages changes in one or more files of the repository. The list of commits, in chronological order, constitute the history of a Git repository.
To get there, we click on the button on the left showing an icon that indicates a branching from one circle to two others. The button should be overlaid with the number 1 in a circle.
A dialog will replace the list of files. At the top is a text field for a commit message. Then comes a button labeled “Commit & Push”, followed by a list of all files that were changed, added, or deleted.
A commit message should summarize the changes that are packaged into the commit. Good commit messages are what makes the history of a repository useful.
We enter a good commit message, for example “Add README.md” and click the button labeled “Commit to ‘main’”.
Having done that, we are done editing and navigate back to the
project’s homepage. To get there, we need to click on the button labeled
“GitLab” in the lower left of the screen and select “Go to
Project Page After Adding Files
We are greeted by the project homepage, similar to the following screenshot:
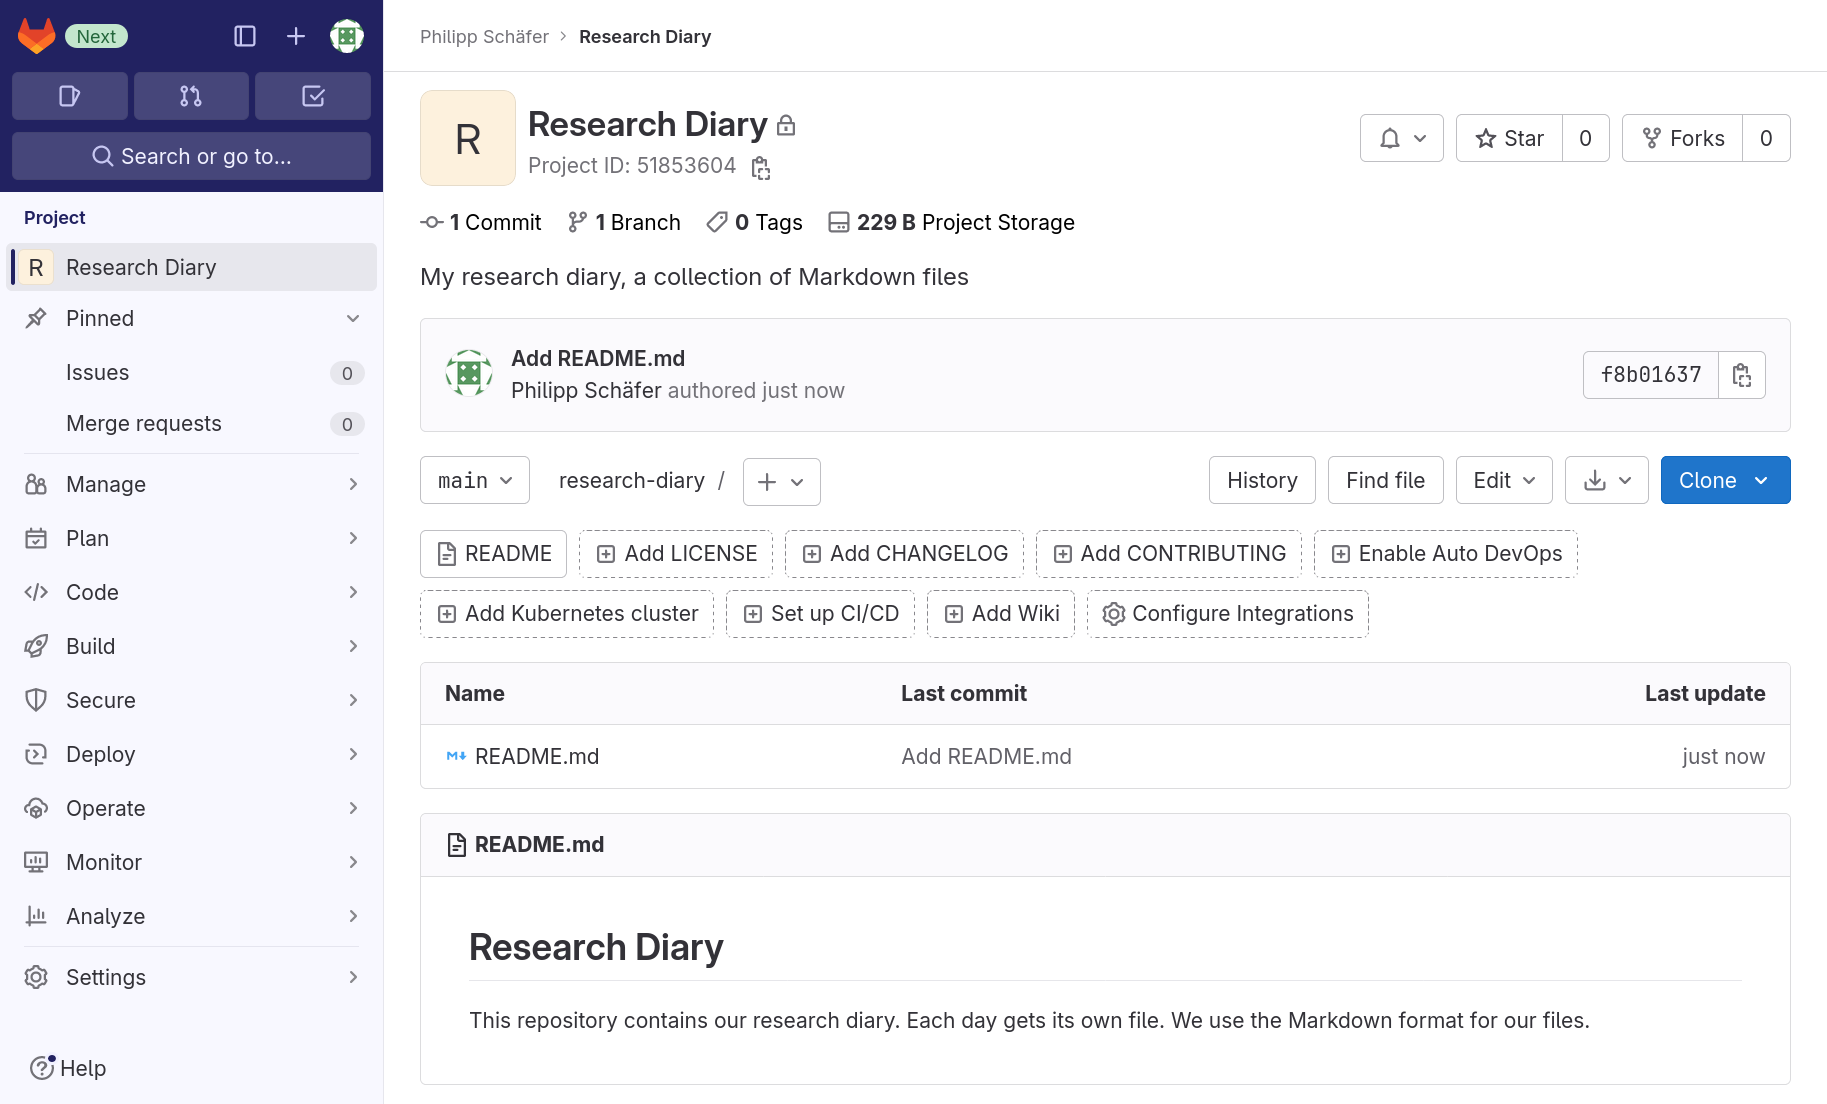
Let us look at what has changed compared to its initial state. The interface elements encouraging us to add members to the project are gone. Of course, we can still navigate to the project’s Members page later on, if we need to. We also, correctly, no longer get told that the repository is empty and the instructions on how to push content to the repository have vanished.
Instead, we see some statistics below the project’s title: 1 Commit, 1 Branch, 0 Tags, 209B Project Storage. They double as buttons to other project pages.
Below the description is a box presenting information on the last commit of the currently selected branch, followed by a new button bar.
The following buttons, that we saw earlier, allow us to add specific
files or navigate to the configuration of certain GitLab features. Note
that one button changed from reading “Add README” to just “README”,
since we added a file called README.md. The button is now a
link to the latest version of that file in the current branch.
Then we see a list of files. So far, there is only
README.md. The list also tells us through which commit it
was last changed and when that commit was created.
Finally, we see the rendered version of the markdown file
README.md. Because having a README-file in the root
directory of a repository is a widespread convention, GitLab (and other
platforms like it) usually render it on a project’s homepage.
- Alternative Git: You can fill a fresh GitLab project’s repository by pushing a local repository.
- Alternative NoGit: You can create and edit files in a repository using GitLab’s web interface.
Content from Collaboration
Last updated on 2026-07-14 | Edit this page
Estimated time: 20 minutes
Overview
Questions
- How can multiple people collaborate on a project?
Objectives
- Explain the concepts of members and roles.
- Add a member to a project.
- Contribute to a project that you are a member of.
Two Alternative Episode Versions
This episode consists of two alternative parts.
The first alternative uses Git for collaboration. It consists of the first and second section.
The second alternative uses GitLab’s web interface for collaboration. It consists of the first and third section.
Adding Project Members
So far, each of you has created a GitLab project that no one but you can contribute to; depending on the visibility setting, no one but you might be able to even see it.
Git and GitLab can be and is used for one-person projects. But we want our colleagues to contribute to our research diary, when they keep tabs on our experiments for us on the weekends. To achieve this, we will grant others access to our GitLab project.
Using the menu on the left side of the project homepage (or nearly any other project page), we navigate to the project members page hovering over or clicking on “Manage” and then clicking on “Members” in the submenu. The project member page should look similar to the following screenshot:
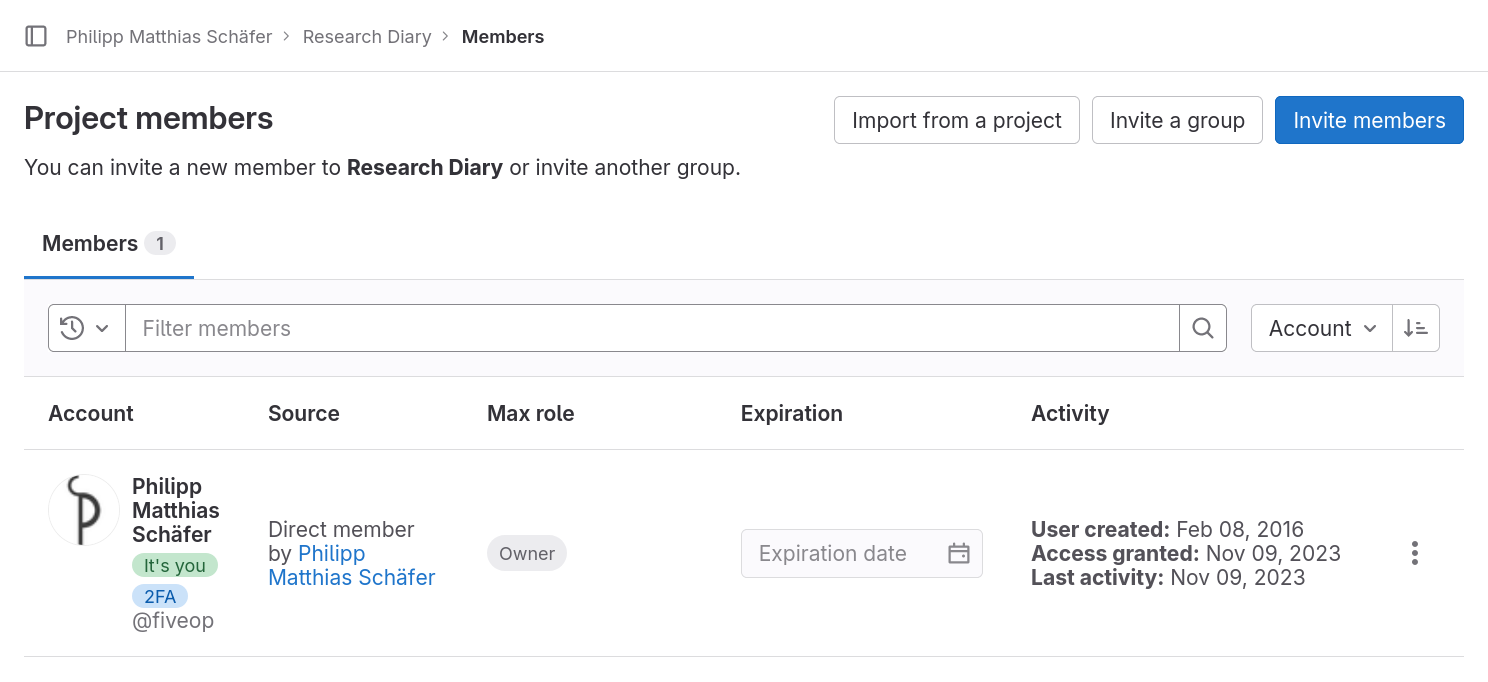
On the page we can see the page title, “Project members”, three buttons to the left of the title, and a filterable table of members, currently only listing ourselves.
The table shows our full name and account name, why we are a member of this project, what our maximum role is–more on that in a bit–, when we got access—at the moment we created the project—, a disabled membership expiration date widget, and three dates on our activity.
For practice we will all add an instructor to our project and remove them again right away. Click the button labeled “Invite members”, type in the username your instructors provided you with into the search field, make sure that “Guest” is selected as a role, and click the button labeled “Invite”.
Your instructor should now be listed next to you in the table. Unlike in your row, you can change the role and the expiration date of this new entry.
The role determines what the member is allowed to do in the project. An owner has full rights, a guest almost none. GitLab’s handbook gives a detailed overview of the different roles’ permissions.
Now, we are going to remove the instructor from your project’s members again. Click the three dots on the right in the instructor’s row, then click on “Remove member”, and finally click the button of the same name in the popup dialog. The page reloads itself and the entry vanishes from the table.
Adding Members
Get into pairs and add each other with the role “Maintainer” to your projects.
The “Maintainer” role grants just enough permissions for all the collaborative tasks we will practice in this lesson.
This exercise should take about 5 minutes.
Contribute Changes to Project Repository (using Git)
Now, everyone should be the member of one of your co-learners’ projects. We will now add a diary entry for imaginary work that we did on their experiments last weekend.
First, we clone their repositories into the directory
rd-colleague.
$ git clone https://gitlab.com/someothernovice/research-diary.git rd-colleagueCloning into 'research-diary'...
Username for 'https://gitlab.com': somenovice
Password for 'https://somenovice@gitlab.com':
remote: Enumerating objects: 3, done.
remote: Counting objects: 100% (3/3), done.
remote: Compressing objects: 100% (2/2), done.
remote: Total 3 (delta 0), reused 0 (delta 0), pack-reused 0Moving into the directory
$ cd rd-colleaguewe check its contents. If your colleague did everything we did, it
should contain a single file, README.md.
$ lsREADME.mdNow we are sure that everything is in order with the cloned repository and we can add our lab entry.
First we create a file, named 2022-03-13.md after the
date on which we did the work, listing the work we did:
MARKDOWN
* Injected transformational fluid into moss sample.
* Moss turned into several butterflys. SUCCESS!Markdown Lists
Lists can be represented in Markdown by starting their items with a
* character followed by a space. If an list item wraps over
multiple lines, lines following the first are started with sufficient
spaces to align the lines text with the first line’s text.
For example:
* First item
* Second item with enough text to make us wrap to a second
  line.
Then we add the file as part of a new commit to the repository:
$ git add 2022-03.13.md
$ git commit -m "Record work on experiment A-13"
[main 4eac24c] Record work on experiment A-13
1 file changed, 2 insertions(+)
create mode 100644 2022-03-13.mdWe check Git’s log for our commit:
$ git log -n 1commit 4eac24cafbcebc4f0d528bd2e1246a4624265085 (HEAD -> main)
Author: Some Novice <some.novice@example.com>
Date: Thu Mar 17 16:00:23 2022 +0000
Record work on experiment A-13And everything seems to be in order, so we push our change.
$ git pushUsername for 'https://gitlab.com': somenovice
Password for 'https://somenovice@gitlab.com':
Enumerating objects: 4, done.
Counting objects: 100% (4/4), done.
Delta compression using up to 4 threads
Compressing objects: 100% (3/3), done.
Writing objects: 100% (3/3), 388 bytes | 388.00 KiB/s, done.
Total 3 (delta 0), reused 0 (delta 0)
To https://gitlab.com/somenovice/research-diary.git
2dd2c21..4eac24c main -> mainWe have now recorded in pairs lab work we carried out for a colleague during the last weekend. Curious what our colleagues did for us, we navigate back to the directory of our own repository in the shell, for example:
$ cd ../research-diaryThere, we pull the changes that our colleagues previously pushed.
$ git pullUsername for 'https://gitlab.com': somenovice
Password for 'https://somenovice@gitlab.com':
Updating 2dd2c21..4eac24c
Fast-forward
2022-03-13.md | 2 ++
1 file changed, 2 insertions(+)
create mode 100644 2022-03-13.mdFrom the output’s last line, we can already see that a single file,
2022-03-13.md was added. Letting the shell write out the
files contents shows us, what our colleague did:
$ cat 2022-03-13.mdWe successfully collaborated through GitLab on a project of text files.
Contribute Changes to Project Repository (using GitLab WebIDE)
Now that we are members of the project of one of our co-learners, we can contribute to each others projects. We will add a diary entry for imaginary work that we did on their experiments last weekend.
To navigate to our co-learner’s project, we click on the GitLab-Logo in the upper left corner of the page. The list under “Your projects” should now contain at least two projects: the one we created ourselves in the beginning and the project of our co-learner. We click on the name of our co-learner’s project to navigate to it’s homepage.
To add a file, we click on the button labeled “Edit” towards the right of page above the list of files, and select WebIDE from the popup-menu. This redirects us to a page with a file browser in a column on the left, with most of the screen taken up by a box welcoming us to the WebIDE.
We want to create a new file, as we created the
README.md file before. To do that we click on the button
above the list of files on the left that is marked with an icon
representing a sheet of paper with a +-sign on top of it. The button is
only visible, when the mouse hovers over the list of files.
A pop-up text input field prompts us for a name, which we will
provide: 2023-02-05.md, the date on which we did the work
in the laboratory. We confirm the file name by pressing the return
key.
We see the result of our action in two ways: A file named
2023-02-05.md appeared in the list of files on the left and
a tab labeled 2023-02-05.md showing an text editor appeared
in the space to the right of the list of files.
We will now add a list of things we supposedly did in the laboratory last Sunday, for example:
Markdown Lists
Lists can be represented in Markdown by starting their items with a
* character followed by a space. If an list item wraps over
multiple lines, lines following the first are started with sufficient
spaces to align the lines text with the first line’s text.
For example:
* First item
* Second item with enough text to make us wrap to a second
  line.
To save the changes, the creation of the file and the text we entered, we need to create a so called commit. A commit packages changes in one or more files of the repository. The list of commits, in chronological order, constitute the history of a Git repository.
To get there, we click on the button on the left showing an icon that indicates a branching from one circle to two others. The button should be overlaid with the number 1 in a circle.
A dialog will replace the list of files. At the top is a text field for a commit message. Then comes a button labeled “Commit & Push”, followed by a list of all files that were changed, added, or deleted.
A commit message should summarize the changes that are packaged into the commit. Good commit messages are what makes the history of a repository useful.
We enter a good commit message, for example “Record work on experiment A-13” and click the button labeled “Commit to ‘main’”.
In the dialog that pops up in the center top of the screen, we select “Continue”.
Having done that, we are done editing and navigate back to our project’s homepage. To get there, we click on the button labeled “GitLab” in the lower left of the screen and select “Go to GitLab” from the list that pops up at the top. This will open the project view in a new window or tab, depending on the settings of your browser. We select our own project from the list of projects under “Your projects”.
In the list of files, we should see the file added by our co-learner.
- Adding others as members allows them to directly contribute to your projects
- Members with sufficient rights can independently contribute to repositories
- Alternative Git: You update your local repositories relative to the
GitLab repository with the
git pullcommand - Alternative Git: You send changes committed in your local repository
to the GitLab repository with the
git pushcommand.
Content from Groups
Last updated on 2026-07-14 | Edit this page
Estimated time: 30 minutes
Overview
Questions
- How can I organize the projects of my (research) group and my collaborations?
Objectives
- Create a group.
- Move a project.
- Add a member to a group.
- Explain how the members of a group relate to its subgroups and projects.
- Delete a group.
In the first episode, we already learned about groups; GitLab’s way to organize projects. A group might hold projects of a research group or those of a research project with contributors from multiple institutions. Together with members and their permissions groups can be used to manage access to multiple repositories (for example, restrict access to certain repositories to staff while others may be accessed by student assistants as well).
In this episode we will create (and delete) a group, move our project, and learn how members of a group relate to its subgroups and projects.
Creating a Group
To create a group, we click on the button with the “+” symbol near the top of the side menu on the right and select “New group”. On the next page, we select “Create group”.
This leads to the following page:
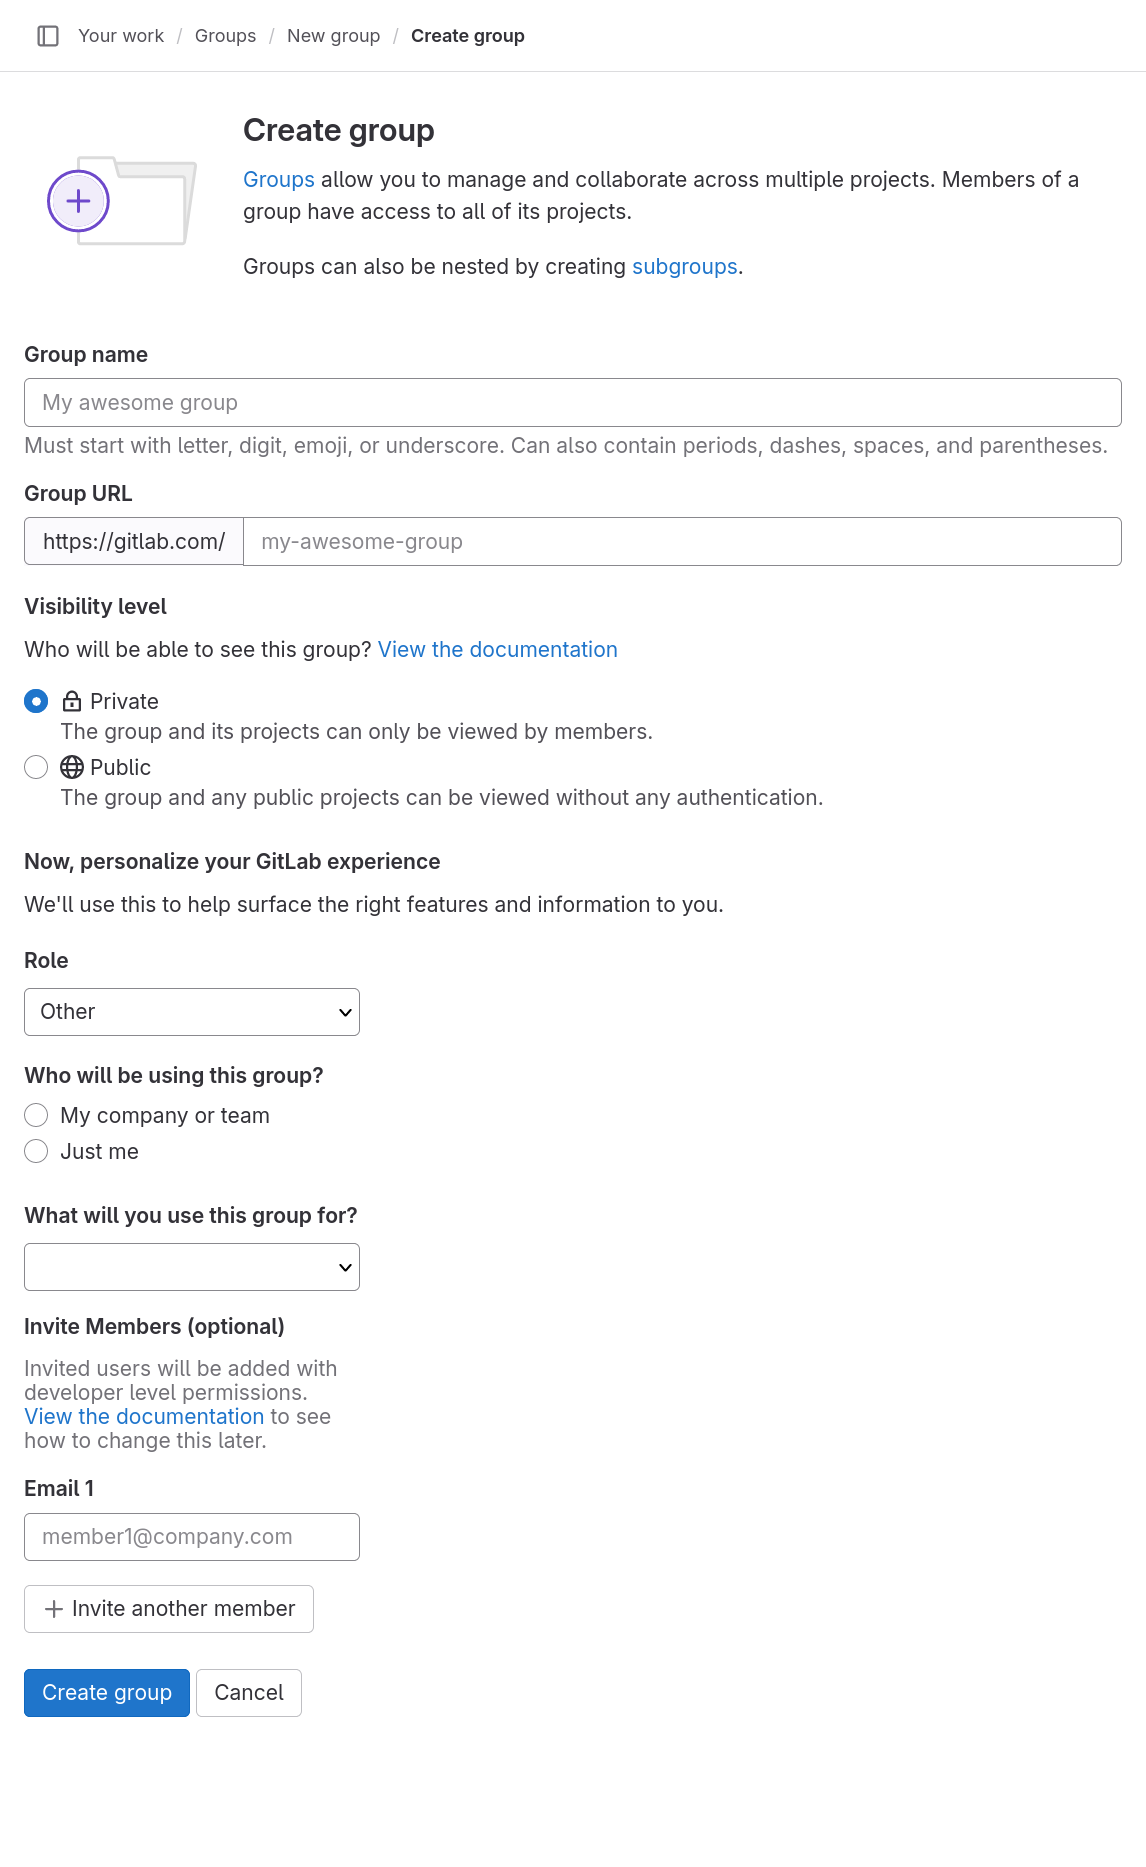
Choose any name for the group, for example a fictional research group like “Ant-Sized Elephants’ Applications Lab”. When you move the focus out of the input field, for example by pressing the tabulator key, GitLab will suggest a URL for the group. Usually, we might want to adapt it, but for now all we care about that it is available.
You can leave the group’s visibility private. The visibility of a group works like that of a project.
We will leave the remaining fields as they are and create the group by clicking the blue button labeled “Create group”. GitLab will navigate to the group home page, which usually lists the group’s subgroups and projects. Since there are currently none, it shows two big buttons for creating a new subgroup and a new project.
We will have a look at how to create a project in the new group.
We click on the button labeled “Create new project”. On the next page, we select “Create blank project”.
This leads to the create blank project form page. We do not really want to create a project. Instead we have a look at the drop-down field under the heading “Project URL”. Because of the way that we took to get to this page, it is prefilled with our group’s URL slug.
Submitting the form with our group’s URL selected would create a project in that group. But we will not do that.
Move Project to Group
Instead, we will now move our project to our group.
We start, by navigating to our project’s homepage. Once there, we select “Settings” then “General” in the side menu. On that page, we expand the section labeled “Advanced” and scroll down to the subsection labeled “Transfer Project”.
Now, please read the subsections notes, with an emphasis on the list of things to be aware of.
A few comments on the last two items of the list:
The second to last tells us that we will need to update our local repositories to point to the new location. Because we are moving the project to a group from our own projects, the URL will change. So the URL we specified when adding the remote to our local repository will no longer be valid. We will test this, but will not change the URL, because we will move the project back in a bit.
The last item on the list informs us about potential visibility changes. For example, moving a public project to a private group, will cause the project to become private.
Having carefully read and thought about the warnings, we are ready to move our project. We select the group that we previously created from the drop-down field and click the button labeled “Transfer project”.
A dialog appears and we confirm, that we are sure, by typing in the name of our project and clicking the button labeled “Confirm”.
The project will be transferred to the group.
Check that the project URL changed (only when teaching with Git)
To test that the URL changed, we switch to the shell and navigate to the directory containing our repository; Not the repository of our co-learner!
Running
git remote get-url originshould tell us that our project points to the old project URL. So, let us try to run
git pullAlready up to date.That result is unexpected. The reason for this is that GitLab will redirect the old URLs to the new ones, as long as the old URLs do not point to a new project.
Adding Members to Group
Adding Members
Add your instructor as a member of your group with the role of “Guest”. The process is the same as adding members to a project.
This exercise should take about 5 minutes.
Steps to solve the challenge:
- Navigate to the group home page.
- Select “Manage”, then “Members” from the side bar menu.
- Click the “Invite members” button.
- Fill in the dialog to invite your instructor with the “Guest” role.
- Click the “Invite” button.
After adding a member to the group, we a have look at the member list of our research diary project.
The list has three entries: ourselves, our co-learner, and our instructor. We have the “Owner” role and, as its creator, are a direct member of the project. Our co-learner has the “Maintainer” role that we assigned them and are also a direct member of the project, as we added them directly to the project.
The entry we are really interested in is that of the instructor. We added them as a “Guest” to the group. Now, they show up in the list of this project with the same role. The reason is, as the column “Source” tells us, that our project is in our group, and our instructor is a member of that group.
That means, projects and groups inherit the members of the group they belong to.
Move project
Move your project back to your username space.
This exercise should take about 5 minutes.
Delete Group
Now that our group is empty again, we will delete it, to be polite users of free resources. (If you created a group, that you actually intend to keep, do not delete it.)
Delete a Group
Delete your group. You find the deletion form at the same position in the group’s settings, as the project deletion form in a project’s settings.
This exercise should take about 5 minutes.
Steps to solve the challenge:
- Navigate to the group home page.
- Select “Settings”, then “General” from the side bar menu.
- Expand the “Advanced” section and scroll all the way down.
- Click “Remove group”.
- Fill in the dialog and click “Confirm”.
- Groups and subgroups are used to organize projects.
- Groups can have members.
- Projects and groups inherit members from the group they belong to.
Content from Issues
Last updated on 2026-07-14 | Edit this page
Estimated time: 20 minutes
Overview
Questions
- How can I use GitLab to manage development or a whole project?
Objectives
- Create an issue.
- Comment on an issue.
- Close an issue.
- Use boards to get an overview the state of issues.
Create Issue
Before our excursion to learn about groups, we contributed lab notes to our co-learner’s repository. Having done that, we think we should be listed as contributors in the documentation of that repository. Since, we want our co-learner to do the honors, we create an issue in their repository, to document our desire.
Issues are a feature of GitLab that allows us to organize tasks by project and by group (and its descendant groups and projects). By default anyone that has read access to a project can file issues. This usually makes sense, because users can report their problems and ask their questions that way, even when they are not supposed to change anything themselves.
With our co-learner’s help, we navigate to their project. On the side bar menu on the left we click the entry labeled “Issues” and on the following page we click on the button labeled “New issue”.
This leads us to the following form:
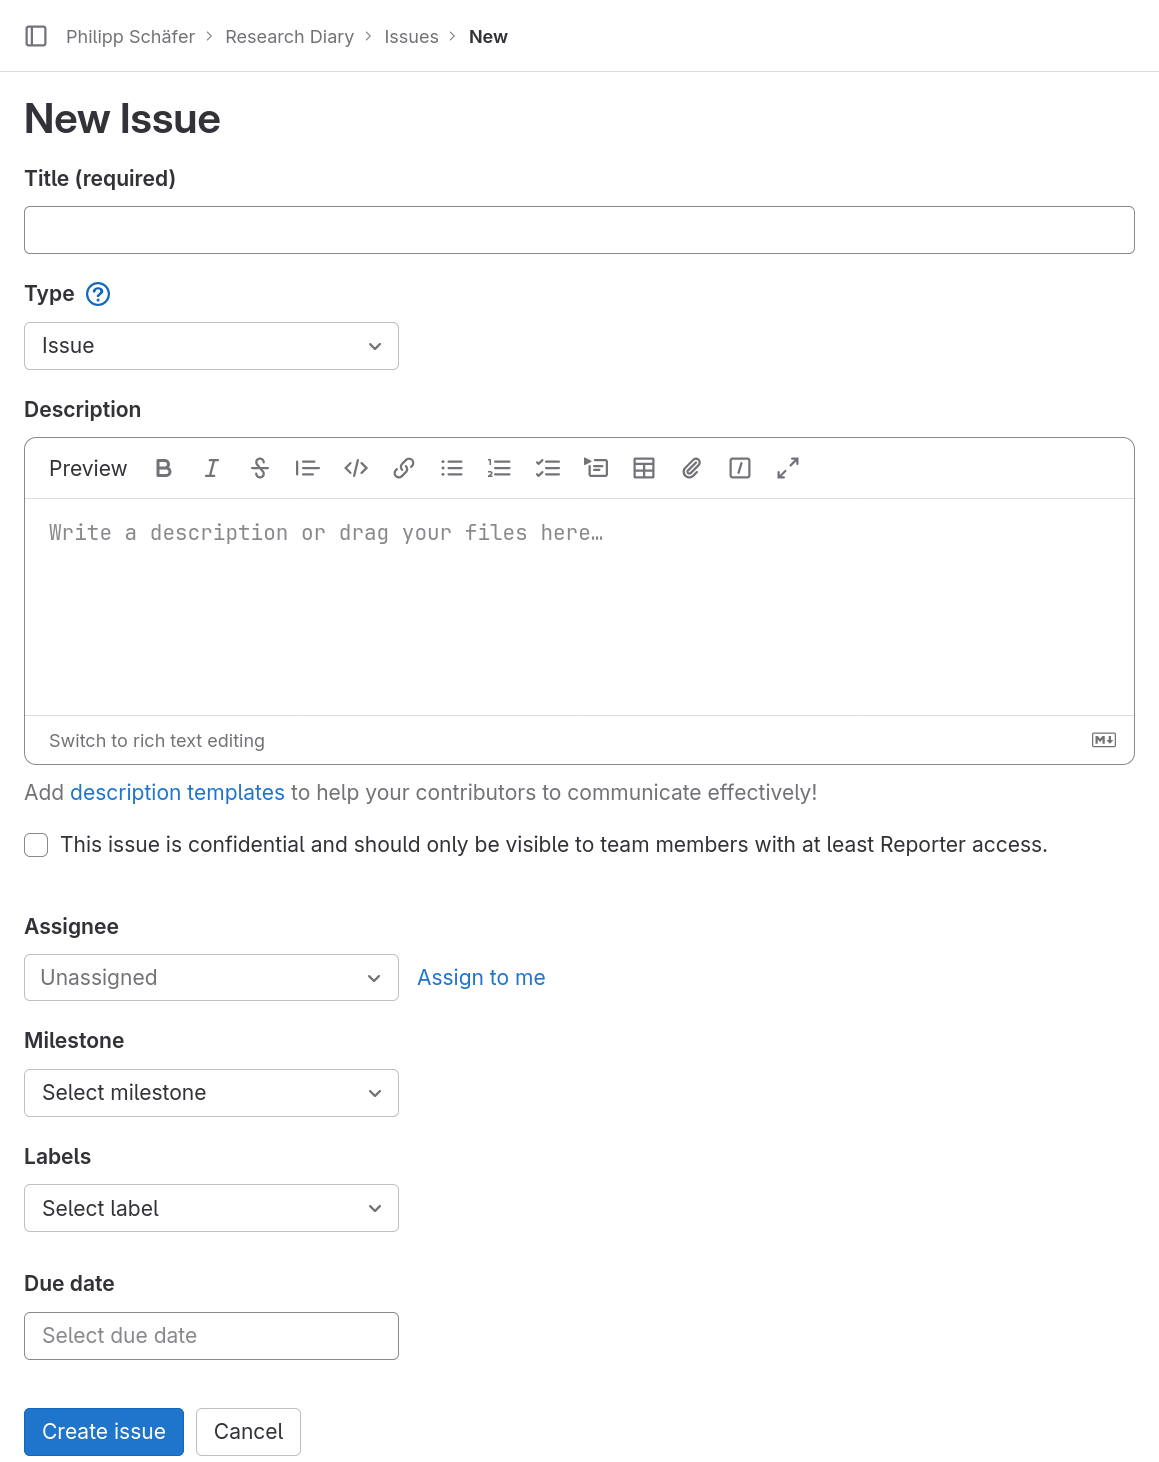
For our issue we provide a short, descriptive title, for example “Recognize outside contributors” and a description:
MARKDOWN
Outside contributors should be mentioned in the project’s documentation. Their
names could be listed in one of the following locations:

* a section in `README.md`
* a separate `CONTRIBUTORS.md` fileMarkdown Code Spans and Blocks
Markdown provides syntax for formatting text in a monospaced font, this is usually used to typeset code, because code is usually written to be readable in such fonts.
For a monospaced snippet within a normal paragraph, enclose the snippet in a single backquote (also called backtick or grave accent), for example
will be typeset as:
The filename README.md will be set in a monospaced
font.
For a whole block of monospaced text, for example some lines of code, start and end the block with a line consisting of three or more backquotes, where the number should match for start and end, for example
MARKDOWN
```
# This python code will also be set in a monospaced font, which preserves
# relative indentation between lines.
def some_function():
    pass
```
will be typeset as:
# This python code will also be set in a monospaced font, which preserves
# relative indentation between lines.
def some_function():
    pass
We assign the new issue to our co-learner by selecting their account in the drop-down field labeled “Assignee”. They need to be a member of the project, directory or indirectly, in order to be listed in that field.
Then we click the button labeled “Create issue”. This redirects us to the new issue’s page. Near top we see its title followed by its description. A text field below the description can be used to create a comment and a side bar on right lists more fields that could be used to further specify properties of that issue.
Add a Label
We will assign a value to one of the fields, the one labeled “Labels”, now.
We want to know when our co-learner starts to work on the issue. To communicate that fact through GitLab’s issue system we can use its Label feature. Issues can be defined for groups and projects. In the case of groups they are then also available to all its descendant groups and projects.
So, if we want to assign a label to the issue, we first have to create it. We click on the “Edit” link next to the “Label” field in the side bar. This opens a small dialog titled ”Assign labels”. If we had already defined labels, they would be listed here.
Since have not, we click the link “Create project label” in the small dialog. A new dialog opens titled “Create project label”. We call it “WIP” for work in progress and select our preferred color. Colors are often used to group labels, for example one color for labels referring to the subproject or subsystem the issue relates to, another color for the current progress of the issue (like our WIP label), etc. Then we click the button labeled “Create”.
This brings us back to the “Assign labels” dialog, this time with our new label listed. We select our label by clicking it and close the dialog by clicking on the x in the upper right corner.
Comment on an Issue
We provided a generic description of the issue in its description, but we want to make sure that our co-learner does not forget to include us. So we write a comment regarding our inclusion.
To support our case we want to reference our contribution. For this, we can use another feature of GitLab’s markdown: When we mention a commit of the project’s repository by its identifier, GitLab will automatically convert it to a link to the page of the commit.
First we need to know the identifier of our commit. We navigate to the project’s commit history by clicking the submenu item “Commits” of the menu item “Code” in the side menu. There we find our commit at the top with a short sequence of numbers and letters on the right. This is beginning, the prefix, of the commit’s identifier, which is also called a SHA due to how it is created. Right next to the prefix is a button with an icon that looks like a clipboard. As its tooltip tells us, clicking it will copy the commit SHA (identifier). We click on the button.
We navigate back to our issue by clicking the menu item “Issues” in the side menu and clicking on the title of our issue in the list that opened.
Using the copied commit identifier, we formulate our commit similar to
Please mention me as a contributor due to commit 4eac24cafbcebc4f0d528bd2e1246a4624265085.and click the button labeled “Comment”. A new box shows up above the comment text area showing our message. We can see that GitLab uses and shortened version of the commits identifier for the link text, which makes it slightly more readable.
Before we move on, please note the button labeled “Close issue” under the comment text field. An issue starts in the open state and can be closed by clicking this button. When we type something into the comment field the label of the button changes to “Comment & close issue”, so we can add a final comment before closing the issue.
This is a very important feature, allowing us to distinguish between issues that have yet to be dealt with and those that have already been dealt with. We do not, in general, delete issues, because they are often still useful even if closed already. For example, we can use the search to check whether a certain topic was already discussed in the past.
Issue Boards
Now, we will have a look at boards, a feature that uses labels to visually organize a project’s issues.
We navigate to our project’s issue board by clicking the submenu item “Issue boards” of the menu item “Plan” in the side menu.
The following page loads:
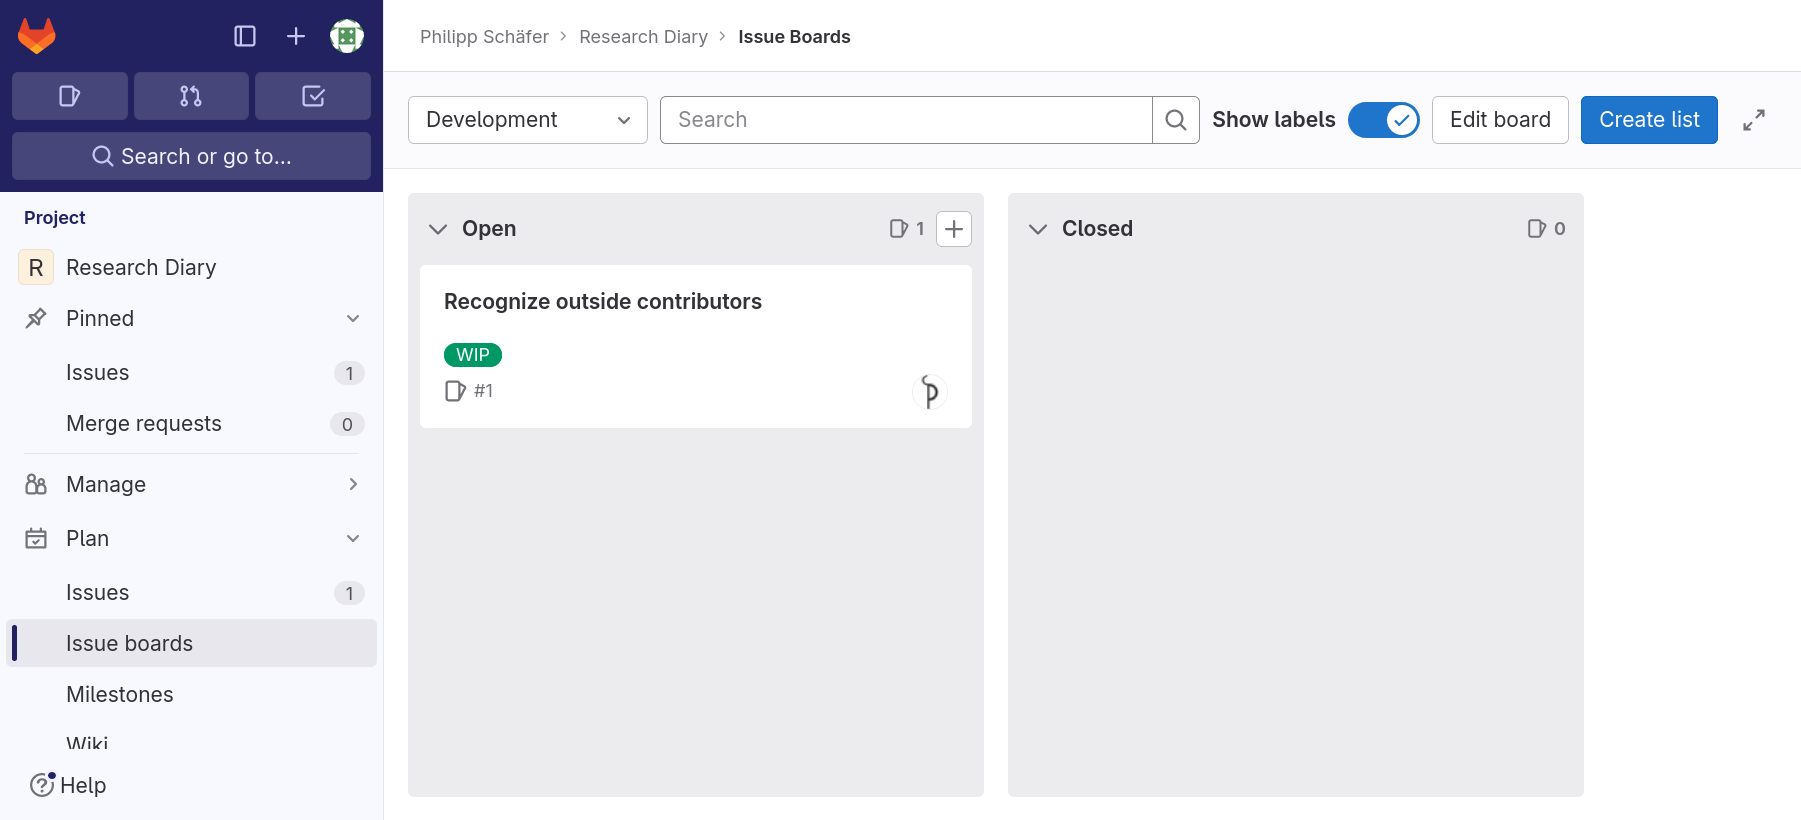
By default, GitLab creates one board, called “Development”, for each project. This is the board we see. It has two so called lists configured, labeled “Open” and “Closed”, which list all open and closed issues of the project, respectively. These two lists cannot be deleted.
We will now create another list for issues that are work in progress, that is those that are labeled “WIP”.
We click on the button labeled “Create List”. A new list appears to the right of the “Closed” list. We are prompted to select a label. We select our label “WIP” and click the button labeled “Add to board”.
The new list is created between the “Open” and “Closed” lists. Those two will always be on the left and right end, respectively. We can reorder the lists created by us however we want between these two.
Note, that our issue is initially shown in the “Open” list and our new list. When we reload the page, it disappears from the “Open” list. In general, open issues that belong to one of the custom lists, due to their labels, will not appear in the “Open” list. Closed issues, however, will always only appear in the “Closed” list.
Boards can not only be used to get an overview of a project’s issues. They can also be used to manipulate their labels. If we drag an issue from one list to another, the label of the originating list will be removed and that of the target list will be added (unless it is one of the “Open” and “Closed” lists). Moving an issue to the “Closed” list will close the issue, while moving an issue out of the “Closed” list will reopen it.
We note that we added the “WIP” label to our issue, however, that is not accurate. Our co-learner should add the label whenever they start to work on it. To remove the label we drag the issue to the “Open” list.
We click on the issue’s title to navigate to its page. Initially the comment text field was directly under the description. By now, there is a list that chronicles the changes to the issue. It starts with the assignment to our co-learner (from creating the issue), next we see that the “WIP” label was added by us, then comes our comment, and finally it lists that we removed the ”WIP” label again.
This helps keep track of who did what at which point in time.
- GitLab has a feature to manage issues of a project.
- Issues consist of titles and descriptions.
- Issues can be open or closed.
- Labels can be assigned to issues.
- Users can be assigned to issues.
- Boards can give an overview of issues and their stats.
- An issue’s state can be manipulated in the board view.
Content from Merge Requests
Last updated on 2026-07-14 | Edit this page
Estimated time: 30 minutes
Overview
Questions
- How can I contribute to a project on GitLab?
Objectives
- Fork a project.
- Create and edit a file on GitLab.
- Create/Accept a merge request.
- Mention an issue in GitLab markdown.
In the episode on collaboration, we learned how to contribute changes to a project that we are a member of. We also learned, in the previous episode, that we can contribute to other projects by filing issues to report problems or ask questions. In this episode, we will learn about a way to suggest concrete changes to a GitLab project to which we have no write access.
The feature that allows us to do this is called Merge Request, the corresponding feature on GitHub is called Pull Request. As a target for our merge request, we will use our co-learners repository. We do have write access to it, but sometimes even then we want to suggest changes instead of just making them.
We will create a merge request for a file that lists the contributors. This will solve the issue that we filed during the previous episode.
Create a Fork
Since we are a member of our co-learner’s project we could create a merge request within the project. But this is no longer true if we ever want to suggest changes to a project that we are not a member of. So, to learn a little more, we will make ourselves some extra work.
So, suppose that we cannot make changes to our co-learner’s project. We need a copy that we can change. Such a copy is called a fork in GitLab’s (and also GitHub’s) case. The term can be explained by looking at its use in “fork in the road”: Once we make changes to our copy, the development history will have forked into two different directions.
To create a fork, we navigate to the homepage of our co-learner’s project. In the upper right corner is a button labeled ”Forks”. The number next to it tells us how many forks of this repository exist on GitLab. We will now increase that number by one by clicking on the button.
This redirects us to a form that looks like a reduced version of the “Create new project” form, which correctly indicates that by forking, we create a new project.
We need to select a namespace (group or our personal space) in which the fork should be created. We click on the drop-down list under “Project URL” and select our username.
Unique Project Name
If there already is a project with the name or the same slug, GitLab will show you an error message when you try to create the for. At the time of me writing this, the message can be summarized to “an error has occurred”, which is not very helpful. If that happens, reload the page, select a different name and/or slug and try again.
Now we click the “Fork project” button.
We are redirected to the fork’s project home page. The fork is a full featured project just like the original, however, only the Git repository is copied. So, for example, there are no issues in it, even though the original had at least one.
Create and Edit a File on GitLab
Our goal is to create a file that lists contributors of the project. We will do this within GitLab using its file creation and editing features.
To add a file, we click on the button labeled “Edit” towards the right of page above the list of files, and select WebIDE from the popup-menu. This redirects us to a page with a file browser in a column on the left, with most of the screen taken up by a box welcoming us to the WebIDE.
We do not want to edit an existing file, but want to create a new one. To do that we click on the button above the list of files on the left that is marked with an icon representing a sheet of paper with a +-sign on top of it. The button is only visible, when the mouse hovers over the list of files.
A pop-up dialog prompts us for a name, which we will provide:
CONTRIBUTORS.md. Then we confirm the file name by pressing
the return key.
All caps filenames
In software projects it is customary to name certain files with
information about the project in all caps. One example we already
encountered is the README file. Others are the file containing the
license (LICENSE), a file about how to contribute
(CONTRIBUTING), or how to install the software
(INSTALL).
Sometimes a file extension indicating the format is appended, usually in lower-case letters.
We see the result of our action in two ways: A file named “CONTRIBUTORS.md” appeared in the list of files on the left and a tab labeled “CONTRIBUTORS.md” showing an text editor appeared in the space to the right of the list of files.
We will now add something similar the following lines in the editor:
To save the changes, the creation of the file and the text we entered, we need to create a so called commit. A commit packages changes in one or more files of the repository. The list of commits, in chronological order, constitute the history of a Git repository.
To get there, we click on the button on the left showing an icon that indicates a branching from one circle to two others. The button should be overlaid with the number 1 in a circle.
A dialog will replace the list of files. At the top is a text field for a commit message. Then comes a button labeled “Commit & Push”, followed by a list of all files that were changed, added, or deleted.
We enter an appropriate commit message, for example
Add CONTRIBUTORS.mdand click the button labeled “Commit to ‘main’”.
In the dialog that pops up in the center top of the screen, we select “Continue”.
Create a Merge Request
Having created the commit, we navigate back to the project home page. We lick on the button labeled “GitLab” in the lower left of the screen and select “Go <project name> project on GitLab” from the list that pops up at the top.
We notice that the file that we created is now present in the list of files.
To create a merge request, we click on the menu item labeled “Merge requests” in the menu on the left and on the following page on the button labeled “New merge request”.
This gets us to the following dialog:
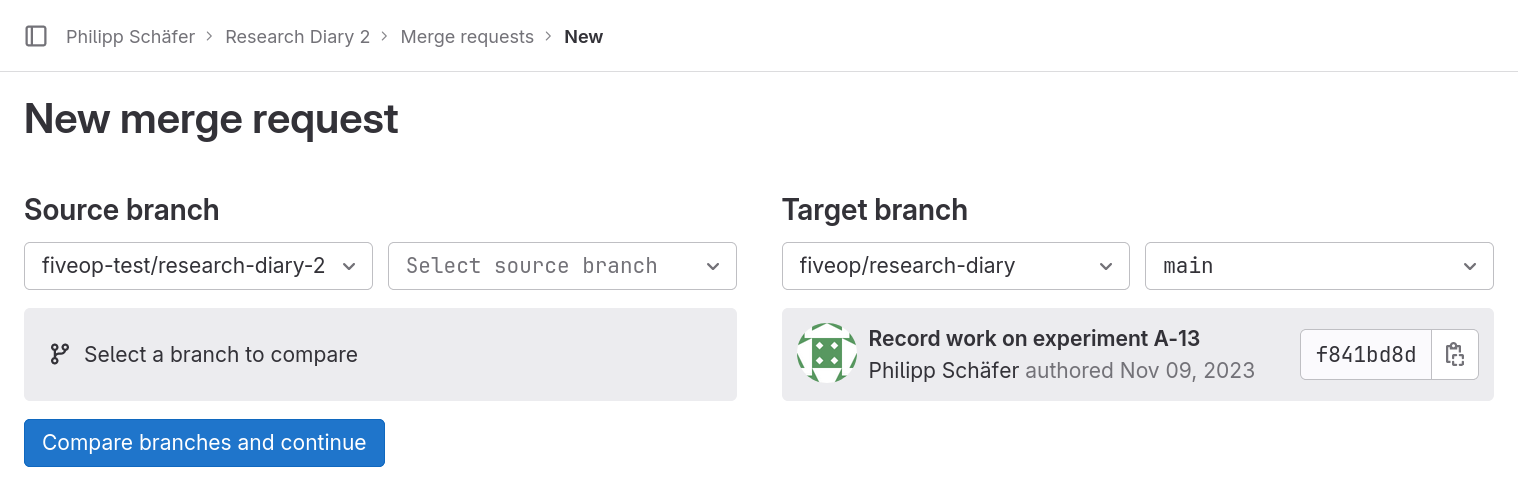
On the left side, we select the main branch for our change. Once done, a box with details of the last commit on that branch appears below the drop-down fields on the left.
We click the button labeled “Compare branches and continue”. On the following page, we can see that a merge request has its own title and description. They are prefilled with the newest commit message of the source branch. To connect this merge request with the issue that we filed, we write
Resolves #1in the merge request description. Everything else, we leave with its default value or in its default state.
Closing Issues Automatically
Whenever a merge request is merged to the default branch of a project
and its description or the description of one of its commits contains
the phrase <keyword> #<number> for one of the
keywords
mentioned in GitLab’s documentation, then the issue with number
<number> is closed automatically.
This can save a few clicks and ensures that closing the issue will not be forgotten.
We click the button labeled “Create merge request”. This leads us to the page for the created merge request. It looks similar to the page for an issue.The main difference are the tabs, their headers being located just below the title: “Overview” (the one that is shown initially), “Commits”, “Pipelines”, and “Changes”.
Clicking on the tab header labeled “Commits”, we see a list of all the commits of this merge request, which in our case is the commit we created.
We ignore the tab labeled “Pipelines”.
Clicking on the tab header labeled “Changes”, we see a so called diff for each of the changed files. In our case a file was added, so all the lines in the file are new, indicated by the plus sign at the beginning of each line and the background color green.
Back on the “Overview” tab, below the description there is button to “Approve“ the merge request. By default this is optional, but a project can be configured to require approval of merge requests by a certain group of members. Then there is a grayed-out button labeled “Merge”, followed by text that we need to ask someone with write access to click it. We will do exactly that in a moment. Note also, that the box around it mentions that the merge request mentions the issue. This can otherwise be easily overlooked, if the mention happens in a commit message of the merge request.
Finally at the bottom, we see that a merge request can be commented on, just like an issue.
But for merge request there is more. Navigating to the “Changes” tab and hovering the mouse over a line number, we see a speech bubble button appear at the start of the line. When we press it, a text field for a comment appears. We can use that to comment on individual lines. This feature allows users to have separate discussions for different changes of a merge request.
Code Review
Being able to comment on individual lines is a useful feature for a practice called code review. Code review entails that a peer of the author of some changes reviews those, before they are merged. This practice is the origin of the merge request feature, but it lends itself as well to reviewing text based changes other than code.
Accept a Merge Request
While we were creating the merge request for our co-learner’s repository, they did the same for ours. Now it is time to review and accept those changes.
Navigate to the issue your co-learner created in your repository. At the very bottom of the issue’s history you will see en entry of the form “Co-learner @colearner mentioned in merge request !1 2 minutes ago”. The merge request reference, ”!1”, is a link. We follow the link by clicking on it.
This leads us to the merge request page, very similar to the page of our own merge request. The difference, that we are interested in, is the state of the button labeled “Merge”. The button is no longer disabled. Above the button is a line of text that informs us that one commit and one merge commit will be added to branch ‘main’.
The merge commit serves as a common descendant of the heads of your main branch and the branch on which your co-learner based their merge request.
We click on the button labeled “Merge”. After a few seconds the box that allowed us to merge is replaced by a box that informs us about the successful merge.
In particular, there still is a sentence informing us that the merge request mentions an issue. Our intention was for that issue to be closed, so we click on the issue reference, for example “#1”, to check.
On the issue page, we can see that indeed the issue was closed. The last entry in the issue’s history reads similar to “Co-learner closed via commit abcdef12 just now”, informing us why the issue was closed.
- You can create a project with a copy of another project’s repository by forking it.
- You can suggest changes to a project that you have no write access to through a merge request.
- You can close issues by use of certain keywords in merge request descriptions or commit messages.
Content from Process Automation
Last updated on 2026-07-14 | Edit this page
Estimated time: 0 minutes
Overview
Questions
- How can I use GitLab to automate processes?
- How can I host a static website directly from GitLab?
Objectives
- Setup a process to run automatically when a commit is pushed to a repository.
- Safely use secrets in a process automatically triggered by GitLab.
- Configure a GitLab repository to host a static website.
We have setup our project, collaborated with our colleagues; we fill our research diary every day. Now it is time to make use of it.
We want to share it with the world, because what we do is so important and everyone should now about it. So we want to create a website based on the diary and update it whenever our Markdown files change. But we do not want to do that by hand. Instead, we are going to let GitLab automatically turn our Markdown files into HTML, whenever our repository changes. To achieve it, we will use two GitLab features: CI/CD-Pipelines and Pages.
CI/CD or Continuous Integration/Continuous Deployment
The terms continuous integration (CI) and continuous deployment (CD) come from the fields of software engineering and software operation.
A software project uses CI, if it has setup a process that automatically runs some (or all) tests for a software project, whenever changes are committed to the main branch of a repository or even just proposed (for example through a merge request). In particular, when tests are already run for proposed changes this can help prevent bugs to reach the code base, while freeing the developer from remembering to run all the tests, before creating a merge request.
CD is a process that updates the software on the production machines (deploys) as soon as a new change reaches the code base, generally after having passed the CI process.
Both processes can be implemented by running scripts, called jobs on GitLab, triggered either by changes to the code base, the creating of merge request, or by the successful completion of other jobs, which lead to the CI/CD feature of GitLab.
Example Configuration
To configure our automatic process, we navigate to our project page and click the menu item labeled “Pipelines” in the submenu “Build” of the main menu on the left.
The page that this leads to invites us to “use a sample
.gitlab-ci.yml template file to explore how CI/CD works.”
The GitLab CI is configured by providing a file called
.gitlab-ci.yml in the root directory of a project’s
repository. Even though we want to learn how to configure CI in GitLab,
we do not follow the invitation, because the example is quite elaborate
and targets software developers specifically. Instead, we will use the
provided template for Bash.
In the list at the bottom of the page, we click on the button labeled “Use template” in the entry for Bash.
This leads us to an editor for the .gitlab-ci.yml file
that is prepopulated with the selected template. The file is expected to
be written in the YAML file format,
hence the file extension .yml. We will go through the
example line by line. Afterwards we will adapt it to our needs.
The first few lines, starting with the symbol #, are
comments notifying us of where to find further information. The last of
these lines is the exception, which is a comment on the first functional
line:
This line states that the scripts that are provided later on should be executed in Docker containers build from the stated Docker image. Busybox is a very small Linux distribution, reduced to the bare minimum, that provides bash, a shell.
Docker
TODO
It is followed by two blocks starting with
before_script: and after_script:. We will
ignore those.
The remaining four blocks, build1:, test1:,
test2:, and deploy1:, each define a so called
job. A job represents one non-divisible unit of a CI/CD
process. Together the jobs defined in a project’s
.gitlab-ci.yml file form a so called
pipeline.
By default a pipeline in GitLab has three stages,
called build, test, and deploy,
and their order is important. The terminology comes again from software
development. A pipeline is executed by running all jobs of the first
stage and, if they succeed, to then continue with jobs of the next
stage, repeating this until a job fails or all stages complete.
The four jobs in the example are named similar to the stages they are
assigned to. The assignment is done through the keyword
stage: that can in this example be found in the second line
of each job’s definition.
The lines following the keyword script: in each section,
define the script that will be executed as part of the respective job.
In this example, they are all echo statements, that output
what follows.
Our Own Configuration
We will now adapt the script to our requirements.
First we delete everything.
Then we define our own stages, because we do not develop software and want to have descriptive names for our use case:
In the first stage, we will do some testing, in the second we will create the HTML version of our diary and publish it.
We call the first job check-for-mds and in it make sure,
that at least one Markdown file exists, because otherwise someone must
have accidentally removed them all.
We use the docker image bash, because Bash provides the
compgen command that allows us to check for the existence
of files. We also state that the job belongs to the stage
check. Finally, we provide the script. It tests for the
existence of any files with names ending in .md.
Whenever the job check-for-mds successfully completes,
we want to create the HTML version of our research diary. We define a
second job and call it publish-on-web.
YAML
publish-on-web:
    image:
        name: pandoc/core:latest
        entrypoint: ["/bin/sh", "-c"]
    stage: publish
    script:
        - pandoc *.md -o diary.html
    artifacts:
        paths:
            - diary.html
After giving the name of the job, we again provide an Docker image in
which the job should run. We use pandoc to convert our Markdown files
into an HTML file, so we use the official pandoc Docker image. The next
line, with the keyword entrypoint is necessary, because the
pandoc Docker image is configured to directly run pandoc, when started
in a container (pandoc is configured as its entrypoint). However, GitLab
CI expects to runs the provided scripts in a shell in the specified
Docker images.
Pandoc
Pandoc converts text documents from one format to another, for example from Markdown to HTML. It supports many formats for the source documents and even more for the target document.
The project webpage provides a complete list (in text and graphical form).
The conversion is customizeable, for example through templates.
Next, we specify the stage, followed by the script. It runs pandoc on
all files ending in .md in the current directory and
instructs it to output a file diary.html. Pandoc deduces
from the file extension that it should be in HTML format.
The final three lines, starting with the keyword
artifacts, specify that GitLab CI should save the file
diary.html from the Docker container the job runs in and
provide it for download on its web interface.
This completes our GitLab CI configuration. There are a lot more configuration options, for example to have a process run only for commits to certain branches, that are documented in GitLab’s Handbook
We change the commit message to ”Configure CI”, leave the branch as
it is (main), and click the button labeled “Commit
changes”.
Clicking the button does not cause a change in page. Instead, we are
informed at the top of the page about the status of the pipeline run
that was initiated by committing the .gitlab-ci.yml to the
repository.
To get a better overview, we click the menu item labeled “Pipelines” in the submenu “Build” of the main menu on the left. This brings us to the list of pipeline runs. We should see exactly one entry in the list, as we have just configured the CI.
A blue, red, or green box in the “Status” column informs on the left informs us about the state of the pipeline. Blue indicates a running pipeline, red a failed pipeline, and green a pipeline that successfully completed. Below the status box we have the runtime of the pipeline and below that information about when it was started.
In the ”Pipeline” column, we see the first line of the commit that
triggered the pipeline run, the number of the pipeline run, for example
#11071, the branch the commit is part of as well as the
short identifier of the commit. Most of these serve as links to pages
for their respective entities.
The ”Created By” column tells us who caused the pipeline run. In our case that’s the author of the commit.
The ”Stages” column visualizes the stages and their state. In addition to the colors discussed above, there can be stages colored in gray. They are waiting for their predecessor stages (or need to be manually triggered, if configured that way).
We wait until our pipeline ran through. It should complete without error.
The behavior of the CI is the most fragile step of this course. There are some outside influences that can cause the pipeline to fail. This needs to be handled on a case by case basis.
We click on the button labeled by the three dots on the right of the
entry. In the menu that opens, we see that it provides a link to
download artifacts of the pipeline. We click on the link labeled
“publish-on-web:archive”, which causes our browser to download a file
called artifacts.zip.
In that archive, we find the file diary.html that was
build by our second job, publish-on-web.
By opening the file in your browser, you can verify that it contains the contents of all Markdown our files. (We ignore the fact, that the order might not make sense at all. For that we would need to improve the script that builds the HTML file.)
Publishing to the Web
So far we managed to create an HTML page from our Markdown files. But we wanted to publish it on the web.
To achieve this goal, we can use a feature of GitLab called Pages. It
allows us to publish the results of a specific job of a CI pipeline to
the web under the gitlab.io domain.
We navigate to the editor of the CI-configuration, by clicking on “Pipeline editor” under “Build” in the menu on the right.
We change the configuration of our second job to look as follows:
YAML
pages:
    image:
        name: pandoc/core:latest
        entrypoint: ["/bin/sh", "-c"]
    stage: publish
    script:
        - mkdir public
        - pandoc *.md -o public/diary.html
    artifacts:
        paths:
            - public
We change the job name to pages. This name is a
convention to tell GitLab, that we want this job to create the contents
for our web page. Then we create the HTML file in a directory called
public and change the path that defines the job artifacts
to public as well. The directory public is,
again by convention, the place from which GitLab will take the contents
to be published.
We enter the commit message “Setup GitLab-Page publication” and click on “Commit changes”. Afterwards change, the pipeline will automatically run.
When it has successfully completed, we select “Pages” under the
“Deploy” submenu of the menu on the left. In the section called “Access
pages”, we find a link to the base path of our web page. This will lead
to a page informing us that the requested resource was not found. The
reason is, that we do not provide a file called index.html.
Instead, we need to append /diary.html at the end of the
URL shown in the settings page. Now we see the rendered version of that
diary, published in the web.