Collaboration
Last updated on 2026-07-21 | Edit this page
Estimated time: 20 minutes
Overview
Questions
- How can multiple people collaborate on a project?
Objectives
- Explain the concepts of members and roles.
- Add a member to a project.
- Contribute to a project that you are a member of.
Two Alternative Episode Versions
This episode consists of two alternative parts.
The first alternative uses Git for collaboration. It consists of the first and second section.
The second alternative uses GitLab’s web interface for collaboration. It consists of the first and third section.
Adding Project Members
So far, each of you has created a GitLab project that no one but you can contribute to; depending on the visibility setting, no one but you might be able to even see it.
Git and GitLab can be and is used for one-person projects. But we want our colleagues to contribute to our research diary, when they keep tabs on our experiments for us on the weekends. To achieve this, we will grant others access to our GitLab project.
Using the menu on the left side of the project homepage (or nearly any other project page), we navigate to the project members page hovering over or clicking on “Manage” and then clicking on “Members” in the submenu. The project member page should look similar to the following screenshot:
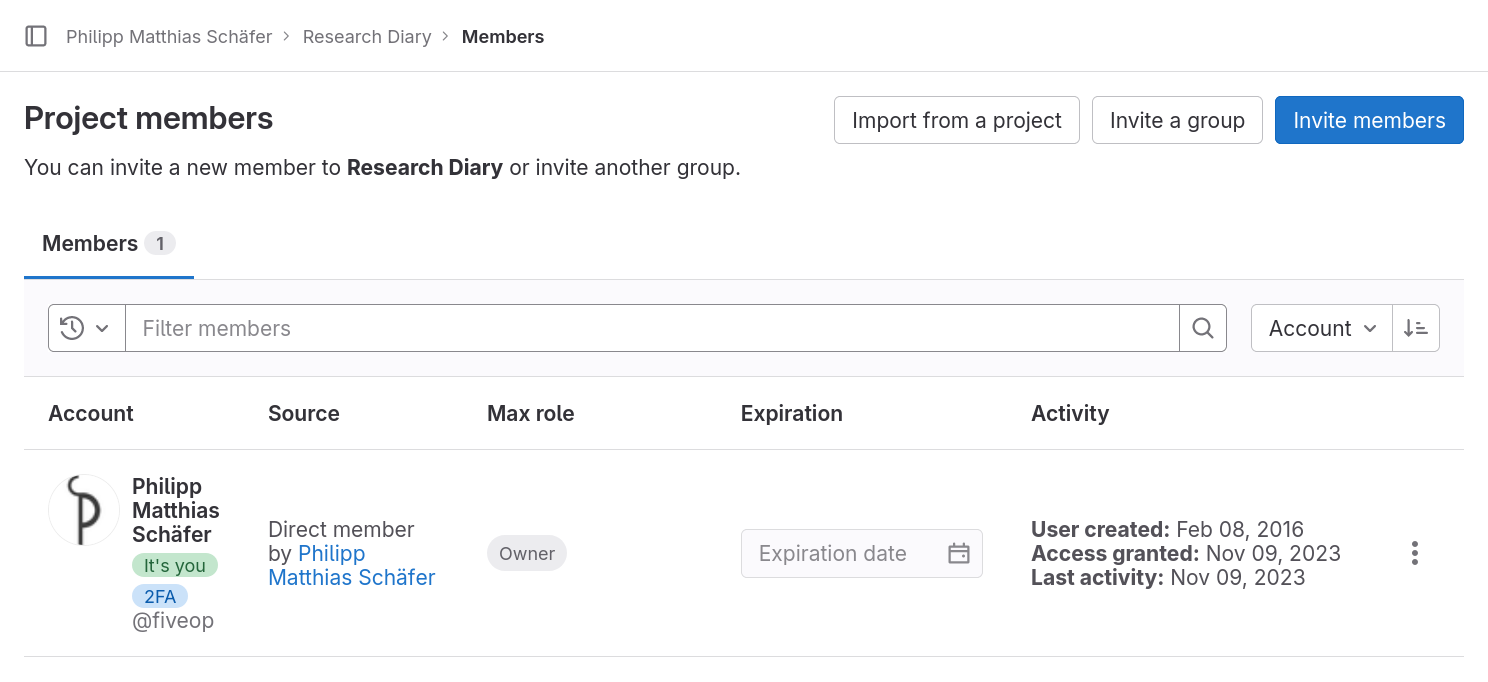
On the page we can see the page title, “Project members”, three buttons to the left of the title, and a filterable table of members, currently only listing ourselves.
The table shows our full name and account name, why we are a member of this project, what our maximum role is–more on that in a bit–, when we got access—at the moment we created the project—, a disabled membership expiration date widget, and three dates on our activity.
For practice we will all add an instructor to our project and remove them again right away. Click the button labeled “Invite members”, type in the username your instructors provided you with into the search field, make sure that “Guest” is selected as a role, and click the button labeled “Invite”.
Your instructor should now be listed next to you in the table. Unlike in your row, you can change the role and the expiration date of this new entry.
The role determines what the member is allowed to do in the project. An owner has full rights, a guest almost none. GitLab’s handbook gives a detailed overview of the different roles’ permissions.
Now, we are going to remove the instructor from your project’s members again. Click the three dots on the right in the instructor’s row, then click on “Remove member”, and finally click the button of the same name in the popup dialog. The page reloads itself and the entry vanishes from the table.
Adding Members
Get into pairs and add each other with the role “Maintainer” to your projects.
The “Maintainer” role grants just enough permissions for all the collaborative tasks we will practice in this lesson.
This exercise should take about 5 minutes.
Contribute Changes to Project Repository (using Git)
Now, everyone should be the member of one of your co-learners’ projects. We will now add a diary entry for imaginary work that we did on their experiments last weekend.
First, we clone their repositories into the directory
rd-colleague.
$ git clone https://gitlab.com/someothernovice/research-diary.git rd-colleagueCloning into 'research-diary'...
Username for 'https://gitlab.com': somenovice
Password for 'https://somenovice@gitlab.com':
remote: Enumerating objects: 3, done.
remote: Counting objects: 100% (3/3), done.
remote: Compressing objects: 100% (2/2), done.
remote: Total 3 (delta 0), reused 0 (delta 0), pack-reused 0Moving into the directory
$ cd rd-colleaguewe check its contents. If your colleague did everything we did, it
should contain a single file, README.md.
$ lsREADME.mdNow we are sure that everything is in order with the cloned repository and we can add our lab entry.
First we create a file, named 2022-03-13.md after the
date on which we did the work, listing the work we did:
MARKDOWN
* Injected transformational fluid into moss sample.
* Moss turned into several butterflys. SUCCESS!Markdown Lists
Lists can be represented in Markdown by starting their items with a
* character followed by a space. If an list item wraps over
multiple lines, lines following the first are started with sufficient
spaces to align the lines text with the first line’s text.
For example:
* First item
* Second item with enough text to make us wrap to a second
  line.
Then we add the file as part of a new commit to the repository:
$ git add 2022-03.13.md
$ git commit -m "Record work on experiment A-13"
[main 4eac24c] Record work on experiment A-13
1 file changed, 2 insertions(+)
create mode 100644 2022-03-13.mdWe check Git’s log for our commit:
$ git log -n 1commit 4eac24cafbcebc4f0d528bd2e1246a4624265085 (HEAD -> main)
Author: Some Novice <some.novice@example.com>
Date: Thu Mar 17 16:00:23 2022 +0000
Record work on experiment A-13And everything seems to be in order, so we push our change.
$ git pushUsername for 'https://gitlab.com': somenovice
Password for 'https://somenovice@gitlab.com':
Enumerating objects: 4, done.
Counting objects: 100% (4/4), done.
Delta compression using up to 4 threads
Compressing objects: 100% (3/3), done.
Writing objects: 100% (3/3), 388 bytes | 388.00 KiB/s, done.
Total 3 (delta 0), reused 0 (delta 0)
To https://gitlab.com/somenovice/research-diary.git
2dd2c21..4eac24c main -> mainWe have now recorded in pairs lab work we carried out for a colleague during the last weekend. Curious what our colleagues did for us, we navigate back to the directory of our own repository in the shell, for example:
$ cd ../research-diaryThere, we pull the changes that our colleagues previously pushed.
$ git pullUsername for 'https://gitlab.com': somenovice
Password for 'https://somenovice@gitlab.com':
Updating 2dd2c21..4eac24c
Fast-forward
2022-03-13.md | 2 ++
1 file changed, 2 insertions(+)
create mode 100644 2022-03-13.mdFrom the output’s last line, we can already see that a single file,
2022-03-13.md was added. Letting the shell write out the
files contents shows us, what our colleague did:
$ cat 2022-03-13.mdWe successfully collaborated through GitLab on a project of text files.
Contribute Changes to Project Repository (using GitLab WebIDE)
Now that we are members of the project of one of our co-learners, we can contribute to each others projects. We will add a diary entry for imaginary work that we did on their experiments last weekend.
To navigate to our co-learner’s project, we click on the GitLab-Logo in the upper left corner of the page. The list under “Your projects” should now contain at least two projects: the one we created ourselves in the beginning and the project of our co-learner. We click on the name of our co-learner’s project to navigate to it’s homepage.
To add a file, we click on the button labeled “Edit” towards the right of page above the list of files, and select WebIDE from the popup-menu. This redirects us to a page with a file browser in a column on the left, with most of the screen taken up by a box welcoming us to the WebIDE.
We want to create a new file, as we created the
README.md file before. To do that we click on the button
above the list of files on the left that is marked with an icon
representing a sheet of paper with a +-sign on top of it. The button is
only visible, when the mouse hovers over the list of files.
A pop-up text input field prompts us for a name, which we will
provide: 2023-02-05.md, the date on which we did the work
in the laboratory. We confirm the file name by pressing the return
key.
We see the result of our action in two ways: A file named
2023-02-05.md appeared in the list of files on the left and
a tab labeled 2023-02-05.md showing an text editor appeared
in the space to the right of the list of files.
We will now add a list of things we supposedly did in the laboratory last Sunday, for example:
Markdown Lists
Lists can be represented in Markdown by starting their items with a
* character followed by a space. If an list item wraps over
multiple lines, lines following the first are started with sufficient
spaces to align the lines text with the first line’s text.
For example:
* First item
* Second item with enough text to make us wrap to a second
  line.
To save the changes, the creation of the file and the text we entered, we need to create a so called commit. A commit packages changes in one or more files of the repository. The list of commits, in chronological order, constitute the history of a Git repository.
To get there, we click on the button on the left showing an icon that indicates a branching from one circle to two others. The button should be overlaid with the number 1 in a circle.
A dialog will replace the list of files. At the top is a text field for a commit message. Then comes a button labeled “Commit & Push”, followed by a list of all files that were changed, added, or deleted.
A commit message should summarize the changes that are packaged into the commit. Good commit messages are what makes the history of a repository useful.
We enter a good commit message, for example “Record work on experiment A-13” and click the button labeled “Commit to ‘main’”.
In the dialog that pops up in the center top of the screen, we select “Continue”.
Having done that, we are done editing and navigate back to our project’s homepage. To get there, we click on the button labeled “GitLab” in the lower left of the screen and select “Go to GitLab” from the list that pops up at the top. This will open the project view in a new window or tab, depending on the settings of your browser. We select our own project from the list of projects under “Your projects”.
In the list of files, we should see the file added by our co-learner.
- Adding others as members allows them to directly contribute to your projects
- Members with sufficient rights can independently contribute to repositories
- Alternative Git: You update your local repositories relative to the
GitLab repository with the
git pullcommand - Alternative Git: You send changes committed in your local repository
to the GitLab repository with the
git pushcommand.