
Summary and Setup
Workshop Overview
This workshop teaches researchers how to run machine learning and AI work on AWS. It works through the practical decisions, where to store the data, which compute to use, how to launch and monitor a job, and how to estimate and manage the cost.
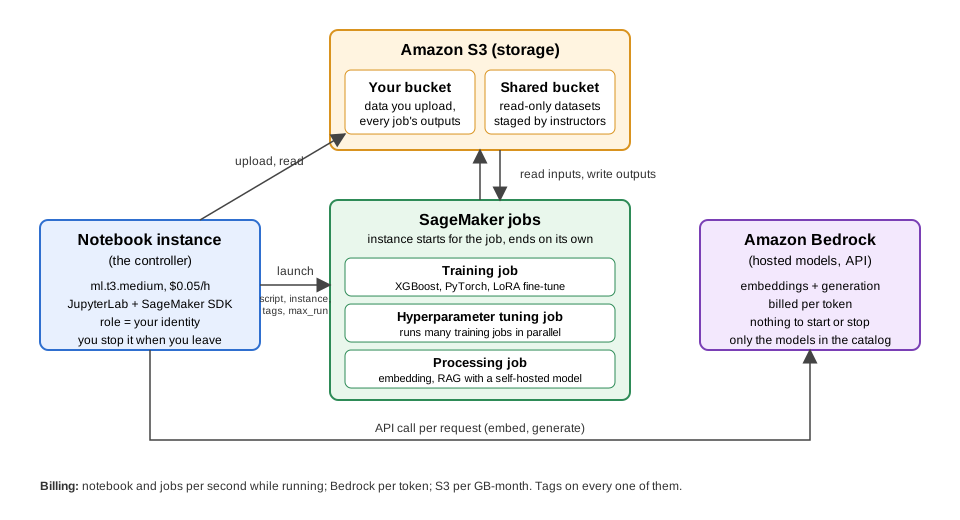
We use Amazon SageMaker to train, fine-tune and run our own models, and Amazon Bedrock to call models AWS hosts through an API. Throughout, we work from a small SageMaker notebook instance that acts as the controller. The demanding work runs on separate instances that SageMaker starts for each job and releases when the job finishes.
The workshop is in four parts, from AWS basics to training, inference and resource management.
The lesson uses four AWS pieces. The overview episode introduces each one in more detail.
Who this workshop is for
Researchers and students who already use machine learning or AI and want to run that work in the cloud. You should be comfortable with Python and Jupyter and know the basics of model training, hyperparameter tuning, fine-tuning, embeddings and RAG. The emphasis is on using AWS, not on teaching those methods. Instructors may review some of them briefly depending on the audience, but the workshop assumes the background. No previous AWS experience is needed.
Cost controls
One of the workshop’s main points is that cloud computing is affordable for research when the resources are chosen and managed with care. Run as written, the exercises cost each learner a few dollars, CPU and GPU training jobs, hyperparameter tuning, a LoRA fine-tune and RAG inference included.
We estimate the cost before launching a job, set a limit on how long it can run, and check its billable time afterwards. Resources are tagged so that spending can be attributed to each learner and project. We also look at how fast the cost grows when a GPU instance is left running or an experiment is scaled up without checking what it needs.
The workshop uses a shared AWS account with restrictions that block the expensive mistakes. The final part looks at those safeguards and how to set the same ones on an account of your own.
What this workshop does not cover
- General ML/AI instruction. The focus is on running existing ML and AI workflows on AWS, not on teaching the algorithms.
- Model deployment. We do not deploy trained or fine-tuned models as always-on inference endpoints. A model trained elsewhere, on a campus cluster say, can still be used here. Upload its weights to S3 and run inference over a dataset as a Processing job, which is what the RAG with Processing Jobs episode does with an open-weight model. Serving it to an application behind an endpoint is the part the lesson leaves out, and the RAG overview says when that is the right tool.
- AI agents and tool use. We do not cover agent frameworks or applications that let a language model call external tools.
If there is another ML or AI workflow you would like to see covered, we welcome suggestions. Open an issue on the lesson GitHub or email endemann@wisc.edu.
Setup (Complete Before The Workshop)
Before the workshop:
- GitHub Account (optional) – Only needed for the optional episode on pushing your own code to GitHub.
- AWS Access – Use a shared AWS account (UW-Madison) or an AWS account of your own.
- Data – Download one small zip.
- Glossary — Skim the workshop glossary.
- Episodes 1 to 4 first — They create the bucket and notebook instance every later episode uses.
Details on each step are outlined below.
1. GitHub Account (optional)
Only needed for the optional episode on pushing your notebooks to GitHub. Sign up if you plan to do it.
2. AWS Account
There are two ways to get access to AWS for this lesson. Please wait for a pre-workshop email from the instructor to confirm which option to choose.
Instructors, before the workshop
The launch rules the shared-account tab describes are not part of SageMaker. They are policies you attach to the account, and the shared data bucket has to be staged. Work through the instructor pages before the first session: the Account preparation checklist sets the quotas, Bedrock model access, the cost tags and the guard rails, and the Shared data bucket page stages the datasets and model weights the fine-tuning and RAG episodes read. The Instructor Notes index has the rest, including the end-of-workshop cleanup.
Once your AWS account is set up, log in to the AWS Management
Console. For the shared account that means the sign-in link
from your instructor’s email, of the form
https://<org>.awsapps.com/start/#/console?account_id=...&role_name=...;
for your own account, the regular console sign-in at
https://console.aws.amazon.com/.
3. Download the Data
- Download data.zip (Right-click -> Save as).
- Extract it (Right-click -> Extract all on Windows; double-click on Mac).
- Keep the two Titanic files somewhere you can find them during the S3 episode, e.g.
~/Downloads/data/titanic/titanic_train.csv~/Downloads/data/titanic/titanic_test.csv
4. Review the Workshop Glossary Page
Skim the Glossary before the workshop (it is also in the top menu of every lesson page); the terms come up from the first episode.
5. Episodes 1 to 4 come first
Do episodes 1 to 4 before anything else. Episode 2 creates your S3 bucket, episode 3 creates the notebook instance and clones the lesson onto it, which is where every later episode’s notebook comes from, and episode 4 is the first read of your bucket from the notebook.
After that, do episodes 6 to 8 in order, since 8 needs the files 7 saves. Episode 9, the fine-tune, stands on its own. Episodes 10 to 13 also go in order, since each reuses what the one before cached in your bucket.