Introduction
Overview
Teaching: 0 min
Exercises: 0 minQuestions
What is MarkDown?
Where can I use MarkDown?
Objectives
Finding a suitable MarkDown Editor
What to look for in a MarkDown Editor
What is MarkDown
Before explaining what MarkDown is we should just mention what “markup” is. In the days before computers had graphic user interfaces (GUIs), authors of documents had to find a way to indicate how they wanted their text formatted. When this was done on paper the text would be marked up with a red or blue pen. When computers came into play, markup was done by tags embedded in plain texts files. The tags had to be distinguishable from the manuscript text and would be interpreted by a separate program that would create an appropriately formatted document - mostly for printing. Markup was never completely replaced as it is still being used for web pages and online documentation but GUI environments became more popular and word processors took over which were WYSIWYG (What You See Is What You Get). WYSIWIG was much simpler and more intuitive for non-technical people to use. However, things have changed. We are moving away from using so much paper. Most of our documentation is now meant for online reading. There was a need for some kind of markup that would be simpler than the markup used for web pages or for technical documentation such as in LaTeX. In 2004 Aaron Swartz and Joh Gruber worked together to create MarkDown with the aim of enabling people “write using easy-to-read and easy-to-write plain text format”.
Where can I use MarkDown
MarkDown is most suitable for online documentation. It is much simpler than HTML (Hyper Text Markup Language) which is the standard for creating web pages. MarkDown is turned into HTML by your editor and thus, depending on your editor, you might also be able to use inline HTML in your MarkDown document to do formatting which MarkDown cannot do. It is also important to take note of the fact that there are some non-standard features that are available in some editors. So you have to make sure that, what you want to do, is implemented in your editor.
To allow people to format their text well for readability, Markdown is now used on several platforms such as
- Version control websites such as GitHub and BitBucket
- Question and Answer websites such as Stack Overflow
- Note taking applications such as Evernote and Joplin
- Team communication and collaboration applications such as Slack, Discord and Zulip
- Jupyter Notebooks
Where would you use MarkDown?
List some things that you think you will be using MarkDown for
Finding an editor
A MarkDown document is a plain text document. So you can use any plain text editor to create the document. Obviously, not all plain text editors will render the document for you but fortunately there are several options available for creating, rendering and viewing MarkDown documents.
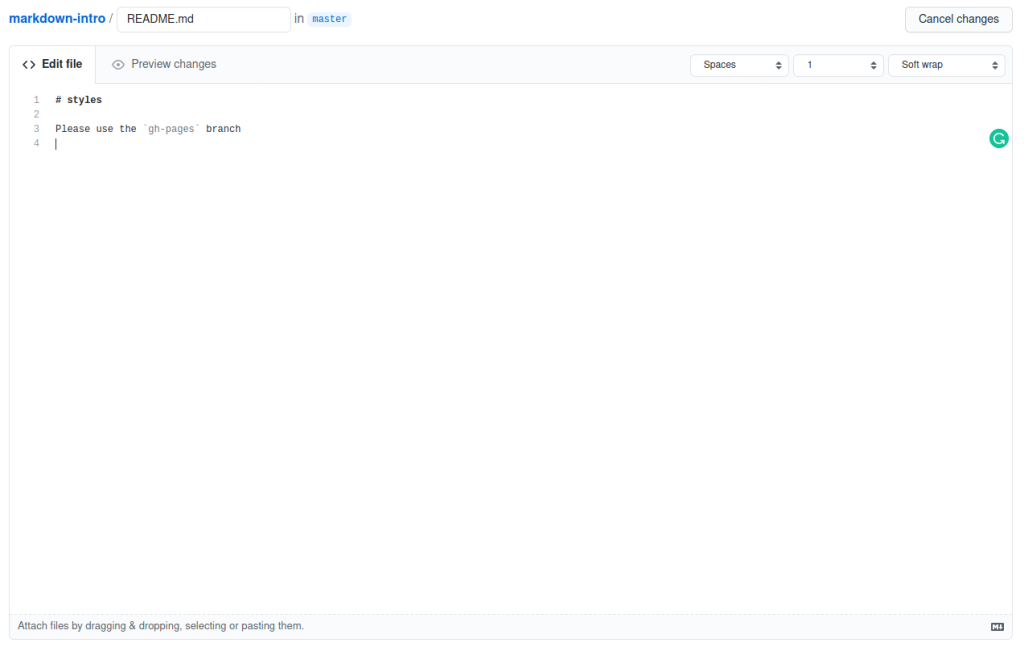
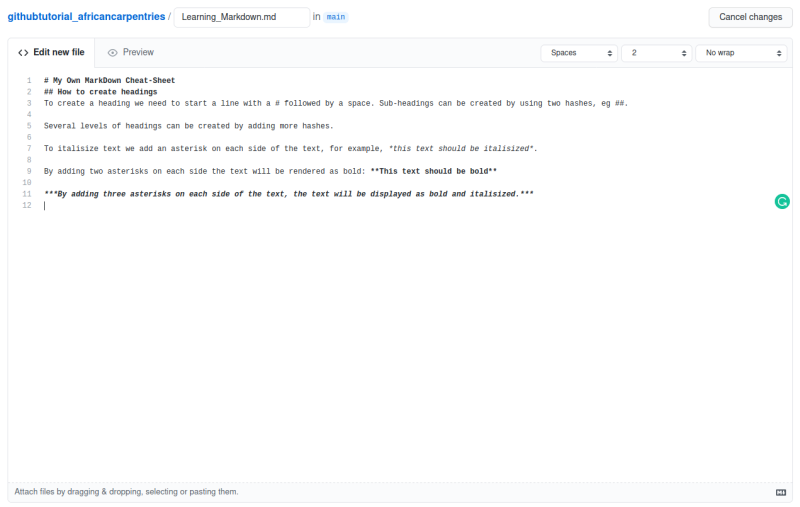
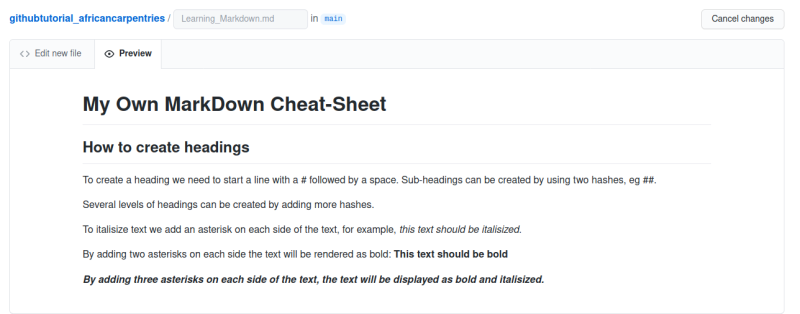
If you use websites such as GitHub, BitBucket, Medium, Stack Overflow, Evernote, Slack, Discord and Zulip, then they all have MarkDown already built into their web pages. The image below shows how it is implemented in GitHub. Notice that there are two tabs, <>Edit File and 👁Preview changes. To see what your text will like, once rendered, you have to click on the preview tab.
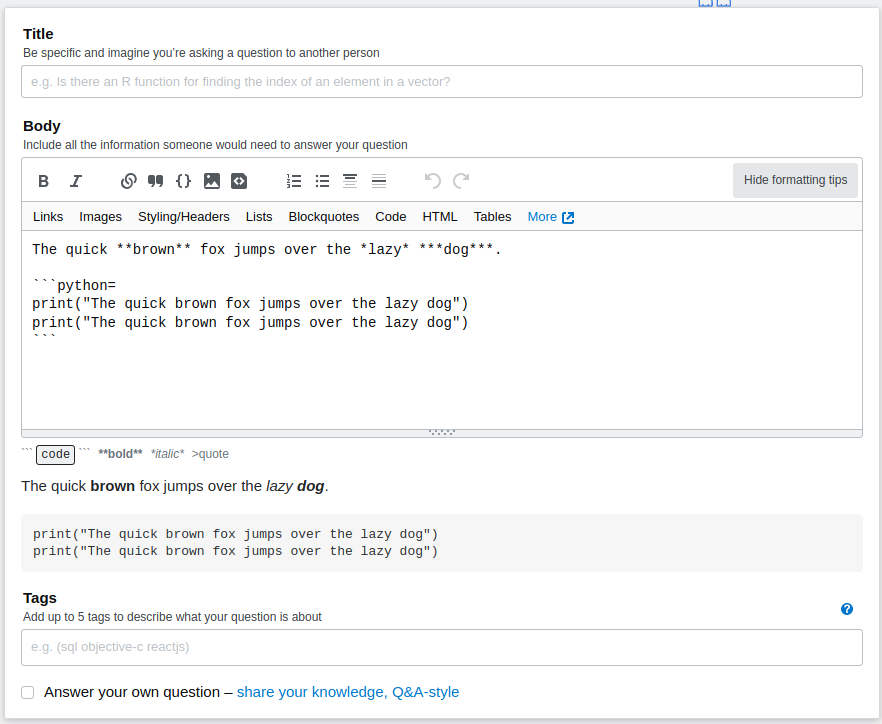
Stack Overflow has a different approach. Your rendered text is displayed below the editor as you type:
For these, built-in editors, you don’t need to install anything on your computer. However, let’s say you don’t want to work online. For instance, you might just want to make notes using Joplin and keep it on your own computer. Or, you might want to work on your GitHub repository on your own computer before uploading it the Internet at a later stage. Applications such as Evernote provide an online and an offline option. The offer an application that you can download and install onto your computer. When you go online, Evernote will automatically synchronise your notes with the online server.
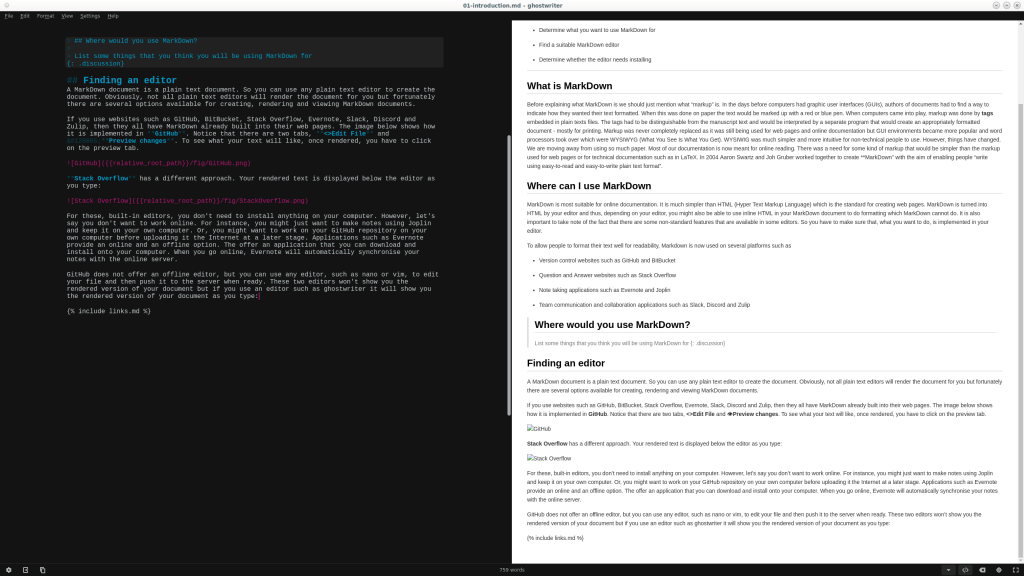
GitHub does not offer an offline editor, but you can use any editor, such as nano or vim, to edit your file and then push it to the server when ready. These two editors won’t show you the rendered version of your document but if you use an editor such as ghostwriter it will show you the rendered version of your document as you type:
Evernote is a commercial option with a free tier, but Joplin, being open source, is completely free. Joplin does not provide an online server but you can run your own server or synchronise to your own cloud spaces such as Dropbox and OneDrive. So Joplin has to be downloaded and installed:
Another very useful application of MarkDown is for collaborative documentation. These are online options so they don’t need installing. HackMd is an open source platform. You can host it on a server in the cloud yourself or you can use the service at https://hackmd.io/ which offers a free tier if you are happy to have all your documents being public. For Carpentries related documents you can use the Carpentries’ instance of HackMd at codimd.carpentries.org/
Key Points
Determine what you want to use MarkDown for
Find a suitable MarkDown editor
Determine whether the editor needs installing
Creating a Markdown Document in HedgeDoc
Overview
Teaching: 0 min
Exercises: 0 minQuestions
How do I create a new Markdown document?
Objectives
Create a new document on HedgeDoc
HedgeDoc
For this lesson we will use an online and open source tool called HedgeDoc to learn Markdown. There is no software to install on your local computer, but you will need an active internet connection and a modern web browser, Chrome, Firefox, Safari or MS Edge during the lesson. HedgeDoc will allow you to type Markdown text and see how it will be rendered all in one screen.
Make your first HedgeDoc Page
You can create a demo HedgeDoc document on the HedgeDoc project’s server by clicking this link:
Make a Document (Try to open this link in a new tab)
This will create a new (unique to you) document that you can use to learn about Markdown with.
This is not a private document and you should not have any expectation that text you place in this tool will be kept or private. We are using it as a learning tool to learn about Markdown syntax, and you should not store any personal or private information in this document.
Find your document again
Note: Should you lose track of the page you were typing in, you can find it again by clicking History at the top of the main HedgeDoc demo server page.
HedgeDoc User Interface
HedgeDoc main screen:
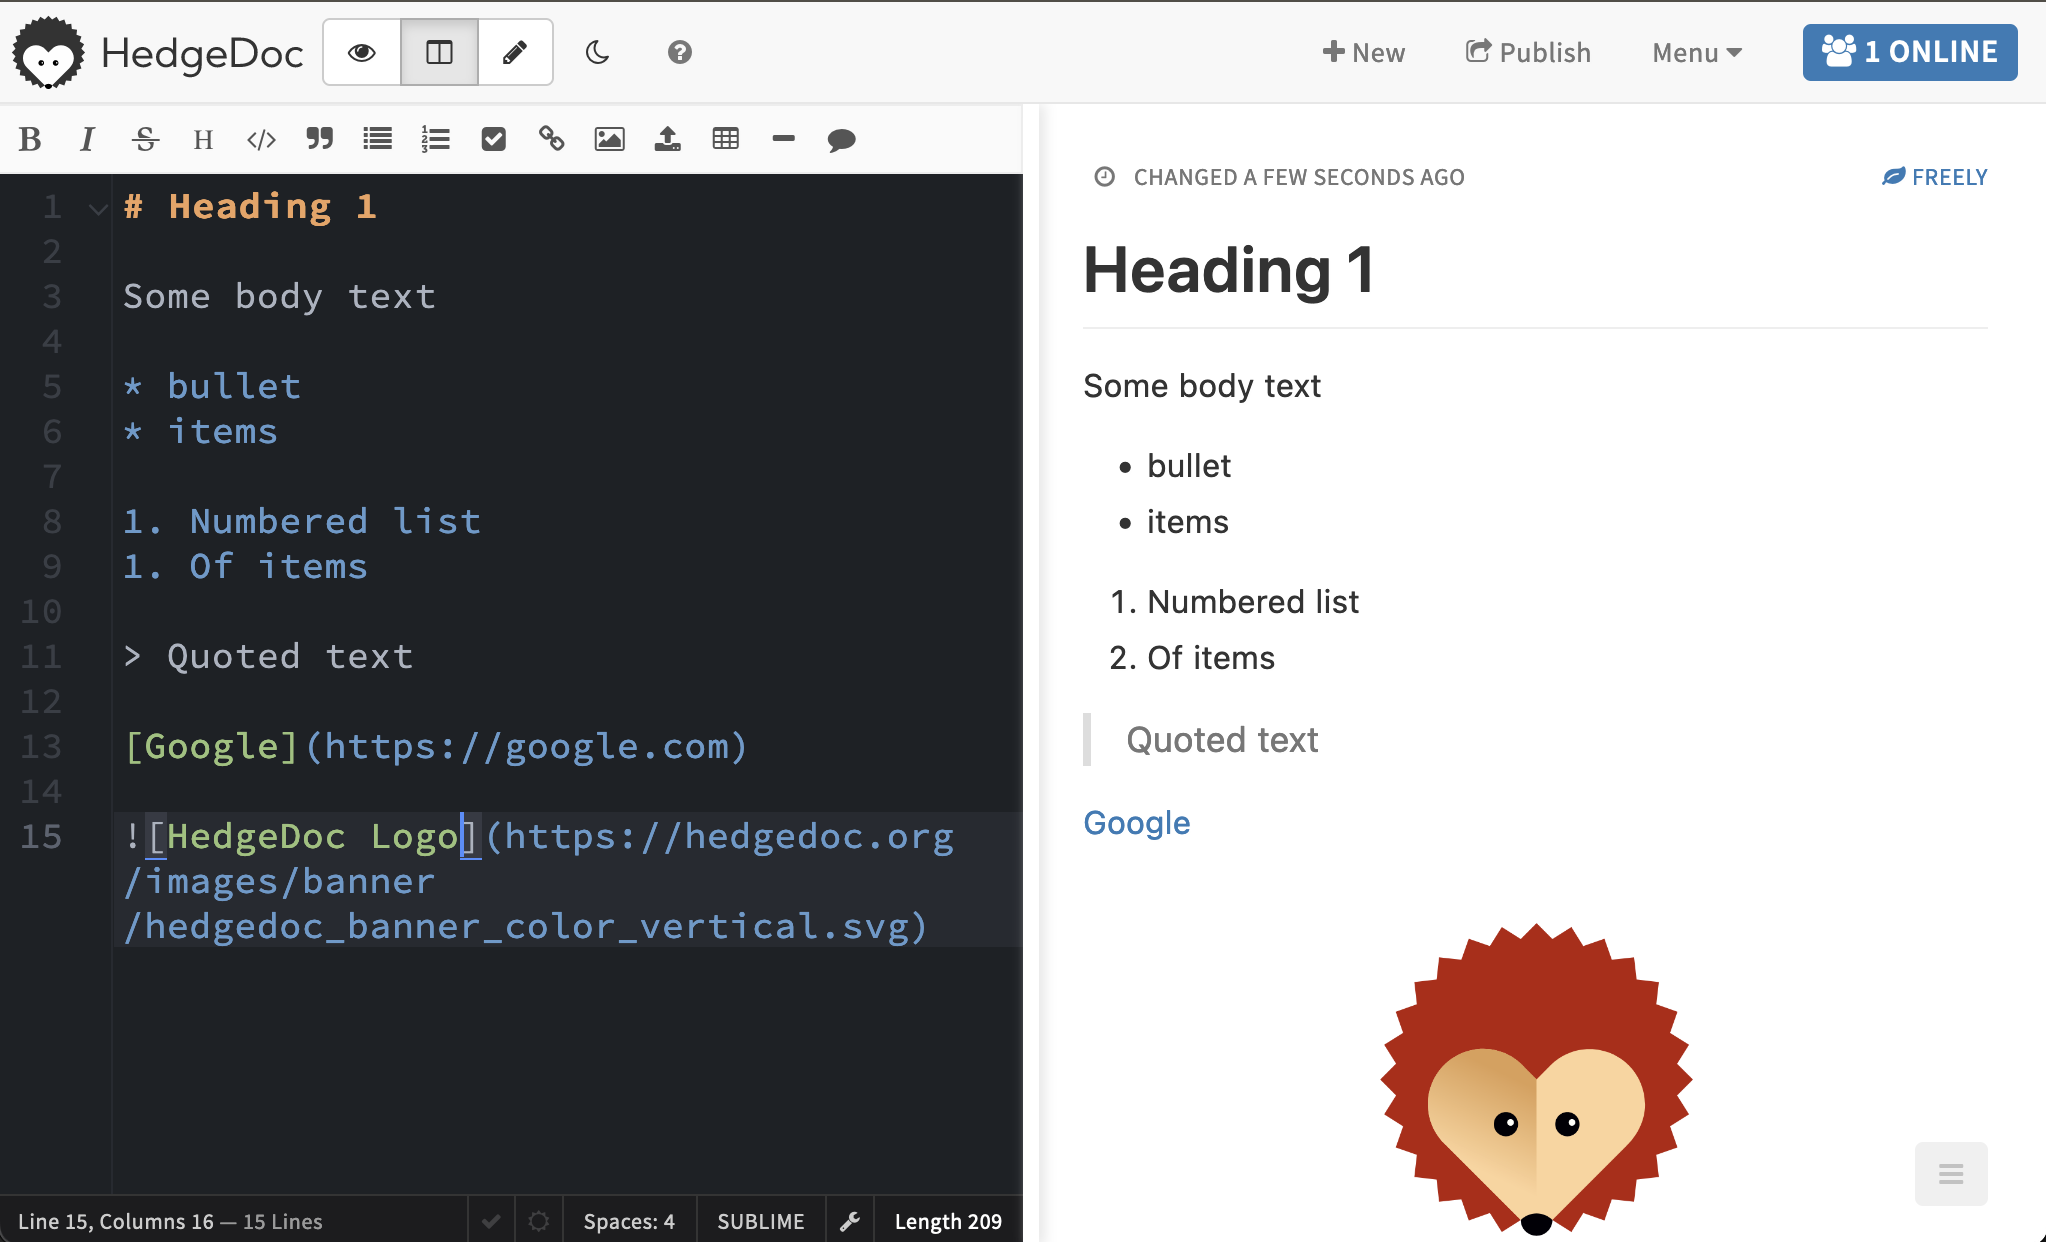
The main HedgeDoc Screen contains an editing panel (on the left) and a preview panel (on the right) you can enter Markdown syntax on the left and see it rendered on the right.
HedgeDoc views:
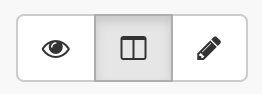
If you’d prefer a bigger preview area, you can click the leftmost eye icon, if you’d like a split-view (as in the screenshot above) you can click the middle two-panel icon, if you’d like a bigger editing area you can click the rightmost pencil icon. By default your document will be in the split screen view, which is good while you’re learning Markdown.
HedgeDoc Menu:

The menu across the top can be a useful crutch when you can’t remember specific Markdown syntax. Clicking on one of the icons will make an example of that kind of Markdown element appear in the editor. During the lesson try not to use this menu, but when you come back to writing Markdown after a break for awhile, it is a very useful helper.
Key Points
Create a new document on HedgeDoc
Adding plain text, bold and italics
Overview
Teaching: 0 min
Exercises: 0 minQuestions
How do I add text to a MarkDown document?
How can I make different levels of headings?
How do I make text bold?
How do I format text as italic?
How do I format text as bold and italic
Objectives
Adding text to a MarkDown document.
Formatting text as headings, bold and italic.
Adding text:
Let’s start creating our document by entering some text in the editor. We’ll make our own MarkDown cheat-sheet and we’ll start it with a heading. To create a heading we start the line with #. Notice the space after the hash:
# My Own MarkDown Cheat-Sheet
We can also create a subheading by using two hashes. Don’t forget the space after the hashes:
## How to create headings
Followed by some text:
To create a heading we need to start a line with a # followed by a space. Sub-headings can be created by using two hashes, eg ##. Several levels of headings can be created by adding more hashes.

To start a new paragraph we need to press enter twice.
We can italisize some of the text by adding an asterisk on each side
To italisize text we add an asterisk on each side of the text, for example, *this text should be italisized*
With two asterisks on each side we can make the text bold
By adding two asterisks on each side the text will be rendered as bold: **This text should be bold**
To make the text italisized and bold we use three asterisks on each side:
***By adding three asterisks on each side of the text, the text will be displayed as bold and italisized.***
By now the text in the editor should look more or less like this:
And, if we select the preview, it should look like this:
- Use MarkDown tas to format text
Key Points
Adding text to a MarkDown document.
#is used for headings.
*is used for italic and bold text.
Creating Lists
Overview
Teaching: 0 min
Exercises: 0 minQuestions
How can I create bullet (unordered) lists?
How can I create numbered lists?
How can I create todo lists?
Objectives
Creating lists.
Making lists:
There are three types of lists that can be created with MarkDown. The first type of list is the ordered list where every item in the list is numbered. The second type of list is the unordered list where each item in the list is marked with a bullet. The third type of list is a todo list where each item in the lists starts with a tickbox.
ordered lists
Ordered lists can be created by starting a line with a number followed by a fullstop followed by a space, eg. 1.. The value of the number doesn’t matter and the numbers also do not need to be sequential. The value of the number is inconsequential except for the very first number which will indicate where the numbering should start. MarkDown will make the numbers sequential. So whether you enter
1. one
1. two
1. three
1. four
or
1. item one
2. item two
3. item three
4. item four
or
1. item one
10. item two
1. item three
1000. item four
They will all display as:
- item one
- item two
- item three
- item four
If however, the number you start with will determine the number of the first element in the list with following items incrementing from the first value. The following examples will all result in the same list:
23. twenty-three
1. twenty-four
1. twenty-five
1. twenty-six
23. twenty-three
1. twenty-four
1000. twenty-five
1. twenty-six
23. twenty-three
24. twenty-four
25. twenty-five
26. twenty-six
results in:
- twenty-three
- twenty-four
- twenty-five
- twenty-six
unordered lists
Some editors will allow the use of -, + and * to create unordered lists. However, some editors only allow -. You need to try it out and see what works for your chosen editor.
using -
- item one
- item two
- item three
using +
- item one
- item two
- item three
using *
- item one
- item two
- item three
To-do lists
In editors such as HackMD, Joplin and GitHub, you can create todo lists with tick boxes. To create such a list you start the line with - [ ]. Note that there is a space between the square brackets. To create a ticked box you place an x between the square brackets: - [x]. You’ll notice that you cannot tick the boxes on this web page. However, in the previous mentioned editors you can usually tick the boxes in either display or editing mode.
- todo one
- todo two
- todo three
Sub lists:
To create sub-lists you need to indent the sublist items with two spaces. Some editors might require more spaces. So if things do not display as you expect, try adding an extra space or two:
- first item
- sub item
- second sub item
- second item
- first sub item
- second sub item
Key Points
You can use
-,+or*at the very beginning of the line to create an unordered list.You can use a digit followed by a fullstop, eg.
1.to create a numbered listYou can create a list with tickboxes by using
- [ ]
Adding Links and Images
Overview
Teaching: 0 min
Exercises: 0 minQuestions
How does one add a link?
How does one add an image?
How does one add an image that is also a link?
Objectives
Adding links and images.
Links
Links are created by using square brackets around the text to be displayed, followed by round brackets for the link to be used. For example, to create a link to the GitHub website we can do this:
[GitHub Website](https://github.com)
This will be displayed as:
Images
To add an image the MarkDown is similar to that of a link but a ! is added to the front, eg.

That should result in:
![]()
As you can, the above link references and images that is in another repository. If you uploaded the image to your local repository, you only need to specify the name. If it is in a sub-directory below your Markdown file it is referenced in a relative way, eg.


Image Credit: By Jerome Walker - Own work, created from GDFL work created by Michael Ströck, Public Domain, https://commons.wikimedia.org/w/index.php?curid=934419
Key Points
Use
[]and()to add images and links
Adding Code With Syntax Highlighting
Overview
Teaching: 0 min
Exercises: 0 minQuestions
How does one add code?
How does one add syntax highlighting for a specific language?
Objectives
Adding code and syntax highlighting
Code and Syntax Highlighting
You have probably seen how code is displayed in the Carpentries lessons in a grey block and with syntax highlighting. Since most of what we do is about coding, this is a very handy feature. Whenever you surround text with three back quotes (`) the text will be displayed monospace and in a gray box:
```
s = "This is a Python string"
print(s)
```
To get syntax highlighting, just add the name of the programming language directly after the first three back quotes:
```python
s = "This is a Python string"
print(s)
```
This will be displayed as:
s = "This is a Python string"
print(s)
Key Points
Using back quotes for code
Tables, Block quotes and Horizontal Lines
Overview
Teaching: 0 min
Exercises: 0 minQuestions
How does one create a table?
How can one draw a line between sections across a page?
How does one create a block quote?
Objectives
Adding tables, block quotes and horizontal lines
Tables
Blockquotes
Blockquotes are created by adding > in front of every line of the block, followed by a space eg.
This is a block quote
Every line starts with a > symbol followed by a space
This line started with two > symbols followed by a space, thus: » .This mimmicks the type of formatting you get in emails that have been forwarded.
Horizontal Rule
Horizontal rules can be created in one of three ways
---***___
Key Points
Tables, block quotes and horizontal lines