Adding Files to a Project Repository
Last updated on 2026-07-21 | Edit this page
Overview
Questions
- How can I add files to my GitLab project?
Objectives
- Alternative Git: Push local Git repository to newly created project.
- Alternative NoGit: Add file to project repository using GitLab’s web interface.
Two Alternative Episode Versions
This episode consists of two alternative parts.
The first alternative shows how to push a local Git repository to the
project that was created as part of the previous episode. It consists of
the first three sections and the last, which is part of both
alternatives. As part of the process a README.md file will
be added.
The second alternative adds the README.md file using
GitLab’s web interface, thus obviating the use of Git itself. It
consists of the last two sections.
Configuring Git
Before we initialize a local Git repository, we make sure that Git is properly configured.
To check for our name and email address, We run
$ git config --global --get user.nameand
$ git config --global --get user.emailIf both return sensible values, we are good to go. Otherwise we provide the missing values, for example:
$ git config --global user.name "Some Novice"
$ git config --global user.email "some.novice@example.com"
It is now common to name the default branch main, rather
than master as is still the default in Git. For more
information see, for example, the announcement
of GitLab to change the default branch Since the discussion on this
topic has started, Git has introduced a configuration value for the
initial branch created by the git init command. We will use
this, to make sure that all future repositories created locally start
with a branch called main:
$ git config --global init.defaultBranch mainCreating a Local Repository
Research Diary’s Initial Content (Required)
Create a Git repository anywhere on your computer. Add a README file in markdown format that describes the repository’s future contents.
Remember to use a good commit message for your commit.
This exercise should take about 10 minutes.
We start by creating and navigating to a new directory,
research-diary. There we initialize a git repository.
$ mkdir research-diary
$ cd research-diary
$ git init
Next we create a file called README.md with the
following content using our preferred text editor.
# Research Diary

This repository contains our research diary.
Each day gets its own file.
We use the Markdown format for our files.
Finally, we stage the added file using and create a commit.
$ git add README.md
$ git commit -m "Add README.md"
Checking the status of the git repository, we should see that it exists and that there are no changes in the working directory or in the stating area:
$ git statusOn branch main
nothing to commit, working tree cleanThere is one file, README.md:
$ lsREADME.mdConnecting Local and Remote Repository
Having thus created our local repository, we want to save it to our repository in GitLab. To that end, we have a look at the project overview page again; this time at the instructions toward the bottom of the page. They read:
Git global setup
git config --global user.name "Some Novice"
git config --global user.email "some.novice@example.com"
Create a new repository
git clone https://gitlab.com/somenovice/research-diary.git
cd test
git switch --create main
touch README.md
git add README.md
git commit -m "add README"
git push --set-upstream origin main
Push an existing folder
cd existing_folder
git init --initial-branch=main
git remote add origin https://gitlab.com/somenovice/research-diary.git
git add .
git commit -m "Initial commit"
git push --set-upstream origin main
Push an existing Git repository
cd existing_repo
git remote rename origin old-origin
git remote add origin https://gitlab.com/somenovice/research-diary.git
git push --set-upstream origin --all
git push --set-upstream origin --tags
We already covered the global setup.
The next three sets of instructions are mutually exclusive. The first is not for us, because we already created a repository. Neither is the second, because although we have a directory with contents, its already a Git repository. That leaves us with the third option, which is the one applicable to our situation: “Push an existing Git repository.”
Transferring our changes to a remote repository is called pushing, because we are sending the changes from us, the local repository, to somewhere else, a remote repository. Later on we will “pull” changes from a remote repository, completing the analogy.
Going back to the shell, we configure our project’s repository as a remote in our local repository:
$ git remote add origin https://gitlab.com/somenovice/research-diary.githttps:// vs git@
We assume throughout this lesson that the user has no SSH key configured, because we do not want to make the setup of such a key a prerequisite.
If however, a user has configured an SSH key for their account, GitLab would default to showing links to repositories in the form for Git over SSH instead.
For example, without a configured key GitLab shows
https://gitlab.com/somenovice/research.git
for our example repository, whereas with a configured key it would show
git@gitlab.com:somenovice/research.git.
The HTTPS link still works if a SSH key is configured, it is only no longer shown by default.
We instruct Git to add a remote called origin with the
address https://gitlab.com/somenovice/research-diary.git.
Make sure to copy that URL from the project overview page, because it
represents the Git address of your project’s repository on GitLab. It
will be different for everyone.
Note also, that we skipped the second line of the instructions. It
renames an existing remote origin to
old-origin, but we have no existing remote.
Names for remotes
Apart from the restrictions that Git puts on remote names, which can be adhered to without much thought by using only letters, numbers, underscores, and hyphens, we should choose meaningful names for remotes, in particular, when we add multiple remotes to a local repository.
In most examples, origin is used as the name for a
remote, because it is the name of the remote created when cloning a
repository. It is a meaningful name for the main remote repository, if
there is one. This together with its ubiquitous use make it a very good
name.
In other cases, we might call a remote to a private copy of the main
repository after our username or server it is located on, for example
uni for a university GitLab instance.
Finally, we push our changes to the remote repository. The command will prompt for our user name and password:
$ git push --set-upstream origin --allEnumerating objects: 3, done.
Counting objects: 100% (3/3), done.
Writing objects: 100% (3/3), 250 bytes | 250.00 KiB/s, done.
Total 3 (delta 0), reused 0 (delta 0), pack-reused 0
To https://gitlab.com/somenovice/research-diary.git
* [new branch] main -> main
branch 'main' set up to track 'origin/main'.Having successfully pushed our commit to the GitLab repository, we change to our browser and navigate to the project (or reload it, if we still have it open).
Adding a File to the Project
We are now going to add a file to our project. To do this, we first navigate to the project’s homepage, unless we are already on that page. Below the heading “The repository for this project is empty” there are several buttons. We click the one labeled “New file”, which brings us to a new page, the so called WebIDE.
The WebIDE shows a list of files on the left and a tabbed environment for open files on the right. When we first open it, it shows a Welcome page, which we can safely close by clicking the “x” labeled button on the Welcome page’s tab at the top.
Changing the WebIDE Theme
GitLab’s WebIDE uses a dark theme by default. To change it, click on the gear icon in the lower left corner and select “Themes”, then “Color Theme” from the opening menu. This opens a dialog to select a color theme for the IDE. Light themes are listed at the top and dark themes at the bottom. “GitLab Light” is GitLab’s own light theme. Select a theme by clicking on its name.
To actually create a new file, we click on the button labeled with an
icon representing a sheet of paper with a plus sign in the lower right
corner. Note thate this button is only visible, if you mouse hovers over
the list of files, which is currently empty, on the left. An text input
field appears below the button, which prompts us for a filename. We type
README.md into the field and confirm by pressing the return
key.
The list of files should only have one entry: README.md.
The text editor itself shows the contents of the file
README.md: nothing so far. We see the filename at the top
in a tab, which indicates that we can open multiple files and switch
between them using the tabs at the top.
Markdown Headlines
In Markdown, headlines are marked by one up to six #
characters followed by a space character in front of the text. The
number of # characters indicates the heading’s level, with
1 being the most significant.
For example, a level 3 headline:
### Interesting Section TitleResearch Diary’s Initial Content 2 (Required)
Describe the repository’s future contents in the README.md.
This exercise should take about 2 minutes.
To save the changes, the creation of the file and the text we entered, we need to create a so called commit. A commit packages changes in one or more files of the repository. The list of commits, in chronological order, constitute the history of a Git repository.
To get there, we click on the button on the left showing an icon that indicates a branching from one circle to two others. The button should be overlaid with the number 1 in a circle.
A dialog will replace the list of files. At the top is a text field for a commit message. Then comes a button labeled “Commit & Push”, followed by a list of all files that were changed, added, or deleted.
A commit message should summarize the changes that are packaged into the commit. Good commit messages are what makes the history of a repository useful.
We enter a good commit message, for example “Add README.md” and click the button labeled “Commit to ‘main’”.
Having done that, we are done editing and navigate back to the
project’s homepage. To get there, we need to click on the button labeled
“GitLab” in the lower left of the screen and select “Go to
Project Page After Adding Files
We are greeted by the project homepage, similar to the following screenshot:
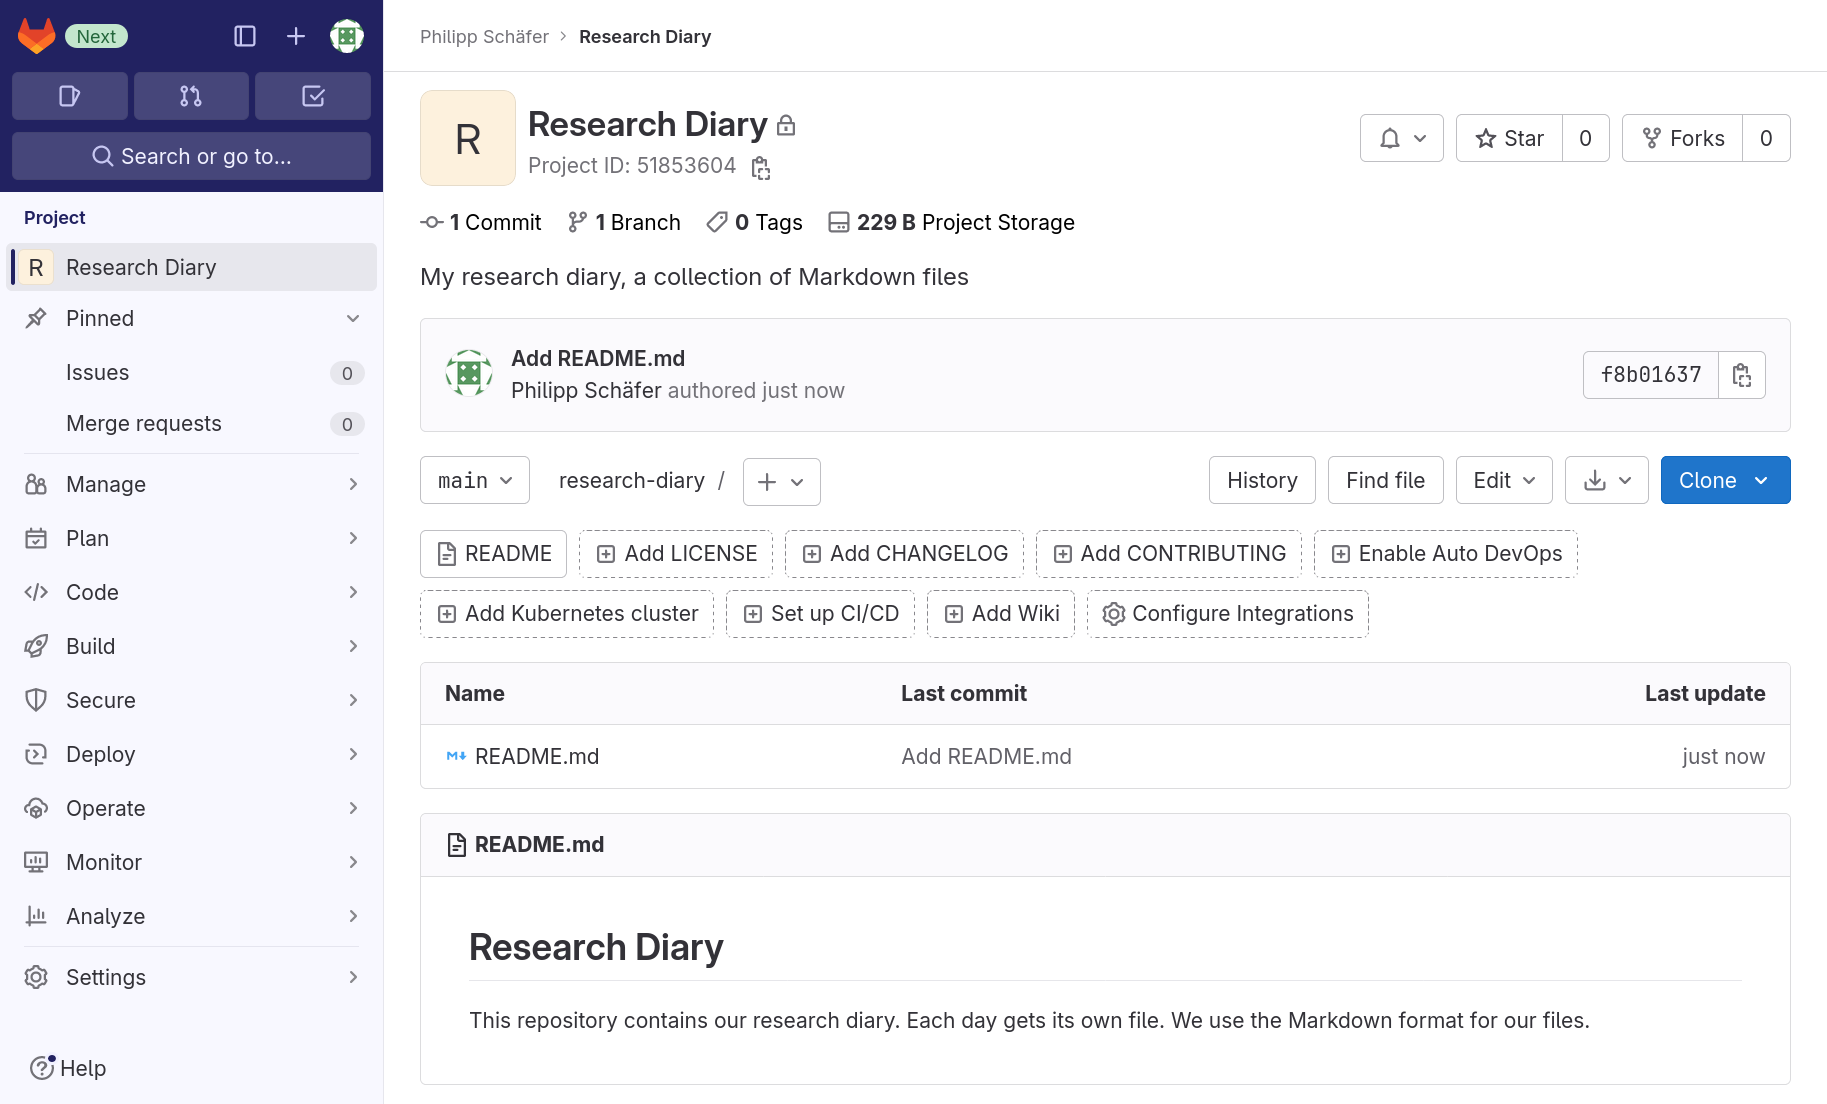
Let us look at what has changed compared to its initial state. The interface elements encouraging us to add members to the project are gone. Of course, we can still navigate to the project’s Members page later on, if we need to. We also, correctly, no longer get told that the repository is empty and the instructions on how to push content to the repository have vanished.
Instead, we see some statistics below the project’s title: 1 Commit, 1 Branch, 0 Tags, 209B Project Storage. They double as buttons to other project pages.
Below the description is a box presenting information on the last commit of the currently selected branch, followed by a new button bar.
The following buttons, that we saw earlier, allow us to add specific
files or navigate to the configuration of certain GitLab features. Note
that one button changed from reading “Add README” to just “README”,
since we added a file called README.md. The button is now a
link to the latest version of that file in the current branch.
Then we see a list of files. So far, there is only
README.md. The list also tells us through which commit it
was last changed and when that commit was created.
Finally, we see the rendered version of the markdown file
README.md. Because having a README-file in the root
directory of a repository is a widespread convention, GitLab (and other
platforms like it) usually render it on a project’s homepage.
- Alternative Git: You can fill a fresh GitLab project’s repository by pushing a local repository.
- Alternative NoGit: You can create and edit files in a repository using GitLab’s web interface.