Create and Setup your blog repository on GitHub
Overview
Teaching: 1 min
Exercises: 10 minQuestions
How do we set up a GitHub repository for blogging?
Objectives
Create a repository on GitHub ready for hosting a blog site
In this first episode, we will create the repository that will host our website on GitHub.
We will do this entirely in the browser and we will also assume that your GitHub account is called HelmUpgradeBot.
- Go to https://github.com and sign in to your account
- In the top, right-hand corner of the browser, click the plus
+symbol and select “New repository” from the dropdown menu. - Give your repository the name
HelmUpgradeBot.github.io. This is a special GitHub repository that will act as your website. Make sure that it is public! (You can have private GitHub Pages sites, but they cost money!)- Also add a README file to your repository and a license (the MIT license has been used in the example below but you might prefer Creative Commons).
- Once you’re happy, click “Create repository”
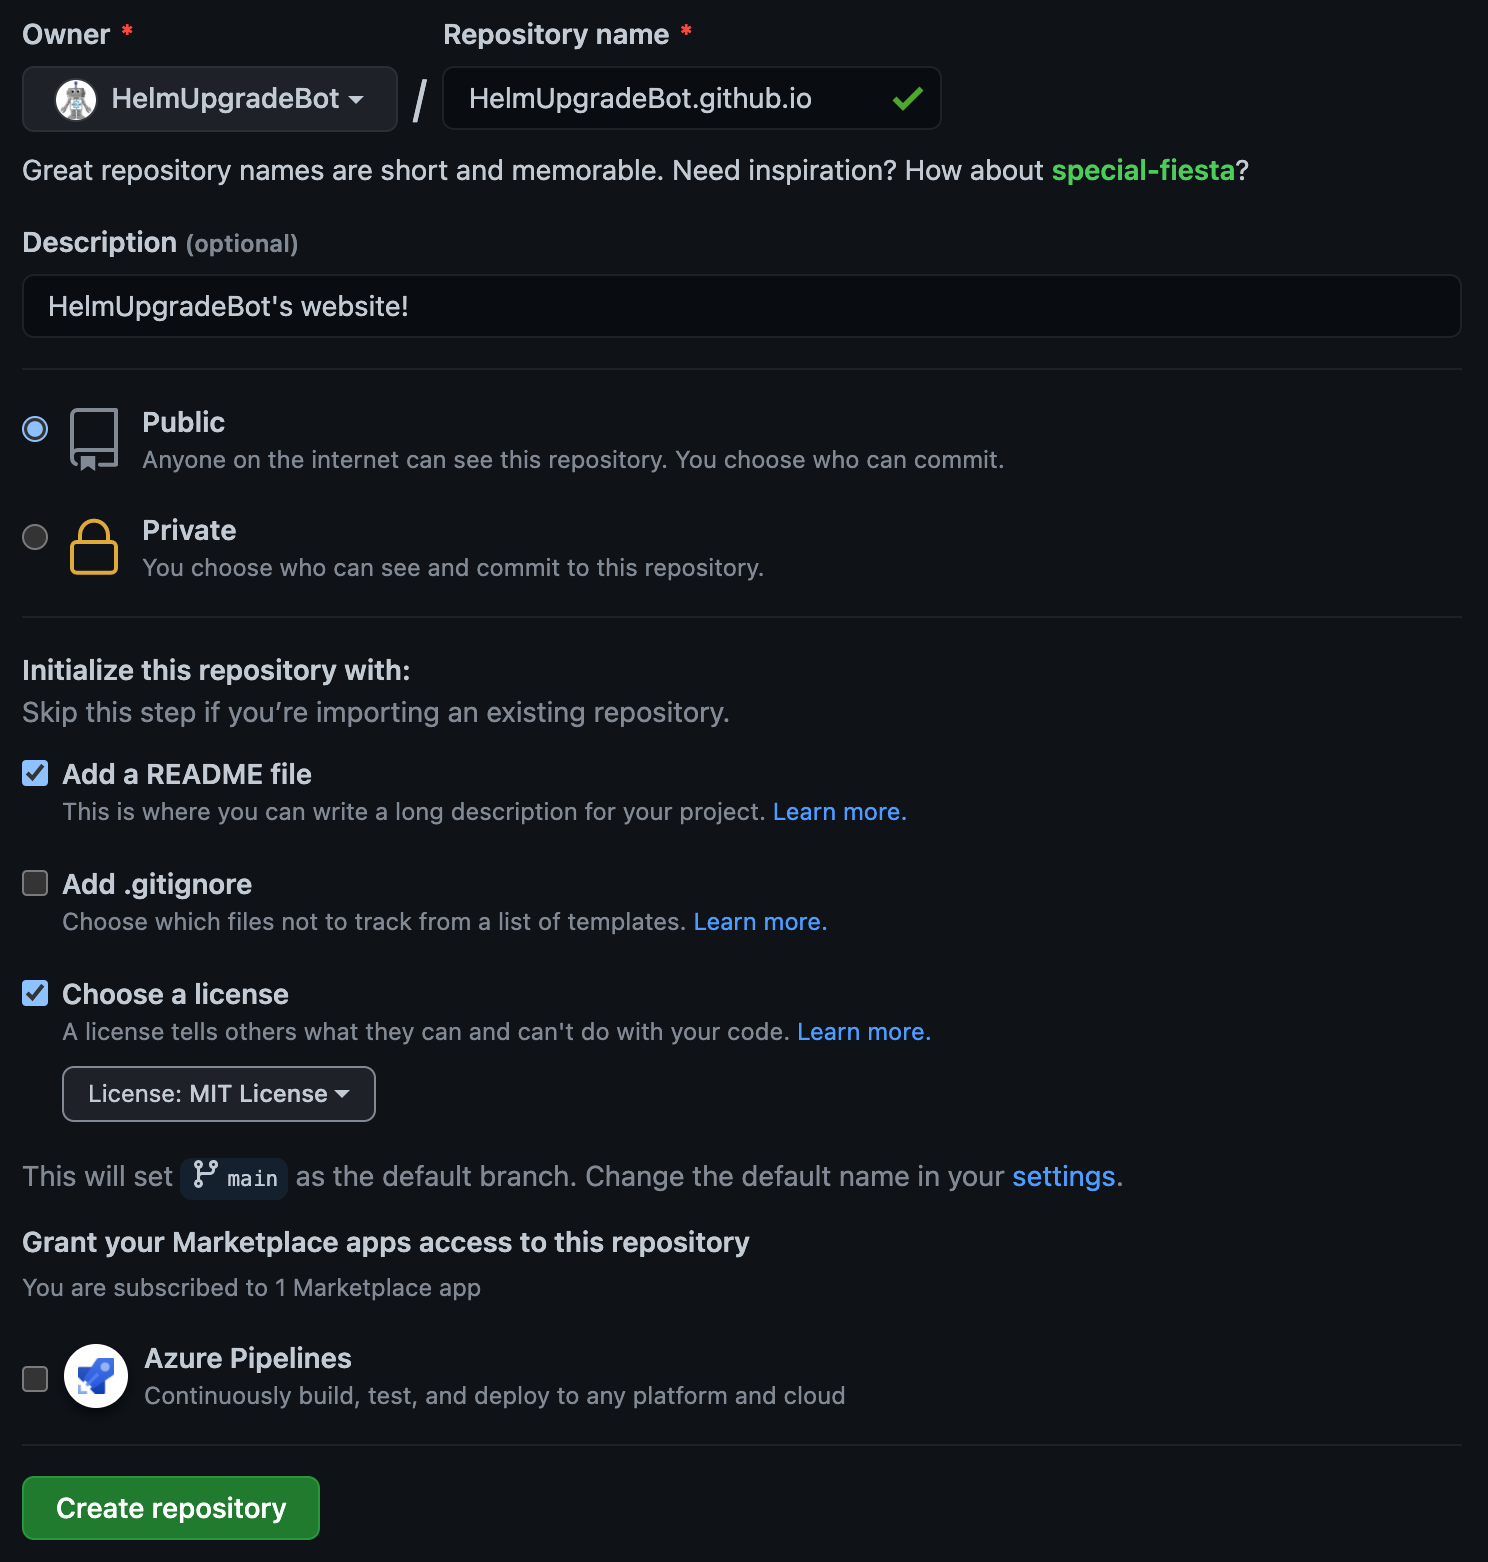 |
|---|
| Example of how to fill in GitHub’s create repository form |
- Once your GitHub repo has been created, click the large, green “code” button in the top-right, make sure “HTTPS” is selected, and click the clipboard icon to copy the contents of the text box.
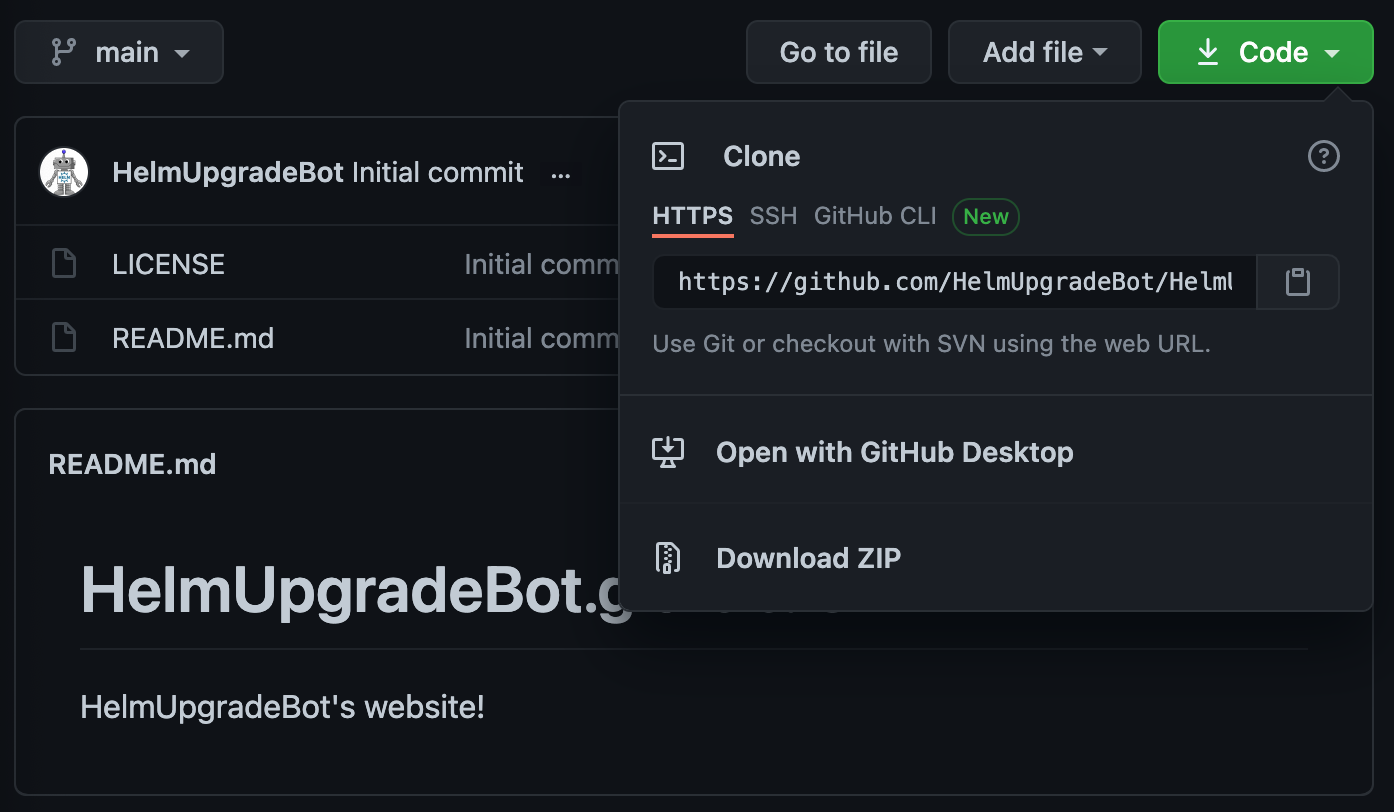 |
|---|
| Where to find the address of your GitHub repo |
Next we will make a local copy of this repository and set it up to create a blog site with Hugo.
Key Points
Blog sites hosted on GitHub usually have the repo name
USERNAME.github.io
Locally setting up our blog site with Hugo
Overview
Teaching: 1 min
Exercises: 15 minQuestions
How do we get a local copy of a GitHub repo?
How do we initialise a blog site using Hugo?
How do we add and configure a theme for our site?
Objectives
Get a local copy of our repository onto our machines
Initialise a blog site with Hugo
Apply a theme to our blog site and set some basic configuration options
Now we will “clone” our GitHub repository - meaning we will add a copy of it to our local machines. This is where we will make changes to our repository and initialise a new site using Hugo.
- Open up your terminal app on your machine
- Change to a “sensible” directory somewhere on your filesystem
- This could be
Desktop, or maybe you have a folder calledprojects- wherever makes sense to you is the right place to go! In this example, we will usesource/github.
cd source/github - This could be
-
Now clone the repository using the
git clonecommand and pasting the address we copied in step 4 of section 1. Here we are assuming your GitHub account is calledHelmUpgradeBotand your repository is calledHelmUpgradeBot.github.io.git clone https://github.com/HelmUpgradeBot/HelmUpgradeBot.github.io.gitCloning into 'HelmUpgradeBot.github.io'... remote: Enumerating objects: 4, done. remote: Counting objects: 100% (4/4), done. remote: Compressing objects: 100% (4/4), done. remote: Total 4 (delta 0), reused 0 (delta 0), pack-reused 0 Receiving objects: 100% (4/4), done. -
git clonewill have created a new directory named after your repo, containing all the files currently in your repo (only the README and LICENSE files so far!). You can use the commandlsto check this. Now change into that directory.cd HelmUpgradeBot.github.io -
The first action to take in good gitflow is to create a new branch to work on, so we are not saving our work to the
mainbranch until we are ready. Let’s call our new branchsetup-hugo.git checkout -b setup-hugoSwitched to a new branch 'setup-hugo' -
And now we use hugo to create our website! The below command will auto-generate all of the structure we need to generate html files using hugo’s site template. The most important file this command will create is
config.tomlwhich will allow us to control the look and feel of our site. (For a tangent into the TOML file format, read this “Learn X in Y minutes” explainer!)hugo new site --force .Congratulations! Your new Hugo site is created in ~/source/github/HelmUpgradeBot/HelmUpgradeBot.github.io. Just a few more steps and you're ready to go: 1. Download a theme into the same-named folder. Choose a theme from https://themes.gohugo.io/ or create your own with the "hugo new theme <THEMENAME>" command. 2. Perhaps you want to add some content. You can add single files with "hugo new <SECTIONNAME>/<FILENAME>.<FORMAT>". 3. Start the built-in live server via "hugo server". Visit https://gohugo.io/ for quickstart guide and full documentation.For your information
Some things to note about the above command:
- The
.means “Create the site right here please”, not in another directory. - We needed to use the
--forceflag as hugo would have complained that our directory wasn’t empty - remember the README and LICENSE? Using--forcemeans that hugo will ignore those files when it generates the site.
- The
-
Next we will add a theme. You can choose any of the free themes available at https://themes.gohugo.io/ but, for this lesson, we will use Anatole. Add the theme to your repository using the
git submodulecommand.git submodule add https://github.com/lxndrblz/anatole.git themes/anatoleCloning into '~/source/github/HelmUpgradeBot/HelmUpgradeBot.github.io/themes/anatole'... remote: Enumerating objects: 1611, done. remote: Counting objects: 100% (255/255), done. remote: Compressing objects: 100% (177/177), done. remote: Total 1611 (delta 120), reused 188 (delta 77), pack-reused 1356 Receiving objects: 100% (1611/1611), 4.79 MiB | 7.27 MiB/s, done. Resolving deltas: 100% (844/844), done.For your information
Now under the
themes/anatoledirectory, we will have checked out a single reference of the anatole repository to build the content from. -
Now we need to update
config.tomlto use the theme. Open up the file in your favourite text editor. This is how you would open it innano.nano config.tomlNow add the following line to the bottom of the file.
theme = "anatole"While you have the config file open, let’s make a few more edits to personalise our site. The templates provide a guide on common configuration options - for example, see Anatole’s guide.
Firstly, I strongly recommend updating the
baseURLfield to be that of our GitHub repository, like so:baseURL = "https://HelmUpgradeBot.github.io/"Another super useful field to add here is the one that will enable the rendering of emojis in your posts :wink:
enableEmoji = trueWe are now going to create a new section in our config file called
[params]and list some more metadata about our site there.Give your website a cool name in the
titlefield, describe what your site is about in thedescriptionfield, and add your name under theauthorfield:[params] title = "A Bot with a Blog" author = "HelmUpgradeBot" description = "Automatic blogging from a GitHub bot"All together, your config file should now look like this:
 baseURL = "https://HelmUpgradeBot.github.io/"
 languageCode = "en-us"  # Update to "en-gb" if you prefer, or another language!
 theme = "anatole"
 enableEmoji = true

 [params]
 title = "A Bot with a Blog"
 author = "HelmUpgradeBot"
 description = "Automatic blogging from a GitHub bot"
Make sure to save the file!
Theme-specific configuration
Some of the information you’ve been asked you to add to your
config.tomlfile will be specific to the “anatole” theme and will not work if you swap themes. You should always check the documentation and example site of the theme you wish to use as they will outline what fields can be used and what their expected values will be. -
Now check your site builds by running the below command in your terminal, and then visiting http://localhost:1313 in your browser.
hugo serverStart building sites … WARN 2021/05/16 21:17:56 found no layout file for "HTML" for kind "home": You should create a template file which matches Hugo Layouts Lookup Rules for this combination. WARN 2021/05/16 21:17:56 found no layout file for "HTML" for kind "taxonomy": You should create a template file which matches Hugo Layouts Lookup Rules for this combination. WARN 2021/05/16 21:17:56 found no layout file for "HTML" for kind "taxonomy": You should create a template file which matches Hugo Layouts Lookup Rules for this combination. | EN -------------------+----- Pages | 3 Paginator pages | 0 Non-page files | 0 Static files | 0 Processed images | 0 Aliases | 0 Sitemaps | 1 Cleaned | 0 Built in 4 ms Watching for changes in ~/source/github/HelmUpgradeBot/HelmUpgradeBot.github.io/{archetypes,content,data,layouts,static} Watching for config changes in ~/source/github/HelmUpgradeBot/HelmUpgradeBot.github.io/config.toml Environment: "development" Serving pages from memory Running in Fast Render Mode. For full rebuilds on change: hugo server --disableFastRender Web Server is available at http://localhost:1313/ (bind address 127.0.0.1) Press Ctrl+C to stop
Our blog doesn’t look very exciting yet, but it’s good to know that it works! Let’s save what we have and we will deploy it online in the next episode.
Close your browser window displaying your website and run Ctrl+C in your terminal to stop the hugo server command.
Key Points
Get a local copy of a GitHub repository using the
git clonecommandInitialise a blog site with hugo using the
hugo new sitecommandAdd a blog theme as a submodule using the
git submodule addcommand and configure the theme by editing theconfig.tomlfile
Push our Hugo site to GitHub
Overview
Teaching: 1 min
Exercises: 5 minQuestions
How do we save and track our local changes in
git?How do we send our changes to our GitHub repository?
How do we open and merge a Pull Request?
Objectives
Push the Hugo site to GitHub and use a Pull Request to bring it into the
mainbranch
In this episode, we will push the changes we made in our local repository back to the remote repository on GitHub.
For more detail on the workflows used in this episode, see the Version Control with Git Software Carpentry lesson.
-
First of all, we need to tell
gitto track all of the changes we have created. We do this by adding them to git’s staging area.git add .For your information
As we saw before, here the
.means “please add everything in this current location.”If you now run
git statusyou should see a similar output as below.git statusOn branch setup-hugo Changes to be committed: (use "git restore --staged <file>..." to unstage) new file: .gitmodules new file: archetypes/default.md new file: config.toml new file: themes/anatole -
To tell git to make a snapshot (or “commit”) of the current state of our files, we use the
git commitcommand, passing the-mflag in order to leave a message about what we’ve changed.git commit -m "Initial setup of blog site"The output should look similar to below.
 [setup-hugo 62d794e] Initial setup of blog site
  4 files changed, 19 insertions(+)
  create mode 100644 .gitmodules
  create mode 100644 archetypes/default.md
  create mode 100644 config.toml
  create mode 160000 themes/anatole
For your information
Now if we run
git statusagain, we should see the messagenothing to commit, working tree clean -
Now we push this commit from our local commit up to the GitHub server using the
git pushcommand. In the below command,originis a reference to the original repo we setup on GitHub, andsetup-hugorepresents an instruction to create a new branch on the GitHub-hosted repo with the same name as our locally-created branch.git push origin setup-hugoTotal 0 (delta 0), reused 0 (delta 0), pack-reused 0 remote: remote: Create a pull request for 'setup-hugo' on GitHub by visiting: remote: https://github.com/HelmUpgradeBot/HelmUpgradeBot.github.io/pull/new/setup-hugo remote: To https://github.com/HelmUpgradeBot/HelmUpgradeBot.github.io.git * [new branch] setup-hugo -> setup-hugo -
If we head back onto GitHub to our repo’s page, we should now see a banner informing us that a branch has been updated and providing us with an option to “Compare & pull request”. Click that big, green button!
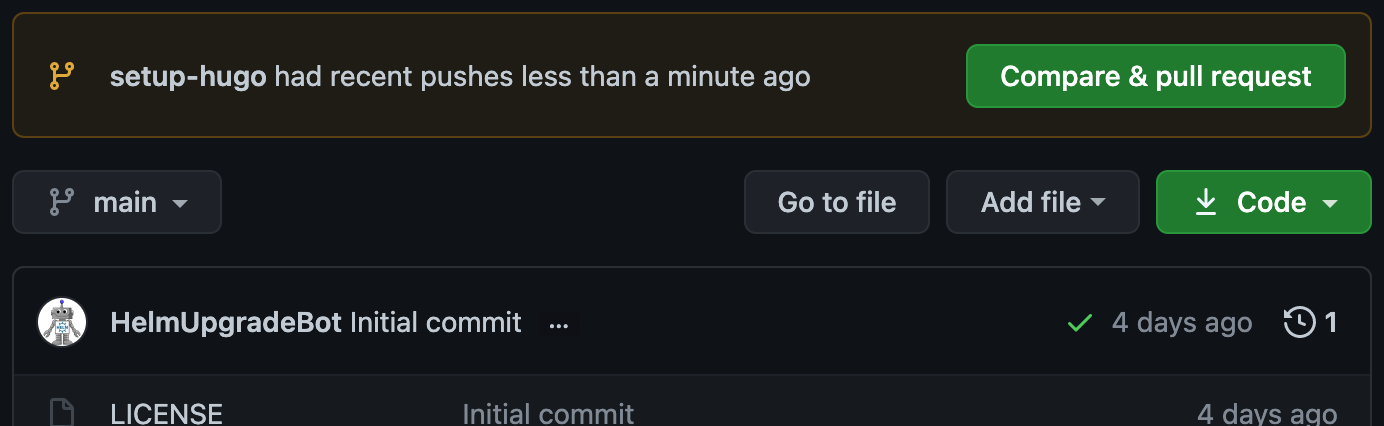 |
|---|
| GitHub repo page with a banner and “Compare & pull request” button |
You will be redirected to GitHub’s interface for opening a Pull Request (PR). Give your PR an informative title and a descriptive summary in the relevant boxes, then click “Create pull request”.
If we had any tests for our website, this is where they’d run before we merged the PR. However, we’ll set up our tests next, so go ahead and click “Merge pull request”, followed by “Confirm merge”.
If you head back over to the repo’s landing page, you’ll see our changes have now been added to the main branch - but that doesn’t mean our blog is live and deployed yet!
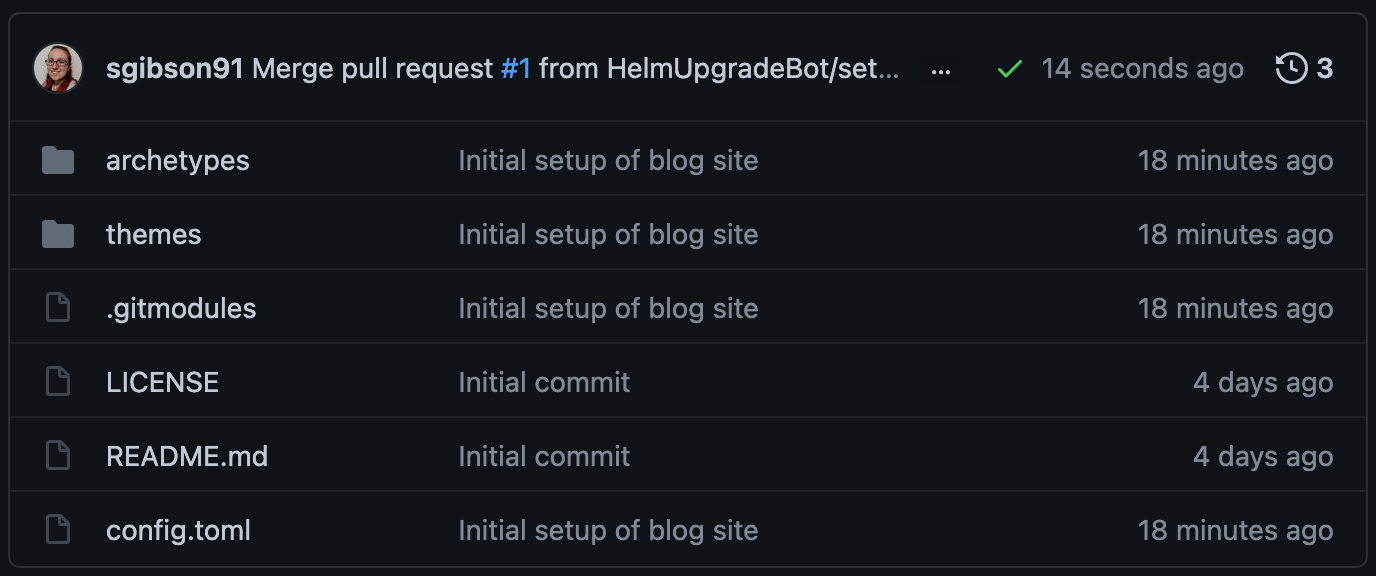 |
|---|
The GitHub repo’s main branch with the hugo files now added to it |
First, let’s update our local copy of the repo and then we can add a GitHub Action workflow to automatically deploy our website for us.
In your terminal, run the following git checkout and git pull commands.
git checkout main
warning: unable to rmdir 'themes/anatole': Directory not empty
Switched to branch 'main'
Your branch is up to date with 'origin/main'.
For your information
This time, we did not use the
-bflag in thegit checkoutcommand because we are switching to a branch that already exists, not creating a new one.
git pull
remote: Enumerating objects: 1, done.
remote: Counting objects: 100% (1/1), done.
remote: Total 1 (delta 0), reused 0 (delta 0), pack-reused 0
Unpacking objects: 100% (1/1), 636 bytes | 636.00 KiB/s, done.
From https://github.com/HelmUpgradeBot/HelmUpgradeBot.github.io
   594286e..cd19a8f  main       -> origin/main
Updating 594286e..cd19a8f
Fast-forward
 .gitmodules           | 3 +++
 archetypes/default.md | 6 ++++++
 config.toml           | 3 +++
 themes/anatole        | 1 +
 4 files changed, 13 insertions(+)
 create mode 100644 .gitmodules
 create mode 100644 archetypes/default.md
 create mode 100644 config.toml
 create mode 160000 themes/anatole
Key Points
Local changes are saved and tracked using the
git addandgit commitcommandsThe remote repository on GitHub is synced with a local repository using
git push. The reverse sync is achieved withgit pull.A Pull Request can be opened and merged in the GitHub browser interface
Automating Website Deployment
Overview
Teaching: 5 min
Exercises: 10 minQuestions
What is Continuous Deployment and what does it mean in the context of our site?
How do we enable GitHub Actions on our repository?
What needs to go into a GitHub Actions workflow to enable Continuous Deployment of our site?
Objectives
Understand what the concept of Continuous Deployment means for a website
Understand the content of a GitHub Actions workflow file that enables Continuous Deployment to GitHub Pages
In this episode, we will use GitHub Actions to define a Continuous Deployment pipeline that will automatically update our webite when we merge Pull Requests in GitHub.
The concept of Continuous Deployment is as follows:
For every change we integrate or merge into our GitHub repo, a fresh version of our website should be created and deployed automatically for us.
-
Let’s start by checking out a new branch in our local repo.
git checkout -b add-cdSwitched to a new branch 'add-cd' -
GitHub Actions are automatically triggered by files that are stored in a special folder called
.github/workflows. So let’s create that folder!mkdir -p .github/workflowsFor your information
The
-pflag here means “If the parent directory doesn’t already exist (i.e..github/), then please create that too.” Try running the above command without this flag first and see what error message you get! -
Create a
cd.yml(cdis short for Continuous Deployment) file inside the.github/workflowsfolder. You can do this in the terminal with the below command.touch .github/workflows/cd.ymlNow open it in your favourite text editor. Here’s how you would open the file with
nano.nano .github/workflows/cd.yml(Find out more about the YAML (
.yml) file format in this blog post.) -
We have a workflow ready for us to use below which you should feel free to copy and paste into your
cd.ymlfile, and then we’ll go through each section.
Whitespace matters with YAML so be careful when you copy and paste!
What does “whitespace matters” mean? Why is it important?
It means that the spaces in the file carry meaning. A bit like how in Python if you indent lines then it knows they’re part of a for loop. The way that a for loop ends is that you don’t indent the next line. Think about replacing the whitespace (either spaces or tabs) with characters, such as dots. 4 dots (….) which represent 4 spaces ( ) tells the file that this new information belongs to the line above. In some programming languages whitespace doesn’t matter - newlines might matter but where you put the words is only important for what it looks like, not what actually happens. Python, Markdown, YAML all depend on whitespace to understand what the developer means.
name: Build and Deploy Site

on:
  push:
    branches:
      - main
  pull_request:
    branches:
      - main

jobs:
  build-and-deploy-site:
    runs-on: ubuntu-latest
    steps:
      - name: Checkout repo
        uses: actions/checkout@v2
        with:
          submodules: true
          fetch-depth: 0

      - name: Setup Hugo
        uses: peaceiris/actions-hugo@v2
        with:
          hugo-version: 'latest'

      - name: Build site with Hugo
        run: hugo --minify

      - name: Check HTML
        uses: chabad360/htmlproofer@master
        with:
          directory: "./public"
          arguments: --only-4xx --check-favicon --check-html --assume-extension --empty-alt-ignore --disable-external
        continue-on-error: true

      - name: Deploy to GitHub Pages
        if: github.event_name == 'push' && github.ref == 'refs/heads/main'
        uses: peaceiris/actions-gh-pages@v3
        with:
          github_token: ${{ secrets.GITHUB_TOKEN }}
          publish_dir: ./public
- The
nameparameter defines what our workflow should be called - The
onblock beginning defines what events should trigger our workflow to run. We have two defined here:on.push.branches = [main]: This tells GitHub Actions to run the workflow whenever a push is made to themainbranch. This is most commonly when a PR is merged.on.pull_request.branches = [main]: This tells GitHub Actions to run the workflow every time a PR intending to merge something into themainbranch is opened.
- The
jobssection defines which jobs the workflow will run when triggered. We have one job to run calledbuild-and-deploy-siteand we have requested the latest version of the Ubuntu Operating System to run this job on (Windows and Mac OSs are also available to execute jobs). - The
stepssection, underneathjobs.<job_name>, defines each step involving in running the job.- Step 1 is a checkout step.
This clones the repo like we did manually in step 3 of episode 2.
The
fetch-depth: 0line asks GitHub to not download the full repo history, only the most recent commit, and thesubmodules: trueline asks GitHub to also checkout the submodules we depend on. Without this, ourthemesfolder won’t be populated with the info we need to build the site! - Step 2 installs the latest version of Hugo.
- Step 3 builds the site using Hugo.
The
--minifyflag ensures that the output HTML files are compressed to take up the minimum amount of space required. The ouput files are stored in a folder calledpublic/. - Step 4 runs a tool called
htmlprooferover the generated HTML files inpublic. This tool checks for things like broken links across the site.- This step has the
continue-on-errorflag set totrueallowing the deployment process to continue even ifhtmlprooferdiscovers errors. This is because this step will fail since, for example, we do not setup favicons during this lesson and this is one of the properties the tool checks.
- This step has the
- Step 5 will commit the HTML files to a new branch on our repo called
gh-pages. It only publishes the HTML files contained in thepublicdirectory as they are the only ones required to create the site at this point.- Note this step has an
ifstatement that states this step should only be executed when the event that triggered the workflow was a push to themainbranch (most commonly a merged PR). This prevents the live website being redeployed by unreviewed/unapproved changes in a PR. - This step also requires a secret
GITHUB_TOKEN. You do not have to worry about creating and/or storing this token. It is a special token that is automatically generated by GitHub for every triggered workflow run and allows the workflow to commit and publish new branches. GitHub released a blog post discussing how to control the permissions of this token.
- Note this step has an
- Step 1 is a checkout step.
This clones the repo like we did manually in step 3 of episode 2.
The
Add, commit and push the cd.yml file to GitHub as we did in episode 3.
git add .github/workflows/cd.yml
git commit -m "Add a GitHub Actions workflow to build and deploy the site"
[add-cd 92c9552] Add a GitHub Actions workflow to build and deploy the site
 1 file changed, 41 insertions(+)
 create mode 100644 .github/workflows/cd.yml
git push origin add-cd
Enumerating objects: 6, done.
Counting objects: 100% (6/6), done.
Delta compression using up to 4 threads
Compressing objects: 100% (3/3), done.
Writing objects: 100% (5/5), 875 bytes | 875.00 KiB/s, done.
Total 5 (delta 1), reused 0 (delta 0), pack-reused 0
remote: Resolving deltas: 100% (1/1), completed with 1 local object.
remote:
remote: Create a pull request for 'add-cd' on GitHub by visiting:
remote:      https://github.com/HelmUpgradeBot/HelmUpgradeBot.github.io/pull/new/add-cd
remote:
To https://github.com/HelmUpgradeBot/HelmUpgradeBot.github.io.git
 * [new branch]      add-cd -> add-cd
Create another PR in GitHub’s browser interface as we did in episode 3. You should see the check now running and report a status at the bottom of the open PR page! Merge the PR once the test has passed. At any point, you can click the “Actions” tab at the top of the GitHub page to see the status of your GitHub Action workflows.
We now need to configure some more settings for the GitHub repo.
- Click the “Settings” tab along the top of the GitHub webpage.
- Select “Branches” from the menu on the left-hand-side (4th option from the top).
-
We will add a branch protection rule to prevent changes that could break our site from being deployed. Click “Add rule”.
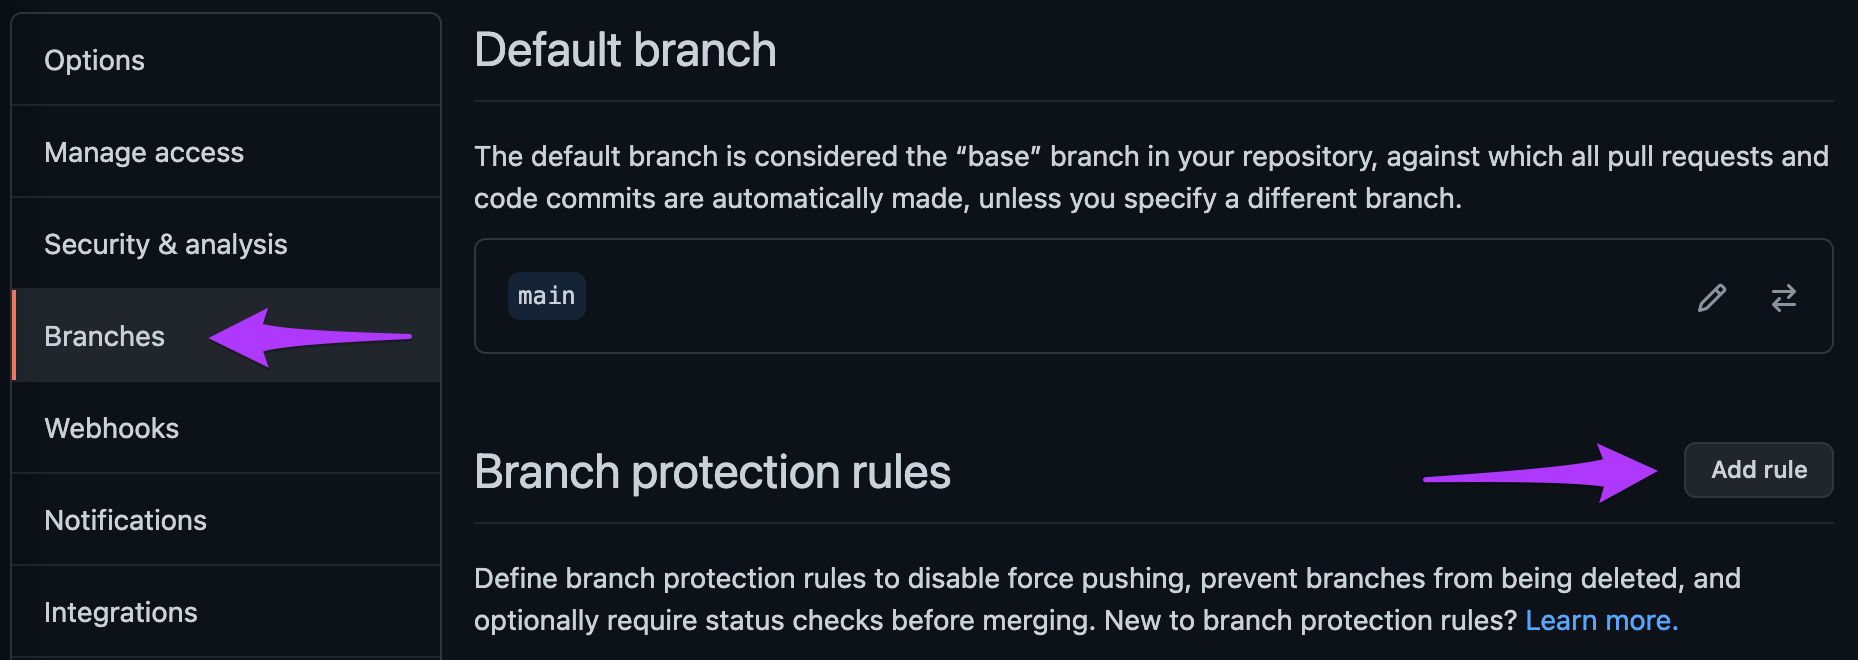
Add a branch protection rule to the repo -
In the “Branch pattern name” type
main, then select the “Require status checks to pass before merging” box. Finally select thebuild-and-deploy-sitestatus check from the list and click “Create” at the bottom of the page. (You may be asked to reenter your GitHub password.) This means that thebuild-and-deploy-sitejob MUST pass, otherwise merging the PR will be blocked.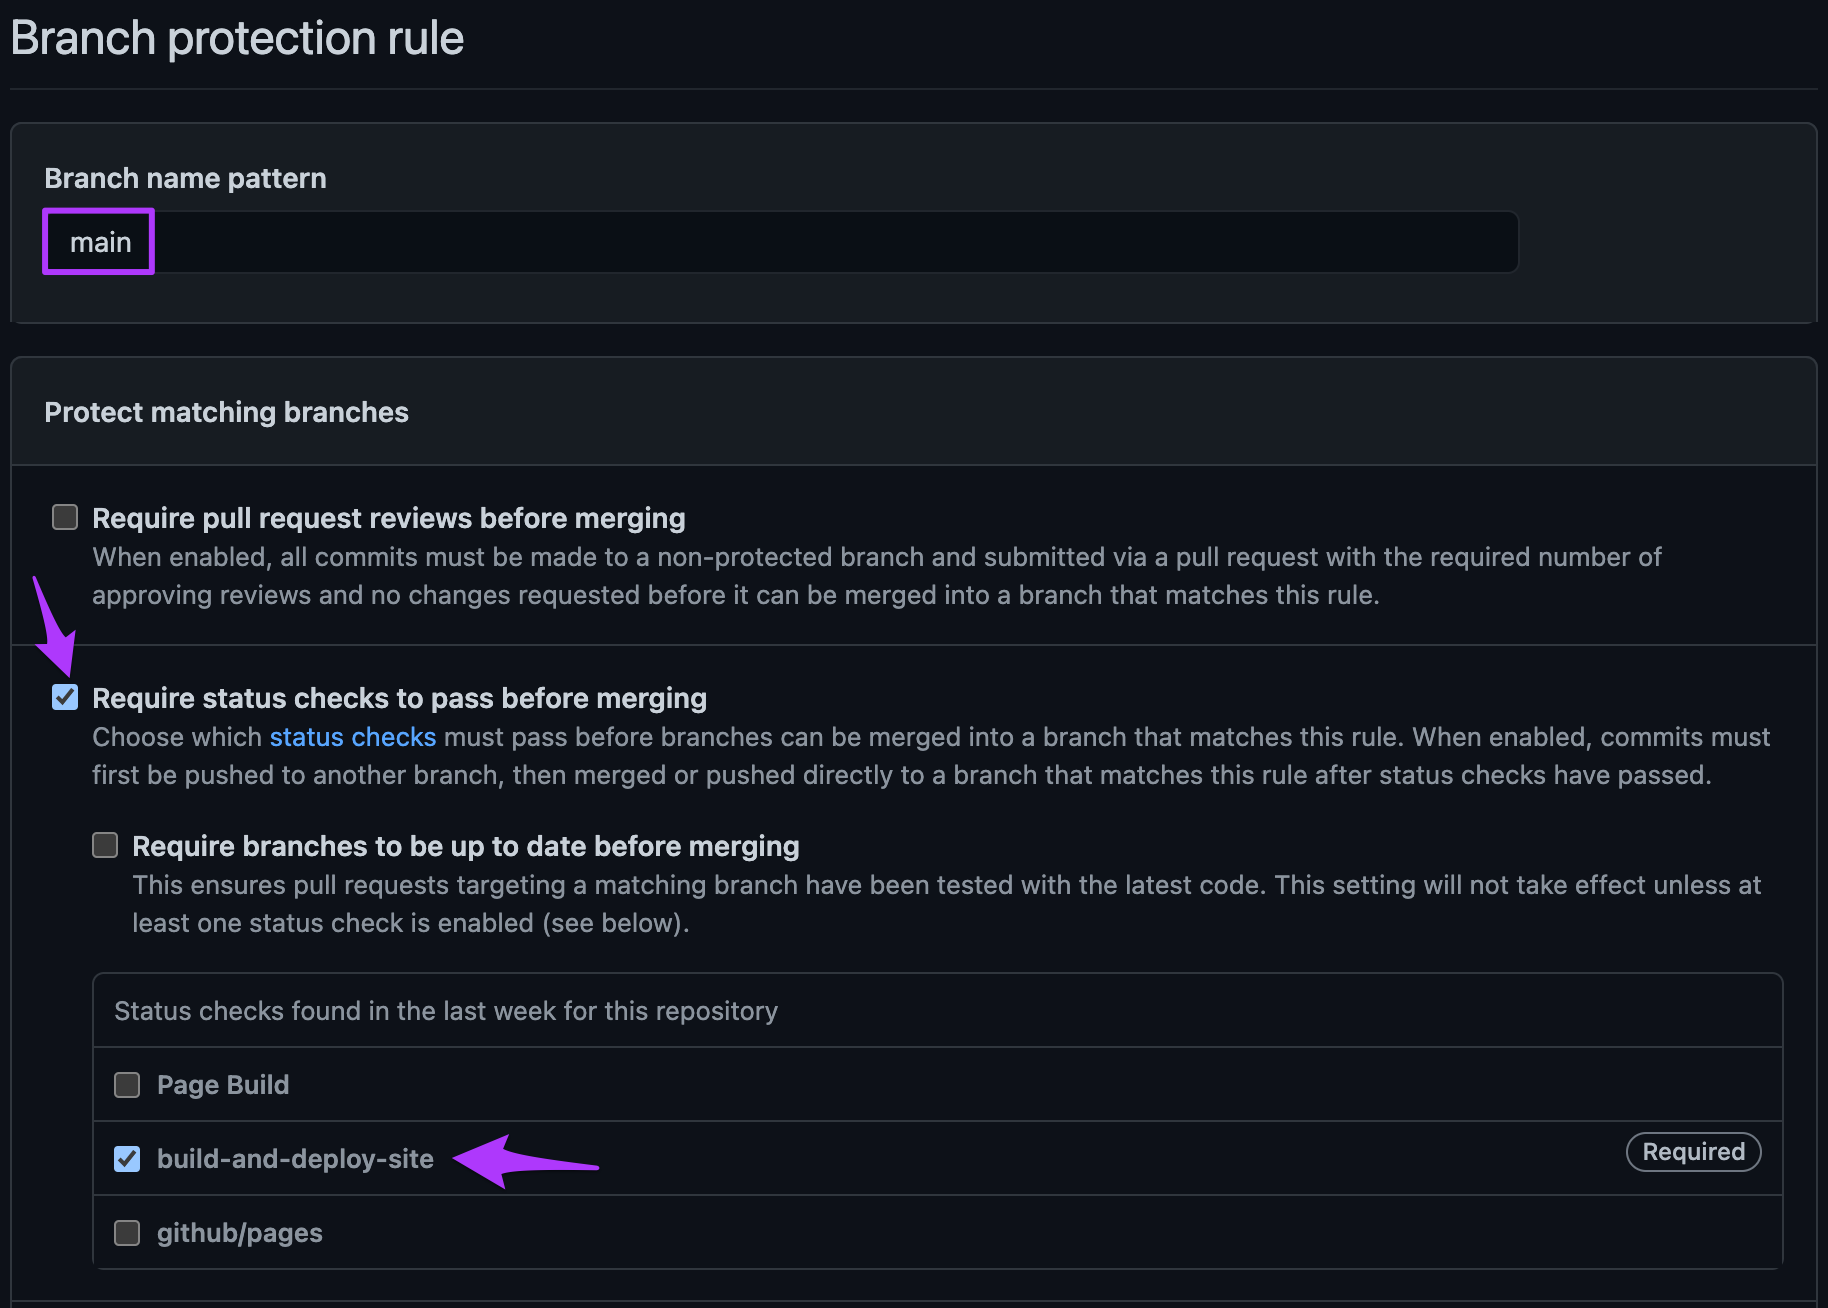
Create the branch protection rule - Now select the “Pages” option from the left-hand-side menu (second option from the bottom). This is where we configure GitHub Pages to host the website.
-
In the “Source” section, select
gh-pagesfrom the “Branch” dropdown and leave the folder dropdown as/ (root). Then click “Save”.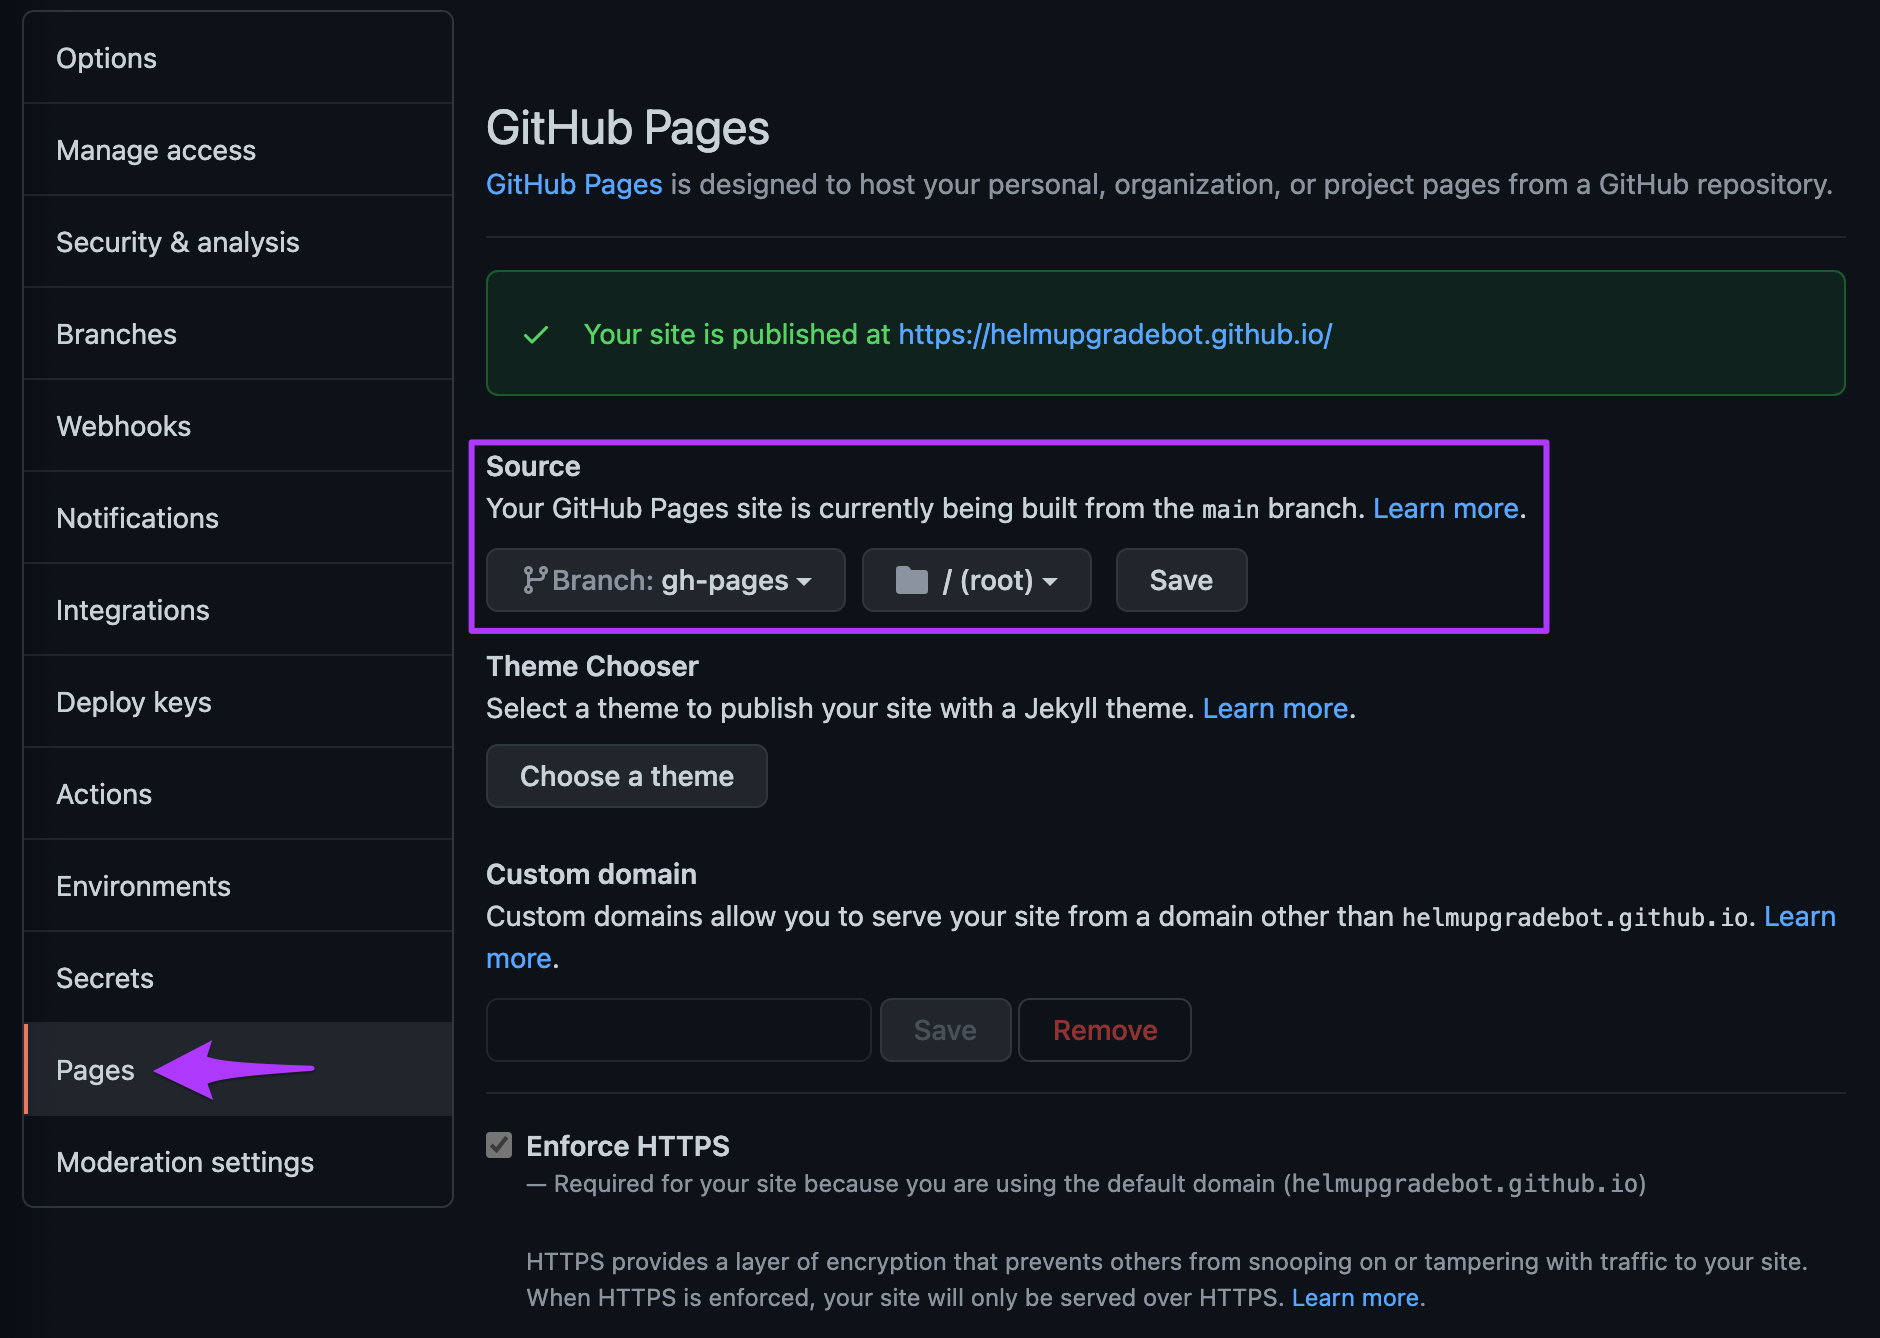
Configure GitHub Pages in the repo Settings - After a few moments, refresh the page.
The banner along the top should now be green and read “Your site is published at
https://HelmUpgradeBot.github.io”. Click the link in the browser and see your site live!
Congratulations! Your site is now live on GitHub Pages!
It’s still a little bare though, so let’s update our local repo in our terminal and then add some content.
Close your browser window displaying your website and run Ctrl+C in your terminal to stop the hugo server command.
git checkout main
Switched to branch 'main'
Your branch is up to date with 'origin/main'.
git pull
remote: Enumerating objects: 1, done.
remote: Counting objects: 100% (1/1), done.
remote: Total 1 (delta 0), reused 0 (delta 0), pack-reused 0
Unpacking objects: 100% (1/1), 654 bytes | 654.00 KiB/s, done.
From https://github.com/HelmUpgradeBot/HelmUpgradeBot.github.io
   cd19a8f..dfed2bc  main       -> origin/main
Updating cd19a8f..dfed2bc
Fast-forward
 .github/workflows/cd.yml | 41 +++++++++++++++++++++++++++++++++++++++++
 1 file changed, 41 insertions(+)
 create mode 100644 .github/workflows/cd.yml
Key Points
Continuous Deployment of a website involves rebuilding and republishing the site with every change
GitHub Action workflows are YAML files that contain triggers, jobs and steps that are performed automatically. GitHub automatically detects these files in the
.github/workflowsfolder.
Generating Blog Content
Overview
Teaching: 1 min
Exercises: 10 minQuestions
How do we add a profile picture to our blog site?
How do we create a new blog post with Hugo?
What frontmatter does Hugo create for posts?
How do we embed external content into our posts?
Objectives
Add a profile picture to our blog site
Create our first blog post
Embed a tweet into our blog post
For your information
The episodes we have covered so far involve setting up the repository to publish the website on GitHub Pages. These should be considered one-time tasks that may only need tweaking once setup. In this episode, we will cover the more regular processes of publishing new content, such as blog posts.
Let’s start to make our site a little more attractive by adding some content. Let’s give our site a profile picture, publish our first blog post and embed some external content into it - in this case, a tweet.
First, check out a new branch to add content to:
git checkout -b adding-content
Switched to a new branch 'adding-content'
Profile Picture
It’ll be good for people to know who we are by adding a photo of us or a logo that reflects our branding!
-
Images go into a special folder that Hugo will parse when generating the HTML - so let’s create that folder.
mkdir -p static/images -
Now copy an image (of you, a logo, your pet!) into this folder. You can do this by just saving an image directly into the folder or using the below bash command. We’ll use the example filename
profile_pic.png. What your image is called isn’t really important, just remember it!# Example only - this command won't actually work! cp /path/to/my/picture.png ./static/images/profile_pic.png -
We let Hugo know where our profile picture is by adding the following line to the bottom of our
config.tomlfile.profilePicture = "images/profile_pic.png"For your information
Notice how we didn’t have to define the path as
static/images/profile_pic.pnghere? That’s becausestaticis a special folder to Hugo that it knows how to parse. In fact, it’s calledstaticas Hugo won’t modify these files in any way, just import them into the HTML files it creates - hence they are “static”. -
Run the
hugo servercommand again and visit http://localhost:1313 in your browser. You should now see your image on your site! :tada:hugo server
Blog homepage with profile picture
Close your browser window displaying your website and run Ctrl+C in your terminal to stop the hugo server command.
Creating a blog post
Next let’s add our first blog post!
This is equivalent to creating a new Markdown file with some extra metadata that Hugo will read.
Hugo has a built in command to generate new Markdown files with the appropriate metadata and it will deposit all of these in the content folder.
The command looks like this:
# Example only - don't run this!
# (It'll work, but it's probably not what you want)
hugo new path/to/content.md
For your information
If any of the folders
path/orto/don’t already exist undercontent/, Hugo will create them automatically.
-
So let’s create a new blog post by running:
hugo new blog/my-first-blog.mdThis will create the
my-first-blog.mdMarkdown file in theblogfolder underneath thecontentfolder. -
If you open this file, you will see that it is not empty!
 ---
 title: "My First Blog"
 date: 2021-05-06T13:40:20+01:00
 draft: true
 ---
This is the metadata Hugo generates that we talked about before. Hugo has prefilled the
titlefield from the name of the Markdown file, the timestamp of when the file was created, and it has automatically put the file into draft mode.For your information
Draft mode means that Hugo will NOT build and publish this file unless the
--buildDrafts [-D]flag is passed to thehugo servercommand or the metadata is changed todraft: falseYou can edit these fields as you wish. It is strongly recommend to update the
draftfield tofalseright now so that it will automatically build when this file is merged tomain.You can then write your content underneath the metadata field as you like. Let’s leave the message “Hello World! :earth_africa:” All together, the file looks like this:
--- title: "My First Blog" date: 2021-05-06T13:40:20+01:00 draft: false --- Hello World! :earth_africa: -
We’ll edit the
config.tomlagain to place our blog post on the homepage of our site. Add the following line to the bottom of the file:mainSections = ["blog"] -
Run the
hugo servercommand again and visit http://localhost:1313 in your browser. You should now see your blog post listed on your site with, as promised, a properly rendered emoji! You can then click through to the full post.hugo server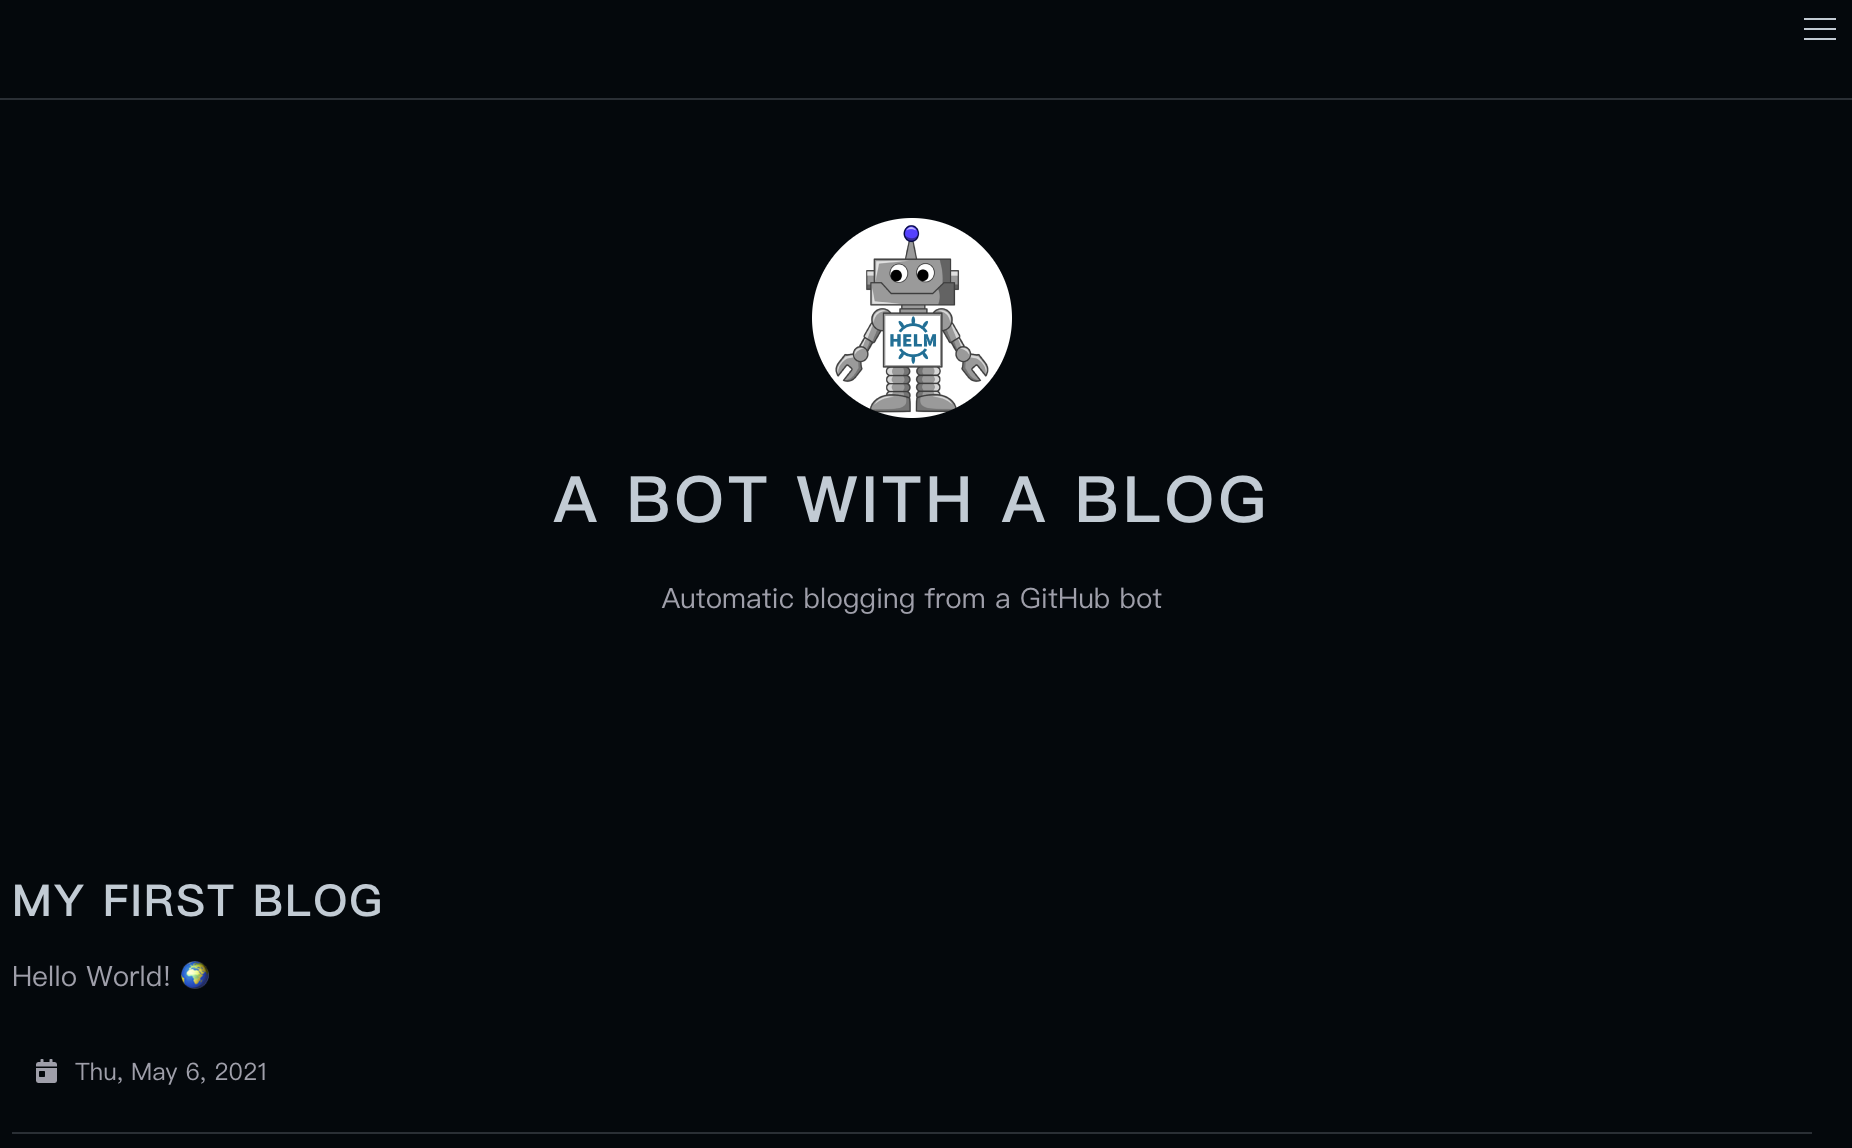
Homepage with a blog post listed
Close your browser window displaying your website and run Ctrl+C in your terminal to stop the hugo server command.
Embedding External Content using Hugo Shortcodes
The beauty of using Markdown to build a blogsite is that it is a very simple file format - what you type is what is rendered. However, blogs often contain more than just words (images, tweets, videos) and Markdown is not always equipped to cope with all of these extra sources. The solution would be to manually construct a HTML block to embed the content, which breaks the simplicity of the Markdown document.
 |
|---|
| An example of a Markdown file using HTML blocks to embed a Google calendar and Twitter timeline into a blog page |
Hugo’s solution to this problem is to provide a set of shortcodes that handle this embedding in the backend for a range of external sources including instagram, twitter, youtube, and more. So let’s experiment by adding a tweet to our blog post.
Here is a tweet claiming how cool HelmUpgradeBot is: https://twitter.com/drsarahlgibson/status/1390312389346828291. All we need to embed this tweet into our blog post is the tweet ID (the numeric part of the tweet URL) and the user who tweeted it.
 |
|---|
| The ID of a tweet is the numerical section of the URL |
The syntax for embedding a tweet is then:
{{< tweet user="TWIITER_USER_HERE" id="TWEET_ID_HERE" >}}
Which is much shorter than the corresponding HTML!
So to add the above tweet to our blog post, edit the content/blog/my-first-post.md file again and add the following code to the end of the file.
{{< tweet 1390312389346828291 >}}
All together, the file now looks like this:
---
title: "My First Blog"
date: 2021-05-06T13:40:20+01:00
draft: false
---

Hello World! :earth_africa:

{{< tweet 1390312389346828291 >}}
Save and close the file, then rerun hugo server and visit http://localhost:1313 in your browser again.
The tweet won’t show up in the short summary of the blog post on the homepage, but if you click through, it should be embedded in the full blog page!
hugo server
 |
|---|
| Blog post with embedded tweet |
Close your browser window displaying your website and run Ctrl+C in your terminal to stop the hugo server command.
Other shortcodes you will find useful are:
figurefor linking an image from a URLrefandrelreffor creating links within your blog, such as to another post or section of a post
For your information
Want to add your own image to your site by committing it to GitHub? Add it to the
static/imagesfolder, as we did with the profile picture. You can then include the image using the standard Markdown syntax
For your information
If you are feeling super brave, you can even create your own shortcodes to embed specific content. Check out some examples.
Pushing to GitHub and Merging to main
Let’s save what we’ve done to GitHub and set it live on the website using the same add, commit, push, open and merge Pull Request that we’ve used in episodes 2 and 3.
git add .
git commit -m "Add our first blog post to the website"
[adding-content 8038986] Add our first blog post to the website
 2 files changed, 9 insertions(+)
 create mode 100644 content/blog/my-first-blog.md
git push origin adding-content
Enumerating objects: 8, done.
Counting objects: 100% (8/8), done.
Delta compression using up to 4 threads
Compressing objects: 100% (4/4), done.
Writing objects: 100% (6/6), 598 bytes | 598.00 KiB/s, done.
Total 6 (delta 1), reused 0 (delta 0), pack-reused 0
remote: Resolving deltas: 100% (1/1), completed with 1 local object.
remote:
remote: Create a pull request for 'adding-content' on GitHub by visiting:
remote:      https://github.com/HelmUpgradeBot/HelmUpgradeBot.github.io/pull/new/adding-content
remote:
To https://github.com/HelmUpgradeBot/HelmUpgradeBot.github.io.git
 * [new branch]      adding-content -> adding-content
- On the GitHub interface, click “Create & pull request”
- Give your PR an informative title and summary, then click “Create pull request”
- After the continuous integration test has passed, click “Merge pull request” then “Confirm merge”
While waiting for CD/GitHub Pages to deploy the update, let’s update our local repo.
git checkout main
Switched to branch 'main'
Your branch is up to date with 'origin/main'.
git pull
remote: Enumerating objects: 12, done.
remote: Counting objects: 100% (12/12), done.
remote: Compressing objects: 100% (5/5), done.
remote: Total 10 (delta 2), reused 9 (delta 2), pack-reused 0
Unpacking objects: 100% (10/10), 1.57 KiB | 161.00 KiB/s, done.
From https://github.com/HelmUpgradeBot/HelmUpgradeBot.github.io
   dfed2bc..85e39a8  main       -> origin/main
 * [new branch]      gh-pages   -> origin/gh-pages
Updating dfed2bc..85e39a8
Fast-forward
 config.toml                   | 3 +++
 content/blog/my-first-blog.md | 6 ++++++
 2 files changed, 9 insertions(+)
 create mode 100644 content/blog/my-first-blog.md
Then visit https://YOUR-USERNAME.github.io in the browser to see your site live.
Key Points
Files to be included in the site, without modification, should be placed under the
staticfolderNew content is generated with the
hugo newcommandHugo automatically generates
title,dateanddraftfrontmatter for contentExternal content is embedded into posts using shortcodes
Closing Remarks
Overview
Teaching: 3 min
Exercises: 0 minQuestions
What have we learned?
What are the next steps?
Objectives
Consolidate and reflect on what we’ve learned
So here’s what we’ve achieved over the course of this lesson.
- We’ve setup a repository on GitHub with a Hugo site template and a theme via a git submodule
- We’ve added a Continuous Deployment pipeline that automatically builds our website and publishes it to GitHub Pages whenever we merge a change, using GitHub Actions as a vendor
- We’ve created a new post with Hugo and added content, including updating our profile picture and embedding content from external sources using shortcodes
From here, you can:
- Continue to use the site as it is and begin publishing your blogs
- Further customise your site by editing the
config.tomlfile (see the anatole documentation and this config file for examples) - Or try implementing a new theme from https://themes.gohugo.io/!
You can do this by running the
git submodule addcommand again with your new theme and then updating theconfig.tomlfile.
Using a new theme
Be warned, some settings we’ve used during this lesson may break when changing themes! Always check the theme’s example documentation!
We hope you’ve enjoyed learning how to get setup with Hugo and GitHub Pages. Happy blogging!
Key Points
We’ve setup a repository on GitHub with a Hugo site template and a theme via a git submodule
We’ve added a Continuous Deployment pipeline that automatically builds our website and publishes it to GitHub Pages whenever we merge a change, using GitHub Actions as a vendor
We’ve created a new post with Hugo and added content, including updating our profile picture and embedding content from external sources using shortcodes
The theme can be changed by running a new
git submodule addcommand, but the configuration file will need updating