Introduction
Overview
Teaching: 10 min
Exercises: 0 minQuestions
What do I do when I need to make complex decisions with my git respository?
How do I collaborate on a software project with others?
Objectives
Understand the range of functionality that exists in git.
Understand the different challenges that arrise with collaborative projects.
Introduction
Version control systems are a way to keep track of changes in text-based documents. We start with a base version of the document and then record the changes you make each step of the way. You can think of it as a recording of your progress: you can rewind to start at the base document and play back each change you made, eventually arriving at your more recent version.
The git version control system, used to manage the code in many millions of software projects, is one of the most widely adopted one. It uses a distributed version control model (the “beautiful graph theory tree model”), meaning that there is no single central repository of code. Instead, users share code back and forth to synchronise their repositories, and it is up to each project to define processes and procedures for managing the flow of changes into a stable software product.
Challenges
Git is powerful and flexible to fit a wide range of use cases and workflows from simple projects written by a single contributor to projects that are millions of lines and have hundreds of co-authors. Furthermore, it does a task that is quite complex. As a result, many users may find it challenging to navigate this complexity. While committing and sharing changes is fairly straightforward, for instance, but recovering from situations such as accidental commits, pushes or bad merges is difficult without a solid understanding of the rather large and complex conceptual model. Case in point, three of the top five highest voted questions on Stack Overflow are questions about how to carry out relatively simple tasks: undoing the last commit, changing the last commit message, and deleting a remote branch.
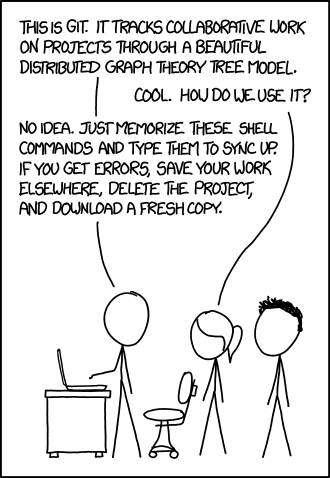
Mouse-over text: If that doesn’t fix it, git.txt contains the phone number of a friend of mine who understands git. Just wait through a few minutes of ‘It’s really pretty simple, just think of branches as…’ and eventually you’ll learn the commands that will fix everything.
With this lesson our goal is to give a you a more in-depth understanding of the conceptual model of git, to guide you through increasingly complex workflows and to give you the confidence to participate in larger projects.
Review of Intro Git Commands
First, lets review the concepts and commands that constitute the basic git workflow.
git init
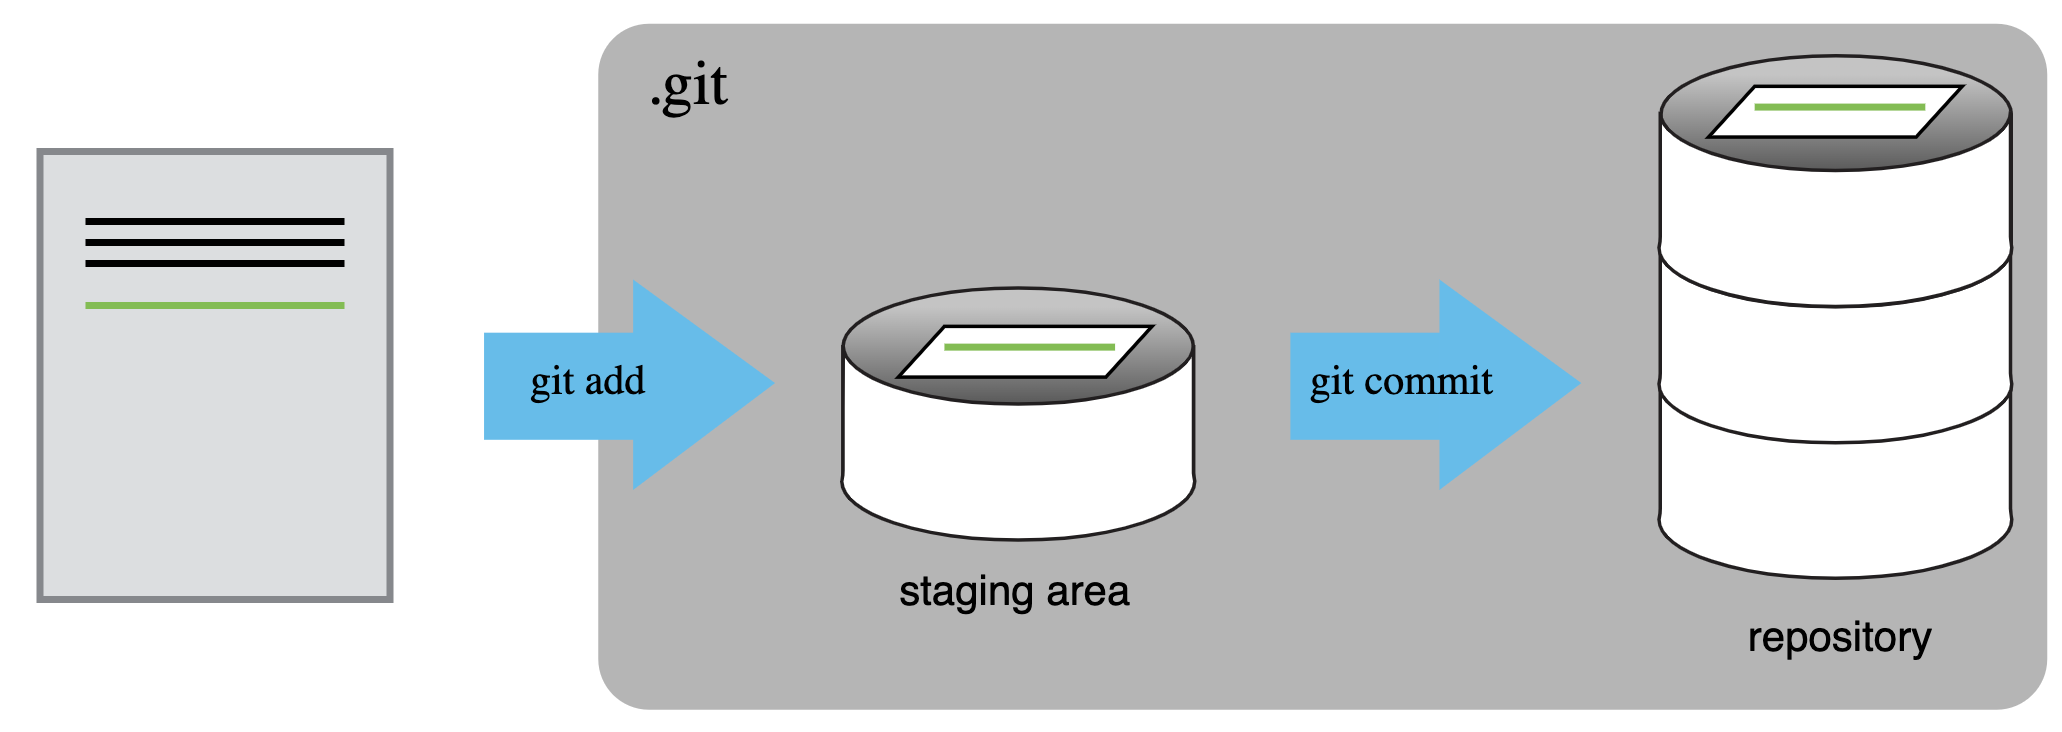
git add file.txt
git commit -m "Message"
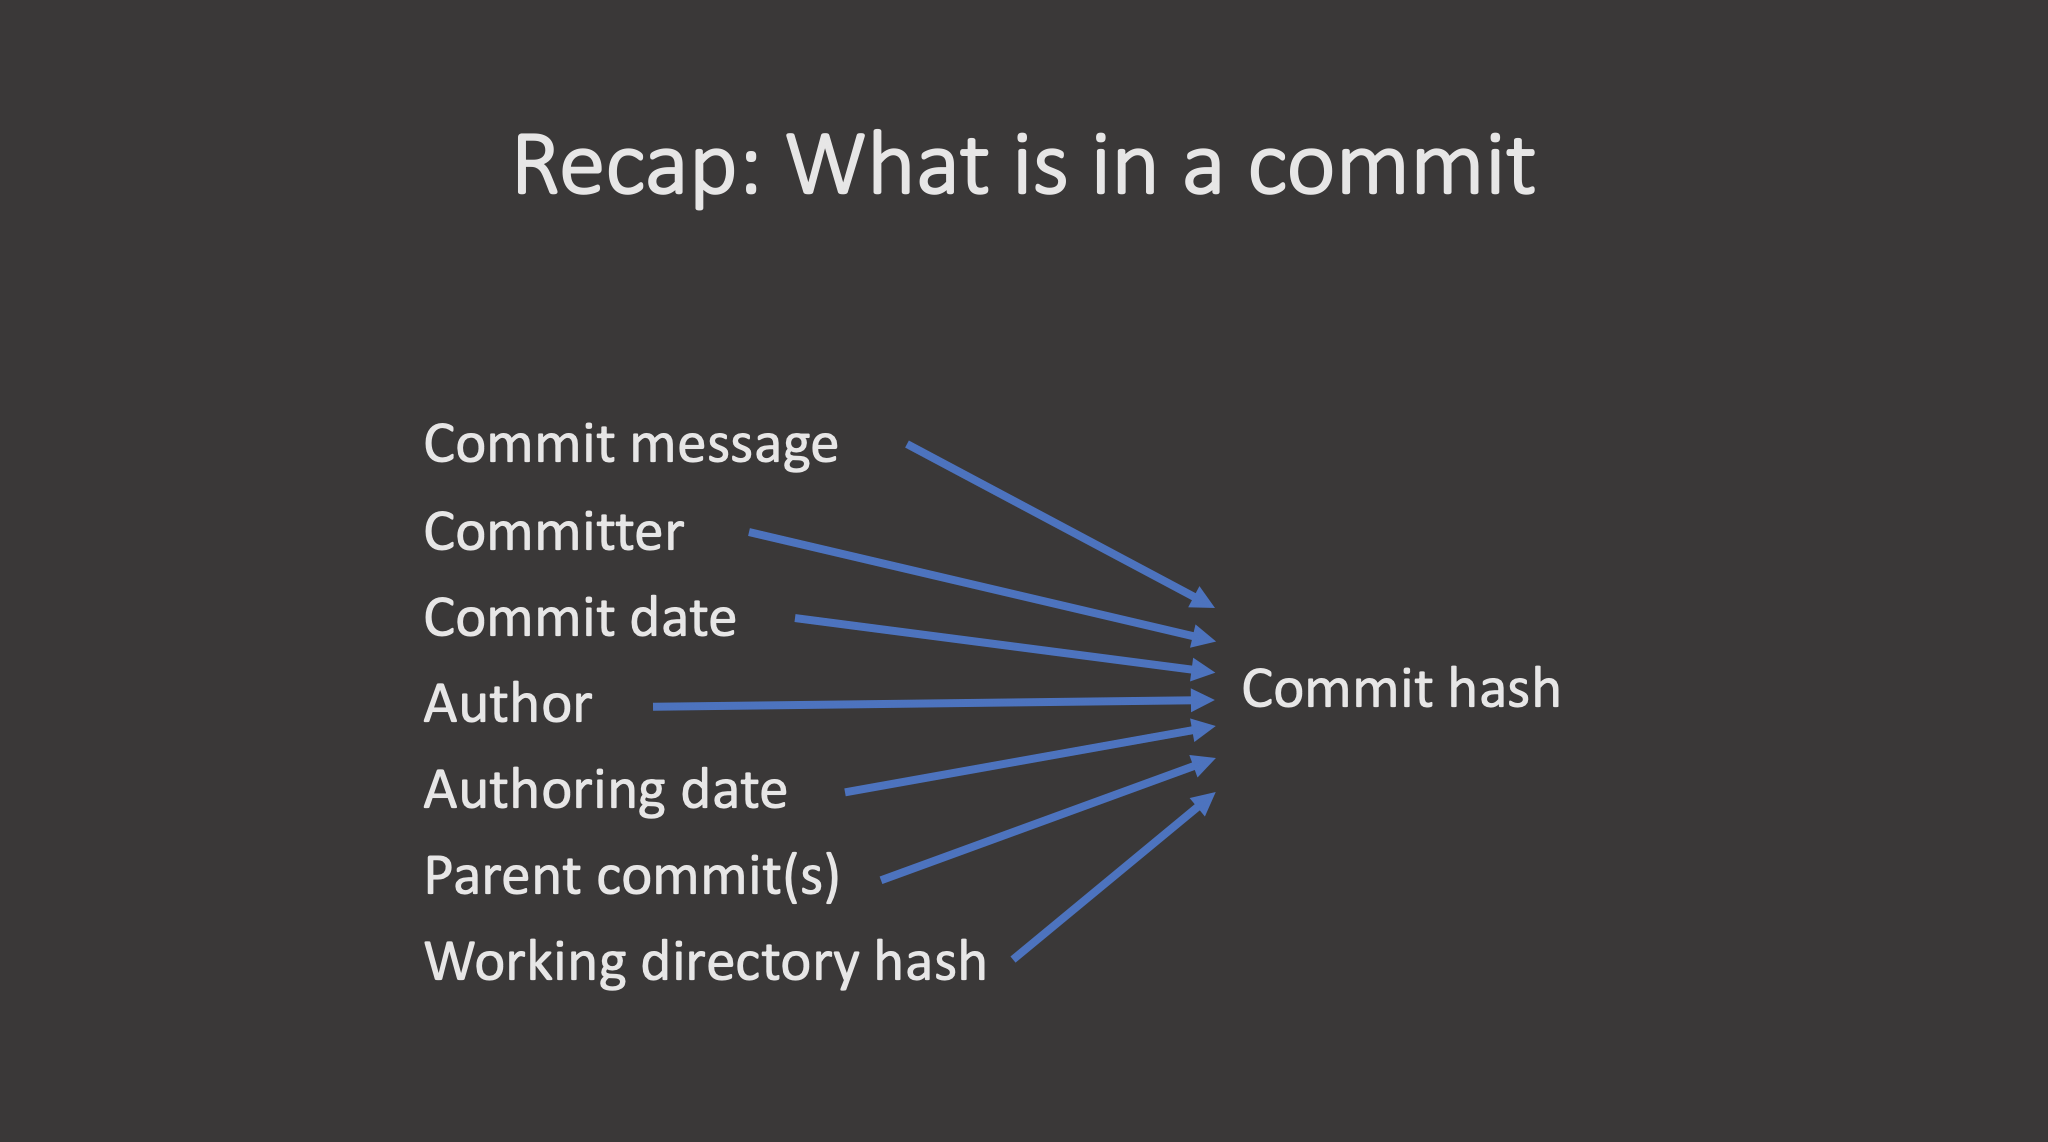
A commit, or “revision”, is an individual change to a file or set of files. It’s like when you save a file, except with git, every time you save it creates a unique ID (a.k.a. the “SHA” or “hash”) that allows you to keep record of what changes were made when and by who. Commits usually contain a commit message which is a brief description of what changes were made.
git log
git status
git diff
git checkout HEAD file.txt
git revert
git checkout returns the files not yet committed within the local repository to a previous state, whereas git revert reverses changes committed to the local and project repositories.
git clone http://....
git push
git pull
Finally, the git fetch command downloads commits, files, and refs from a remote repository into your local repo. When downloading content from a remote repo, git pull and git fetch commands are available to accomplish the task. You can consider git fetch the ‘safe’ version of the two commands. It will download the remote content but not update your local repo’s working state, leaving your current work intact. git pull is the more aggressive alternative; it will download the remote content for the active local branch and immediately execute git merge to create a merge commit for the new remote content. If you have pending changes in progress this will cause conflicts and kick-off the merge conflict resolution flow. The following command will bring down all the changes from the remote:
git fetch
It is sometimes useful to only pull the changes from a certain branch, e.g., main. For a repository that has a lot of contributors and branches, all the changes may be unnecessary and overwhelming:
git fetch origin main
https://www.atlassian.com/git/tutorials/syncing/git-fetch
Key Points
Git version control records text-based differences between files.
Each git commit records a change relative to the previous state of the documents.
Git has a range of functionality that allows users to manage the changes they make.
This complex functionality is especially useful when collaborating on projects with others
Branches
Overview
Teaching: 0 min
Exercises: 0 minQuestions
What are branches?
How do I view the current branches?
How do I manipulate branches?
Objectives
Understand how branches are created.
Learn the key commands to view and manipulate branches.
Branching is a feature available in most modern version control systems. Branching in other version control systems can be an expensive operation in both time and disk space. In git, branches are a part of your everyday development process. When you want to add a new feature or fix a bug—no matter how big or how small—you spawn a new branch to encapsulate your changes. This makes it harder for unstable code to get merged into the main code base, and it gives you the chance to clean up your future’s history before merging it into the main branch.
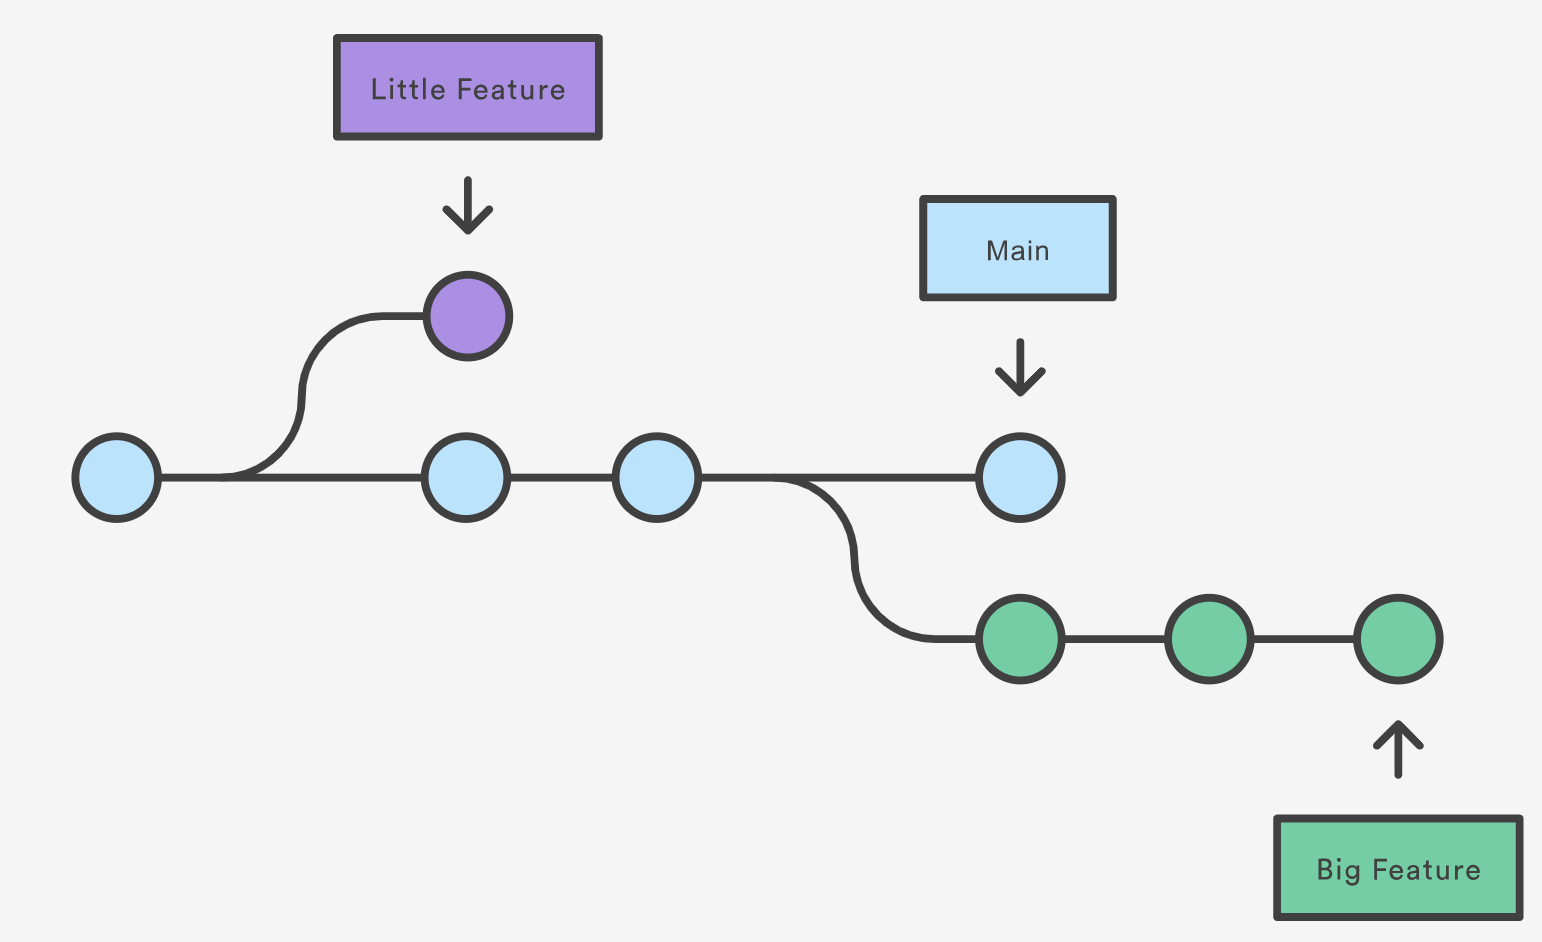
The diagram above visualizes a repository with two isolated lines of development, one for a little feature, and one for a longer-running feature. By developing them in branches, it’s not only possible to work on both of them in parallel, but it also keeps the main branch free from questionable code.
The implementation behind Git branches is much more lightweight than other version control system models. Instead of copying files from directory to directory, Git stores a branch as a reference to a commit. In this sense, a branch represents the tip of a series of commits—it’s not a container for commits. The history for a branch is extrapolated through the commit relationships.
(https://www.atlassian.com/git/tutorials/using-branches)
What is a branch?
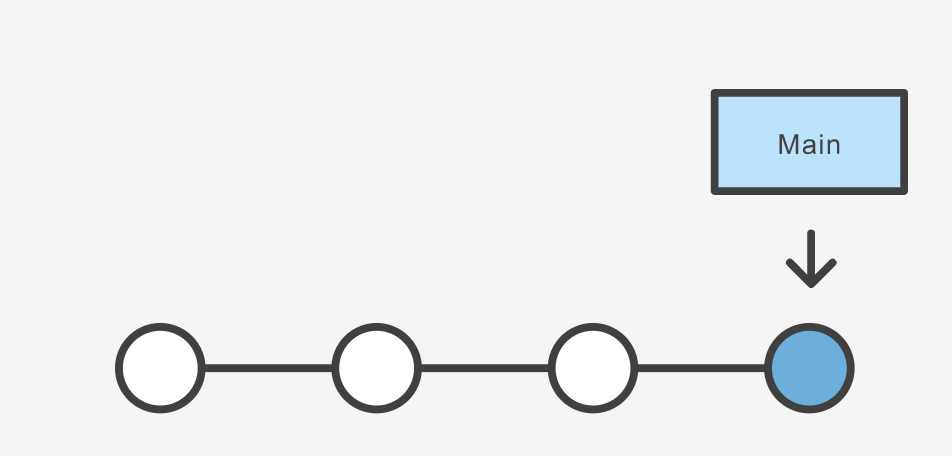
In git a branch is effectively a pointer to a snapshot of your changes. It’s important to understand that branches are just pointers to commits. When you create a branch, all Git needs to do is create a new pointer, it doesn’t change the repository in any other way. If you start with a repository that looks like this:
Then, you create a branch using the following command:
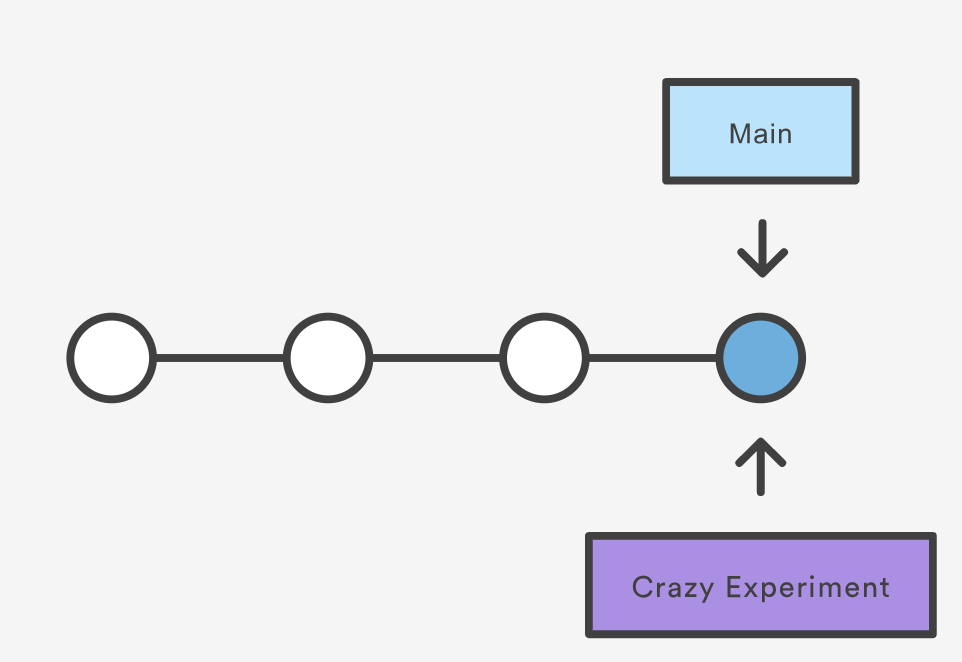
git branch crazy-experiment
The repository history remains unchanged. All you get is a new pointer to the current commit:
Note that this only creates the new branch. To start adding commits to it, you need to select it with git checkout, and then use the standard git add and git commit commands.
A branch also means an independent line of development. Branches serve as an abstraction for the edit/stage/commit process. New commits are recorded in the history for the current branch, which results in a fork in the history of the project. However, it is really important to remember that each commit only records the incremental change in the document and NOT the full history of changes. Therefore, while we think of a branch as a sequence of commits, each commit is independent unit of change.
Branching Commands
Creating, deleting, and modifying branches is quick and easy; here’s a summary of the commands:
To list all branches:
git branch
git branch -avv
To create a new branch named <branch>, which references the same point in history as the current branch.
git branch <branch>
To create a new branch named <branch>, referencing <start-point>, which may be specified any way you like, including using a branch name or a tag name:
git branch <branch> <start-point>
To delete the branch <branch>; if the branch is not fully merged in its upstream branch or contained in the current branch, this command will fail with a warning:
git branch -d <branch>
To delete the branch <branch> irrespective of its merged status:
git branch -D <branch>
To switch to a different branch <branch>, updating the working directory to reflect the version referenced by <branch>.
git switch <branch>
To create a new branch <new> referencing <start-point>, and check it out.
git switch -c <new> <start-point>
The special symbol "HEAD" can always be used to refer to the current branch. In fact, Git uses a file named HEAD in the .git directory to remember which branch is current:
$ cat .git/HEAD
ref: refs/heads/master
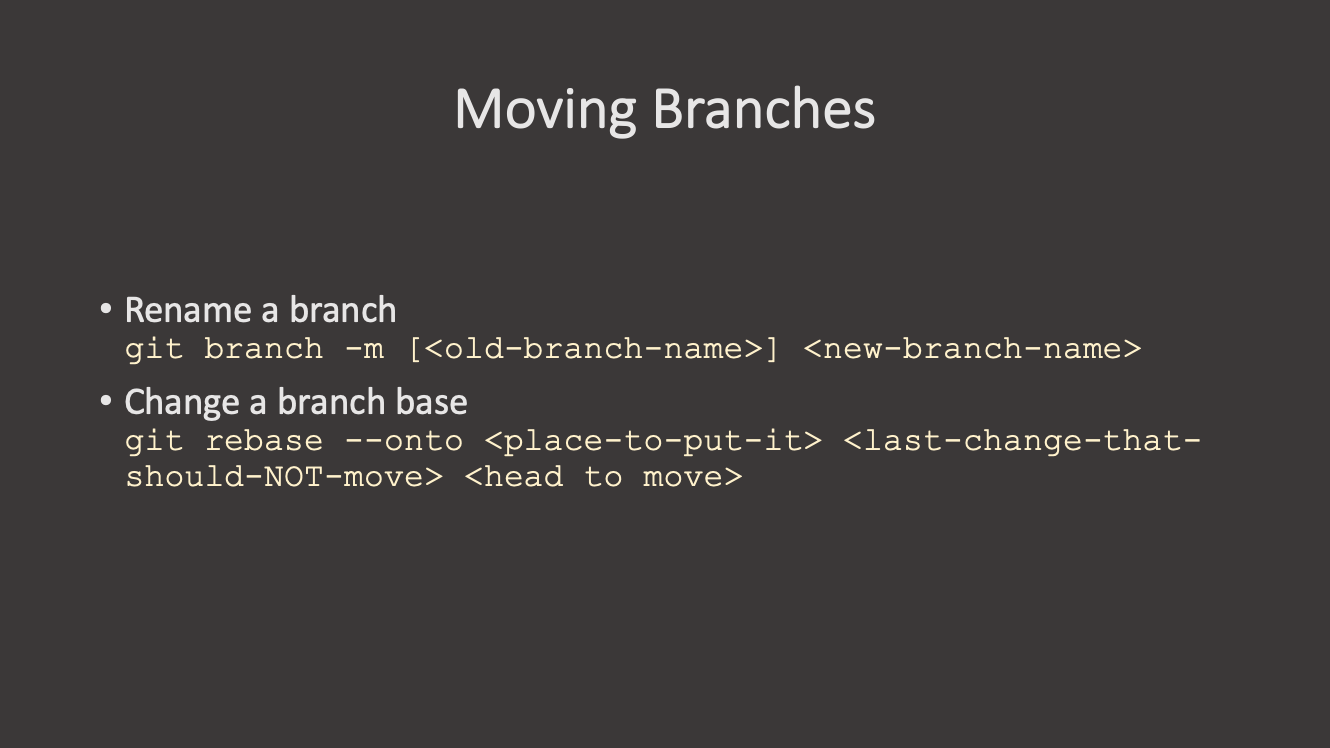
Renaming a branch can be done with the -m tag:
git branch -m <old-branch-name> <new-branch-name>
Key Points
A branch represents an independent line of development.
git branchcreates a new pointer to the current state of the repository and allows you to make subsequent changes from that state.Subsequent changes are considered to belong to that branch.
The final commit on a given branch is its HEAD.
Remote Repositories
Overview
Teaching: 0 min
Exercises: 0 minQuestions
How do I connect my code to other versions of the it?
Objectives
Learn about remote repositories.
https://www.atlassian.com/git/tutorials/syncing
Git’s distributed collaboration model, which gives every developer their own copy of the repository, complete with its own local history and branch structure. Users typically need to share a series of commits rather than a single “changeset”. Instead of committing a “changeset” from a working copy to the central repository, Git lets you share entire branches between repositories.
Git remote
The git remote command lets you create, view, and delete connections to other repositories. Remote connections are more like bookmarks rather than direct links into other repositories. Instead of providing real-time access to another repository, they serve as convenient names that can be used to reference a not-so-convenient URL.
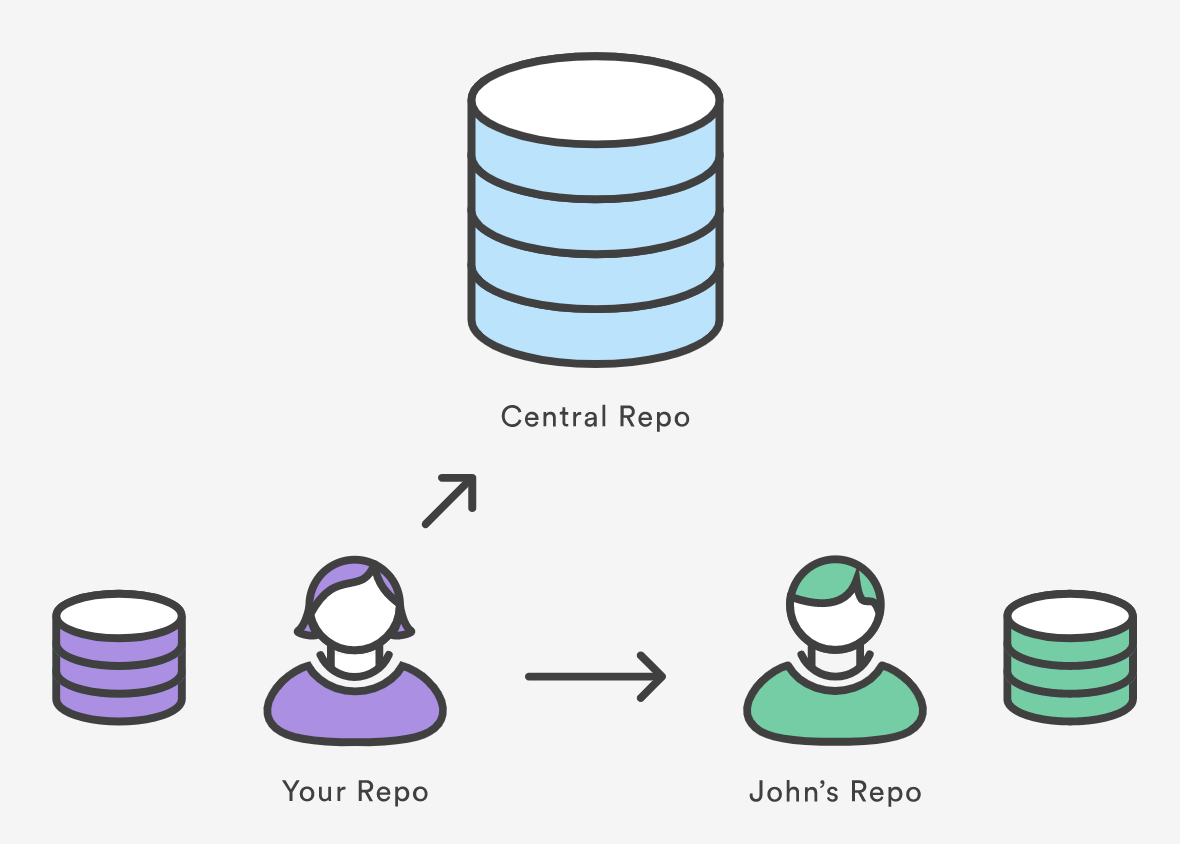
For example, the diagram above shows two remote connections from your repo into the central repo and another developer’s repo. Instead of referencing them by their full URLs, you can pass the origin and john shortcuts to other Git commands.
The git remote command is essentially an interface for managing a list of remote entries that are stored in the repository’s ./.git/config file. The following commands are used to view the current state of the remote list.
Git is designed to give each developer an entirely isolated development environment. This means that information is not automatically passed back and forth between repositories. Instead, developers need to manually pull upstream commits into their local repository or manually push their local commits back up to the central repository. The git remote command is really just an easier way to pass URLs to these “sharing” commands.
View Remote Configuration
To list the remote connections of your repository to other repositories you can use the git remote command:
git remote
If you test this in our training repository, you should get only one connection, origin:
origin
When you clone a repository with git clone, git automatically creates a remote connection called origin pointing back to the cloned repository. This is useful for developers creating a local copy of a central repository, since it provides an easy way to pull upstream changes or publish local commits. This behaviour is also why most Git-based projects call their central repository origin.
We can ask git for a more verbose (-v) answer which gives us the URLs for the connections:
git remote -v
For our training repository this should return:
origin	https://github.com/user_name/advanced-git-training.git (fetch)
origin	https://github.com/user_name/advanced-git-training.git (push)
As expected these point to the original repository we cloned.
Create and Modify Connections
The git remote command also lets you manage connections with other repositories. The following commands will modify the repo’s ./.git/config file. The result of the following commands can also be achieved by directly editing the ./.git/config file with a text editor.
Create a new connection to a remote repository. After adding a remote, you’ll be able to use <name> as a convenient shortcut for <url> in other Git commands.
git remote add <name> <url>
Remove the connection:
git remote rm <name>
Rename a connection:
git remote rename <old-name> <new-name>
To get high-level information about the remote <name>:
git show <name>
Exercise: Add a connection to your neighbour’s repository. Having this kind of access to individual developers’ repositories makes it possible to collaborate outside of the central repository. This can be very useful for small teams working on a large project.
git remote add john http://dev.example.com/john.git
Starting a branch from the main repository state:
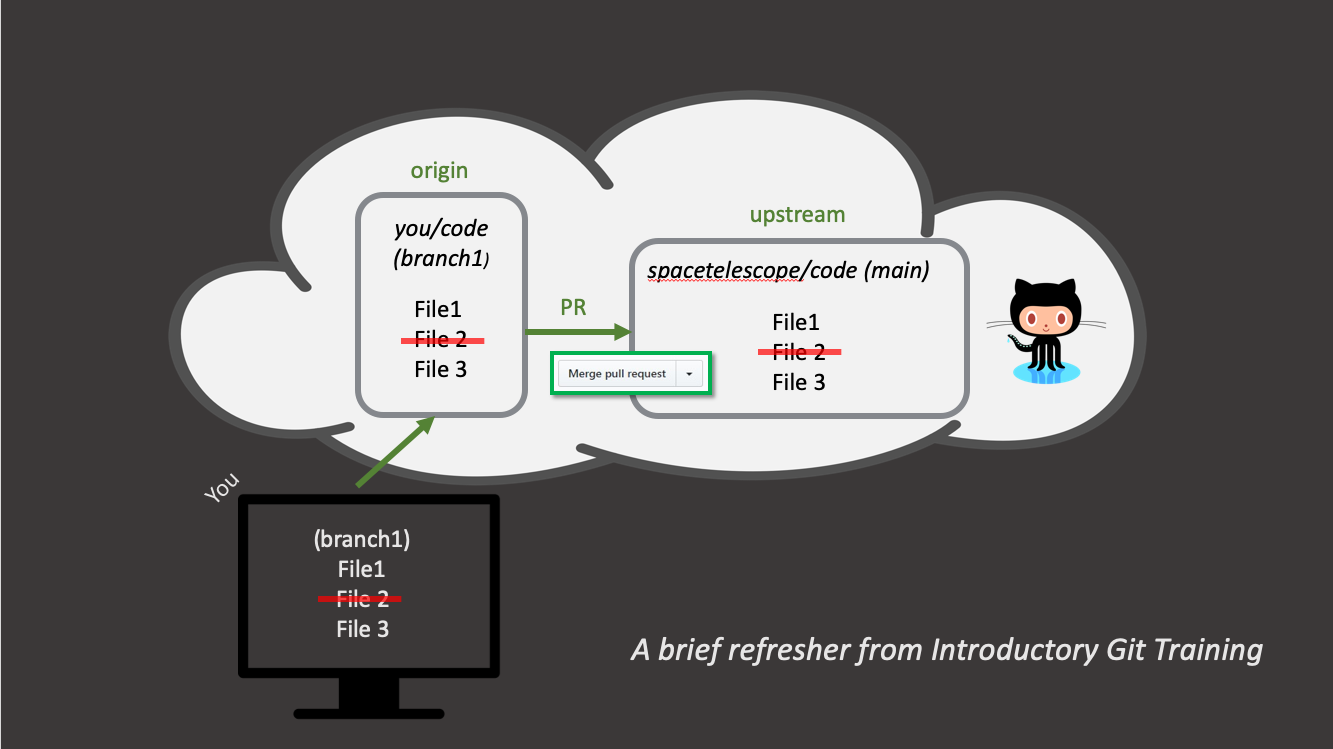
Remember that when you create a new branch without specifying a starting point, then the starting point will be the current state and branch. In order to avoid confusion, ALWAYS branch from the stable version. Here is how you would branch from your own origin/main branch:
git fetch origin main
git checkout -b <branch> origin/main
You must fetch first so that you have the most recent state of the repository.
If there is another “true” version/state of the project, then this connection may be set as upstream (or something else). Upstream is a common name for the stable repository, then the sequence will be:
git fetch upstream main
git checkout -b <branch> upstream/main
Now we can set the MPIA version of our repository as the upstream for our local copy.
Exercies: set the https://github.com/mpi-astronomy/advanced-git-training as the upstream locally.
git remote add upstream https://github.com/mpi-astronomy/advanced-git-training.git
git fetch upstream
git checkout -b develop upstream/develop
Now examine the state of your repository with git branch, git remote -v, git remote show upstream
Key Points
The
git remotecommand allows us to create, view and delete connections to other repositories.Remote connections are like bookmarks to other repositories.
Other git commands (
git fetch,git push,git pull) use these bookmarks to carry out their syncing responsibilities.
Undoing Changes
Overview
Teaching: 0 min
Exercises: 0 minQuestions
How do I undo changes?
Objectives
How do I roll back a single change?
How do I get back to a specific state?
Git Reset
Resetting is a way to move the tip of a branch to a different commit. This can be used to remove commits from the current branch. For example, the following command moves the hotfix branch backwards by two commits.
git checkout hotfix
git reset HEAD~2
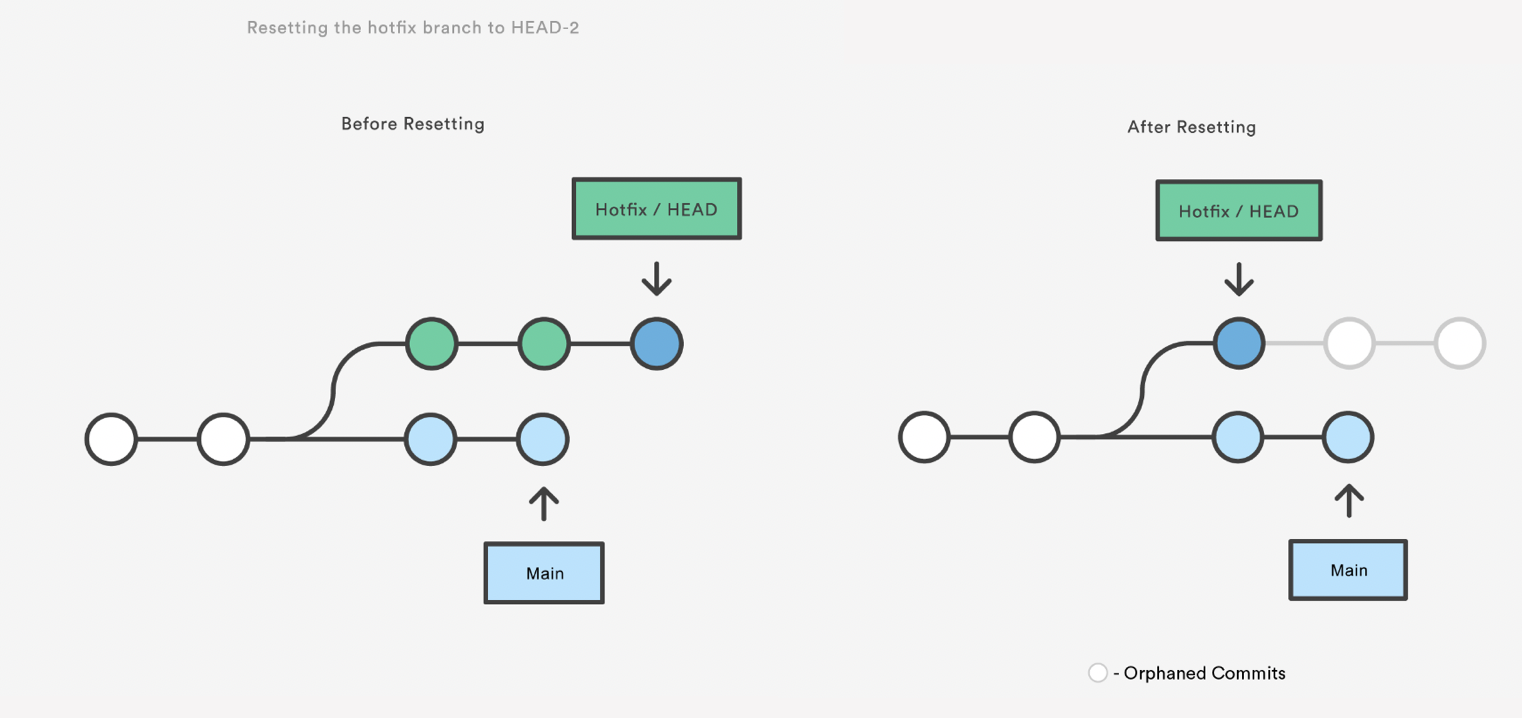
The two commits that were on the end of hotfix are now dangling, or orphaned commits. This means they will be deleted the next time git performs a garbage collection. In other words, you’re saying that you want to throw away these commits.
git reset is a simple way to undo changes that haven’t been shared with anyone else. It’s your go-to command when you’ve started working on a feature and find yourself thinking, “Oh crap, what am I doing? I should just start over.”
In addition to moving the current branch, you can also get git reset to alter the staged snapshot and/or the working directory by passing it one of the following flags:
–soft – The staged snapshot and working directory are not altered in any way.
–mixed – The staged snapshot is updated to match the specified commit, but the working directory is not affected. This is the default option.
–hard – The staged snapshot and the working directory are both updated to match the specified commit.
It’s easier to think of these modes as defining the scope of a git reset operation.
To just undo any uncommitted changes:
git reset HEAD
git reset can also work on a single file:
git reset HEAD~2 foo.txt
Git Revert
Reverting undoes a commit by creating a new commit. This is a safe way to undo changes, as it has no chance of re-writing the commit history. For example, the following command will figure out the changes contained in the 2nd to last commit, create a new commit undoing those changes, and tack the new commit onto the existing project.
git checkout hotfix
git revert HEAD~2
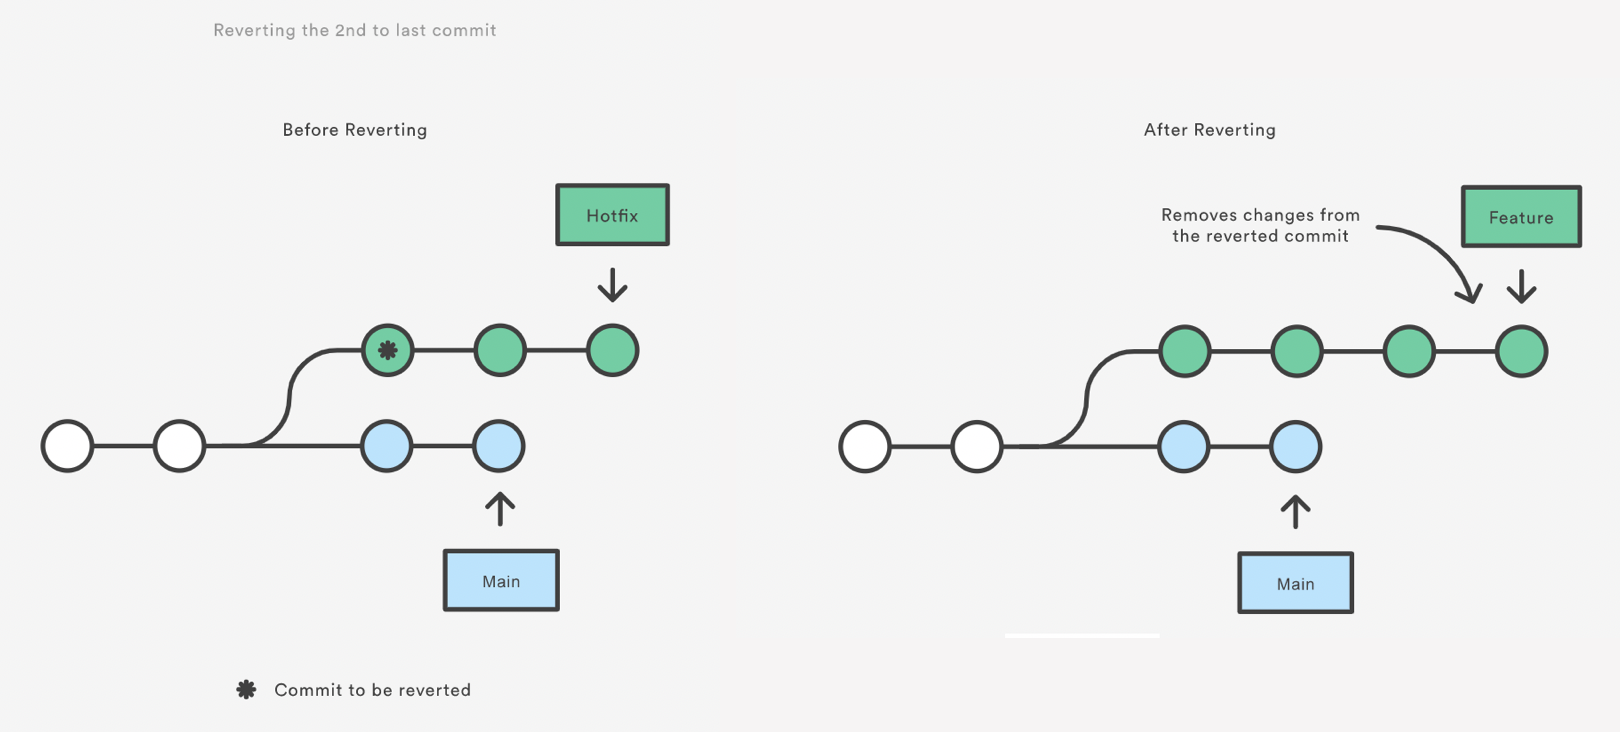
Note that revert only backs out the atomic changes of the specific commit (by default, you can also give it a range of commits but we are not going to do that here, see the help).
git revert does not rewrite history which is why it is the preferred way of dealing with issues when the changes have already been pushed to a remote repository.
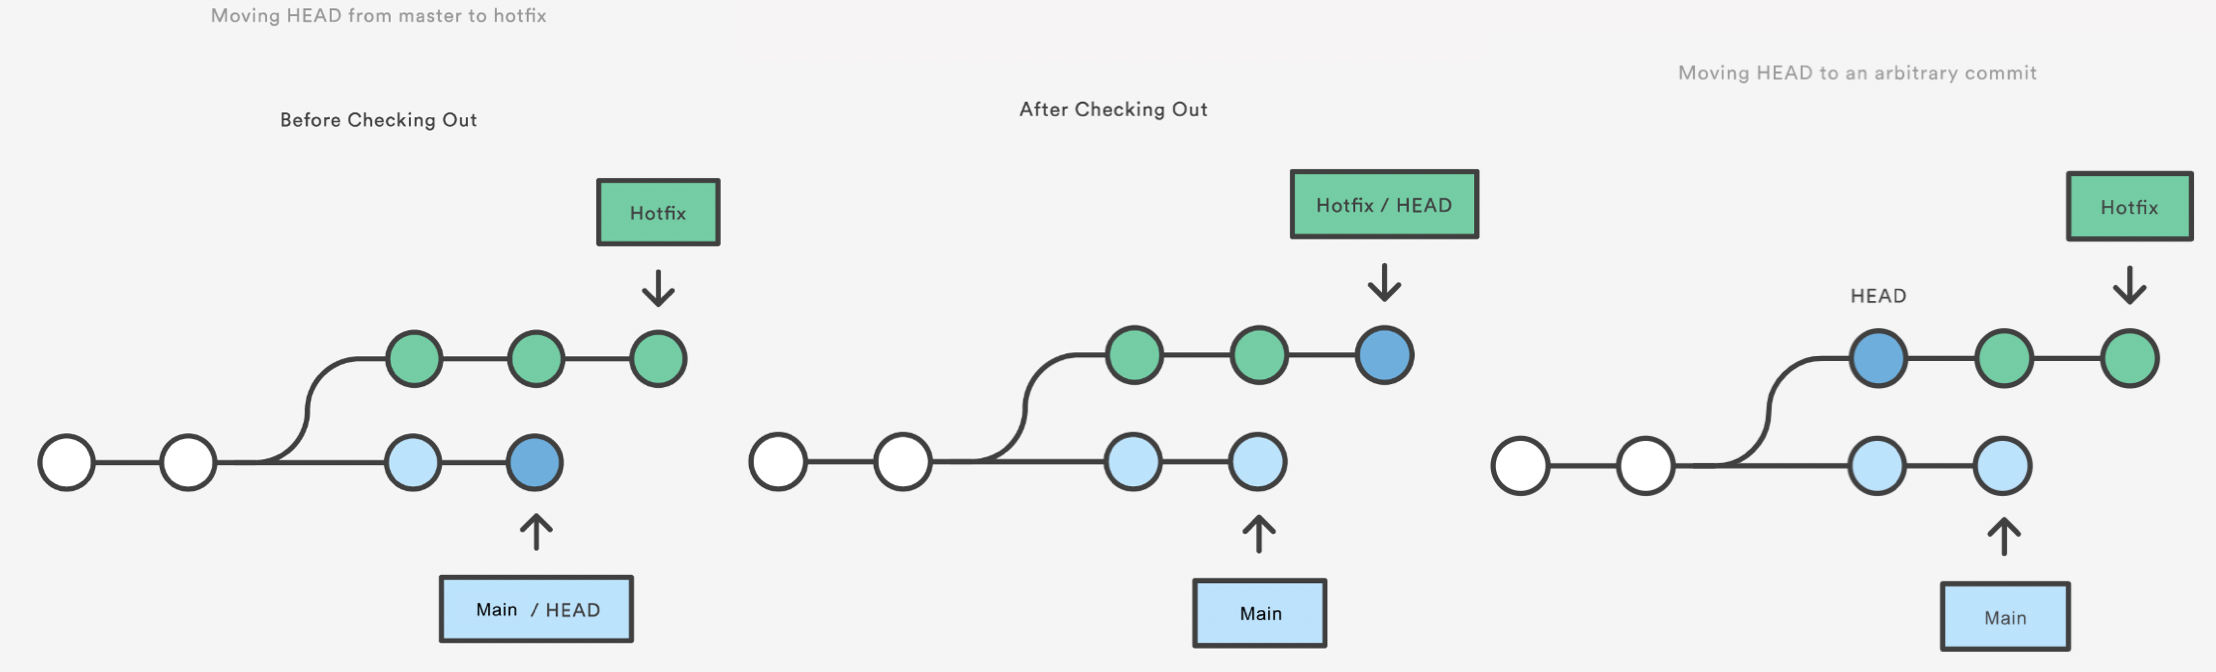
Git Checkout: A Gentle Way
We already saw that git checkout is used to move to a different branch but is can also be used to update the state of the repository to a specific point in the projects history.
git checkout hotfix
git checkout HEAD~2
https://www.atlassian.com/git/tutorials/resetting-checking-out-and-reverting
Exercise: Undoing Changes
- Create a new branch called
hotfix. Create a new file and make 3-4 commits in that file. Check the log to see the SHA of the last commit.Solution
git status
git log
- Revert the last commit that we just inserted. Check the history.
Solution
git revert -m 1 <SHA>
git log
- Completely throw away the last two commits [DANGER ZONE!!!]. Check the status and the log.
Solution
git reset HEAD~2 --hard
git status
git log
- Undo another commit but leave it in the staging area. Check the status and log.
Solution
git reset HEAD~1
git status
git log
- Wrap it up: add and commit the changes.
Solution
git add .
git commit -m "Message"
Key Points
git resetrolls back the commits and leaves the changes in the files
git reset --hardroll back and delete all changes
git resetdoes alter the history of the project.You should use
git resetto undo local changes that have not been pushed to a remote repository.
git revertundoes a commit by creating a new commit.
git revertshould be used to undo changes on a public branch or changes that have already been pushed remotely.
git revertonly backs out a single commit or a range of commits.
Merging
Overview
Teaching: 0 min
Exercises: 0 minQuestions
How do I merge a branch changes?
Objectives
Learn about
git merge.
Even if you live well, one day you will have to merge a branch. Your branch may or may not have diverged from the main branch. The command that accomplishes this is git merge.
There are 3 ways to merge:
-
fast forward merged
-
non-fast-forward merged
-
three way
Reminder: when starting work on a new feature, be careful where you branch from!
git remote add upstream https://github.com/mpi-astronomy/advanced-git-training.git
git fetch upstream
git checkout -b develop upstream/develop
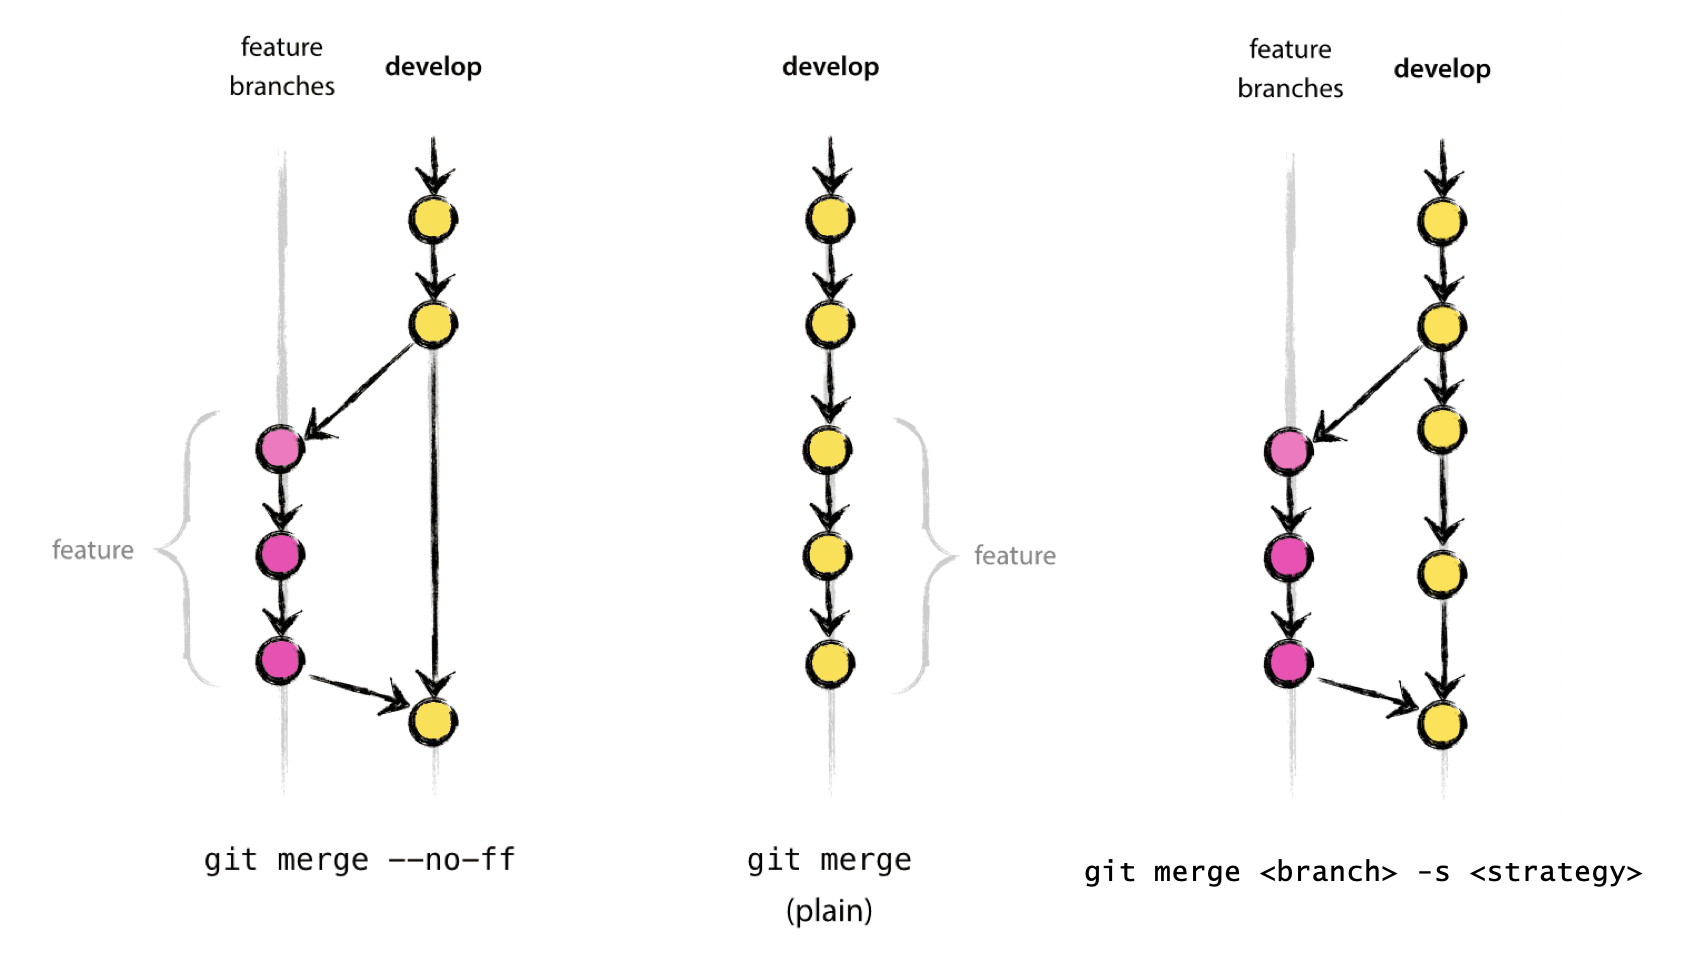
Fast-forward Merger
If there are no conflicts with the main branch, a “fast-forward” merge can be executed with. This will NOT create a merge commit! Aborts merge if it cannot be done. Ideal for updating a branch from remote.
git checkout main
git merge --ff-only <branch>
Using the fast-forward merge it is impossible to see from the git history which of the commit objects together have implemented a feature. You would have to manually read all the log messages. Reverting a whole feature (i.e. a group of commits), is a true headache in the latter situation, whereas it is easily done if the –no-ff flag was used.
Non-fast-forwad Merge
Merges branch by creating a merge commit. Prompts for merge commit message. Ideal for merging two branches.
git checkout main
git merge --no-ff <branch>
The --no-ff flag causes the merge to always create a new commit object, even if the merge could be performed with a fast-forward. This avoids losing information about the historical existence of a feature branch and groups together all commits that together added the feature.
Three-way Merger
Similar to --no-ff, but there may be dragons. Forced upon you when there’s an intermediate change since you branched.
May prompt your to manually resolve
git merge <branch> [-s <strategy>]
See https://git-scm.com/docs/merge-strategies for a zillion options (“patience”, “octopus”, etc), But also git is only so smart and you are probably smarter.
Merging strategies: https://git-scm.com/docs/merge-strategies
https://nvie.com/posts/a-successful-git-branching-model/
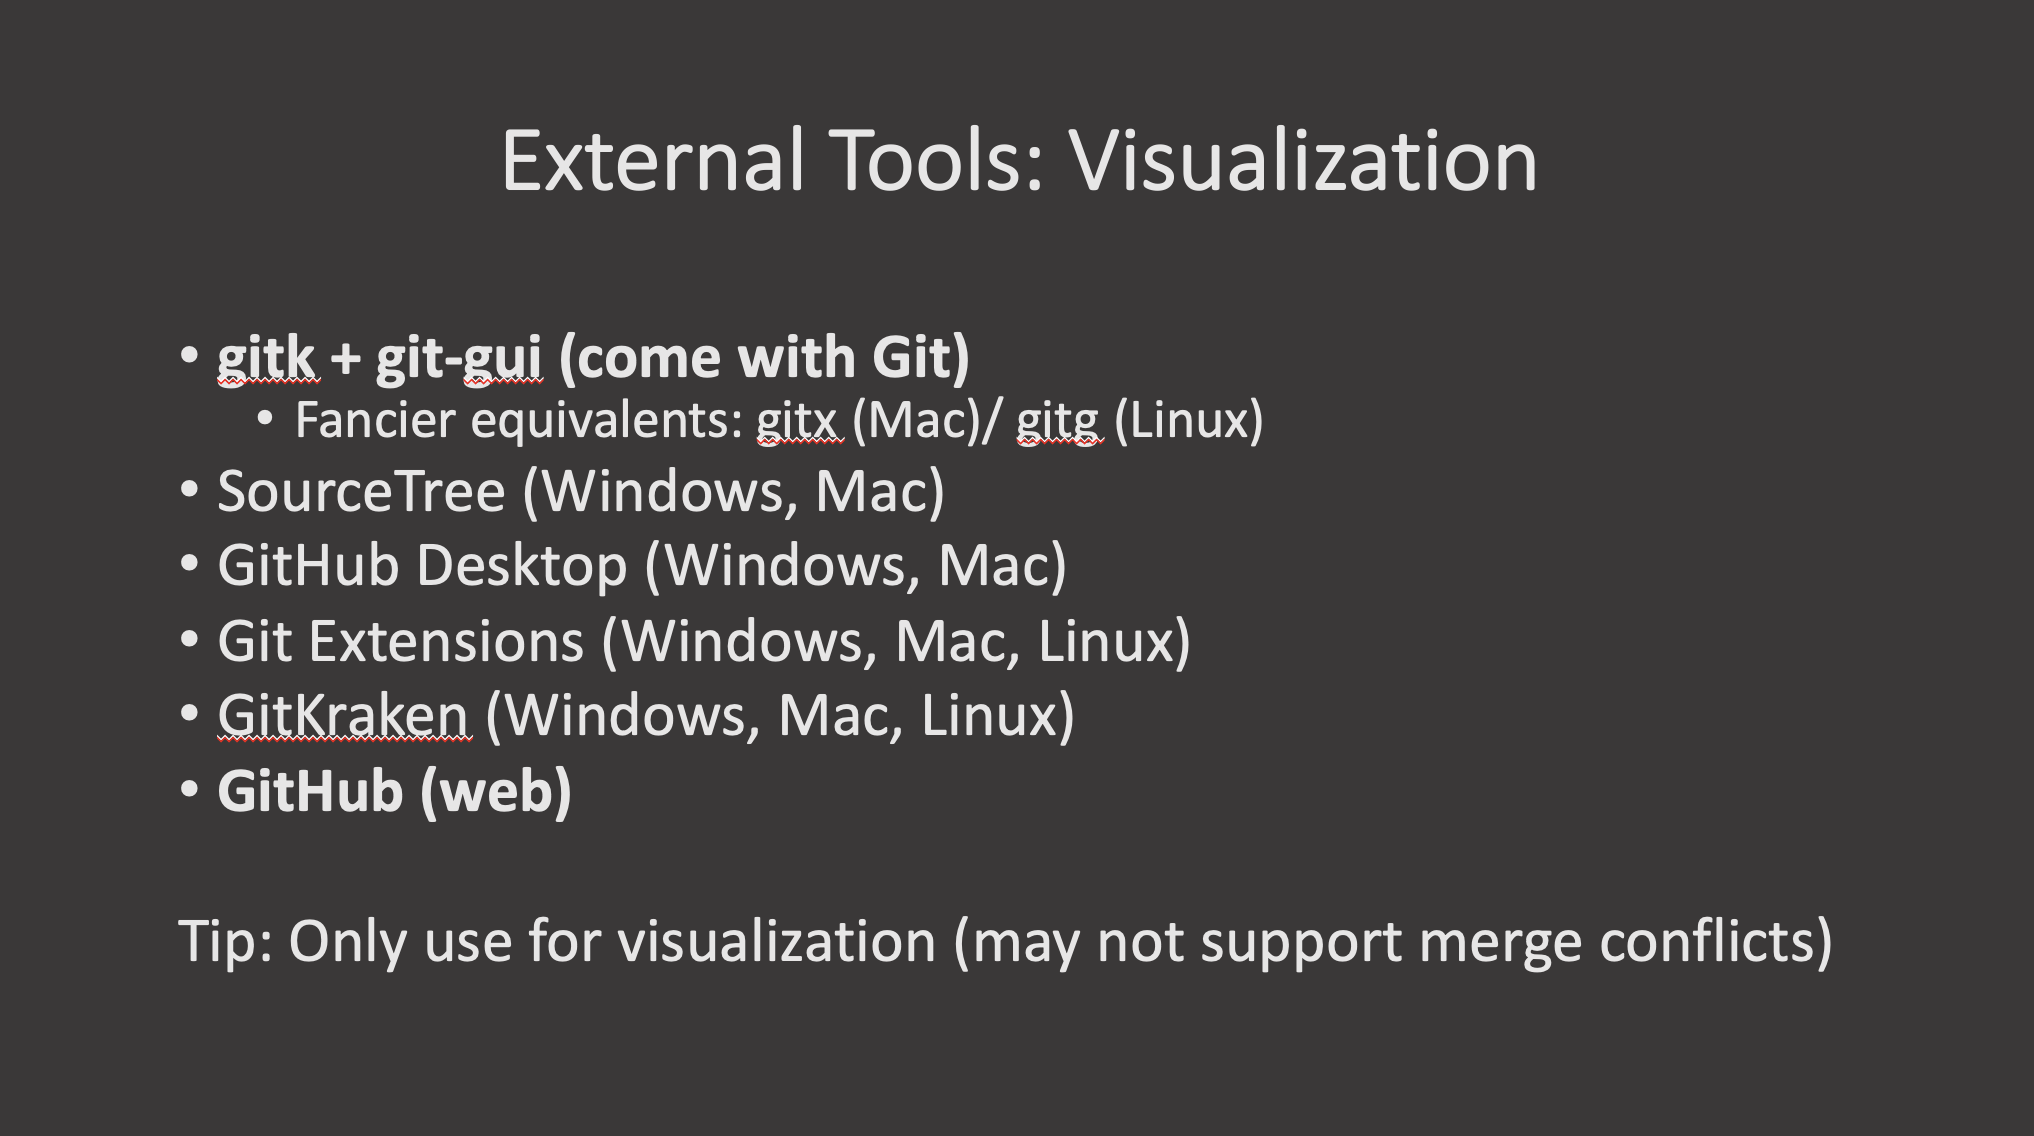
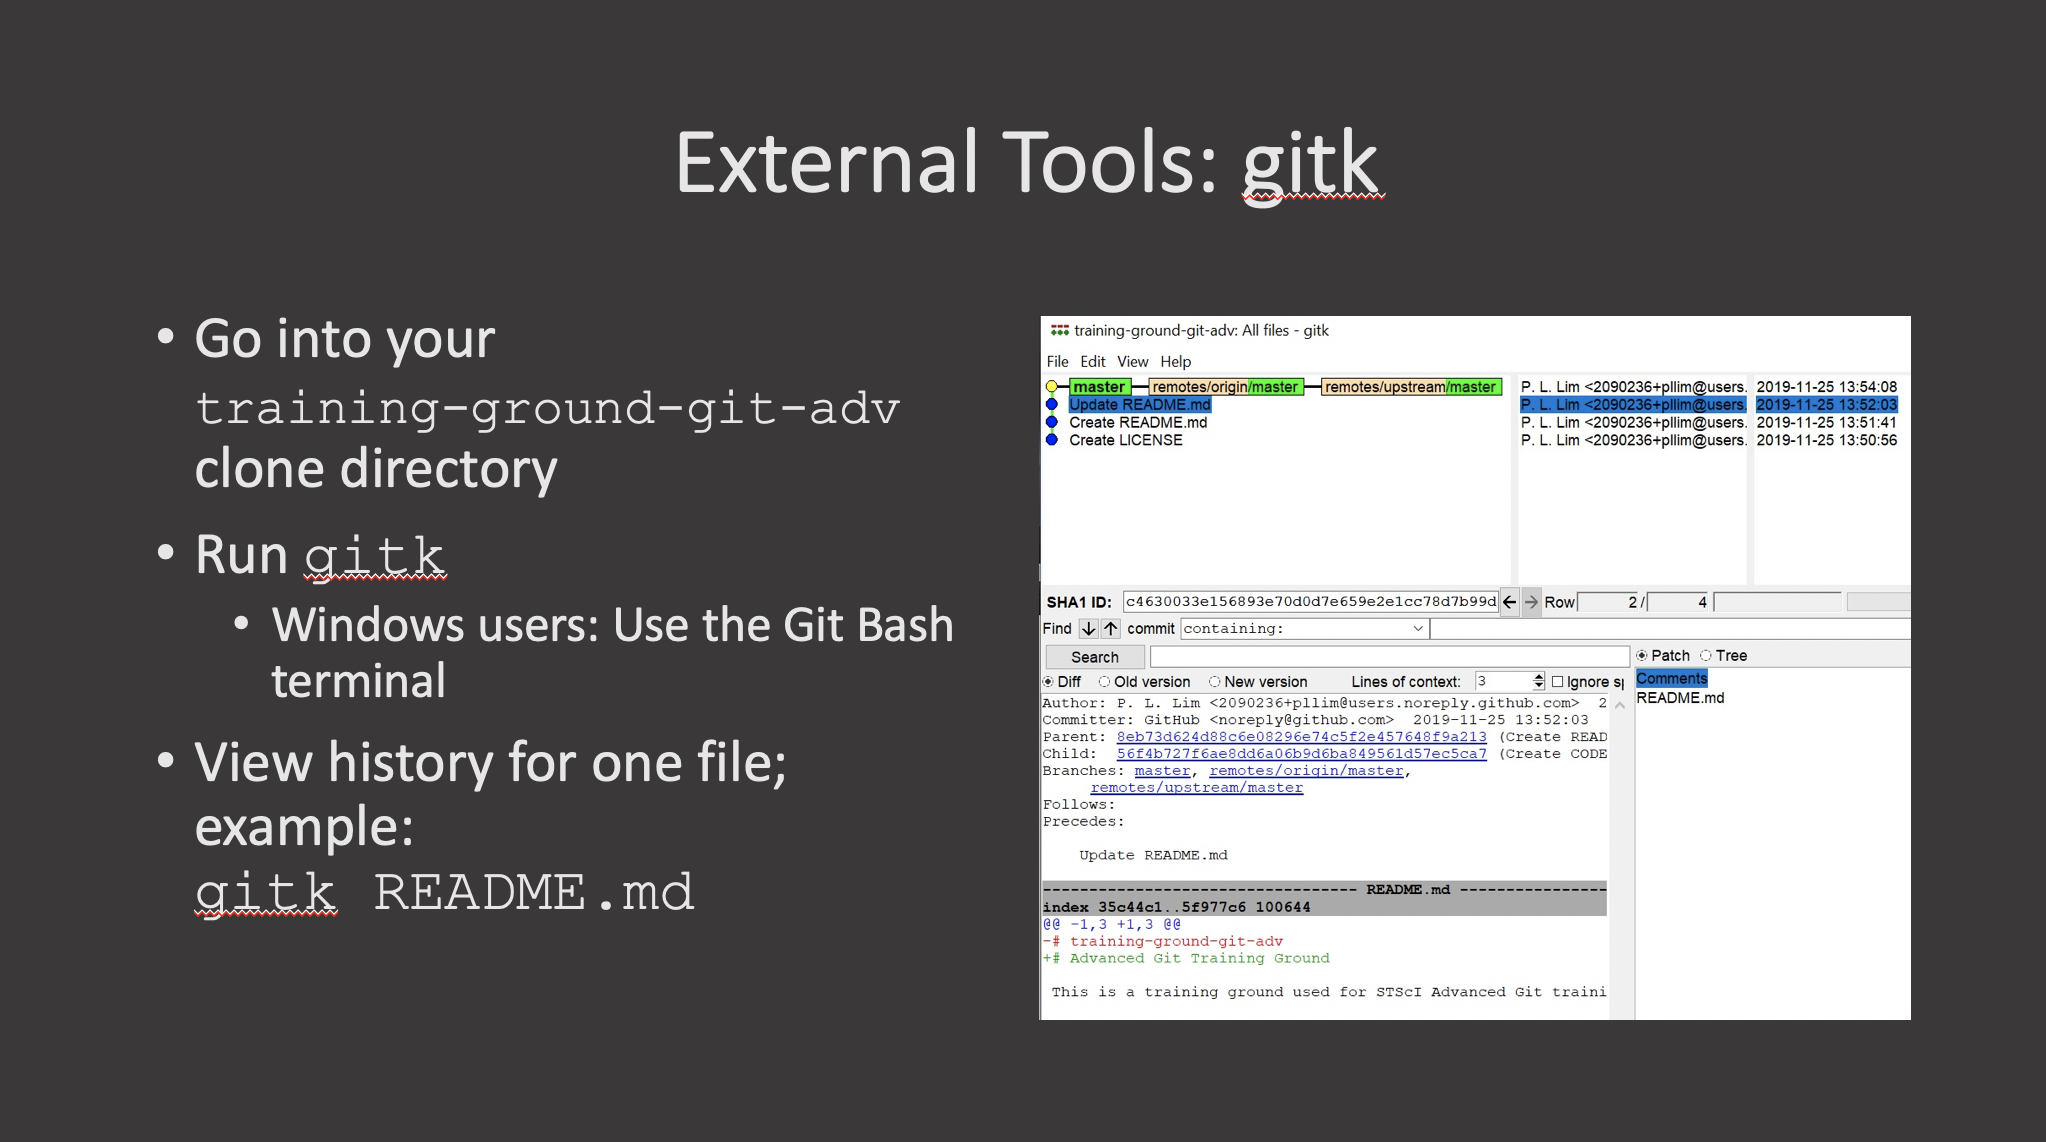
Note: there are a number of external tools that have a graphical interface to allow for merge conflict resolution. Some of these include: kdiff3 (Windows, Mac, Linux), Meld (Windows, Linux), P4Merge (Windows, Mac, Linux), opendiff (Mac), vimdiff (for Vim users), Beyond Compare, GitHub web interface. We do not endorse any of them and use at your own risk. In any case, using a graphical interface does not substitute for understanding what is happening under the hood.
Key Points
git merge --no-ffis the best way to merge changes
git merge --ff-onlyis a good way to pull down changes from remote
Tags
Overview
Teaching: 0 min
Exercises: 0 minQuestions
How can I flag a specific state of the project?
Objectives
Learning about the
git tagcommand
A tag is a marker of a specic commit in the project history. You can think of it as a permanent bookmark. Tags can be created to point to a release version, a major code change, a state of the code that was used to produce a paper or a data release, or any other event you (or the development team) may want to reference in the future.
Once a tag has been created, no other changes can be added to it. But you can delete it and create a new one with the same name.
Don’t name your tags the same as your branches. Or the other way around. git fetch can get a tag or a branch and that can be confusing.
The command that allows you to handle git tags is just git tag. Without any flags it simply list the existing tags:
git tag
You can create a new tag based on the current state of the repository by providing a tag name to the git tag command:
git tag 1.0.0
This however creates what is called a lightweight tag. Lightweight tags are like a branch that doesn’t change.
You can get information on a tag via git show:
git show 1.0.0
Lightweight tags are not recommended in most use cases because they do not save all the information. Instead, use annotated tags (https://git-scm.com/book/en/v2/Git-Basics-Tagging). They are stored as full objects in the Git database: they’re checksummed; contain the tagger name, email, and date; have a tagging message; and can be signed and verified with GNU Privacy Guard (GPG).
To create an annotated tag from the current commit:
git tag -a 2.0.0 -m <message>
It is also possible to tag a past commit by providing that commit’s SHA:
git tag -a <tag> [<SHA>] -m <message>
To get more information about an existing tag you can “verify” it, which displays that tag’s details, including the tagger, date, and message. This only works for annotated commits:
git tag -v 1.0.0
git tag -v 2.0.0
A tag allows you to switch to the version of the code that was tagged, to use that version of the code, or to see what the code looked at that tag. Here is how to check out a state of the code that has been tagged:
git checkout <tag>
Push a tag to origin:
git push origin <tag>
And of course you can delete a tag. This does not delete the commit, just removes the marker/lable. Delete a tag:
git tag -d <tag>
Since tags are frequently used to do releases, it is useful to be aware that codebases and languages have standards on how release versions should be labled. If you are working with an existing code base, follow the standard set by the dev team. If you are developing a library by yourself, follow the standards for the language. For example, the (Python Packaging Authority)[https://packaging.python.org/en/latest/specifications/version-specifiers/#version-specifiers] (and previously(PEP440)[https://peps.python.org/pep-0440/]) specifies the scheme for identifying versions for python libraries.
Key Points
git tagallows us to mark a point we can return to.A tag is tied to a commit.
Branching Models
Overview
Teaching: 0 min
Exercises: 0 minQuestions
What is a branching model?
Why do you need one?
What are the most common branching models?
Objectives
Learn about the importance of a branching model.
What is a branching model/strategy?
Branches are primarily used as a means for teams to develop features giving them a separate workspace for their code. These branches are usually merged back to a master branch upon completion of work. In this way, features (and any bug and bug fixes) are kept apart from each other allowing you to fix mistakes more easily.
This means that branches protect the mainline of code and any changes made to any given branch don’t affect other developers.
A branching strategy, therefore, is the strategy that software development teams adopt when writing, merging and deploying code when using a version control system.
It is essentially a set of rules that developers can follow to stipulate how they interact with a shared codebase.
Such a strategy is necessary as it helps keep repositories organized to avoid errors in the application and the dreaded merge hell when multiple developers are working simultaneously and are all adding their changes at the same time. Such merge conflicts would eventually deter the combination of contributions from multiple developers.
Thus, adhering to a branching strategy will help solve this issue so that developers can work together without stepping on each other’s toes. In other words, it enables teams to work in parallel to achieve faster releases and fewer conflicts by creating a clear process when making changes to source control.
When we talk about branches, we are referring to independent lines of code that branch off the master branch, allowing developers to work independently before merging their changes back to the code base.
In this and the following episodes, we will outline some of the branching strategies that teams use in order to organize their workflow where we will look at their pros and cons and which strategy you should choose based on your needs, objectives and your team’s capabilities.
Why do you need a branching model?
As mentioned above, having a branching model is necessary to avoid conflicts when merging and to allow for the easier integration of changes into the master trunk.
A BRANCHING MODEL AIMS TO:
- Enhance productivity by ensuring proper coordination among developers
- Enable parallel development
- Help organize a series of planned, structured releases
- Map a clear path when making changes to software through to production
- Maintain a bug-free code where developers can quickly fix issues and get these changes back to production without disrupting the development workflow
Git Branching Models
Some version control systems are Very Opinionated about the branching models that can be used. git is very much (fortunately or unfortunately) not. This means that there are many different ways to do development in a team and the team needs to explicitly agree on how and when to merge contributions to the main branch. So the first rule of git granching is: “Talk about your branching model.” The second rule is: “Talk about your branching model.” If in doubt, do what other people around you are doing. If they don’t do anything, call a friend.
That said, there are a number of established (and less so) branching models that are used with git. These include, but are not limited to:
-
Centralized workflow: enables all team members to make changes directly to the main branch. Every change is logged into the history. In this workflow, the contributors do not use other branches. Instead they all make changes on the main branch directly and commit to it. This woks for individual developers or small thema which communicate very well, but can be tricky for larger teams: the code is in constant state of flux and developers keep changes local until they are ready to release.
-
Trunk-based development (cactus flow?): is somewhat similar to the centralized workflow. The development happens on a single branch called
trunk. When changes need to be merged, each developer pulls and rebases from the trunk branch and resolves conflicts locally. This can work if small merges are made frequently and is more successful if there is CI/CD. -
Feature branch workflow: every small change or “feature” gets its own branch where the developers make changes. Once the feature is done, they submit a merge/pull request and merge it into the main branch. Features branches should be relatively short-lived. The benefit of this model is that the main branch is not poluted by unfinished features. Good for teams.
-
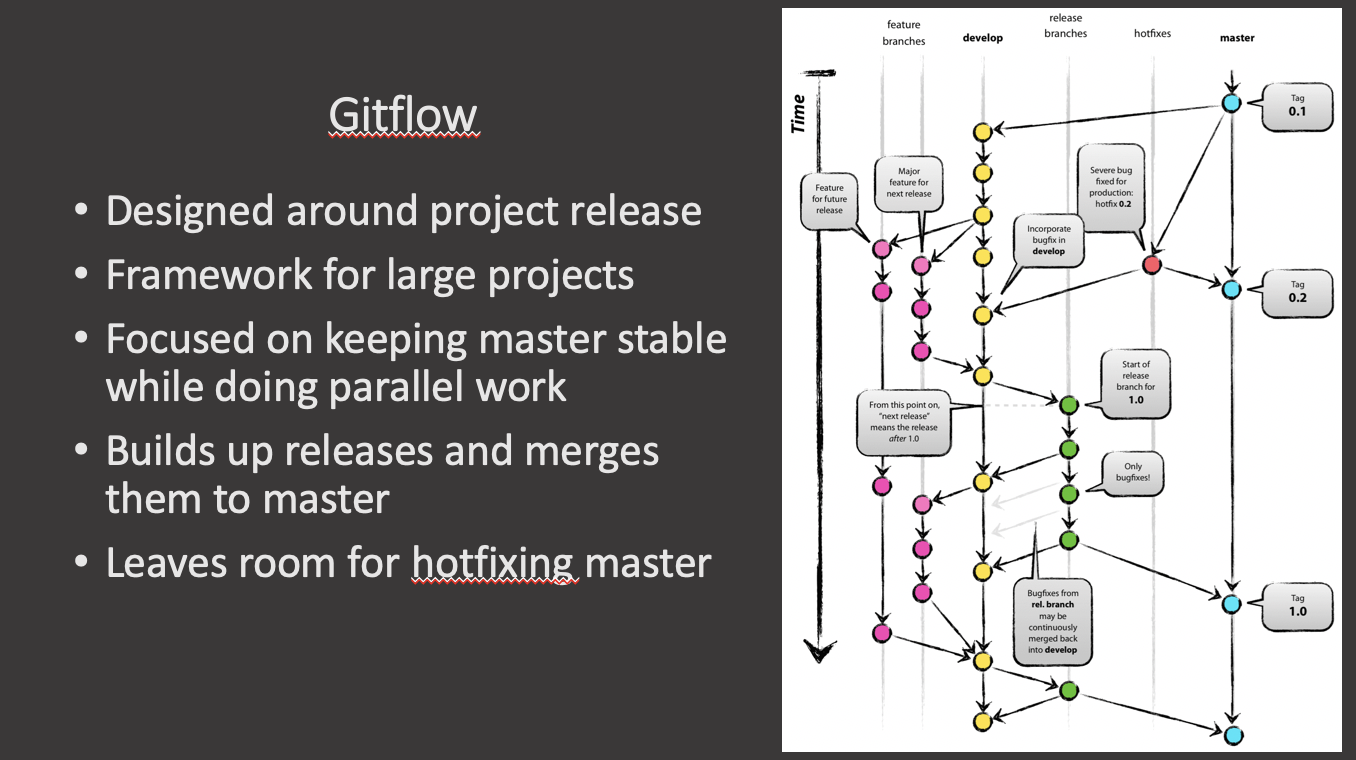
Gitflow: is a model where the main development happens in a develop branch with feature branches. When the develop branch is ready for a release (or to go into production), a team member creates a release branch which is tested and eventually merged onto the dev and eventually main branch.
-
GitHub flow (https://docs.github.com/en/get-started/quickstart/github-flow): similar to the branching workflow.
-
GitLab flow: is a simplified version of Gitflow (https://about.gitlab.com/topics/version-control/what-is-gitlab-flow/)
-
Oneflow: is similar to Gitflow but relies on the maintanance of one long-lived branch. It is meant to be simpler, without a develop branch but feature branches still exist (https://www.endoflineblog.com/oneflow-a-git-branching-model-and-workflow).
-
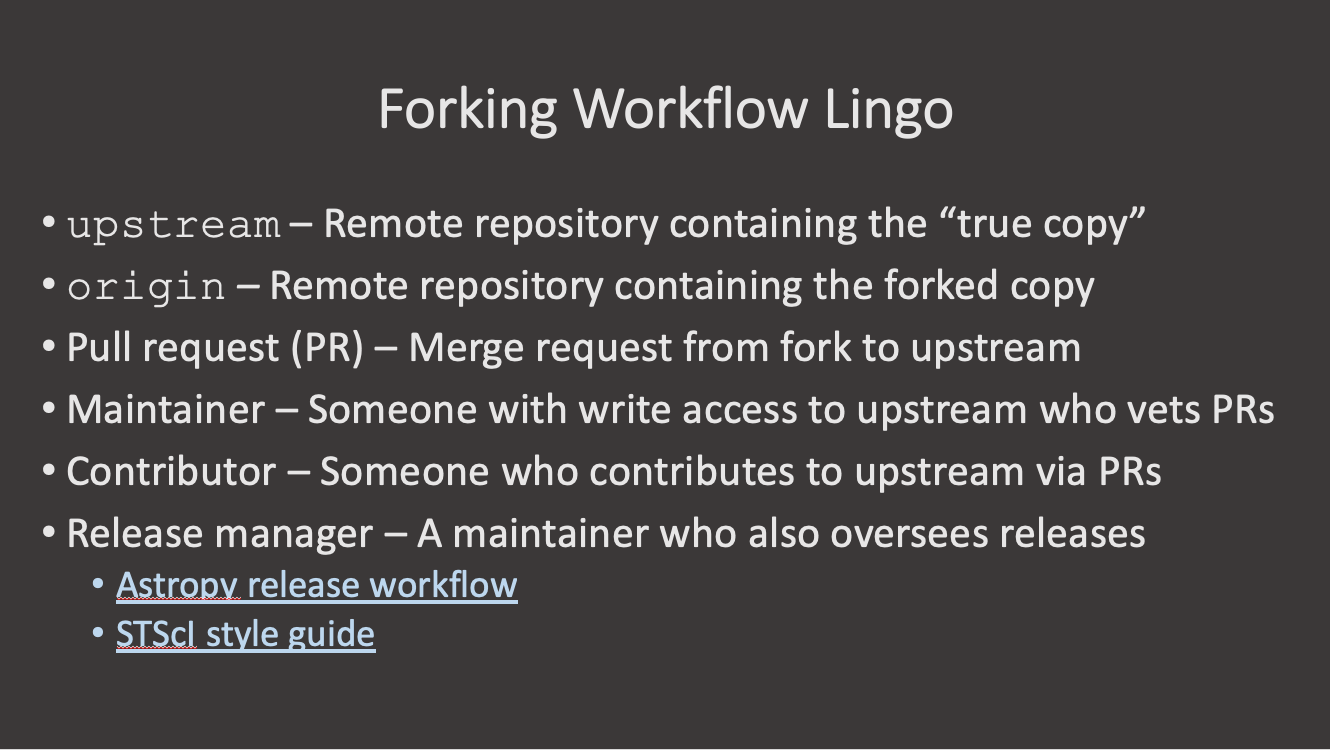
Forking workflow (e.g. astropy): is a model where each contributor creates a
forkor a complete copy of the repository. Every contribitor effectively has two repositories: his own and the main (upstream) one. Changes are made as pull requests against the main repository. This model is propular with open source projects because the vast majority of contributors do not need to have priviledges in the main repository.
A longer description of some of these can be found here: https://about.gitlab.com/topics/version-control/what-is-git-workflow/#feature-branching-git-workflow
In summary, there are many different ways to collaborate on a project. Look at the pros and cons and select one that fits the needs and organization of your team and project. In the following several sections we look at some of these models in more detail.
Key Points
A branching model is a pre-agreed way of merging branches into the main branch.
A branching model is needed when multiple contributors are making changes to a single project.
GitFlow
Overview
Teaching: 0 min
Exercises: 0 minQuestions
What are the common workflows of the GitFlow branching model?
Objectives
First learning objective. (FIXME)
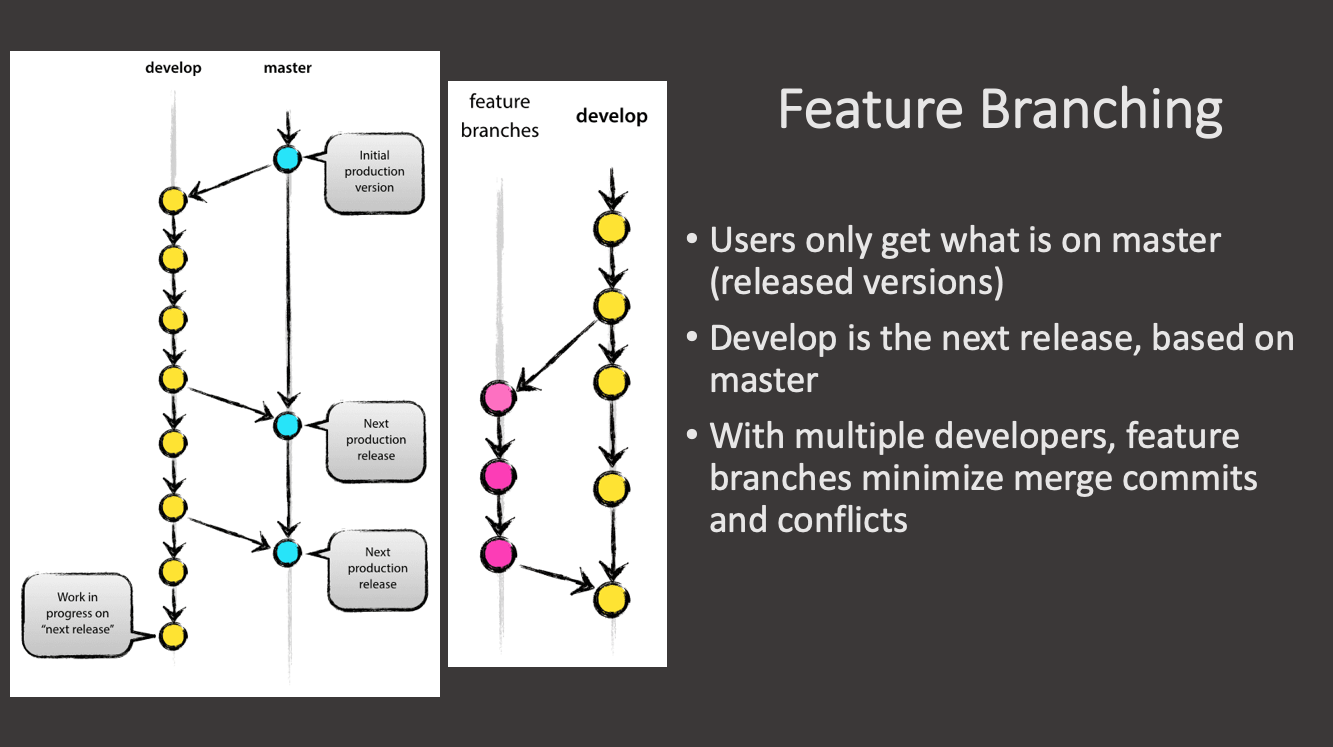
Considered to be a bit complicated and advanced for many of today’s projects, GitFlow enables parallel development where developers can work separately from the master branch on features where a feature branch is created from the master branch.
Afterwards, when changes are complete, the developer merges these changes back to the master branch for release.
This branching strategy consists of the following branches:
- Master
- Develop
- Feature- to develop new features that branches off the develop branch
- Release- help prepare a new production release; usually branched from the develop branch and must be merged back to both develop and master
- Hotfix- also helps prepare for a release but unlike release branches, hotfix branches arise from a bug that has been discovered and must be resolved; it enables developers to keep working on their own changes on the develop branch while the bug is being fixed.
The main and develop branches are considered to be the main branches, with an infinite lifetime, while the rest are supporting branches that are meant to aid parallel development among developers, usually short-lived.
GitFlow pros and cons
Perhaps the most obvious benefit of this model is that it allows for parallel development to protect the production code so the main branch remains stable for release while developers work on separate branches.
Moreover, the various types of branches make it easier for developers to organize their work. This strategy contains separate and straightforward branches for specific purposes though for that reason it may become complicated for many use cases.
It is also ideal when handling multiple versions of the production code.
However, as more branches are added, they may become difficult to manage as developers merge their changes from the development branch to the main. Developers will first need to create the release branch then make sure any final work is also merged back into the development branch and then that release branch will need to be merged into the main branch.
In the event that changes are tested and the test fails, it would become increasingly difficult to figure out where the issue is exactly as developers are lost in a sea of commits.
Indeed, due to GitFlow’s complexity, it could slow down the development process and release cycle. In that sense, GitFlow is not an efficient approach for teams wanting to implement continuous integration and continuous delivery.
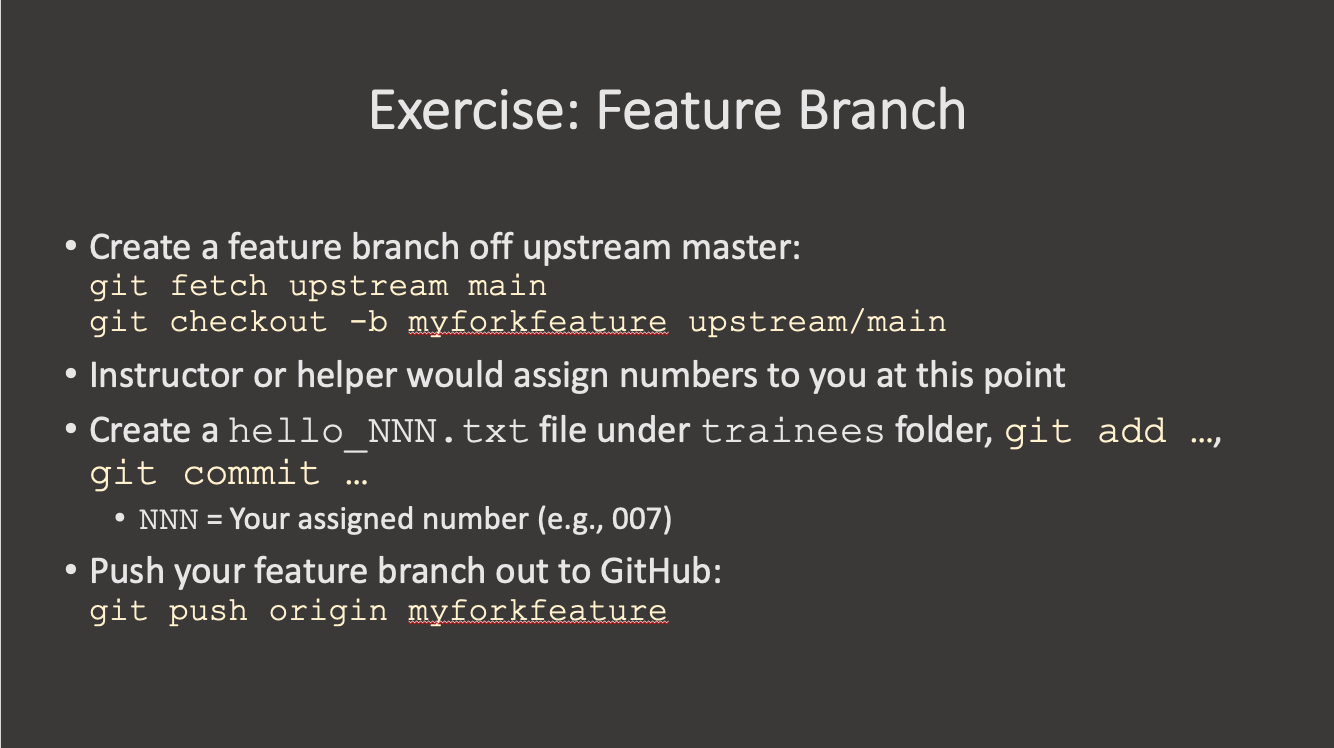
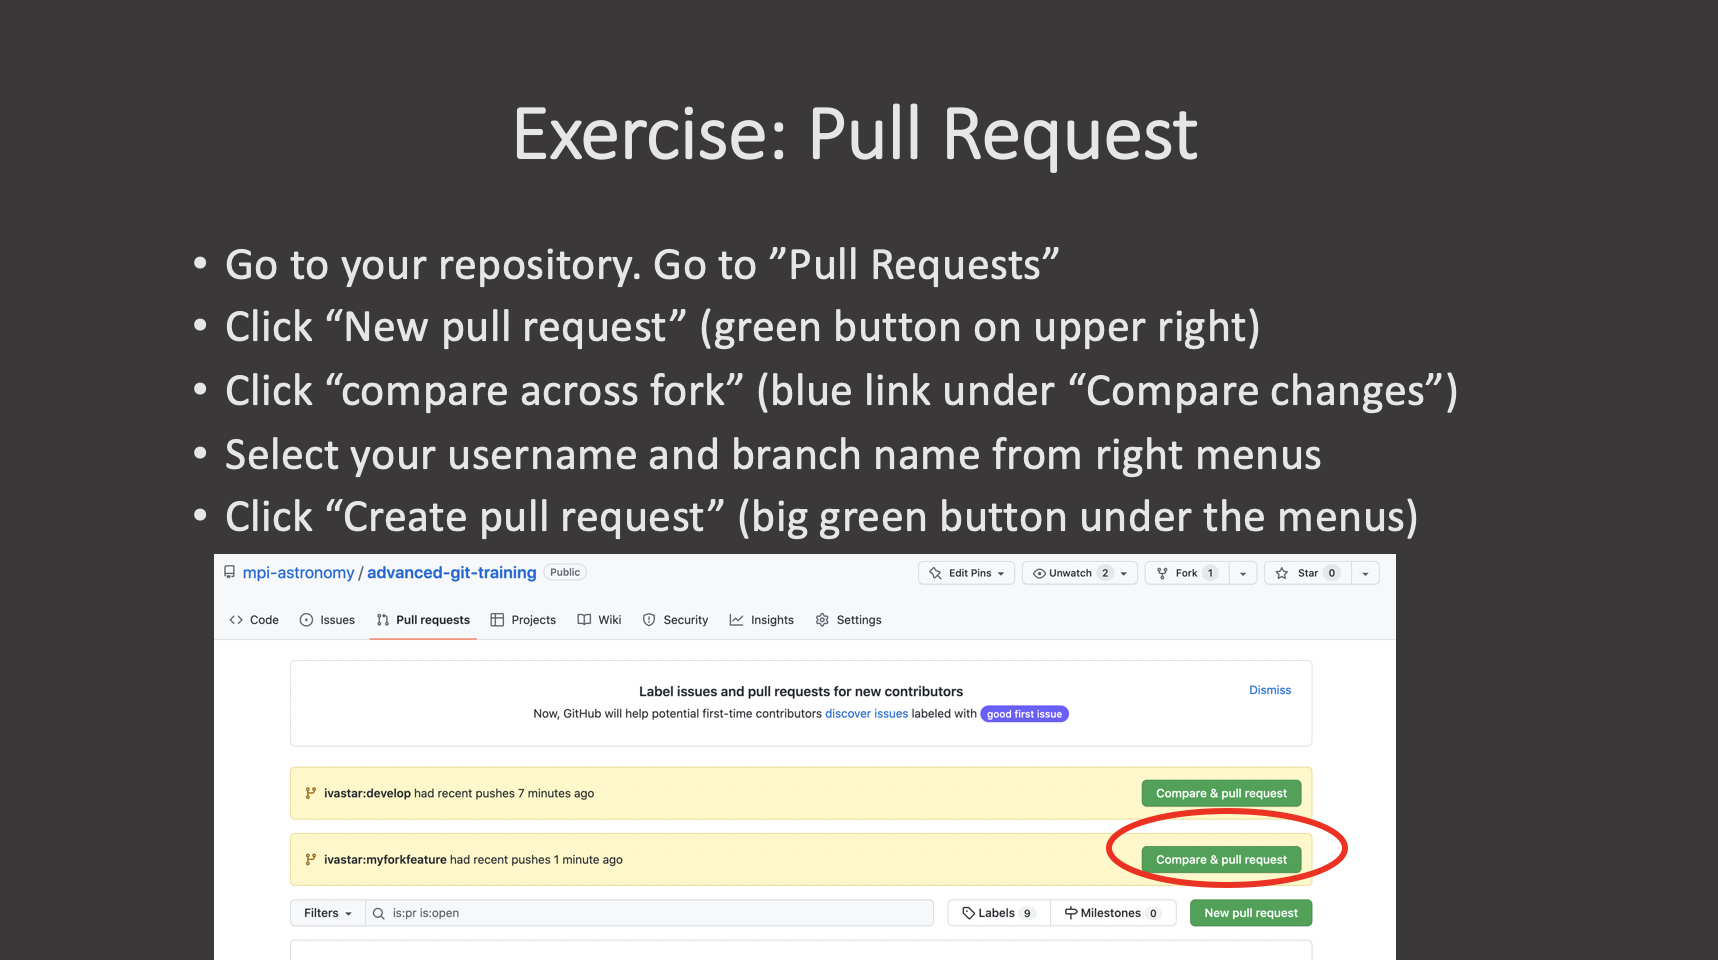
Exercise 1: Creating a Feature Branch
- First go into the repository directory and check the repository status. Make sure the status is clean and, if not, commit any changes.
Solution
cd advanced-git-training
git status
- Check out a new feature branch off the development branch.
Solution
git checkout -b myfeature upstream/develop
- Create a new file that will contain your feature, edit it and commit it:
Solution
git add coolstuff.txt
git commit -m "Add cool stuff."
Now you have a feature branch.
Exercise 2: Making Changes on the develop Branch
Now, while you were developing your feature, someone else merged their changes, otherstuff.txt in the develop branch. Let’s make those changes here by hand so we can then practice merging our coolfeature into the develop branch.
- Check out the
developbranch:Solution
git checkout develop
- Create a new file named, for example,
otherstuff.txt, edit it, add it and commit it to the develop branch:Solution
git add otherstuff.txt
git commot -m "Stuff from another feature."
Exercise 3: Finish Feature
Now we are going to merge the myfeature branch into develop. Make sure you are still on the develop branch by checking the status git status.
- Create a merge commit from the
myfeaturebranch:Solution
git merge --no-ff myfeature
-Delete the feature branch:
Solution
git branch -d myfeature
Finally, check the history again with git log and check the direcotry content with ls. Is your feature file here?
Gitflow Release Branching

Exercise 4: Gitflow Release
- First we need to create a release branch. Release branches should start from the
developbranch.Solution
git checkout -b release-1.0 develop
- The switch to the
mainbranch. We will merge the release branch intomain. Create a merge commit onmainfromrelease-1.0:Solution
git checkout main
git merge --no-ff release-1.0
- Now we can tag the release, push the tag out and delete the release branch:
Solution
git tag -a 1.0 -m "Version 1.0"
git push origin 1.0
git branch -d release-1.0
You can now check the Releases tab on GitHub to see your tagged release.
Gitflow Hotfix
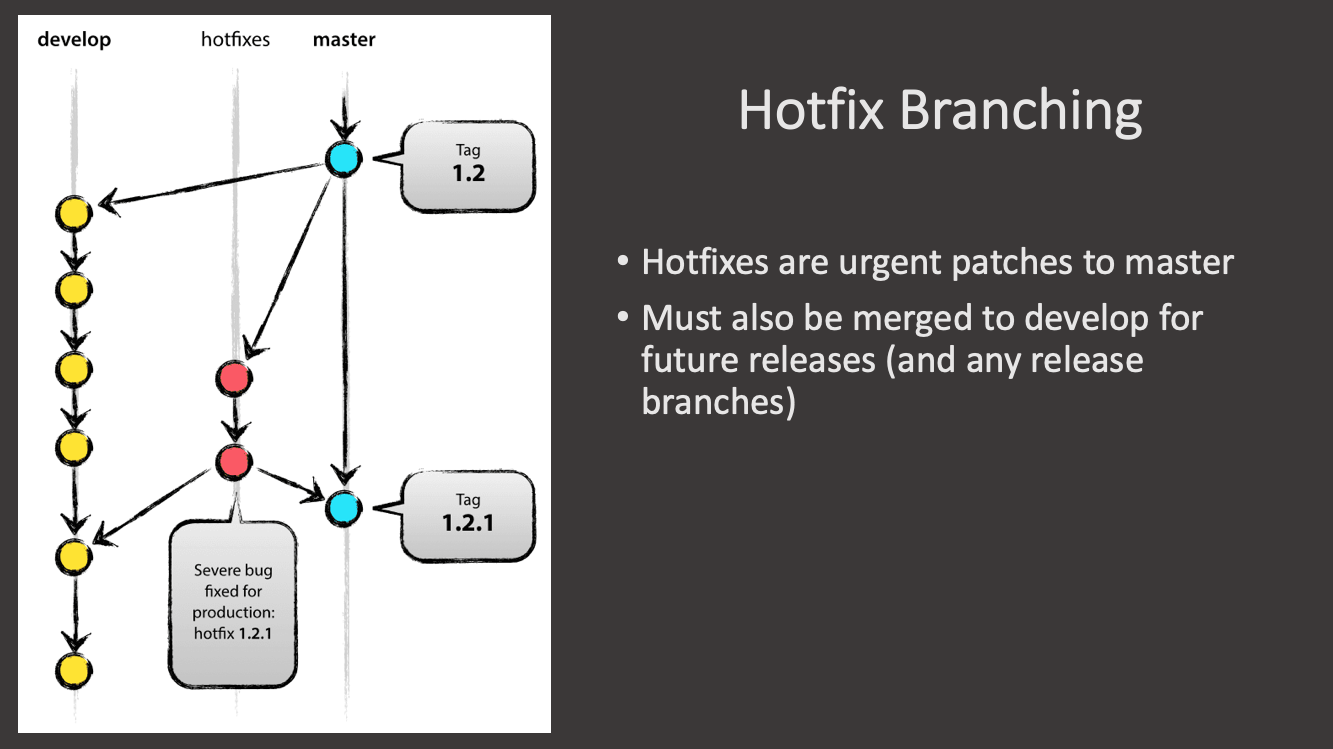
Exercise 5: Gitflow Hotfix
Imagine we made a release but we realized that there is a bug in our cool feature in coolstuff.txt. How do we fix that? We make a hotfix on the code which we then merge into both main and develop and we tag a new hotfix release.
- First, create a hotfix branch off main, this is where our released code lives, we need to fix it:
Solution
git checkout -b hotfix-1.0.1 main
- Now, make some changes to
coolstuff.txt, add and commit it:Solution
git add coolstuff.txt
git commit -m "Cool hotfix"
- Switch back to the main branch and merge the commit:
Solution
git checkout main
git merge --no-ff hotfix-1.0.1
- Tag a new release and push it to GitHub:
Solution
git tag -a 1.0.1 -m "Version 1.0.1"
git push origin 1.0.1
- We also need to merge our change to
developso that it is propagated into the code that is the same as the released version:Solution
git checkout develop
git merge --no-ff hotfix-1.0.1
- Finally we can delete the hotfix branch:
Solution
git branch -d hotfix-1.0.1
Exercise 6: Gitflow Wrap-up
To wrap up the Gitflow workflow we want to make sure we have pushed all our develop and main changes to the remote repository.
- First, as always, check the status of your repository and make sure you are still on the
developbranch:Solution
git status
git branch
git tag
- Then push any changes from develop to the remote:
Solution
git push origin develop
- And do the same with the
mainbranch:Solution
git checkout main
git push origin main
https://www.flagship.io/git-branching-strategies/
Key Points
First key point. Brief Answer to questions. (FIXME)
Forking Workflow
Overview
Teaching: 0 min
Exercises: 0 minQuestions
What are the common workflows of the forking branching model?
Objectives
First learning objective. (FIXME)

Key Points
First key point. Brief Answer to questions. (FIXME)
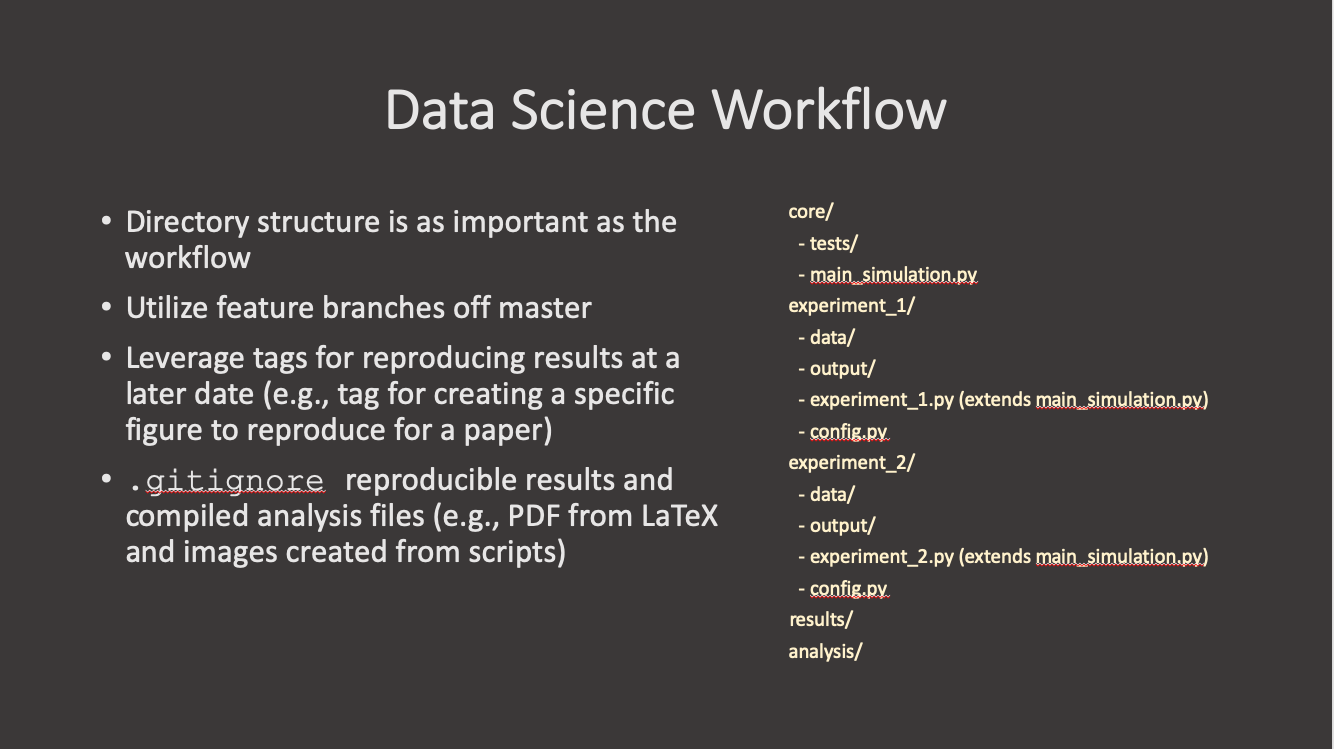
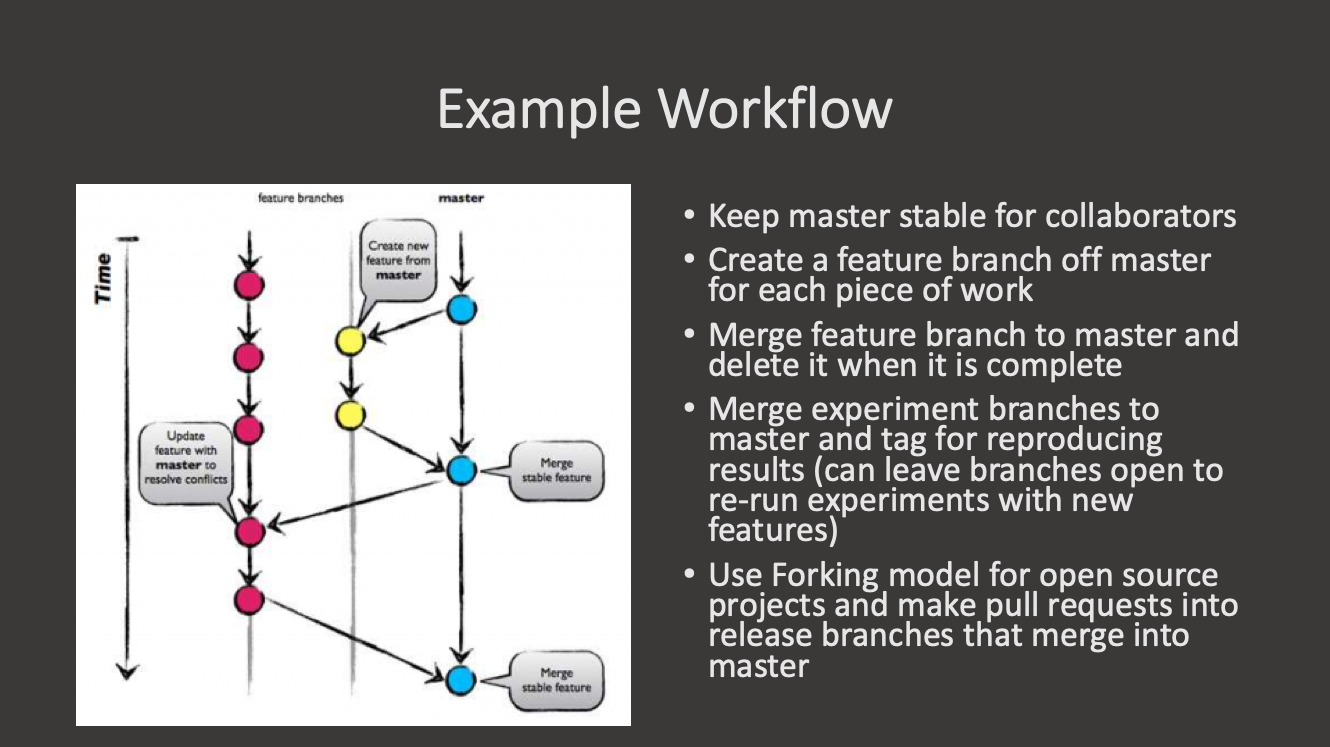
Data Science Workflow
Overview
Teaching: 0 min
Exercises: 0 minQuestions
What are the common workflows of the Data Science branching model?
Objectives
First learning objective. (FIXME)

Key Points
First key point. Brief Answer to questions. (FIXME)
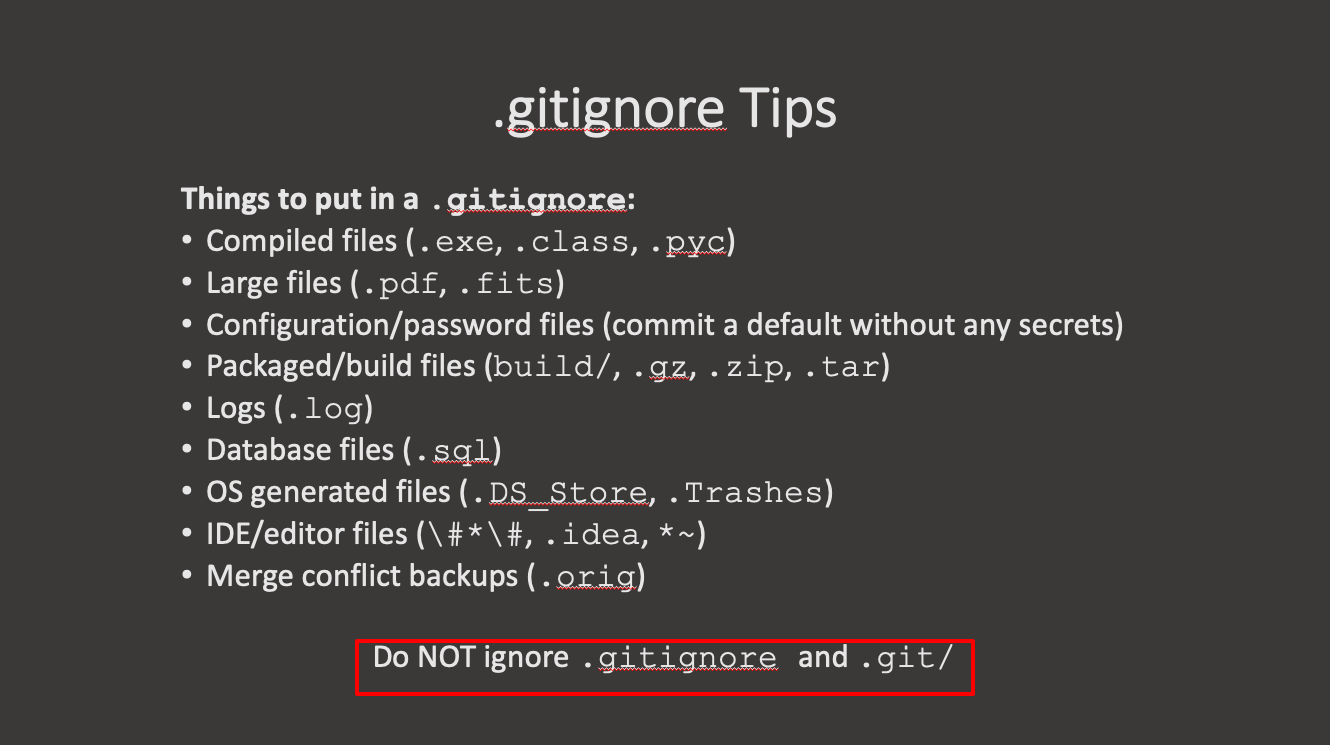
Ignoring in Git
Overview
Teaching: 0 min
Exercises: 0 minQuestions
How do I ignore things in git?
Objectives
First learning objective. (FIXME)
Add info about setting up a global git ignore file.
Key Points
First key point. Brief Answer to questions. (FIXME)
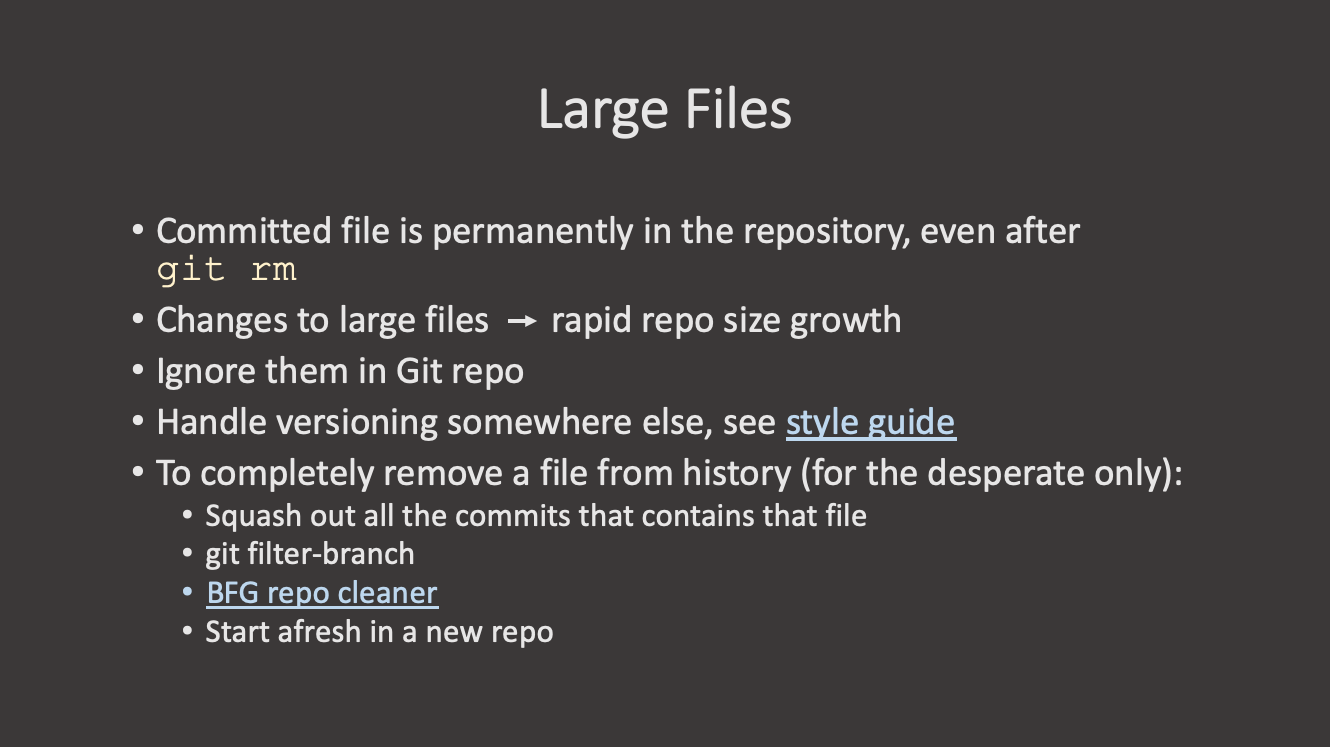
Large Files
Overview
Teaching: 0 min
Exercises: 0 minQuestions
How do I handle large files in git?
Objectives
First learning objective. (FIXME)
Key Points
First key point. Brief Answer to questions. (FIXME)
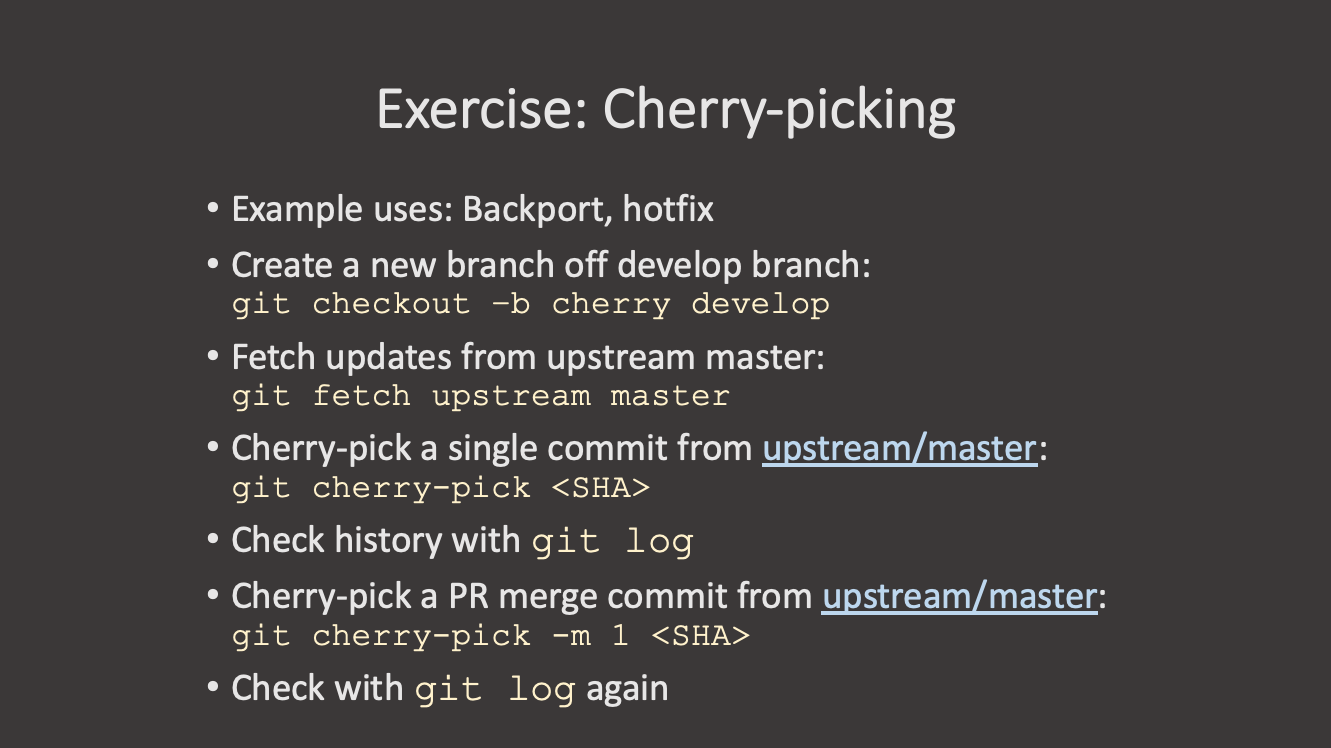
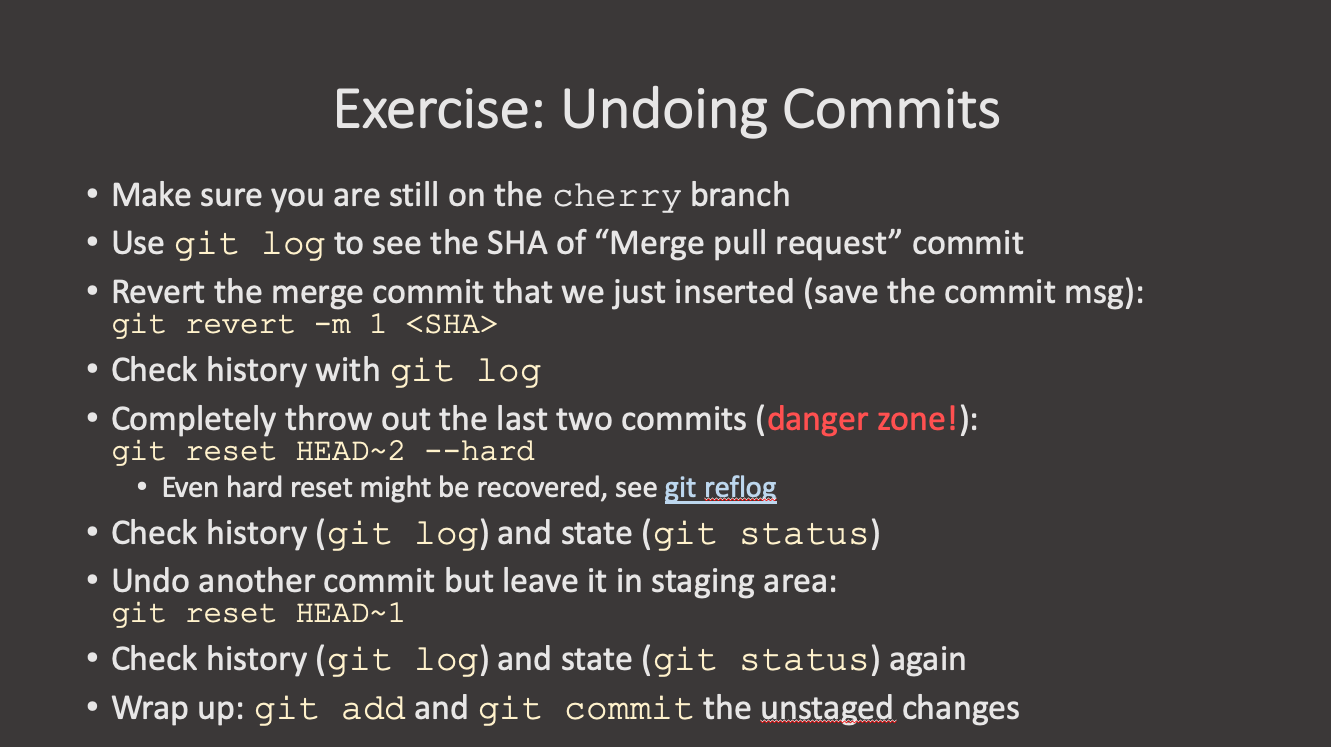
Cherrypick, Move, Undo
Overview
Teaching: 0 min
Exercises: 0 minQuestions
How can I select just one commit?
Objectives
First learning objective. (FIXME)
Key Points
First key point. Brief Answer to questions. (FIXME)
Rebase, Squash, Bisect, Patch
Overview
Teaching: 0 min
Exercises: 0 minQuestions
What are rebase, squash, bisect and patch?
Objectives
First learning objective. (FIXME)

Key Points
First key point. Brief Answer to questions. (FIXME)
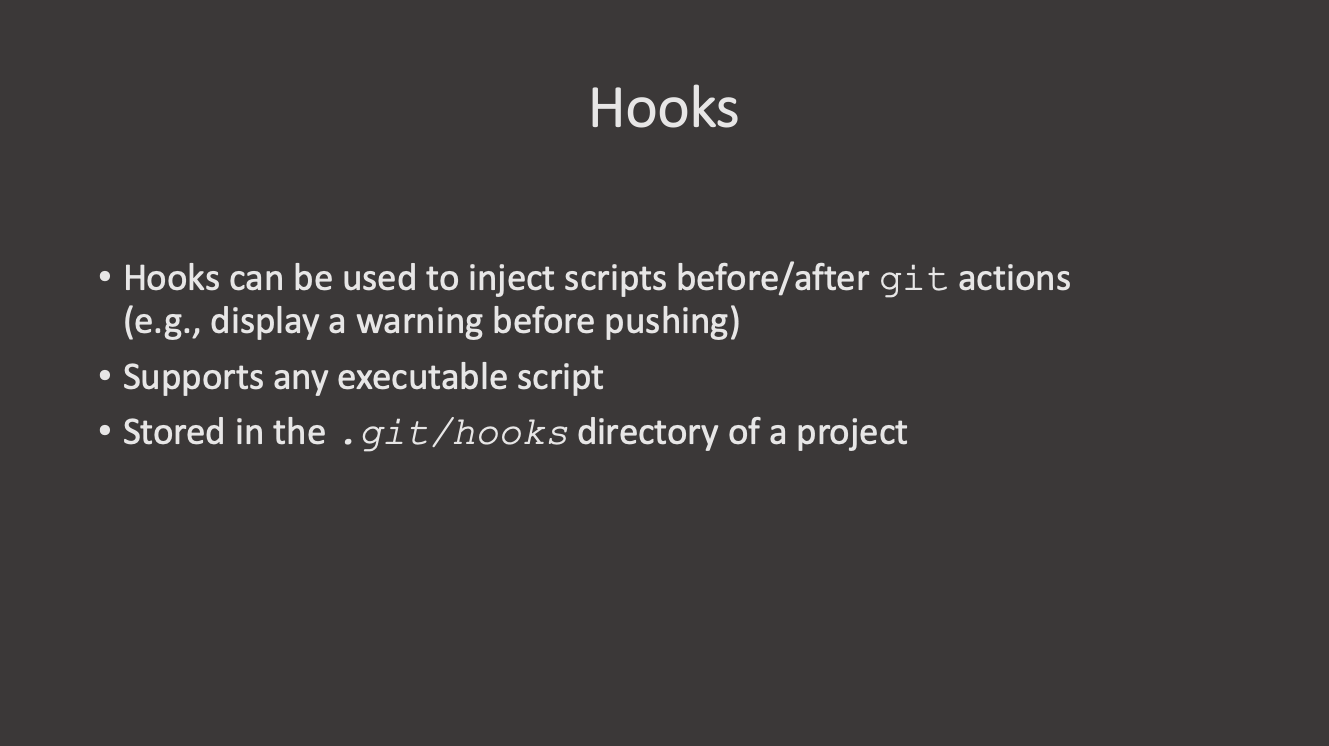
Hooks and Actions
Overview
Teaching: 0 min
Exercises: 0 minQuestions
How do I automate my work locally?
How do I add automations to GitHub?
Objectives
First learning objective. (FIXME)
Key Points
First key point. Brief Answer to questions. (FIXME)
Setting up the Command Prompt
Overview
Teaching: 0 min
Exercises: 0 minQuestions
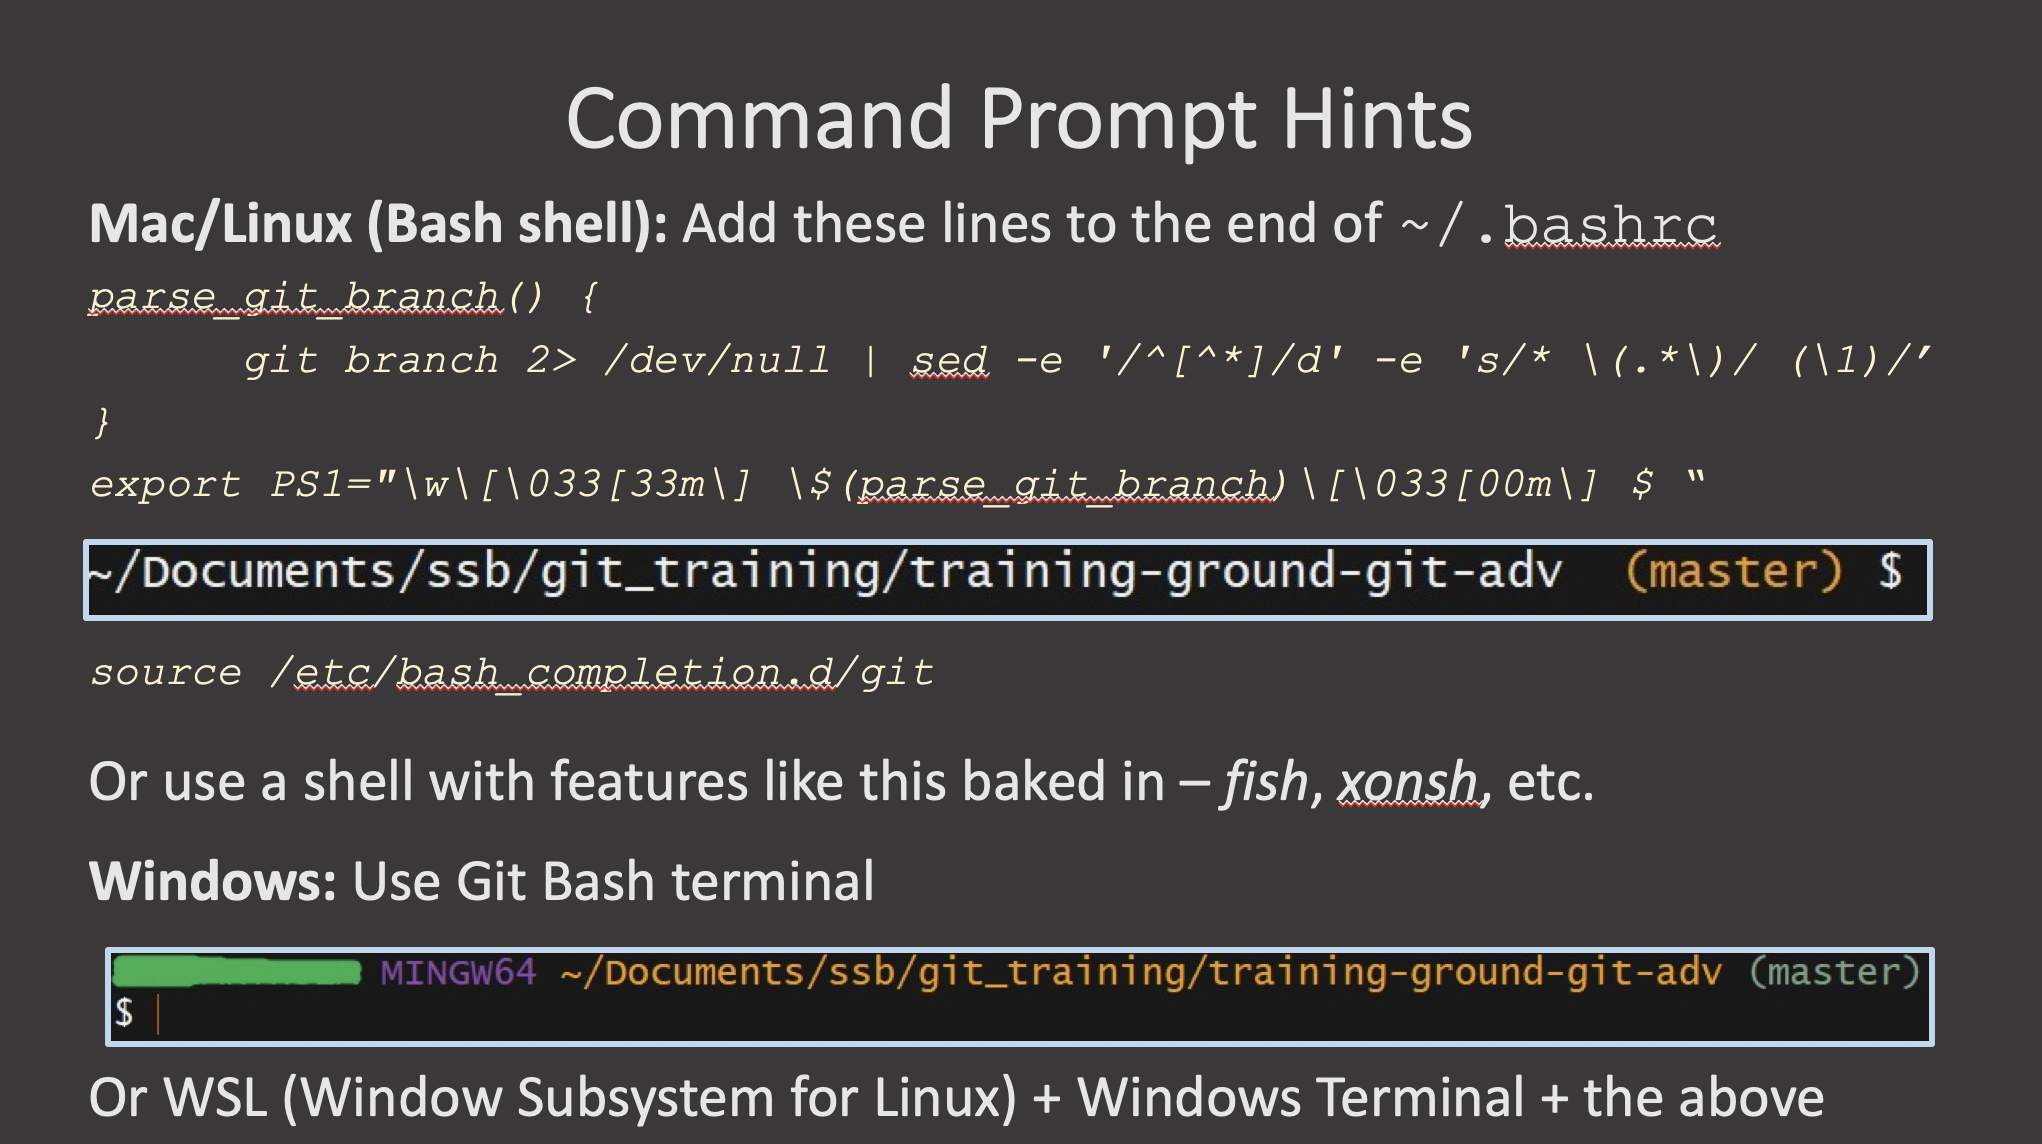
What are some other tools that will help my git workflow?
Objectives
First learning objective. (FIXME)

Key Points
First key point. Brief Answer to questions. (FIXME)