GitFlow
Overview
Teaching: 0 min
Exercises: 0 minQuestions
What are the common workflows of the GitFlow branching model?
Objectives
First learning objective. (FIXME)
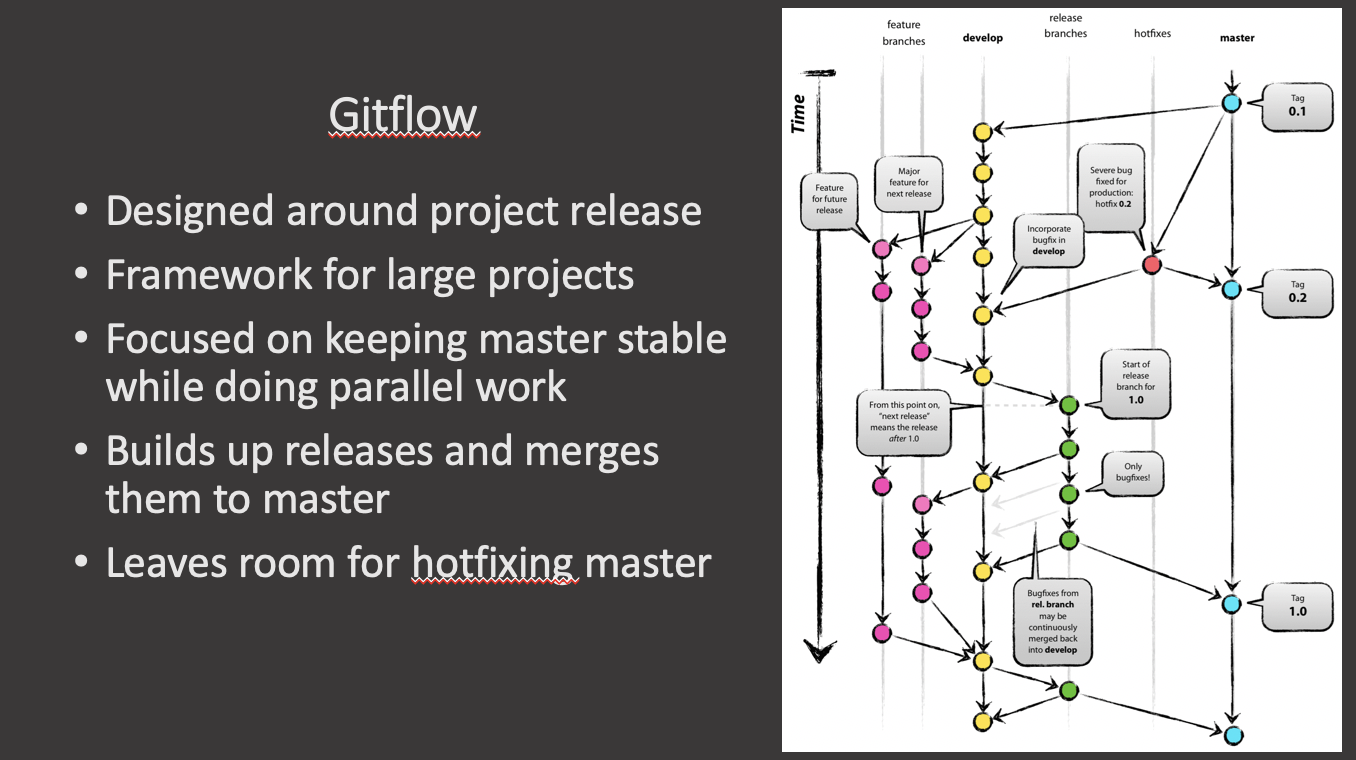
Considered to be a bit complicated and advanced for many of today’s projects, GitFlow enables parallel development where developers can work separately from the master branch on features where a feature branch is created from the master branch.
Afterwards, when changes are complete, the developer merges these changes back to the master branch for release.
This branching strategy consists of the following branches:
- Master
- Develop
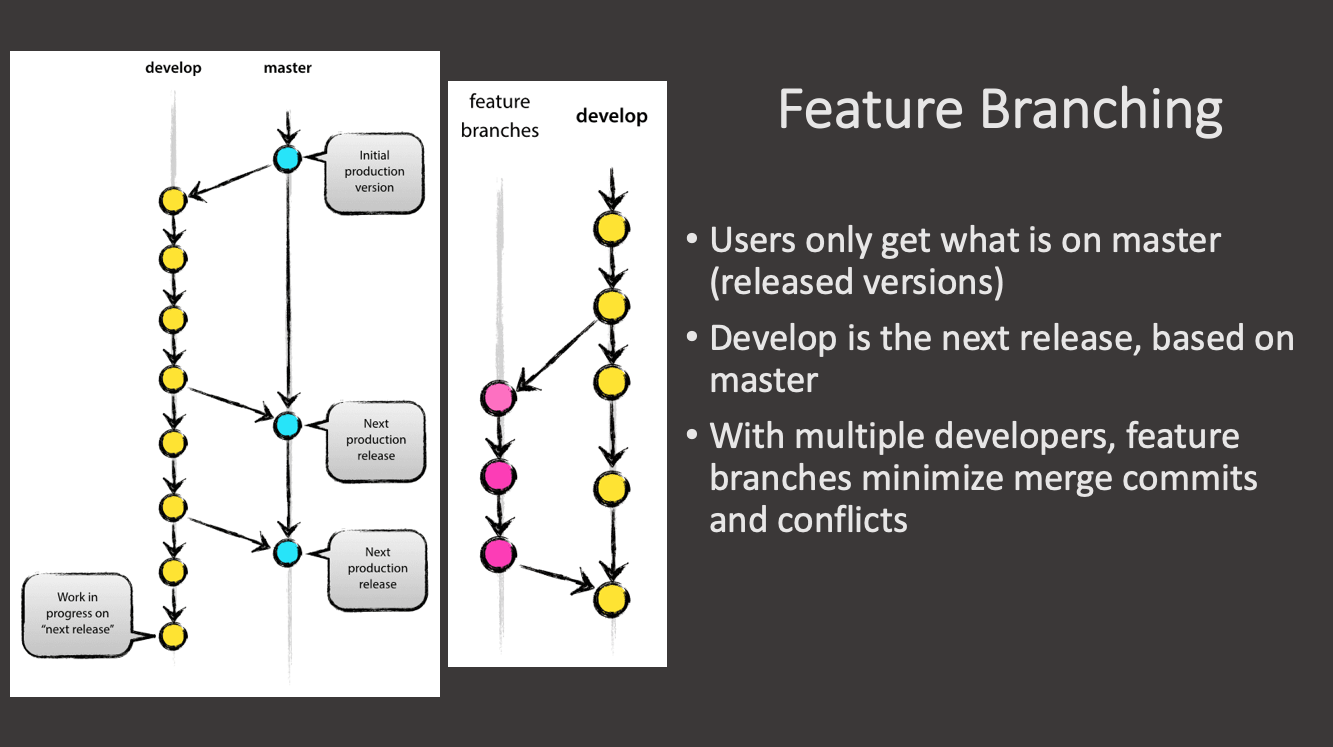
- Feature- to develop new features that branches off the develop branch
- Release- help prepare a new production release; usually branched from the develop branch and must be merged back to both develop and master
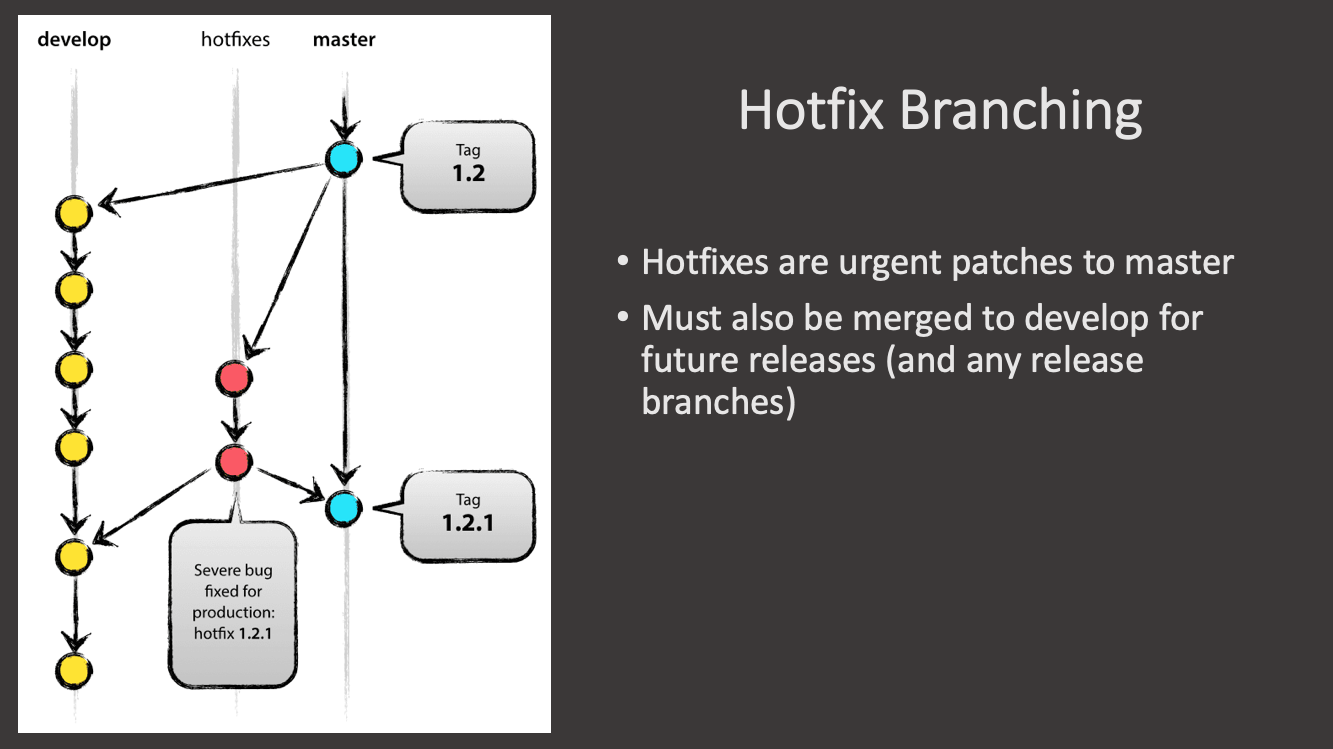
- Hotfix- also helps prepare for a release but unlike release branches, hotfix branches arise from a bug that has been discovered and must be resolved; it enables developers to keep working on their own changes on the develop branch while the bug is being fixed.
The main and develop branches are considered to be the main branches, with an infinite lifetime, while the rest are supporting branches that are meant to aid parallel development among developers, usually short-lived.
GitFlow pros and cons
Perhaps the most obvious benefit of this model is that it allows for parallel development to protect the production code so the main branch remains stable for release while developers work on separate branches.
Moreover, the various types of branches make it easier for developers to organize their work. This strategy contains separate and straightforward branches for specific purposes though for that reason it may become complicated for many use cases.
It is also ideal when handling multiple versions of the production code.
However, as more branches are added, they may become difficult to manage as developers merge their changes from the development branch to the main. Developers will first need to create the release branch then make sure any final work is also merged back into the development branch and then that release branch will need to be merged into the main branch.
In the event that changes are tested and the test fails, it would become increasingly difficult to figure out where the issue is exactly as developers are lost in a sea of commits.
Indeed, due to GitFlow’s complexity, it could slow down the development process and release cycle. In that sense, GitFlow is not an efficient approach for teams wanting to implement continuous integration and continuous delivery.
Exercise 1: Creating a Feature Branch
- First go into the repository directory and check the repository status. Make sure the status is clean and, if not, commit any changes.
Solution
cd advanced-git-training
git status
- Check out a new feature branch off the development branch.
Solution
git checkout -b myfeature upstream/develop
- Create a new file that will contain your feature, edit it and commit it:
Solution
git add coolstuff.txt
git commit -m "Add cool stuff."
Now you have a feature branch.
Exercise 2: Making Changes on the develop Branch
Now, while you were developing your feature, someone else merged their changes, otherstuff.txt in the develop branch. Let’s make those changes here by hand so we can then practice merging our coolfeature into the develop branch.
- Check out the
developbranch:Solution
git checkout develop
- Create a new file named, for example,
otherstuff.txt, edit it, add it and commit it to the develop branch:Solution
git add otherstuff.txt
git commot -m "Stuff from another feature."
Exercise 3: Finish Feature
Now we are going to merge the myfeature branch into develop. Make sure you are still on the develop branch by checking the status git status.
- Create a merge commit from the
myfeaturebranch:Solution
git merge --no-ff myfeature
-Delete the feature branch:
Solution
git branch -d myfeature
Finally, check the history again with git log and check the direcotry content with ls. Is your feature file here?
Gitflow Release Branching

Exercise 4: Gitflow Release
- First we need to create a release branch. Release branches should start from the
developbranch.Solution
git checkout -b release-1.0 develop
- The switch to the
mainbranch. We will merge the release branch intomain. Create a merge commit onmainfromrelease-1.0:Solution
git checkout main
git merge --no-ff release-1.0
- Now we can tag the release, push the tag out and delete the release branch:
Solution
git tag -a 1.0 -m "Version 1.0"
git push origin 1.0
git branch -d release-1.0
You can now check the Releases tab on GitHub to see your tagged release.
Gitflow Hotfix
Exercise 5: Gitflow Hotfix
Imagine we made a release but we realized that there is a bug in our cool feature in coolstuff.txt. How do we fix that? We make a hotfix on the code which we then merge into both main and develop and we tag a new hotfix release.
- First, create a hotfix branch off main, this is where our released code lives, we need to fix it:
Solution
git checkout -b hotfix-1.0.1 main
- Now, make some changes to
coolstuff.txt, add and commit it:Solution
git add coolstuff.txt
git commit -m "Cool hotfix"
- Switch back to the main branch and merge the commit:
Solution
git checkout main
git merge --no-ff hotfix-1.0.1
- Tag a new release and push it to GitHub:
Solution
git tag -a 1.0.1 -m "Version 1.0.1"
git push origin 1.0.1
- We also need to merge our change to
developso that it is propagated into the code that is the same as the released version:Solution
git checkout develop
git merge --no-ff hotfix-1.0.1
- Finally we can delete the hotfix branch:
Solution
git branch -d hotfix-1.0.1
Exercise 6: Gitflow Wrap-up
To wrap up the Gitflow workflow we want to make sure we have pushed all our develop and main changes to the remote repository.

- First, as always, check the status of your repository and make sure you are still on the
developbranch:Solution
git status
git branch
git tag
- Then push any changes from develop to the remote:
Solution
git push origin develop
- And do the same with the
mainbranch:Solution
git checkout main
git push origin main
https://www.flagship.io/git-branching-strategies/
Key Points
First key point. Brief Answer to questions. (FIXME)