Introduction to R and RStudio
Last updated on 2026-05-19 | Edit this page
Overview
Questions
- What is R and what is RStudio?
- How can I find my way around RStudio?
- How can I manage projects in R?
- How can I install packages?
- How can I interact with R?
Objectives
After completing this episode, participants should be able to…
- Create self-contained projects in RStudio
- Install additional packages using R code
- Manage packages
- Define a variable
- Assign data to a variable
- Call functions
Project management in RStudio
RStudio is an integrated development environment (IDE), which means that it provides a user-friendly interface for the R software. For RStudio to work, you need to have R installed on your computer. However, R is integrated into RStudio, so you never actually have to open R software.
RStudio provides a useful feature: creating projects. A project is a self-contained working space (i.e., working directory), to which R will refer to when looking for and saving files. You can create a project in an existing directory or in a new one.
Creating RStudio Project
We’re going to create a project in RStudio in a new directory. To create a project, go to:
FileNew ProjectNew directory- Browse to a location that you will easily find on your laptop and
name the directory
data-carpentry Create project
Organising the working directory
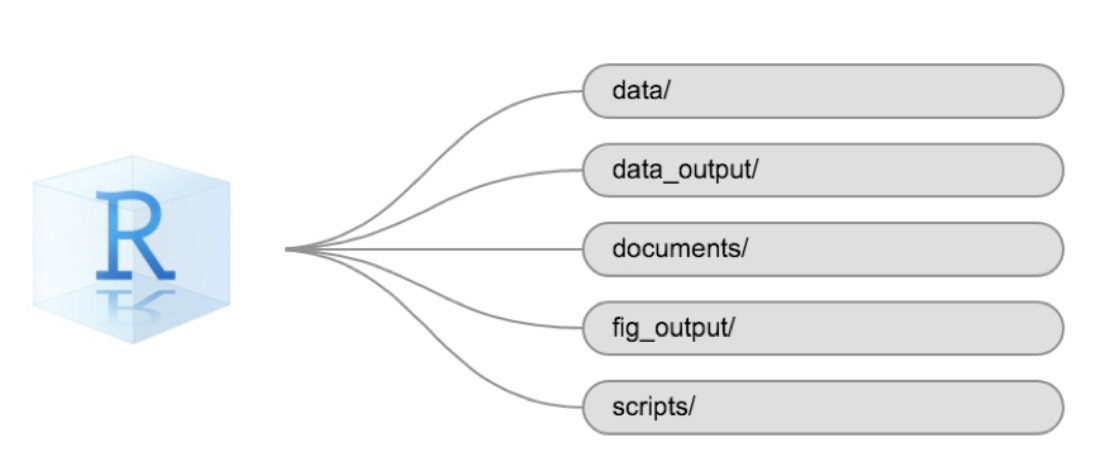
Creating an RStudio project is a good first step towards good project management. However, most of the time it is a good idea to organize the working space further. This is one suggestion of how your R project can look like. Let’s go ahead and create the sub-folders:
-
data/- should be where your raw data is. READ ONLY -
data_output/- should be where your data output is saved READ AND WRITE -
documents/- all the documentation associated with the project -
fig_output/- your figure outputs go here WRITE ONLY -
scripts/- all your code goes here READ AND WRITE
You can create these folders as you would any other folders on your laptop, but R and RStudio offer handy ways to do it directly in your RStudio session.
You can use the RStudio interface to create a folder in your project by going to the lower-bottom pane, Files tab, and clicking on the Folder icon. A dialog box will appear, allowing you typing a name of a folder you want to create.
An alternative solution is to create the folders using the R command
dir.create(). In the console type:
R
dir.create("data")
dir.create("data_output")
dir.create("documents")
dir.create("fig_output")
dir.create("scripts")
In interest of time, focus on one way of creating the folders. You can showcase an alternative method with just one example.
Once you have finished, ask the participants if they have managed to create an R Project and get the same folder structure. To do this, use green and red stickers.
This will become important, as we use relative paths together with
the here package to read and write objects.
Two main ways to interact with R
There are two main ways to interact with R through RStudio:
- test and play environment within the interactive R console
- write and save an R script (
.Rfile)
The console and script windows
When you open the RStudio or create the Rstudio project, you will see Console window on the left by default. Once you create an R script, it is placed in the upper left pane. The Console is moved to the bottom left pane.
Each of the modes o interactions has its advantages and drawbacks.
| Console | R script | |
|---|---|---|
| Pros | Immediate results | Complete record of your work |
| Cons | Work lost once you close RStudio | Messy if you just want to print things out |
Creating a script
During the workshop, we will mostly use an .R script to
have a full documentation of what has been written. This way we will
also be able to reproduce the results. Let’s create one now and save it
in the scripts directory.
FileNew FileR Script- A new
Untitledscript will appear in the source pane - Save it using the floppy disc icon
- Select the
scripts/folder as the file location - Name the script
intro-to-r.R
Running the code
Note that all code written in the script can be also executed at once
in the
interactive console. We will now learn how to run the code both in the
console and in the script.
- In the Console you run the code by pressing Enter at the end of the line
- In the R script there are two way to execute the code:
- You can use the
Runbutton on the top right of the script window. - Alternatively, you can use a keyboard shortcut: Ctrl + Enter on Windows/Linux or Command + Return on Mac.
- You can use the
In both cases, the active line (the line where your cursor is placed) or a highlighted snippet of code will be executed. A common source of error in scripts, such as a previously created object not found, is code that has not been executed in previous lines: make sure that all code has been executed as described above. To run all lines before the active line, you can use the keyboard shortcut Ctrl + Alt + B on Windows/Linux or Command + option + B on Mac.
Escaping
The console shows it’s ready to get new commands with the
> sign. It will show the + sign if it still
requires input for the command to be executed.
Sometimes you don’t know what is missing, you change your mind and want to run something else, or your code is running too long and you just want it to stop. The way to stop it is to press Esc.
Packages
A great power of R lays in packages: add-on sets of
functions that are build by the community and once they go
through a quality process they are available to download from a
repository called CRAN. They need to be explicitly
activated. Now, we will be using the tidyverse package,
which is actually a collection of useful packages. Another package that
we will use is here.
You were asked to install the tidyverse package in
preparation to the workshop. You need to install a package only once, so
you won’t have to do it again. We still need to install the
here package. To do so, go to the script and run:
R
install.packages("here")
Is tidyverse installed?
If you are not sure if you have the tidyverse package
installed, you can check it in the Packages tab in the
bottom right pane. In the search box start typing
‘tidyverse’ and see if it appears in the list of installed
packages. If not, you will need to install it by writing in the
script:
R
install.packages("tidyverse")
Commenting your code
Now we have a bit of an issue with our script. As mentioned, the
packages need to be installed only once, but now, they will be installed
each time we run the script, which can take a lot of time if we’re
installing a large package like tidyverse.
To keep track of you installing the packages, without executing it,
you can use a comment. In R, anything that is written after
a has sign #, is ignored in execution. Thanks to this
feature, you can annotate your code. Let’s adapt our script by changing
the first lines into comments:
R
# install.packages('here')
# install.packages('tidyverse')
Installing packages is not sufficient to work with them. You will
need to load them each time you want to use them. To do that you use the
library() command:
R
# Load packages
library(tidyverse)
library(here)
Handling paths
You have created a project which is your working directory, and a few
sub-folders, that will help you organise your project better. But now,
each time you will save or retrieve a file from those folders, you will
need to specify the path from the folder you are in (most likely the
scripts/ folder) to those files.
That can become complicated and might cause a reproducibility problem, if the person using your code (including future you) is working in a different sub-folder.
We will use the here() package to tackle this issue.
This package converts relative paths from the root (working directory)
of your project to absolute paths (the exact location on your computer).
For instance, instead of writing out the full path like
C:\Users\YourName\Documents\r-geospatial-urban\data\file.csv
or ~/Documents/r-geospatial-urban/data/file.csv, you can
use the here() function to create a path relative to your
project’s root directory. This makes your code more portable and
reproducible, as it doesn’t depend on a specific location of your
project on your computer.
This might be confusing, so let’s see how it works. We will use the
here() function from the here package. In the
console, we write:
R
here()
here("data")
You all probably have something different printed out. And this is
fine, because here adapts to your computer’s specific
situation.
Download files
We still need to download data for the first part of the workshop.
You can do it with the function download.file(). We will
save it in the data/ folder, where the raw
data should go. In the script, we will write:
R
# Download the data
download.file(
  "https://bit.ly/geospatial_data",
  here("data", "gapminder-data.csv")
)
The data we just downloaded is data about country statistics, containing information on, for instance, GDP and life-expectancy. We will work with this data later in the lesson
Importing data into R
Three of the most common ways of importing data in R are:
- loading a package with pre-installed data;
- downloading data from a URL;
- reading a file from your computer.
For larger datasets, database connections or API requests are also possible. We will not cover these in the workshop.
Introduction to R
You can use R as calculator. You can for example write:
R
1 + 100
1 * 100
1 / 100
Variables and assignment
However, what’s more useful is that in R we can store values, that is
assign them to objects and use them whenever we need
to. We use the assignment operator <-, like this:
R
x <- 1 / 40
Notice that assignment does not print a value. Instead, we’ve stored
it for later in something called a variable. The x variable
now contains the value 0.025:
R
x
Look for the Environment tab in the upper right pane of
RStudio. You will see that x and its value have appeared in
the list of Values. Our variable x can be used in place of
a number in any calculation that expects a number, e.g., when
calculating a square root:
R
sqrt(x)
Variables can be also reassigned. This means that we can assign a new
value to variable x:
R
x <- 100
x
You can use one variable to create a new one:
R
y <- sqrt(x) # you can use the value stored in object x to create y
y
- Use RStudio to write and run R programs.
- Use
install.packages()to install packages. - Use
library()to load packages.