Continuous Integration for Automated Testing
Overview
Teaching: 45 min
Exercises: 0 minQuestions
How can I automate the testing of my repository’s code in a way that scales well?
What can I do to make testing across multiple platforms easier?
Objectives
Describe the benefits of using Continuous Integration for further automation of testing
Enable GitHub Actions Continuous Integration for public open source repositories
Use continuous integration to automatically run unit tests and code coverage when changes are committed to a version control repository
Use a build matrix to specify combinations of operating systems and Python versions to run tests over
Introduction
So far we have been manually running our tests as we require. Once we have made a change, or added a new feature with accompanying tests, we can re-run our tests, giving ourselves (and others who wish to run them) increased confidence that everything is working as expected. Now we are going to take further advantage of automation in a way that helps testing scale across a development team with very little overhead, using Continuous Integration.
What is Continuous Integration?
The automated testing we have done so far only takes into account the state of the repository we have on our own machines. In a software project involving multiple developers working and pushing changes on a repository, it would be great to know holistically how all these changes are affecting our codebase without everyone having to pull down all the changes and test them. If we also take into account the testing required on different target user platforms for our software and the changes being made to many repository branches, the effort required to conduct testing at this scale can quickly become intractable for a research project to sustain.
Continuous Integration (CI) aims to reduce this burden by further automation, and automation - wherever possible - helps us to reduce errors and makes predictable processes more efficient. The idea is that when a new change is committed to a repository, CI clones the repository, builds it if necessary, and runs any tests. Once complete, it presents a report to let you see what happened.
There are many CI infrastructures and services, free and paid for, and subject to change as they evolve their features. We will be looking at GitHub Actions - which unsurprisingly is available as part of GitHub.
Continuous Integration with GitHub Actions
A Quick Look at YAML
YAML is a text format used by GitHub Action workflow files. It is also increasingly used for configuration files and storing other types of data, so it is worth taking a bit of time looking into this file format.
YAML (a recursive acronym which stands for “YAML Ain’t Markup Language”) is a language designed to be human readable. A few basic things you need to know about YAML to get started with GitHub Actions are key-value pairs, arrays, maps and multi-line strings.
So firstly, YAML files are essentially made up of key-value pairs,
in the form key: value, for example:
name: Kilimanjaro
height_metres: 5892
first_scaled_by: Hans Meyer
In general, you do not need quotes for strings,
but you can use them when you want to explicitly distinguish between numbers and strings,
e.g. height_metres: "5892" would be a string,
but in the above example it is an integer.
It turns out Hans Meyer is not the only first ascender of Kilimanjaro,
so one way to add this person as another value to this key is by using YAML arrays,
like this:
first_scaled_by:
- Hans Meyer
- Ludwig Purtscheller
An alternative to this format for arrays is the following, which would have the same meaning:
first_scaled_by: [Hans Meyer, Ludwig Purtscheller]
If we wanted to express more information for one of these values we could use a feature known as maps (dictionaries/hashes), which allow us to define nested, hierarchical data structures, e.g.
...
height:
  value: 5892
  unit: metres
  measured:
    year: 2008
    by: Kilimanjaro 2008 Precise Height Measurement Expedition
...
So here, height itself is made up of three keys value, unit, and measured,
with the last of these being another nested key with the keys year and by.
Note the convention of using two spaces for tabs, instead of Python’s four.
We can also combine maps and arrays to describe more complex data. Let us say we want to add more detail to our list of initial ascenders:
...
first_scaled_by:
- name: Hans Meyer
  date_of_birth: 22-03-1858
  nationality: German
- name: Ludwig Purtscheller
  date_of_birth: 22-03-1858
  nationality: Austrian
So here we have a YAML array of our two mountaineers, each with additional keys offering more information.
GitHub Actions also makes use of | symbol to indicate a multi-line string
that preserves new lines. For example:
shakespeare_couplet: |
  Good night, good night. Parting is such sweet sorrow
  That I shall say good night till it be morrow.
They key shakespeare_couplet would hold the full two line string,
preserving the new line after sorrow.
As we will see shortly, GitHub Actions workflows will use all of these.
Defining Our Workflow
With a GitHub repository there is a way we can set up CI
to run our tests automatically when we commit changes.
Let us do this now by adding a new file to our repository whilst on the test-suite branch.
First, create the new directories .github/workflows:
$ mkdir -p .github/workflows
This directory is used specifically for GitHub Actions,
allowing us to specify any number of workflows that can be run under a variety of conditions,
which is also written using YAML.
So let us add a new YAML file called main.yml
(note its extension is .yml without the a)
within the new .github/workflows directory:
name: CI

# We can specify which Github events will trigger a CI build
on: push

# now define a single job 'build' (but could define more)
jobs:

  build:

    # we can also specify the OS to run tests on
    runs-on: ubuntu-latest

    # a job is a seq of steps
    steps:

    # Next we need to checkout out repository, and set up Python
    # A 'name' is just an optional label shown in the log - helpful to clarify progress - and can be anything
    - name: Checkout repository
      uses: actions/checkout@v4

    - name: Set up Python 3.11
      uses: actions/setup-python@v5
      with:
        python-version: "3.11"

    - name: Install Python dependencies
      run: |
        python3 -m pip install --upgrade pip
        python3 -m pip install -r requirements.txt

    - name: Test with PyTest
      run: |
        python3 -m pytest --cov=inflammation.models tests/test_models.py
Note: be sure to create this file as main.yml
within the newly created .github/workflows directory,
or it will not work!
So as well as giving our workflow a name - CI -
we indicate with on that we want this workflow to run when we push commits to our repository.
The workflow itself is made of a single job named build,
and we could define any number of jobs after this one if we wanted,
and each one would run in parallel.
Next, we define what our build job will do.
With runs-on we first state which operating systems we want to use,
in this case just Ubuntu for now.
We will be looking at ways we can scale this up to testing on more systems later.
Lastly, we define the steps that our job will undertake in turn,
to set up the job’s environment and run our tests.
You can think of the job’s environment initially as a blank slate:
much like a freshly installed machine (albeit virtual) with very little installed on it,
we need to prepare it with what it needs to be able to run our tests.
Each of these steps are:
- Checkout repository for the job:
usesindicates that want to use a GitHub Action calledcheckoutthat does this - Set up Python version:
here we use the
setup-pythonAction, indicating that we want Python version 3.11. Note we specify the version within quotes, to ensure that this is interpreted as a complete string. Otherwise, if we wanted to test against for example Python 3.10, by specifying3.10without the quotes, it would be interpreted as the number3.1which - although it is the same number as3.10- would be interpreted as the wrong version! - Install latest version of pip, dependencies, and our inflammation package:
In order to locally install our
inflammationpackage it is good practice to upgrade the version of pip that is present first, then we use pip to install our package dependencies. Once installed, we can usepython3 -m pip install -e .as before to install our own package. We userunhere to run theses commands in the CI shell environment - Test with PyTest: lastly, we run
python3 -m pytest, with the same arguments we used manually before
What about other Actions?
Our workflow here uses standard GitHub Actions (indicated by
actions/*). Beyond the standard set of actions, others are available via the GitHub Marketplace. It contains many third-party actions (as well as apps) that you can use with GitHub for many tasks across many programming languages, particularly for setting up environments for running tests, code analysis and other tools, setting up and using infrastructure (for things like Docker or Amazon’s AWS cloud), or even managing repository issues. You can even contribute your own.
Triggering a Build on GitHub Actions
Now if we commit and push this change a CI run will be triggered:
$ git add .github
$ git commit -m "Add GitHub Actions configuration"
$ git push origin test-suite
Since we are only committing the GitHub Actions configuration file
to the test-suite branch for the moment,
only the contents of this branch will be used for CI.
We can pass this file upstream into other branches (i.e. via merges) when we are happy it works,
which will then allow the process to run automatically on these other branches.
This again highlights the usefulness of the feature-branch model -
we can work in isolation on a feature until it is ready to be passed upstream
without disrupting development on other branches,
and in the case of CI,
we are starting to see its scaling benefits across a larger scale development team
working across potentially many branches.
Checking Build Progress and Reports
Handily, we can see the progress of the build from our repository on GitHub
by selecting the test-suite branch from the dropdown menu
(which currently says main),
and then selecting commits
(located just above the code directory listing on the right,
alongside the last commit message and a small image of a timer).
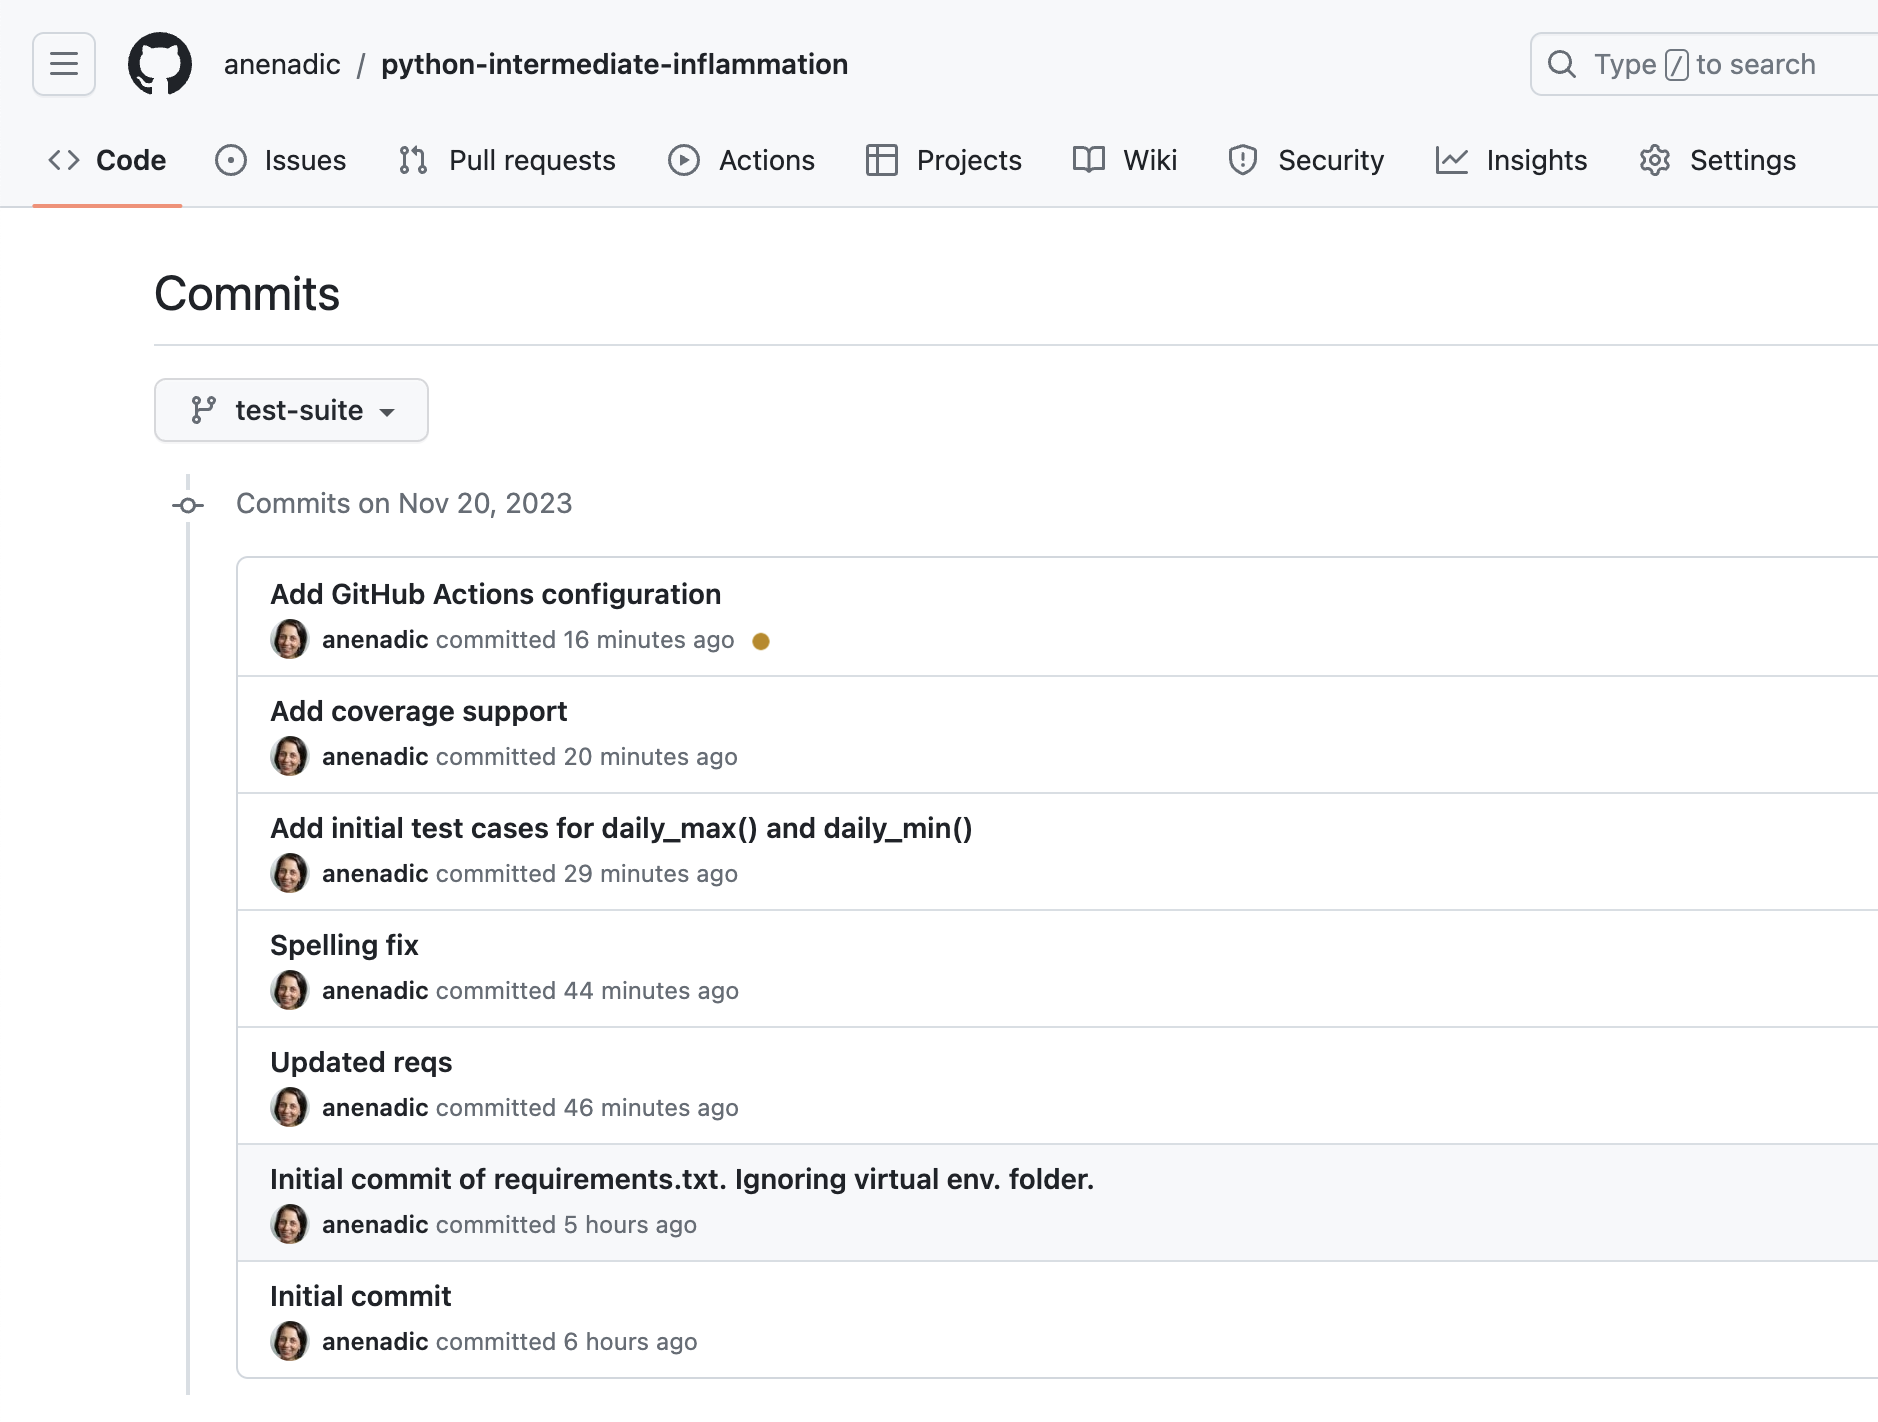
You’ll see a list of commits for this branch,
and likely see an orange marker next to the latest commit
(clicking on it yields Some checks haven’t completed yet)
meaning the build is still in progress.
This is a useful view, as over time, it will give you a history of commits,
who did them, and whether the commit resulted in a successful build or not.
Hopefully after a while, the marker will turn into a green tick indicating a successful build.
Clicking it gives you even more information about the build,
and selecting Details link takes you to a complete log of the build and its output.
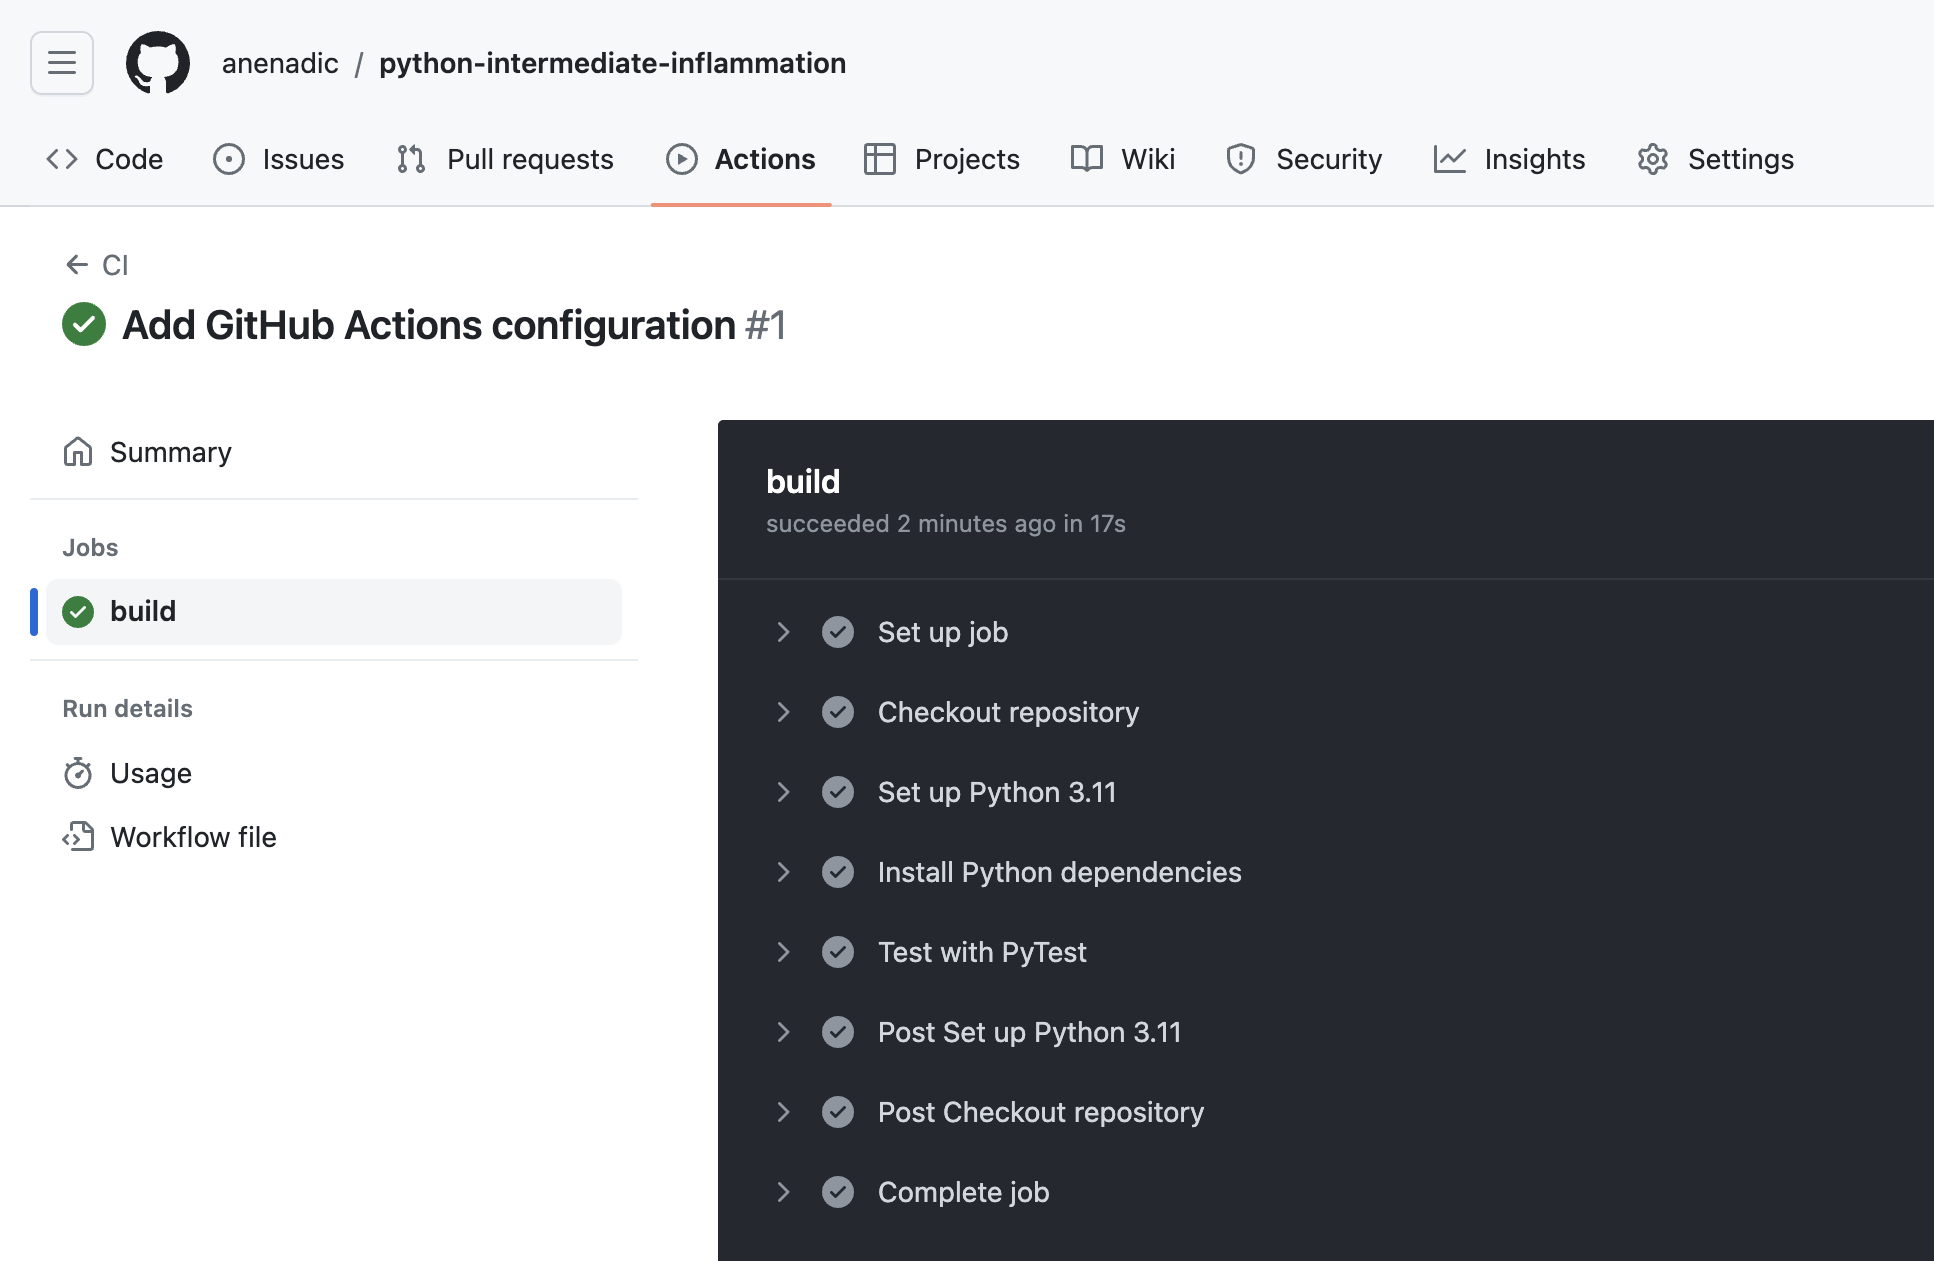
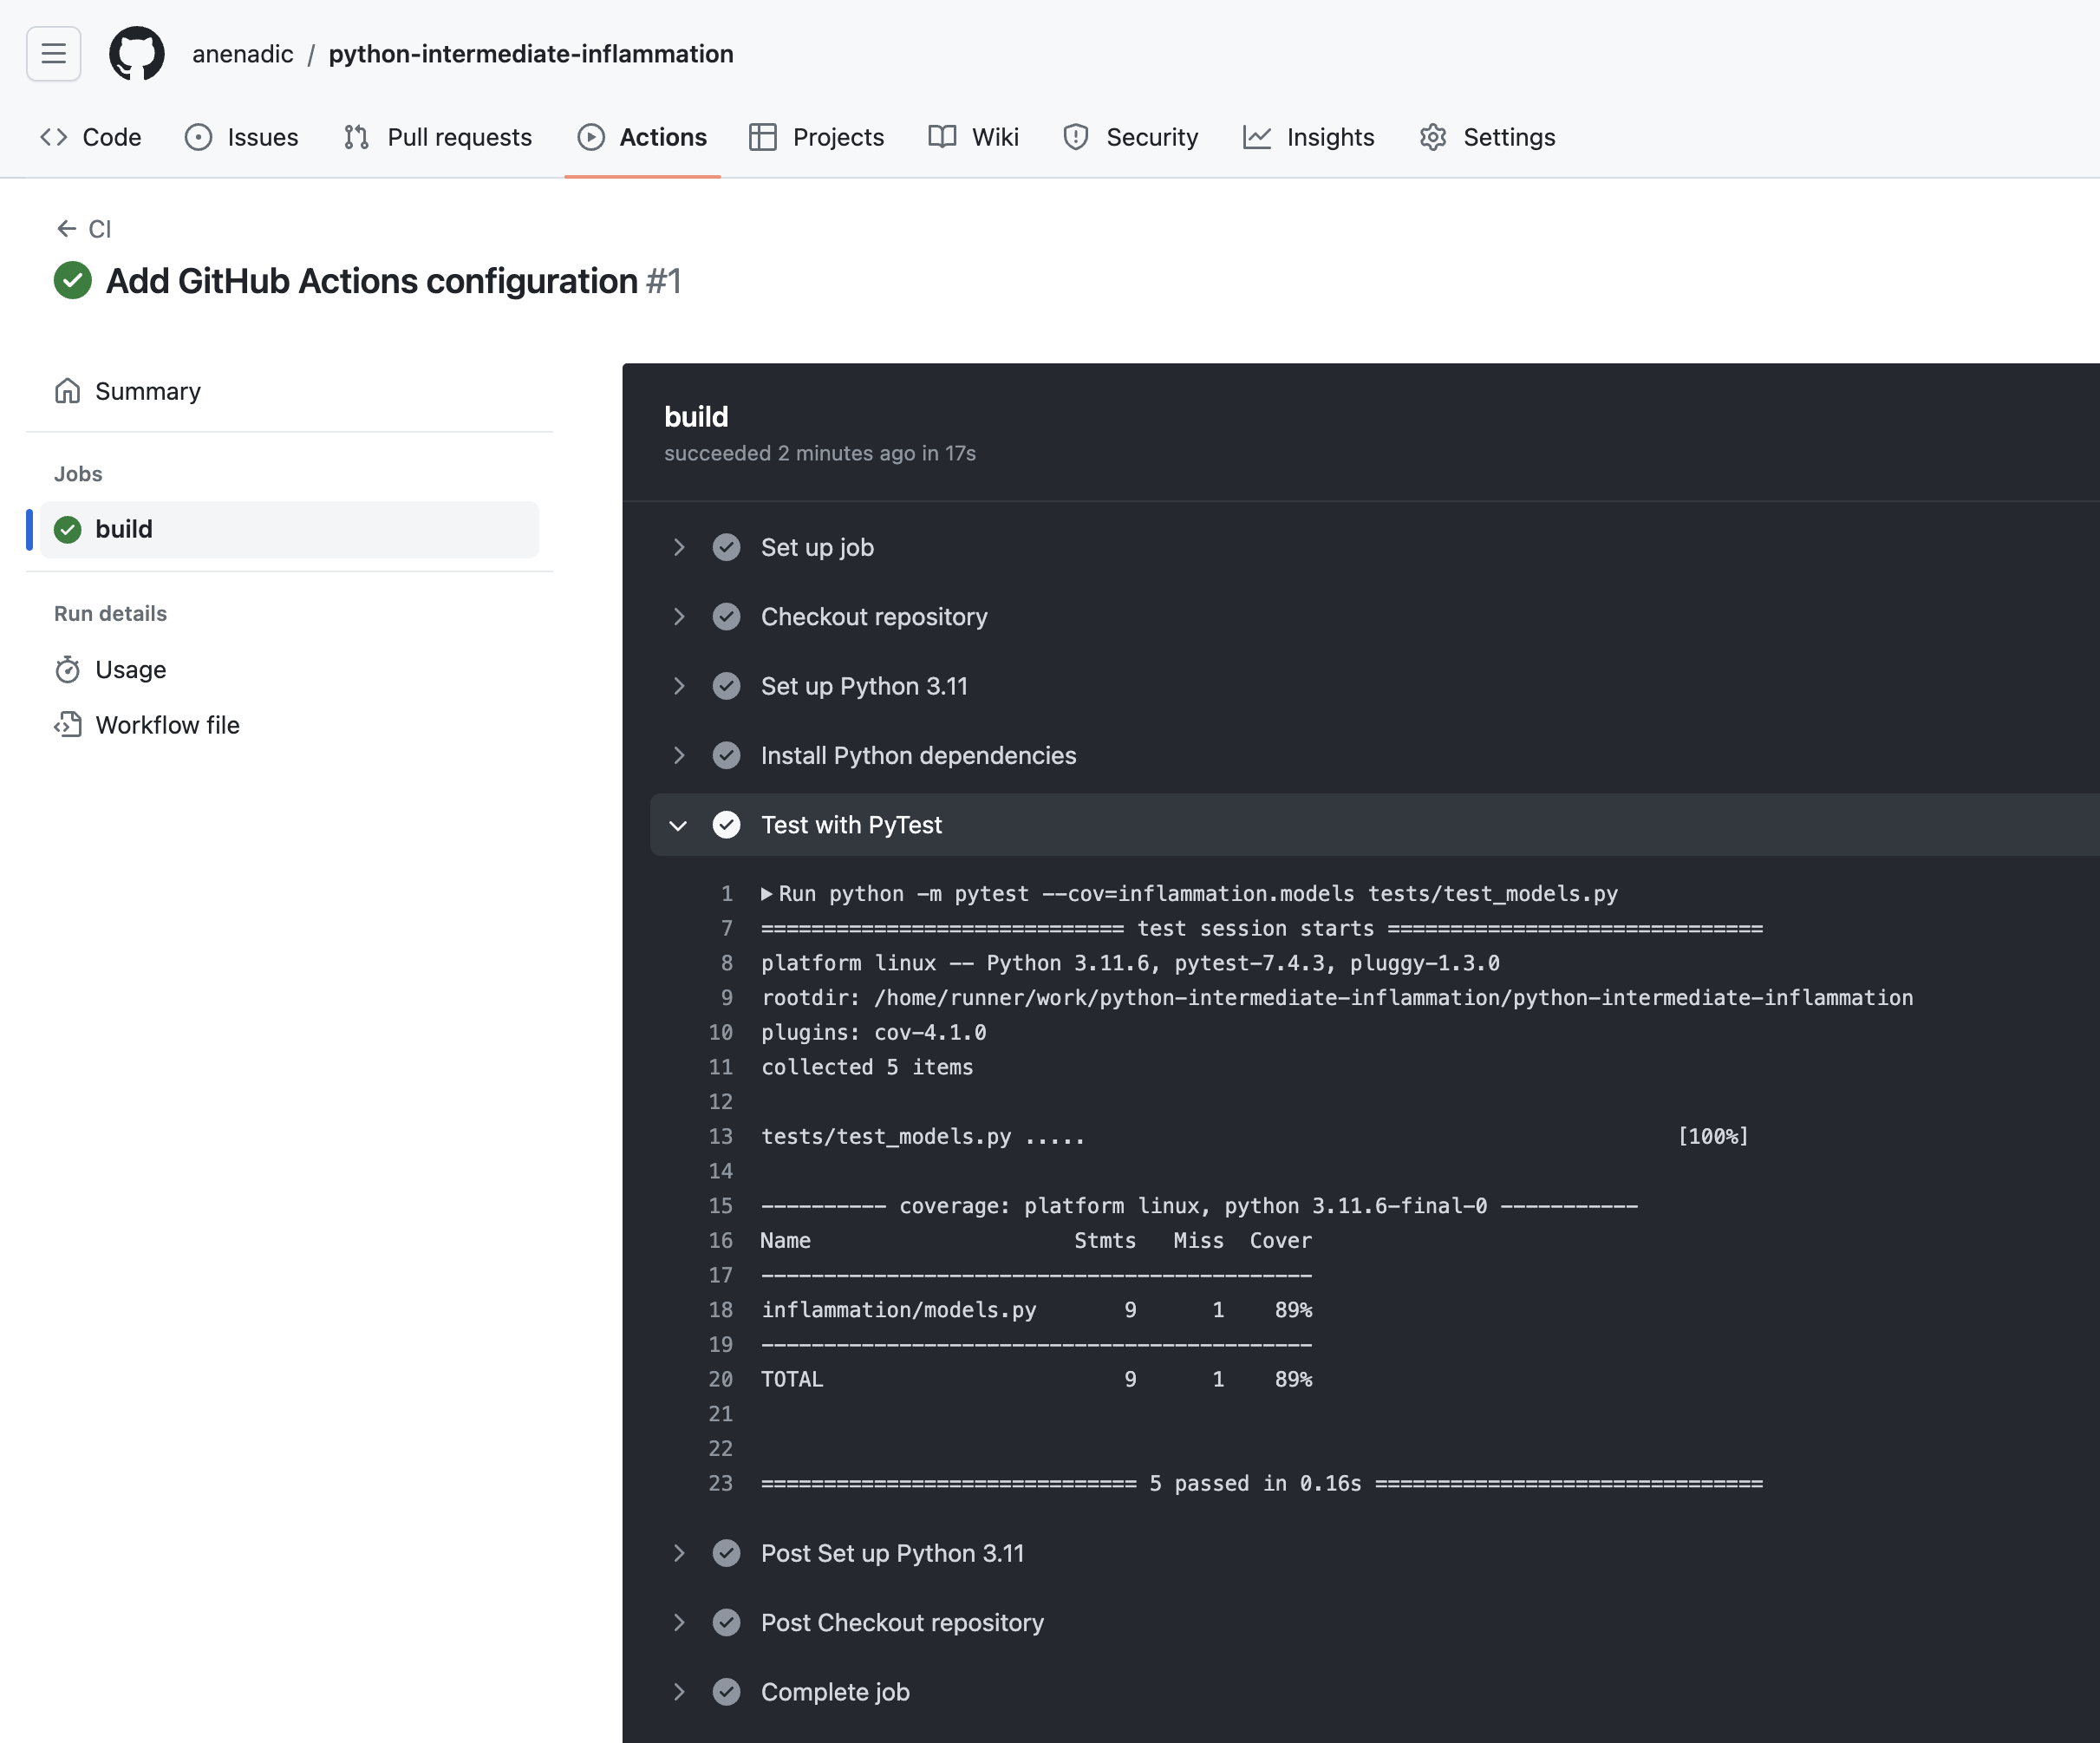
The logs are actually truncated; selecting the arrows next to the entries -
which are the name labels we specified in the main.yml file -
will expand them with more detail, including the output from the actions performed.
GitHub Actions offers these continuous integration features as a completely free service for public repositories, and supplies 2000 build minutes a month on as many private repositories that you like. Paid levels are available too.
Scaling Up Testing Using Build Matrices
Now we have our CI configured and building, we can use a feature called build matrices which really shows the value of using CI to test at scale.
Suppose the intended users of our software use either Ubuntu, Mac OS, or Windows, and either have Python version 3.10 or 3.11 installed, and we want to support all of these. Assuming we have a suitable test suite, it would take a considerable amount of time to set up testing platforms to run our tests across all these platform combinations. Fortunately, CI can do the hard work for us very easily.
Using a build matrix we can specify testing environments and parameters (such as operating system, Python version, etc.) and new jobs will be created that run our tests for each permutation of these.
Let us see how this is done using GitHub Actions.
To support this, we define a strategy as
a matrix of operating systems and Python versions within build.
We then use matrix.os and matrix.python-version to reference these configuration possibilities
instead of using hardcoded values -
replacing the runs-on and python-version parameters
to refer to the values from the matrix.
So, our .github/workflows/main.yml should look like the following:
# Same key-value pairs as in "Defining Our Workflow" section
name: CI
on: push
jobs:
  build:

    # Here we add the matrices definition:
    strategy:
      matrix:
        os: ["ubuntu-latest", "macos-latest", "windows-latest"]
        python-version: ["3.10", "3.11"]

    # Here we add the reference to the os matrix values
    runs-on: ${{ matrix.os }}

    # Same key-value pairs as in "Defining Our Workflow" section
    steps:

    - name: Checkout repository
      uses: actions/checkout@v4

    - name: Set up Python
      uses: actions/setup-python@v5
      with:
        # Here we add the reference to the python-version matrix values
        python-version: ${{ matrix.python-version }}
    # Same steps as in "Defining Our Workflow" section
    - name: Install Python dependencies
      run: |
        python3 -m pip install --upgrade pip
        python3 -m pip install -r requirements.txt
    - name: Test with PyTest
      run: |
        python3 -m pytest --cov=catchment.models tests/test_models.py
The ${{ }} are used
as a means to reference configuration values from the matrix.
This way, every possible permutation of Python versions 3.10 and 3.11
with the latest versions of Ubuntu, Mac OS and Windows operating systems
will be tested and we can expect 6 build jobs in total.
Let us commit and push this change and see what happens:
$ git add .github/workflows/main.yml
$ git commit -m "Add GA build matrix for os and Python version"
$ git push origin test-suite
If we go to our GitHub build now, we can see that a new job has been created for each permutation.
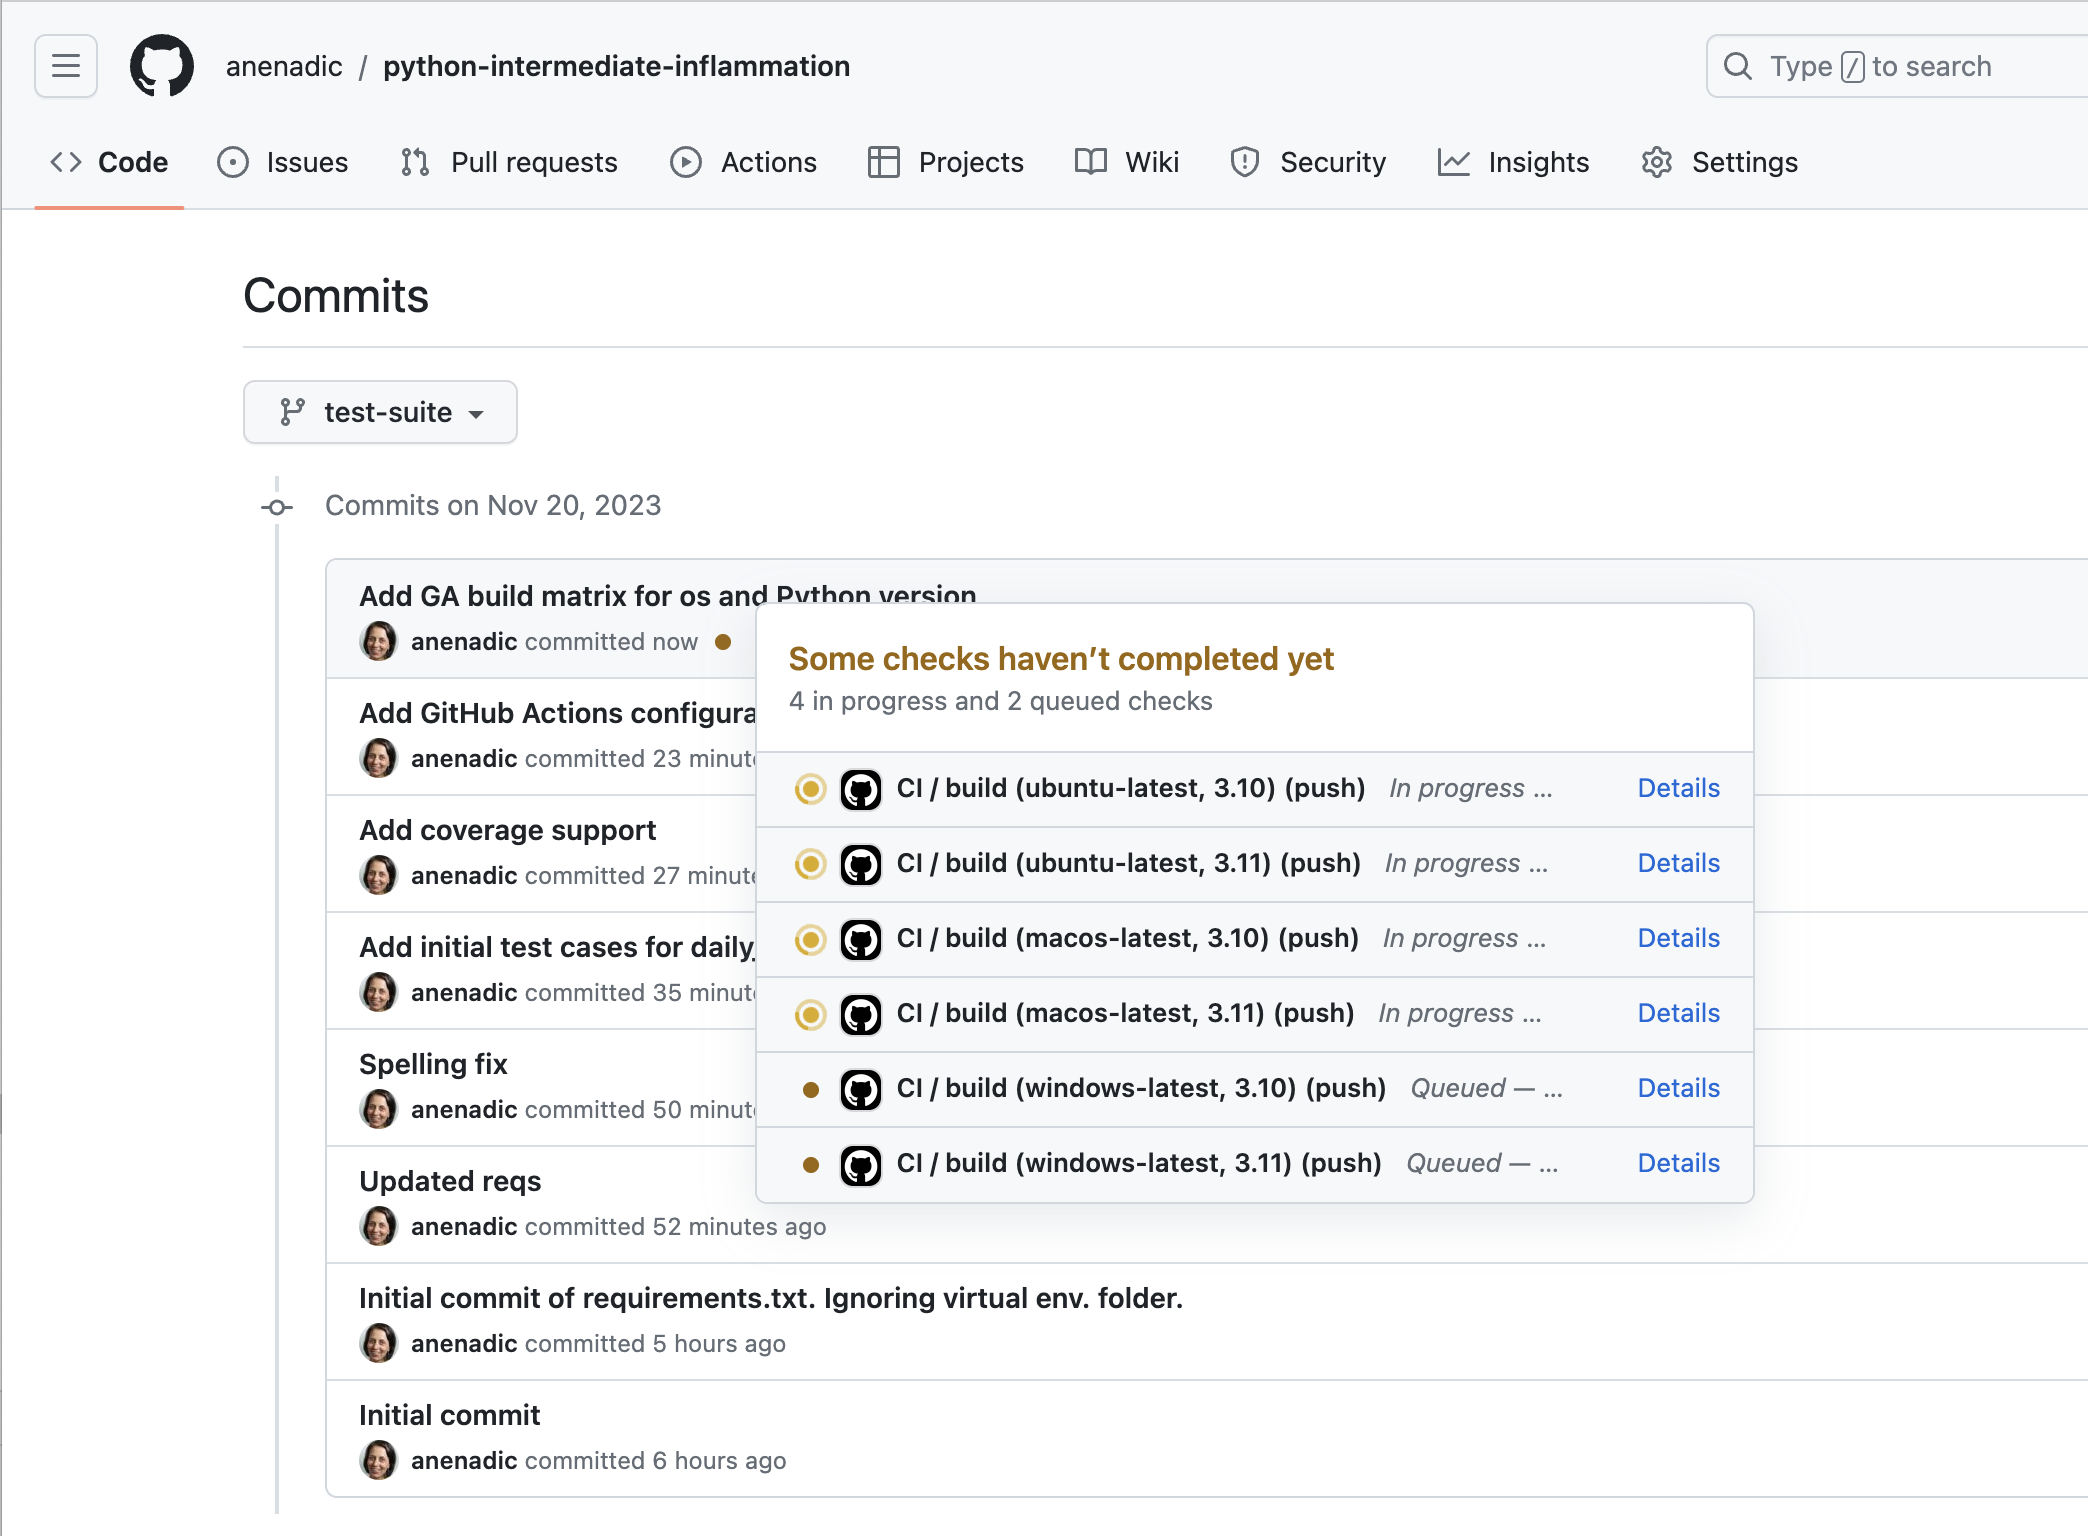
Note all jobs running in parallel (up to the limit allowed by our account) which potentially saves us a lot of time waiting for testing results. Overall, this approach allows us to massively scale our automated testing across platforms we wish to test.
Failed CI Builds
A CI build can fail when, e.g. a used Python package no longer supports a particular version of Python indicated in a GitHub Actions CI build matrix. In this case, the solution is either to upgrade the Python version in the build matrix (when possible) or downgrade the package version (and not use the latest one like we have been doing in this course).
Also note that, if one job fails in the build for any reason - all subsequent jobs will get cancelled because of the default behavior of GitHub Actions. From GitHub’s documentation:
“GitHub will cancel all in-progress and queued jobs in the matrix if any job in the matrix fails.”
This behaviour can be controlled by changing the value of the
fail-fastproperty:... strategy: fail-fast: false matrix: ...
Key Points
Continuous Integration can run tests automatically to verify changes as code develops in our repository.
CI builds are typically triggered by commits pushed to a repository.
We need to write a configuration file to inform a CI service what to do for a build.
We can specify a build matrix to specify multiple platforms and programming language versions to test against
Builds can be enabled and configured separately for each branch.
We can run - and get reports from - different CI infrastructure builds simultaneously.