Introduction
Overview
Teaching: 0 min
Exercises: 0 minQuestions
Key question: What is LaTeX used for?
Key question: How can I create a new typeset document?
Objectives
First learning objective. How to create a new LaTeX project in Overleaf.
Second learning objective. Become familiar with the Overleaf ecosystem.
Third learning objective. Learn what the minimum requirements for a LaTeX document are.
Fourth learning objective. Be able to identify an element’s role in a LaTeX document.
What is LaTeX
LaTeX is a typesetting language, useful for combining text with mathematical equations, figures, tables, and citations, among other things.
LaTeX is written like a mark-up language, meaning that formatting (including bold text, bullet points, and changes in font size) is indicated by the use of commands, special characters, or environments.
In order to produce the actual document, this mark-up text must be compiled. Errors in the mark-up can either be non-fatal, meaning the document will compile with some warnings; or fatal, meaning the document will fail to compile.
Our first LaTeX document
We’ll start by creating a new, ‘blank’, file in Overleaf. You’ll notice that its idea of a blank file is not actually an empty one.
Overleaf fills in a lot of things by default, which is one of the benefits to using it; it makes it very easy to get up-and-running in LaTeX.
There are three parts to the Overleaf window: the file navigator, the text editor, and the preview pane.
In the text editor for our ‘blank’ document, we can see all of the elements necessary to create a minimally-compilable document in LaTeX (and then some).
\documentclass{article}
\usepackage[utf8]{inputenc}

\title{Irish Fairy Tales}
\author{James Stephens}

\begin{document}

\maketitle

\section{Introduction}

\end{document}
Commands in LaTeX are distinguished from regular text through use of a backslash \. Some commands take options andor arguments. Arguments are placed inside curly braces {}. Options go in square brackets [].
The \begin{} and \end{} commands delineate an environment. We’ll see more about environments in later episodes; for now, I’ll say that environments each have their own set of formatting rules and purpose.
Looking at our document
If we look at the different parts of this document, starting at the top, we see:
- the document class declaration (this document is an article)
- the preamble
- a package import statement (this package is used in almost everything; it specifies the unicode character set to use)
- some metadata — this includes the title and author
- the document body
- the document environment
\begin{}statement
- the
\maketitlecommand - a section heading
- the document environment
\end{}statement
- the document environment
Some of these are absolutely necessary:
- the document class declaration (this document is an article)
- the document environment
begin{}statement - the document environment
end{}statement
Without these, the document will not compile.
Let’s make this document a bit more interesting
Now we’re going to add in some dummy text to get a sense of what a more-complete document would look like.
We’ll do this using the lipsum package, which provides sample text blocks. We’ll need to add a new \usepackage{} command to the document preamble and the \lipsum command underneath our section title.
\documentclass{article}
\usepackage[utf8]{inputenc}
\usepackage{lipsum}

\title{Irish Fairy Tales}
\author{James Stephens}

\begin{document}

\maketitle

\section{Introduction}
\lipsum

\section{Early Life}
\lipsum

\end{document}
Challenge 1
Look at the following LaTeX code and decide if it will compile as written. If you say no, decide why not.
\documentclass{article}
\usepackage[utf8]{inputenc}

\title{The Playboy of the Western World}
\author{JM Synge}

\begin{document}

\maketitle

\section{Introduction}
Answer
This code will not compile as written (or, if it does, it will throw some warnings). It is missing the
\end{document}statement.
Challenge 2
In the above code, which of these describes the text ‘JM Synge’:
- it is a command
- it is an argument
- it is an option
Answer
It is an argument;
\authoris a command; an option would be in square brackets.
Challenge 3
Which of these lines should not go in the document preamble?
\maketitle\title{R.U.R.}\usepackage{graphicx}Answer
\maketitledoes not belong in the preamble.\title{R.U.R.}does, because this command stores metadata about the file.
Challenge 4
Which of these lines is optional?
\begin{document}\maketitle\documentclass{book}Answer
\maketitleis optional.
Key Points
First key point. Typesetting is used in many domains to convey information in a more readable format.
Second key point. Creating a new, minimal document requires a document declaration, a preamble, and a document body.
Third key point. LaTeX documents consist of commands, environments, and regular text. Commands may take arguments and/or options.
Basic Formatting
Overview
Teaching: 0 min
Exercises: 0 minQuestions
Key question: How can I create headings for different things?
Key question: How can I format text into boldface, or italics?
Key question: How can I add a footnote to indicate important information?
Objectives
First learning objective. Be able to create headings.
Second learning objective. Understand how to add a Table of Contents.
Third learning objective. Learn that there are two different ways to create boldface and italicised text.
Fourth learning objective. Be able to add a footnote in the correct place.
Basic typesetting
We are now going to actually typeset some text. You’ll need to upload the
brawl_at_allen.txt,
troubadour.jpeg, battle.jpeg,
and trial.jpeg files,
which you can download from the hyperlinks embedded here.
We are first going to renamed the current main.tex document to old.tex;
then, we’re going to create a new document, which we will call main.tex. This
time, we will actually get a blank document from Overleaf (because we didn’t
start a new project), so we’re going to have to remember the necessary parts of
the document structure.
We are renaming the old file because Overleaf will automatically compile
main.tex, even if we hit compile with a different file open in the editor;
otherwise, we would have to swap back and forth between files a lot.
% in main.tex
\documentclass{book}
\usepackage[utf8]{inputenc}

\author{James Stephens}
\title{Irish Fairy Tales}
\date{}

\begin{document}
\maketitle


\end{document}
Previously, we inserted some random text using lipsum, but because that is
generated via a command, we couldn’t format it at all. To be able to do this,
we need to have access to the text prior to compiling the document. We have two
options for adding text in to our new document.
- We can just put the text itself into the document.
\documentclass{book} \usepackage[utf8]{inputenc} \author{James Stephens} \title{Irish Fairy Tales} \date{} \begin{document} \maketitle When the wind picked up the fire spread And the grapevines seemed left for dead And the northern sky looked like the end of days The end of days \end{document} - Or, we can keep the text in a separate document (like
brawl_at_allen.txt) and use a command to insert it (similar to what we did withlipsum, before):% in main.tex \documentclass{book} \usepackage[utf8]{inputenc} \author{James Stephens} \title{Irish Fairy Tales} \date{} \begin{document} \maketitle \input{brawl_at_allen.tex} % this must have the file path as its argument \end{document}
Both options have pros and cons. Keeping everything in one file means fewer files to deal with, but it can reach a point where finding different parts is difficult.
Using separate files keeps any one file from becoming unwieldy, but runs the risk of having too many files to keep track of.
The right depends on how you like to work, and the project at hand. For now,
we’ll keep the text in its own file, but we’ll change its extension to .tex.
Formatting
Sometimes you might be actively writing a document and doing formatting-type things as you write. This is one way to make a LaTeX document. The other is to take text that is already written and simply typeset it. This is what we’re going to do now.
We previously saw the \section{} command in our article example. Our current
document is in the document class ‘book’, so we will be using variations on
\section{}, called \part{} and \chapter{}. The book document class
defaults to things like: printing front and back, different margins for even
and odd pages, and starting every chapter on an odd page.
The Little Brawl at Allen has three chapters, and is one of three fairy tales
to be included in this document. Let’s add a part heading with the story title,
some chapter headings, and a Table of Contents. (I’ve made up some chapter
titles to go with the story.)
Chapter titles:
- The Banquet
- The Brawl
- The Trial
% in brawl_at_allen.tex
\part{The Little Brawl at Allen}

\chapter{The Banquet}
The \chapter{} command takes one argument—the chapter title. We do not need to
give it a number; these are assigned automatically, in the order the compiler
encounters the commands.
Now add the other two \chapter{} commands. (The ‘find’ option might be helpful
here.)
Once all four commands have been added, we can add the \tableofcontents
command in main.tex and the headings will automatically appear there.
% in main.tex
\begin{document}
\maketitle

\tableofcontents
The \tableofcontents command does not take any arguments.
Bold and italicised text and footnotes
Making text bold or italicised is done using some new commands: \textbf{} and
\textit{}. The text to be formatted is given as an argument to the command.
There is a note about the text found at the beginning of Chapter 2; let’s place that in italics to offset it more, and but the word ‘Note:’ in bold.
% in brawl_at_allen.tex
\chapter{The Battle}

\textbf{Note:} \textit{This version of the death of Uail is not correct. Also Cnocha is not in Lochlann but in Ireland.}\\
This formatting helps differentiate the note from the rest of the text. The double slash at the end creates a linebreak, which physically separates the note from the rest of the chapter.
Another option would be to place this in a footnote. This is done with the
\footnote{} command. The argument will be the text of the footnote. (We could
leave the bold/italics, but will remove them for now.)
% in brawl_at_allen.tex
\chapter{The Battle}

\footnote{This version of the death of Uail is not correct. Also Cnocha is not in Lochlann but in Ireland.}
This places the text of the footnote down at the bottom of the page, but the footnote indicator is placed a bit awkwardly. We probably actually want to have it appear after the chapter title.
Placing the footnote command after the } does not fix the problem; we probably
need to place it inside the curly braces.
% in brawl_at_allen.tex
\chapter{The Battle\footnote{This version of the death of Uail is not correct. Also Cnocha is not in Lochlann but in Ireland.}}
This throws an error. Because we didn’t get it before, we know it must be a
result of the new placement of the footnote command. LaTeX error messages can
be hard to decipher, but in this instance the error is caused because chapter
headings are not like regular text. Their appearance at the beginning of a
chapter, in the Table of Contents, and in page headers is all formatted very
specifically and including a footnote in the argument to the \chapter{}
command messes some of that up.
In order to resolve this, we can add an option to the \chapter{} command that
specifies an alternate version of the title, without the footnote.
% in brawl_at_allen.tex
\chapter[The Battle]{The Battle\footnote{This version of the death of Uail is not correct. Also Cnocha is not in Lochlann but in Ireland.}}
This option creates what is called a chaptermark for The Battle that doesn’t include the footnote. Chapter- and sectionmarks are used in the Table of Contents and in page headers. While we are using it to accommodate a footnote, they can also be used to provide shortened versions of long titles.
Challenge 1
Decide which of these are valid ways to input text into a document:
\section{Lyrics} When the wind picked up the fire spread And the grapevines seemed left for dead And the northern sky looked like the end of days The end of days\section{Lyrics} \input{grapevine_fires.tex}\section{Lyrics} \insert{grapevine_fires.tex}\section{Lyrics} \include{grapevine_fires.tex}Answer
All of these are valid, except for
\insert{grapevine_fires.tex}.The first option just places the text where it is typed.
The second, is what we have used above to insert
brawl_at_allen.texinto our document.We have not encountered
\include{}in this lesson, but it is valid, so it’s a bit of a trick option. Functionally,\include{}works similarly to\input{}, although it creates additional pagebreaks.
Challenge 2
\textbf{}and\textit{}are commands that change the style of text. There is another way to tell LaTeX that text should be bold or italicised; this is with the\bfseriesand\itshapedeclarations. Declarations do not take an argument, instead, they modify all of the text that follows them, or is within their environment.Try inserting one of these declarations just after the
\begin{document}line and observe what happens.Once you have, place the declaration inside of curly braces, as if it were the argument for a command, and adding some text after it:
{\itshape War with the Newts}Now, the declaration only affects the text inside the curly braces.
Challenge 3
Use the
\itshapeand\bfseriesdeclarations to typeset the note at the beginning of Chapter 2; (you can leave the footnote we created as it is and just make this new version appear below the chapter title).Answer
% in brawl_at_allen.tex
{\bfseries Note}{\itshape This version of the death of Uail is not correct. Also Cnocha is not in Lochlann but in Ireland.}
Key Points
First key point. Headings are automatically numbered in the correct order and added to the Table of Contents.
Second key point.
\textbf{}and\textit{}format text given to them as an argument.\bfseriesand\itshapeformat all of the text following them, or within a specified environment.Third key point. A separate ‘mark’ can be created for chapters, sections, or other named headings that consists of a shorter version of the name for use in headers and the Table of Contents.
Illustrations
Overview
Teaching: 0 min
Exercises: 0 minQuestions
Key question: How can I add images to my document?
Key question: How does image placement interact with the surrounding text?
Objectives
First learning objective. Place an image at a fixed location.
Second learning objective. Learn the difference between fixed and floating images.
Third learning objective. See how to use options to change how inserted images appear.
Illustrations
We’ve now got a pretty reasonable-looking document. Let’s see about adding in some images.
We’re going to be using a command called \includegraphcs[]{}. It can take many different
options, and requires one argument—the path to the image file. This command comes from the
graphicx package, which we will also need to include.
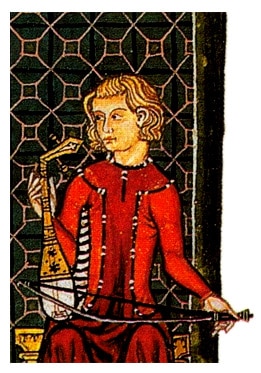
In Chapter 1, The Banquet, we are going to add troubadour.jpeg.
% in brawl_at_allen.tex
\usepackage{graphicx}

...

\chapter{The Banquet}

\includegraphics[]{troubadour}
When this is rendered, the image should appear, but its placement is not going to be ideal. Inserting an image in this way means that the image must appear before any of the text in Chapter 1, no matter what; even if it makes the document look ugly.
If we don’t want this rigid behaviour, we can use a new environment, called a float.
Floats come in two flavours: figure, and table. We will use the figure version.
The figure environment requires a \begin{} and \end{} statement, just like the
document environment. Overleaf will autofill some of the different parts of this, as well.
The image will be automatically centred with \centering, and caption and label commands
will also appear; these are optional, but helpful. The caption can be given a short
description of the image as an argument; the label makes it possible to cross-reference
the image in the text. We’ll look at cross-references later on. For now, you can leave the
label as the default, or pick something short and descriptive.
\begin{figure}
    \centering
    \includegraphics[]{troubadour}
    \caption{A troubadour, performing}
    \label{fig:troubadour}
\end{figure}
Now, when the document is compiled, the figure will fit into the document more naturally.
Now let’s add in a figure to Chapter 2. This time the image will be battle.jpeg.
% in story.tex
\begin{figure}
    \centering
    \includegraphics[]{battle}
    \caption{The battle}
    \label{fig:battle}
\end{figure}
When we compile this, the image is too big for the page. We need to use an option with
\includegraphics to specify the width.
% in story.tex
\begin{figure}
    \centering
    \includegraphics[width = \textwidth]{battle}
    \caption{The battle}
    \label{fig:battle}
\end{figure}
\textwidth will scale the image size down so that the width is equal to the width of the text
in the document.
Finally, we can add the trial.jpeg image to Chapter 3. This image is very wide, so it would
be nice to have it rotated, so it fits better on the page. For this, we will need to add a new
package: lscape.
\usepackage{lipsum}
\usepackage{graphicx}
\usepackage{lscape}
This package gives us a new environment, called landscape. We need to place the entire figure
environment within it.
\chapter{The Trial}

\begin{landscape}
\begin{figure}
    \centering
    \includegraphics[]{trial}
    \caption{The trial}
    \label{fig:trial}
\end{figure}
\end{landscape}
It looks like we may also need to scale this image down a bit. Experiment with different sizes.
\chapter{The Trial}

\begin{landscape}
\begin{figure}
    \centering
    \includegraphics[width = \textwidth]{trial}
    \caption{The trial}
    \label{fig:trial}
\end{figure}
\end{landscape}
THe image seems to be a bit smaller than we might have expected; this is because \textwidth does
not change with the switch to landscape. We probably want to set the height to \textwidth, instead.
\chapter{The Trial}

\begin{landscape}
\begin{figure}
    \centering
    \includegraphics[height=\textwidth]{trial}
    \caption{The trial}
    \label{fig:trial}
\end{figure}
\end{landscape}
This looks better, but the header has now disappeared (because the image is slightly too large to fit
on one page). We can make it fit by placing a scaling factor in front of \textwidth. This will
effectively be multiplied against \textwidth to produce the actual width.
\chapter{The Trial}

\begin{landscape}
\begin{figure}
    \centering
    \includegraphics[height=.8\textwidth]{trial}
    \caption{The trial}
    \label{fig:trial}
\end{figure}
\end{landscape}
Challenge 1
Will this code insert an image at a fixed location, or one whose location is flexible?
\includegraphics[scale=.7]{constellations}Answer
This code will insert an image whose location is fixed because it is not inside a floating environment.
Challenge 2
\includegraphics[]{}has many different options it can take. Apply theangleoption to the first image we added; its value should be a whole number between 0 and 360. You can also try this with the other images; multiple options are specified as a comma-separated list.Answer
\begin{figure}
    \centering
    \includegraphics[angle=30]{troubadour}
    \caption{A troubadour, performing}
    \label{fig:troubadour}
\end{figure}
Key Points
First key point. Including an image requires the use of a command, and possibly a
figureenvironment, an the specification of the path to the image (which may be more than just the filename, if the image is in a subdirectory).Second key point. Floats are placed by LaTeX in locations that will look nice; this is determined by a set of rules (that can be modified, if one is so inclined).
Third key point. The appearance of images can be customised using options to
\includegraphics{}.Fourth key point. Captions are short descriptions of an image. Labels are a way to refer to them within the text.