Wrap-up
Overview
Teaching: 0 min
Exercises: 0 minQuestions
How do all pieces of a Jekyll website fit into a directory structure?
What other resources are available for learning more on Jekyll?
Objectives
Summarise all the different technologies that are coming together to create GitHub Pages websites.
Look at the anatomy of a Jekyll website repository.
Identify other resources and further reading about Jekyll.
Thinking more about how you might use what you’ve learned in practice. You may want to make professional-looking websites by reusing existing website themes. Here, we are going to recap what we have learned so far and look at the anatomy of a GitHub Pages website and its common building blocks, and try using an existing theme template.
Summary
Throughout this lesson, we learned how to create formatted webpage content with Markdown, configure a GitHub repository to use the Jekyll static site generator, and how to use Jekyll to build our Markdown pages and various other files (HTML snippets, CSS, images, etc.) into a set of HTML documents that are then served via the GitHub Pages framework.
HTML is the basic building block of webpages served on the Internet. It describes the structural elements of the page and their raw content and is often aided by CSS - an ordered set of styling instructions telling the browser how the content described in the HTML document should be organised and formatted. HTML is very verbose and difficult to write by hand - beyond their initial design HTML pages are meant to be processed by machines. For that reason, Markdown was introduced - a lightweight Markup language and a convention for adding style information to textual content while retaining the human-readable form. It is not as rich in syntax as HTML, but comparably more usable by a wider audience.
Jekyll is a powerful static site generator behind GitHub Pages that supports a high degree of reuse and separation of content and presentation. It can be configured via the
_config.ymlYAML file that stores site-wide variables accessible from anywhere within our site. It also allows us to define and reuse page-wide variables, by defining them as the front matter at the beginning of our Markdown pages. Used in conjunction with Liquid, its scripting language, Jekyll allows us to include content from reusable markup snippets that can be repeated on multiple pages and to embed code snippets and filters into our pages to create some complex content assembly pipelines. That way, adding a new blog post to your website may only involve creating a file in the_postsfolder of your website, setting it to use the ‘post’ template and focusing on its content - and it will magically appear at the top of your Blog timeline without any extra effort on your part.
As a last thing, let’s put it all together by having a look at a directory structure of a real-life Jekyll website, where different pieces are located and see how they relate to visual components on the rendered website pages.
Jekyll Website Directory Structure
As an example, we will have a look the directory content and Jekyll configuration used to create this lesson (shown in the image below). It uses The Carpentries Jekyll theme, which contains page layouts for various Carpentry websites - lesson materials, workshop websites, etc. We have created a new repository for this lesson by copying the Carpentries theme repository and customised it by adding our episodes and other content.
Note that if you look at other Jekyll websites,
they will have slightly different directory structures as
they may use different themes.
However, there are some common elements, such as
index.md (the home page),
_config.yml (website’s global configuration),
and folders starting with _,
which have special meaning to Jekyll by convention, such as:
_includes- containing reusable page snippets,_layouts- for storing theme’s page templates,_sassorassets(without the leading_) where Jekyll looks for ‘assets’ such as CSS and JavaScript files,_data- for storing well-formatted site data (in either the .yml, .yaml, .json, .csv or .tsv formats) that Jekyll autoloads and makes accessible accessible via thesite.dataglobal variable,_site- containing the static version of the website ready to be served to users once Jekyll compiles it.
Other ‘special’ folders, particular to this example only, are _episodes and _extras - they are collections defined by the theme
designer and have a special role in this website/theme for storing lesson and extra episodes.
Unless these collections are configured as described in the previous episode,
they will not be automatically processed by Jekyll
despite starting with the _.
The theme designer has made sure they are embedded in the website as intended,
by defining them in _config.yml and referring to them in Liquid code snippets
throughout the site.
In the website example we have been building throughout this lesson,
we have seen a similar folder _posts where we stored content of blog posts.
Other commonly seen folders in Jekyll websites are fig,
sometimes also named images or figures,
for storing website images and figures.
There is no firm naming convention in this case - Jekyll will not process
these folders automatically and the website designer will have to make sure to access/link to the content
of these folders appropriately.

Reusing The Carpentries Jekyll Lesson Theme
Reusing the lesson template to create a new lesson can be achieved by copying the theme repository and customising it by adding your episodes in the appropriate place. The template is published under the Creative Commons Attribution 4.0 license, which means you are free to re-use and modify it however you like as long as you acknowledge the original source. You will often find that other Jekyll themes are available with a similarly permissive license, but you should always check the terms to make sure you understand what you can and cannot do with your chosen theme.
Practice Customizing a Theme
We explored building our group website piece by piece to aid in learning. It is somewhat rare that you will be constructing the site from scratch as we did. It is much more likely you will be reusing one of the existing templates that others have made, many of which are freely available to use. Let’s give using a template a try using the mundana template.
We have created a copy of the original mundana repo.
First open our copy of the mundana template repository.
You will notice many directions in the README.md file on how to use this template.
We will be using some and leaving others for you to explore later.
To get your own copy of this repository, click the “Fork” button the upper right-hand side of the GitHub interface.
If you belong to many GitHub organizations, you might have to choose which account to copy/fork the repo to.

Now you will have your own copy of the template to modify.
You can see the repo it was forked from in the upper left-hand side of the page.
As we did earlier in the lesson in the Hosting Websites on GitHub episode,
we need to turn on the option for GitHub to render the page as a website.
Last time we did this in the settings, this time we will create a new branch
called gh-pages which automatically turns on this functionality.
Click on the button on the left-hand side of the page that shows a branching icon and
says main.
Then in the box that reads “Find or create a branch” type gh-pages.
Then click the “Create branch: gh-pages from ‘main’” option that appears below.
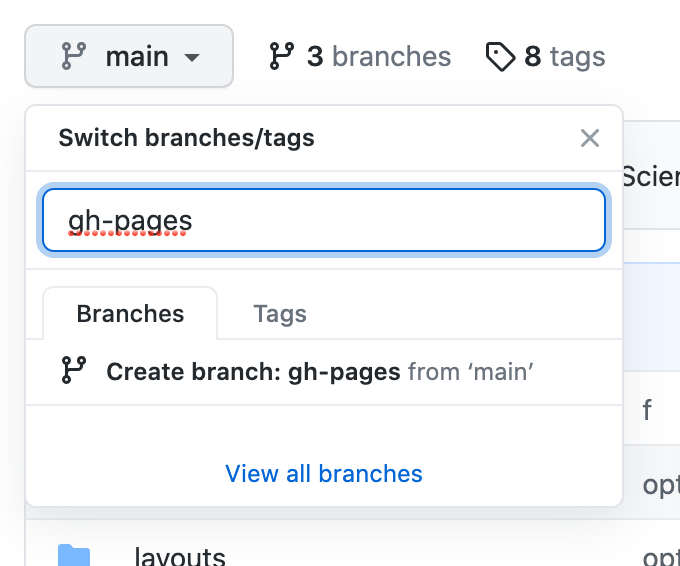
Once you’ve clicked that option you will see the box change to say gh-pages instead
of main indicating you are working on the new branch you created.
Creating a gh-pages branch also has turned on the website to render at
<USERNAME>.github.io/mundana-theme-jekyll. You can navigate to <USERNAME>.github.io/mundana-theme-jekyll
and check in “Settings” to see that it worked as expected.
We will be making lots of edits to the new gh-pages branch in the challenges below.
This will be easier to do if we make it the default branch.
To change the gh-pages branch to the default branch, first click
the branches button to the right of the drop-down menu we used to create
the gh-pages branch.
Then in the box that shows the Default branch click the two arrows button
on the upper right-hand side of the box.
Click that two arrows button again on the next page, choose gh-pages
from the drop down menu options, and click Update.
Confirm your choice by clicking I understand, update the default branch..
Now when you return to the Code tab or the main page of your repo, you will see
gh-pages in the branch drop down by default.
The following series of challenges will have you practice the skills you learned in this lesson to modify this template.
Update GitHub About Section Link to Site
As we did before in the Hosting Websites on GitHub episode, update the repository details to link directly to the rendering website from your fork.
Customize the Configuration
Update the name and the description variables for the site. Reload the rendered page to see the changes to the actual site.
Hint: See the Starting with Jekyll episode for review
Solution
The description and name variables are site-wide variables so they are found in the
_config.ymlfile and can be updated there. Changes are then committed and the site can be reloaded after Github re-renders the latest version of the site with Jekyll.
Customize the Header Menu
Find where the header menu is created and remove the “WP”, “Ghost”, and “Buy me a coffee” items.
Hint: See the Reusing Blocks of Content section for more information about where to find the header menu.
Solution
Lines 12-20 need to be removed from the
_includes/menu-header.htmlfile.
Update a Layout
- Update the
postlayout to remove the newsletter.- Also remove the “Share this” block to the bottom of the post where the newsletter block used to be (above “Author Box”).
Hint: Review the Page Layouts episode from this lesson for more information on layouts.
Solution
- Lines 81-105 need to be removed to remove the newsletter.
- To move the “Share this” box, lines 45-65 should be cut (copied then deleted) and then pasted between the Article and the Author Box section.
Customize the About Page
Oftentimes you might want to edit some existing pages and layouts. In this exercise, we will make the
Aboutpage for this site more useful by changing the layout, editing the text, and including it as a link in the header menu for this site.
- Find the
Aboutpage and update the layout to thepagelayout, turn off the comments option, remove the image and the “made with” text.- Make the
Aboutpage content include the site description you updated and any other text you’d like to add.- Update the header menu to include a link for the
Aboutpage.Solution
- The
Aboutpage is calledabout.mdand is in the_pagesfolder. Once found in the yaml header the variables can be changed to “page” for layout and “false” for comments. In the body of the page the line that starts with “Made with” is removed.- In the body of the
_pages/about.mddescription variable is added using liquid syntax, ` {{ site.description }} `, and add any other text that might be helpful for an about page.- The header is updated in the
_includes/menu-header.html(this may take some searching to track down). The same html from the other items in the header can be copied and modified.
Add Yourself as a Potential Author
Find where the authors collection is defined and add yourself.
Hint 1: the author for an individual post is defined in the frontmatter of the post but the collection of possible authors is defined in a location that allows use across the site.
Hint 2: Review the Loops and Collections episode of this episode for a reminder on how collections work and reminder on where you might find the authors collection.
Solution
The authors collection is found in the
_config.yml. A new entry can be made by copying lines 22-28, pasting them on line 38, and then customizing them.
Add a New Blogpost
Add a new blog post for today’s date with the announcment of your new website.
Hint: See the Loops and Collections for reminders and more information, Pay close attention to the Blogging in the Wild section as it tells you more about how to use the built-in
_postsfunctionality.Solution
- Add a new file to the
_postsfolder with the filenameYYYY-MM-DD-some-key-info.md.- In another window, open another post in the
_postsfolder and copy the frontmatter (yaml header).- Paste the front matter into your new file and change the author and title.
- Add some text, headers, images or other content if you wish.
Use A Filter
Currently the Authors page sorts based on the order of the collection but we would prefer it sort alphabetically. Use this list of Jekyll filters to find a filter and edit the
author-list.htmlpage to display the authors alphabetically.Hint: Refer to this section on looping over a collection if you get a (silent) build error with your first solution.
Solution
For this change we need to first sort the collection and assign the sorted collection to a variable. Then use that sorted collection variable in the for loop when we display the authors.
In the
_pages/author-list.htmlfile add the line{% assign sorted_authors = site.authors | sort "name" %}right before the{% for author in site.authors %}line. Then change that line to{% for author in sorted_authors %}.
Detective Work: Find Comments
Look through the site and see if you can find how it allows for comments.
Solution
This site uses Disqus to manage comments. If you’d like, you can create your own account and configure the site to manage your comments.
Further Resources
Below are some recommended resources to help you continue learning about Jekyll websites:
- W3C Schools HTML tutorial
- W3C Schools CSS tutorial
- Github-flavored Markdown info page
- Getting started with GitHub Pages from GitHub Docs
- JekyllRB - the ultimate source of Jekyll resources
- Jekyll guides
- Jekyll themes
- Jekyll liquid documentation
Key Points
Jekyll is a powerful static site generator behind GitHub Pages that supports a high degree of reuse and separation of content and presentation.
Learning more on Jekyll themes will enable you to create complex and professional-looking websites.