Getting Started with Conda
Overview
Teaching: 15 min
Exercises: 5 minQuestions
What is Conda?
Why should I use a package and environment management system as part of my research workflow?
Why use Conda ?
Objectives
Understand why you should use a package and environment management system as part of your (data) science workflow.
Explain the benefits of using Conda as part of your (data) science workflow.
Packages and Environments
Packages
When working with a programming language, such as Python, that can do almost anything, one has to wonder how this is possible. You download Python, it has about 25 MB, how can everthing be included in this small data package. The answer is - it is not. Python, as well as many other programming languages use external libraries or packages for being able to doing almost anything. You can see this already when you start programming. After learning some very basics, you often learn how to import something into your script or session.
Modules, packages, libraries
- Module: a collection of functions and variables, as in a script
- Package: a collection of modules with an init.py file (can be empty), as in a directory with scripts
- Library: a collection of packages with realted functionality
Library/Package are often used interchangeably.
Dependencies
A bit further into your programming career you may notice/have noticed that many packages do not just do everything on their own. Instead, they depend on other packages for their functionality. For example, the Scipy package is used for numerical routines. To not reinvent the wheel, the package makes use of other packages, such as numpy (numerical python) and matplotlib (plotting) and many more. So we say that numpy and matplotlib are dependencies of Scipy.
Many packages are being further developed all the time, generating different versions of packages. During development it may happen that a function call changes and/or functionalities are added or removed. If one package can depend on another, this may create issues. Therefore it is not only important to know that e.g. Scipy depends on numpy and matplotlib, but also that it depends on numpy version >= 1.6 and matplotlib version >= 1.1. Numpy version 1.5 in this case would not be sufficient.
Environments
When starting with programming we may not use many packages yet and the installation may be straightforward. But for most people, there comes a time when one version of a package or also the programming language is not enough anymore. You may find an older tool that depends on an older version of your programming language (e.g. Pyhton 2.7), but many of your other tools depend on a newer version (e.g. Python 3.6). You could now start up another computer or virtual machine to run the other version of the programming language, but this is not very handy, since you may want to use the tools together in a workflow later on. Here, environments are one solution to the problem. Nowadays there are several environment management systems following a similar idea: Instead of having to use multiple computers or virtual machines to run different versions of the same package, you can install packages in isolated environments.
Environment management
An environment management system solves a number of problems commonly encountered by (data) scientists.
- An application you need for a research project requires different versions of your base programming language or different versions of various third-party packages from the versions that you are currently using.
- An application you developed as part of a previous research project that worked fine on your system six months ago now no longer works.
- Code that was written for a joint research project works on your machine but not on your collaborators’ machines.
- An application that you are developing on your local machine doesn’t provide the same results when run on your remote cluster.
An environment management system enables you to set up a new, project specific software environment containing specific Python versions as well as the versions of additional packages and required dependencies that are all mutually compatible.
- Environment management systems help resolve dependency issues by allowing you to use different versions of a package for different projects.
- Make your projects self-contained and reproducible by capturing all package dependencies in a single requirements file.
- Allow you to install packages on a host on which you do not have admin privileges.
Environment management systems for Python
Conda is not the only way; Python for example has many more ways of working with environments:
Package management
A good package management system greatly simplifies the process of installing software by…
- identifying and installing compatible versions of software and all required dependencies.
- handling the process of updating software as more recent versions become available.
If you use some flavor of Linux, then you are probably familiar with the package manager for your
Linux distribution (i.e., apt on Ubuntu, yum on CentOS); if you are a Mac OSX user then you
might be familiar with the Home Brew Project which brings a Linux-like package
management system to Mac OS; if you are a Windows OS user, then you may not be terribly familiar
with package managers as there isn’t really a standard package manager for Windows (although there
is the Chocolatey Project).
Operating system package management tools are great but these tools actually solve a more general problem than you often face as a (data) scientist. As a (data) scientist you typically use one or two core scripting languages (i.e., Python, R, SQL). Each scripting language has multiple versions that can potentially be installed and each scripting language will also have a large number of third-party packages that will need to be installed. The exact version of your core scripting language(s) and additional, third-party packages will also probably change from project to project.
Package management systems for Python
Also here, Conda is not the only way; Python for example has many more ways of working with packages:
Why should I use a package and environment management system?
Installing software is hard. Installing scientific software is often even more challenging. In order to minimize the burden of installing and updating software (data) scientists often install software packages that they need for their various projects system-wide.
Installing software system-wide has a number of drawbacks:
- It can be difficult to figure out what software is required for any particular research project.
- It is often impossible to install different versions of the same software package at the same time.
- Updating software required for one project can often “break” the software installed for another project.
Put differently, installing software system-wide creates complex dependencies between your research projects that shouldn’t really exist!
Rather than installing software system-wide, wouldn’t it be great if we could install software separately for each research project?
Discussion
What are some of the potential benefits from installing software separately for each project? What are some of the potential costs?
Solution
You may notice that many of the potential benefits from installing software separately for each project require the ability to isolate the projects’ software environments from one another (i.e., solve the environment management problem). Once you have figured out how to isolate project-specific software environments, you will still need to have some way to manage software packages appropriately (i.e., solve the package management problem).
What I hope you will have taken away from the discussion exercise is an appreciation for the fact that in order to install project-specific software environments you need to solve two complementary challenges: environment management and package management.
Conda
From the official Conda documentation. Conda is an open source package and environment management system that runs on Windows, Mac OS and Linux.
- Conda can quickly install, run, and update packages and their dependencies.
- Conda can create, save, load, and switch between project specific software environments on your local computer.
- Although Conda was created for Python programs, Conda can package and distribute software for any language such as R, Ruby, Lua, Scala, Java, JavaScript, C, C++, FORTRAN.
Conda as a package manager helps you find and install packages. If you need a package that requires a different version of Python, you do not need to switch to a different environment manager, because Conda is also an environment manager. With just a few commands, you can set up a totally separate environment to run that different version of Python, while continuing to run your usual version of Python in your normal environment.
Conda vs. Miniconda vs. Anaconda
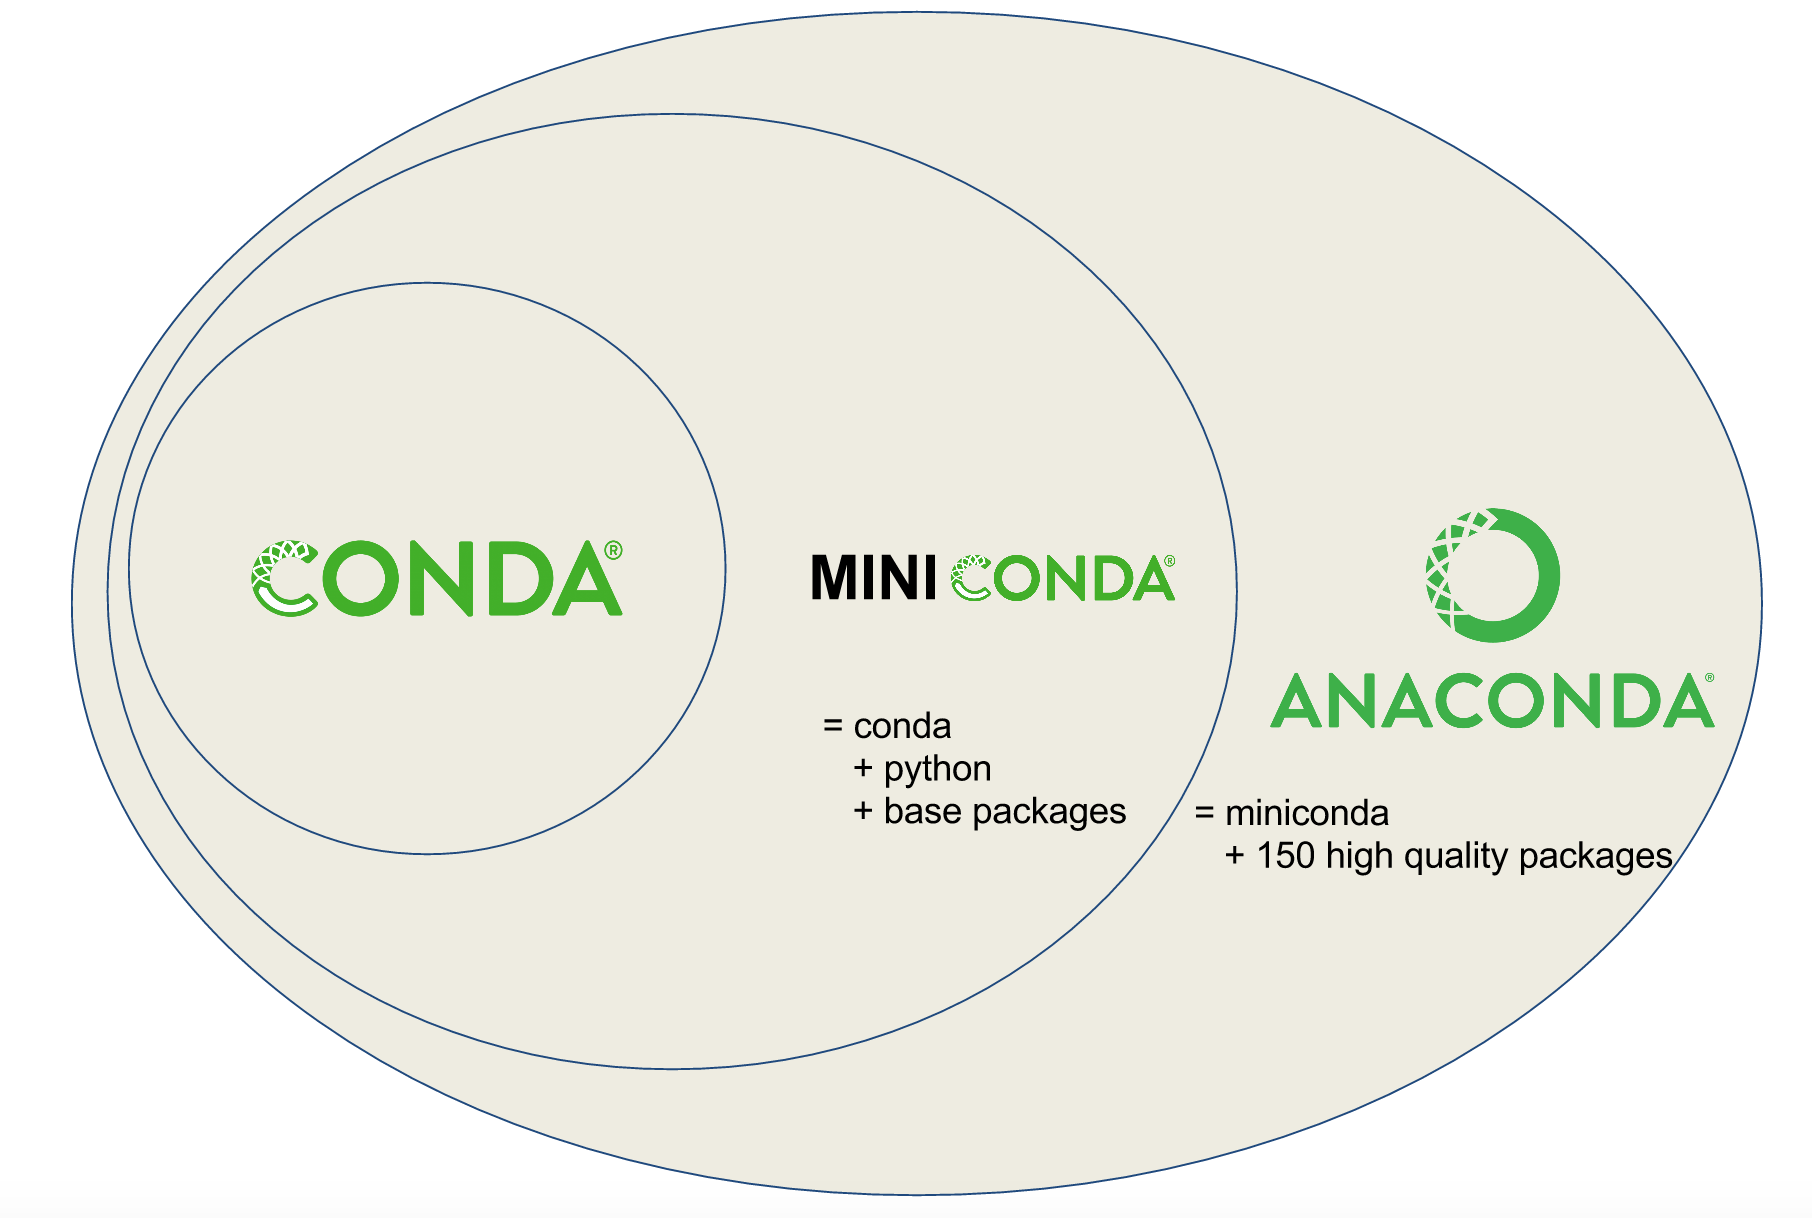
Users are often confused about the differences between Conda, Miniconda, and Anaconda. Conda is a tool for managing environments and installing packages. Miniconda combines Conda with Python and a small number of core packages; Anaconda includes Miniconda as well as a large number of the most widely used Python packages.
Why use Conda?
Whilst there are many different package and environment management systems that solve either the package management problem or the environment management problem, Conda solves both of these problems and explicitly targeted at (data) science use cases.
- Conda provides prebuilt packages, avoiding the need to deal with compilers, or trying to work out how exactly to set up a specific tool. Fields such as Astronomy use conda to distribute some of their most difficult-to-install tools such as IRAF. TensorFlow is another tool where to install it from source is near impossible, but Conda makes this a single step.
- Conda is cross platform, with support for Windows, MacOS, GNU/Linux, and support for multiple hardware platforms, such as x86 and Power 8 and 9. In future lessons we will show how to make your environment reproducible (reproducibility being one of the major issues facing science), and Conda allows you to provide your environment to other people across these different platforms.
- Conda allows for using other package management tools (such as
pip) inside Conda environments, where a library or tools is not already packaged for Conda (we’ll show later how to get access to more conda packages via channels).
Additionally, Anaconda provides commonly used data science libraries and tools, such as R, NumPy, SciPy and TensorFlow built using optimised, hardware specific libraries (such as Intel’s MKL or NVIDIA’s CUDA), which provides a speedup without having to change any of your code.
Key Points
Conda is a platform agnostic, open source package and environment management system.
Using a package and environment management tool facilitates portability and reproducibility of (data) science workflows.
Conda solves both the package and environment management problems and targets multiple programming languages. Other open source tools solve either one or the other, or target only a particular programming language.
Anaconda is not only for Python
Working with Environments
Overview
Teaching: 60 min
Exercises: 15 minQuestions
What is a Conda environment?
How do I create (delete) an environment?
How do I activate (deactivate) an environment?
How do I install packages into existing environments using Conda (+pip)?
Where should I create my environments?
How do I find out what packages have been installed in an environment?
How do I find out what environments that exist on my machine?
How do I delete an environment that I no longer need?
Objectives
Understand how Conda environments can improve your research workflow.
Create a new environment.
Activate (deactivate) a particular environment.
Install packages into existing environments using Conda (+pip).
Specify the installation location of an environment.
List all of the existing environments on your machine.
List all of the installed packages within a particular environment.
Delete an entire environment.
Workspace for Conda environments
If you haven’t done it yet, create a new
introduction-to-conda-for-data-scientistsdirectory on your Desktop in order to maintain a consistent workspace for all your conda environment.On Mac OSX and Linux running following commands in the Terminal will create the required directory on the Desktop.
$ cd ~/Desktop
$ mkdir introduction-to-conda-for-data-scientists
$ cd introduction-to-conda-for-data-scientists
For Windows users you may need to reverse the direction of the slash and run the commands from the command prompt.
> cd ~\Desktop
> mkdir introduction-to-conda-for-data-scientists
> cd introduction-to-conda-for-data-scientists
Alternatively, you can always “right-click” and “create new folder” on your Desktop. All the commands that are run during the workshop should be run in a terminal within the
introduction-to-conda-for-data-scientistsdirectory.
What is a Conda environment
A Conda environment is a directory that contains a specific collection of Conda packages that you have installed. For example, you may be working on a research project that requires NumPy 1.18 and its dependencies, while another environment associated with an finished project has NumPy 1.12 (perhaps because version 1.12 was the most current version of NumPy at the time the project finished). If you change one environment, your other environments are not affected. You can easily activate or deactivate environments, which is how you switch between them.
Avoid installing packages into your
baseConda environmentConda has a default environment called
basethat include a Python installation and some core system libraries and dependencies of Conda. It is a “best practice” to avoid installing additional packages into yourbasesoftware environment. Additional packages needed for a new project should always be installed into a newly created Conda environment.
Creating environments
To create a new environment for Python development using conda you can use the conda create
command.
$ conda create --name python3-env python
For a list of all commands, take a look at Conda general commands.
It is a good idea to give your environment a meaningful name in order to help yourself remember
the purpose of the environment. While naming things can be difficult, $PROJECT_NAME-env is a
good convention to follow. Sometimes also the specific version of a package why you had to create a new environment is a good name
The command above will create a new Conda environment called “python3” and install the most recent
version of Python. If you wish, you can specify a particular version of packages for conda to
install when creating the environment.
$ conda create --name python36-env python=3.6
Always specify a version number for each package you wish to install
In order to make your results more reproducible and to make it easier for research colleagues to recreate your Conda environments on their machines it is a “best practice” to always explicitly specify the version number for each package that you install into an environment. If you are not sure exactly which version of a package you want to use, then you can use search to see what versions are available using the
conda searchcommand.$ conda search $PACKAGE_NAMESo, for example, if you wanted to see which versions of Scikit-learn, a popular Python library for machine learning, were available, you would run the following.
$ conda search scikit-learnAs always you can run
conda search --helpto learn about available options.
You can create a Conda environment and install multiple packages by listing the packages that you wish to install.
$ conda create --name basic-scipy-env ipython=7.13 matplotlib=3.1 numpy=1.18 scipy=1.4
When conda installs a package into an environment it also installs any required dependencies.
For example, even though Python is not listed as a packaged to install into the
basic-scipy-env environment above, conda will still install Python into the environment
because it is a required dependency of at least one of the listed packages.
Creating a new environment
Create a new environment called “machine-learning-env” with Python and the most current versions of IPython, Matplotlib, Pandas, Numba and Scikit-Learn.
Solution
In order to create a new environment you use the
conda createcommand as follows.$ conda create --name machine-learning-env \ ipython \ matplotlib \ pandas \ python \ scikit-learn \ numbaSince no version numbers are provided for any of the Python packages, Conda will download the most current, mutually compatible versions of the requested packages. However, since it is best practice to always provide explicit version numbers, you should prefer the following solution.
$ conda create --name machine-learning-env \
 ipython=7.19 \
 matplotlib=3.3 \
 pandas=1.2 \
 python=3.8 \
 scikit-learn=0.23 \
 numba=0.51
However, please be aware that the version numbers for each packages may not be the latest available and would need to be adjusted.
Activating an existing environment
Activating environments is essential to making the software in environments work well (or sometimes at all!). Activation of an environment does two things.
- Adds entries to
PATHfor the environment. - Runs any activation scripts that the environment may contain.
Step 2 is particularly important as activation scripts are how packages can set arbitrary
environment variables that may be necessary for their operation. Aou activate the
basic-scipy-env environment by name using the activate command.
$ conda activate basic-scipy-env
You can see that an environment has been activated because the shell prompt will now include the name of the active environment.
(basic-scipy-env) $
Deactivate the current environment
To deactivate the currently active environment use the Conda deactivate command as follows.
(basic-scipy-env) $ conda deactivate
You can see that an environment has been deactivated because the shell prompt will no longer include the name of the previously active environment.
$
Returning to the
baseenvironmentTo return to the
baseConda environment, it’s better to callconda activatewith no environment specified, rather than to usedeactivate. If you runconda deactivatefrom yourbaseenvironment, you may lose the ability to runcondacommands at all. Don’t worry if you encounter this undesirable state! Just start a new shell.
Activate an existing environment by name
Activate the
machine-learning-envenvironment created in the previous challenge by name.Solution
In order to activate an existing environment by name you use the
conda activatecommand as follows.$ conda activate machine-learning-env
Deactivate the active environment
Deactivate the
machine-learning-envenvironment that you activated in the previous challenge.Solution
In order to deactivate the active environment you use the
conda deactivatecommand.(active-environment-name) $ conda deactivate
Installing a package into an existing environment
You can install a package into an existing environment using the conda install command. This
command accepts a list of package specifications (i.e., numpy=1.18) and installs a set of
packages consistent with those specifications and compatible with the underlying environment. If
full compatibility cannot be assured, an error is reported and the environment is not changed.
By default the conda install command will install packages into the current, active environment.
The following would activate the basic-scipy-env we created above and install
Numba, an open source JIT compiler that translates a subset of Python
and NumPy code into fast machine code, into the active environment.
$ conda activate basic-scipy-env
$ conda install numba
As was the case when listing packages to install when using the conda create command, if version
numbers are not explicitly provided, Conda will attempt to install the newest versions of any
requested packages. To accomplish this, Conda may need to update some packages that are already
installed or install additional packages. It is always a good idea to explicitly provide version
numbers when installing packages with the conda install command. For example, the following would
install a particular version of Scikit-Learn, into the current, active environment.
$ conda install scikit-learn=0.22
Freezing installed packages
To prevent existing packages from being updating when using the
conda installcommand, you can use the--freeze-installedoption. This may force Conda to install older versions of the requested packages in order to maintain compatibility with previously installed packages. Using the--freeze-installedoption does not prevent additional dependency packages from being installed.
Installing a package into a specific environment
Dask provides advanced parallelism for data science workflows enabling performance at scale for the core Python data science tools such as Numpy Pandas, and Scikit-Learn. Have a read through the official documentation for the
conda installcommand and see if you can figure out how to install Dask into themachine-learning-envthat you created in the previous challenge.Solution
You can install Dask into
machine-learning-envusing theconda installcommand as follow.$ conda install --name machine-learning-env dask=2.16You could also install Dask into
machine-learning-envby first activating that environment and then using theconda installcommand.$ conda activate machine-learning-env $ conda install dask=2020.12
Where do Conda environments live?
Environments created with conda, by default, live in the envs/ folder of your miniconda3 (or anaconda3) directory the absolute path to which will look something the following: /Users/$USERNAME/miniconda3/envs or C:\Users\$USERNAME\Anaconda3.
Running ls (linux) / dir (Windows) on your anaconda envs/ directory will list out the directories containing the existing Conda environments.
Location of Conda environments on Binder
If you are working through these lessons using a Binder instance, then the default location of the Conda environments is slightly different.
$ /srv/conda/envsRunning
ls /srv/conda/envs/from a terminal will list out the directories containing any previously installed Conda environments.
How do I specify a location for a Conda environment?
You can control where a Conda environment lives by providing a path to a target directory when
creating the environment. For example to following command will create a new environment in a
sub-directory of the current working directory called env.
$ conda create --prefix ./env ipython=7.13 matplotlib=3.1 pandas=1.0 python=3.6
You activate an environment created with a prefix using the same command used to activate environments created by name.
$ conda activate ./env
It is often a good idea to specify a path to a sub-directory of your project directory when creating an environment. Why?
- Makes it easy to tell if your project utilizes an isolated environment by including the environment as a sub-directory.
- Makes your project more self-contained as everything including the required software is contained in a single project directory.
An additional benefit of creating your project’s environment inside a sub-directory is that you
can then use the same name for all your environments; if you keep all of your environments in
your ~/miniconda3/env/ folder, you’ll have to give each of them a different name.
Conda environment sub-directory naming convention
In order to be consistent with the convention used by tools such as
venvandPipenv, I recommend usingenvas the name of the sub-directory of your project directory that contains your Conda environment. A benefit of maintaining the convention is that your environment sub-directory will be automatically ignored by the default Python.gitignorefile used on GitHub.Whatever naming convention you adopt it is important to be consistent! Using the same name for all of your Conda environments allows you to use the same
activatecommand as well.$ cd my-project/ $ conda activate ./env
Creating a new environment as a sub-directory within a project directory
First create a project directory called
project-dirusing the following command.$ mkdir project-dir $ cd project-dirNext, create a new environment inside the newly created
project-dirin a sub-directory calledenvan install Python 3.6, version 3.1 of Matplotlib, and version 2.0 of TensorFlow.Solution
project-dir $ conda create --prefix ./env \ python=3.6 \ matplotlib=3.1 \ tensorflow=2.0 \
Placing Conda environments outside of the default ~/miniconda3/envs/ folder comes with a couple
of minor drawbacks. First, conda can no longer find your environment with the --name flag;
you’ll generally need to pass the --prefix flag along with the environment’s full path to
find the environment.
Second, an annoying side-effect of specifying an install path when creating your Conda environments is that your command prompt is now prefixed with the active environment’s absolute path rather than the environment’s name. After activating an environment using its prefix your prompt will look similar to the following.
(/absolute/path/to/env) $
As you can imagine, this can quickly get out of hand.
(/Users/USER_NAME/research/data-science/PROJECT_NAME/env) $
If (like me!) you find this long prefix to your shell prompt annoying, then there is a quick fix:
modify the env_prompt setting in your .condarc file, which you can do with the following
command.
$ conda config --set env_prompt '({name})'
This will either edit your ~/.condarc file if you already have one or create a ~/.condarc file
if you do not. Now your command prompt will display the active environment’s generic name.
$ cd project-directory
$ conda activate ./env
(env) project-directory $
For more on modifying your .condarc file, see the
official Conda docs.
Activate an existing environment by path
Activate the environment created in a previous challenge using the path to the environment directory.
Solution
You can activate an existing environment by providing the path the the environment directory instead of the environment name when using the
conda activatecommand as follows.$ conda activate ./envNote that the provided path can either be absolute or relative. If the path is a relative path then it must start with
./on Unix systems and.\when using PowerShell on Windows.
Conda can create environments for R projects too!
First create a project directory called
r-project-dirusing the following command.$ cd ~/Desktop/introduction-to-conda-for-data-scientists $ mkdir r-project-dir $ cd r-project-dirNext, take a look through the list of R packages available by default for installation using
conda. Create a new environment inside the newly createdr-project-dirin a sub-directory calledenvand installr-base,r-tidyverseandr-sparklyr.Solution
project-dir $ conda create --prefix ./env \ > r-base \ > r-tidyverse \ > r-sparklyr \
Listing existing environments
Now that you have created a number of Conda environments on your local machine you have probably
forgotten the names of all of the environments and exactly where they live. Fortunately, there is
a conda command to list all of your existing environments together with their locations.
$ conda env list
Listing the contents of an environment
In addition to forgetting names and locations of Conda environments, at some point you will
probably forget exactly what has been installed in a particular Conda environment. Again, there is
a conda command for listing the contents on an environment. To list the contents of the
basic-scipy-env that you created above, run the following command.
$ conda list --name basic-scipy-env
If you created your Conda environment using the --prefix option to install packages into a
particular directory, then you will need to use that prefix in order for conda to locate the
environment on your machine.
$ conda list --prefix /path/to/conda-env
Listing the contents of a particular environment.
List the packages installed in the
machine-learning-envenvironment that you created in a previous challenge.Solution
You can list the packages and their versions installed in
machine-learning-envusing theconda listcommand as follows.$ conda list --name machine-learning-envTo list the packages and their versions installed in the active environment leave off the
--nameor--prefixoption.$ conda list
Deleting entire environments
Occasionally, you will want to delete an entire environment. Perhaps you were experimenting with
conda commands and you created an environment you have no intention of using; perhaps you no
longer need an existing environment and just want to get rid of cruft on your machine. Whatever
the reason, the command to delete an environment is the following.
$ conda remove --name my-first-conda-env --all
If you wish to delete and environment that you created with a --prefix option, then you will
need to provide the prefix again when removing the environment.
$ conda remove --prefix /path/to/conda-env/ --all
Delete an entire environment
Delete the entire “basic-scipy-env” environment.
Solution
In order to delete an entire environment you use the
conda removecommand as follows.$ conda remove --name basic-scipy-env --all --yesThis command will remove all packages from the named environment before removing the environment itself. The use of the
--yesflag short-circuits the confirmation prompt (and should be used with caution).
Key Points
A Conda environment is a directory that contains a specific collection of Conda packages that you have installed.
You create (remove) a new environment using the
conda create(conda remove) commands.You activate (deactivate) an environment using the
conda activate(conda deactivate) commands.You install packages into environments using
conda install; you install packages into an active environment usingpip install.You should install each environment as a sub-directory inside its corresponding project directory
Use the
conda env listcommand to list existing environments and their respective locations.Use the
conda listcommand to list all of the packages installed in an environment.
Using Packages and Channels
Overview
Teaching: 20 min
Exercises: 10 minQuestions
What are Conda channels?
What are Conda packages?
Why should I be explicit about which channels my research project uses?
What should I do if a Python package isn’t available via a Conda channel?
Objectives
Install a package from a specific channel.
What are Conda packages?
A conda package is a compressed archive file (.tar.bz2) that contains:
- system-level libraries
- Python or other modules
- executable programs and other components
- metadata under the
info/directory - a collection of files that are installed directly into an
installprefix.
Conda keeps track of the dependencies between packages and platforms; the conda package format is identical across platforms and operating systems.
Package Structure
All conda packages have a specific sub-directory structure inside the tarball file. There is a
bin directory that contains any binaries for the package; a lib directory containing the
relevant library files (i.e., the .py files); and an info directory containing package metadata.
For a more details of the conda package specification, including discussions of the various
metadata files, see the [docs][conda-pkg-spec-docs].
As an example of Conda package structure consider the Conda package for
Python 3.6 version of PyTorch targeting a 64-bit Mac OS, pytorch-1.1.0-py3.6_0.tar.bz2.
.
├── bin
│ └── convert-caffe2-to-onnx
│ └── convert-onnx-to-caffe2
├── info
│ ├── LICENSE.txt
│ ├── about.json
│ ├── files
│ ├── git
│ ├── has_prefix.json
│ ├── hash_input.json
│ ├── index.json
│ ├── paths.json
│ ├── recipe/
│ └── test/
└── lib
└── python3.6
└── site-packages
├── caffe2/
├── torch/
└── torch-1.1.0-py3.6.egg-info/
A complete listing of available PyTorch packages can be found on Anaconda Cloud.
What are Conda channels?
Again from the Conda documentation, conda packages are downloaded from
remote channels, which are URLs to directories containing conda packages. The conda command
searches a default set of channels, and packages are automatically downloaded and updated from the
Anaconda Cloud channels.
main: The majority of all new Anaconda, Inc. package builds are hosted here. Included in conda’s defaults channel as the top priority channel.r: Microsoft R Open conda packages and Anaconda, Inc.’s R conda packages. This channel is included in conda’s defaults channel. When creating new environments, MRO is now chosen as the default R implementation.
Collectively, the Anaconda managed channels are referred to as the defaults channel because,
unless otherwise specified, packages installed using conda will be downloaded from these
channels.
The
conda-forgechannelIn addition to the
defaultchannels that are managed by Anaconda Inc., there is another channel called that also has a special status. The Conda-Forge project “is a community led collection of recipes, build infrastructure and distributions for the conda package manager.”There are a few reasons that you may wish to use the
conda-forgechannel instead of thedefaultschannel maintained by Anaconda:
- Packages on
conda-forgemay be more up-to-date than those on thedefaultschannel.- There are packages on the
conda-forgechannel that aren’t available fromdefaults.- You may wish to use a dependency such as
openblas(fromconda-forge) instead ofmkl(fromdefaults).
How do I install a package from a specific channel?
You can install a package from a specific channel into the currently activate environment by
passing the --channel option to the conda install command as follows.
$ conda activate machine-learning-env
$ conda install scipy=1.6 --channel conda-forge
You can also install a package from a specific channel into a named environment (using --name)
or into an environment installed at a particular prefix (using --prefix). For example, the
following command installs the scipy package from the conda-forge channel into the environment
called my-first-conda-env which we created earlier.
$ conda install scipy=1.6 --channel conda-forge --name machine-learning-env
This command would install tensorflow package from conda-forge channel into an environment
installed into the env/ sub-directory.
$ conda install tensorflow=1.14 --channel conda-forge --prefix ./env
Here is another example for R users. The following command would install
r-tidyverse package from the conda-forge channel into an
environment installed into the env/ sub-directory.
$ cd ~/Desktop/introduction-to-conda-for-data-scientists
$ conda install r-tidyverse=1.3 --channel conda-forge --prefix ./env
Channel priority
You may specify multiple channels for installing packages by passing the
--channelargument multiple times.$ conda install scipy=1.6 --channel conda-forge --channel biocondaChannel priority decreases from left to right - the first argument has higher priority than the second. For reference, bioconda is a channel for the conda package manager specializing in bioinformatics software. For those interested in learning more about the Bioconda project, checkout the project’s GitHub page.
Please note that in our example, adding
biocondachannel is irrelevant becausescipyis no longer available onbiocondachannel.
My package isn’t available on the defaults channel! What should I do?
It may very well be the case that packages (or often more recent versions of packages!) that you need to
install for your project are not available on the defaults channel. In this case you should try the
following.
conda-forge: theconda-forgechannel contains a large number of community curated conda packages. Typically the most recent versions of packages that are generally available via thedefaultschannel are available onconda-forgefirst.bioconda: thebiocondachannel also contains a large number of Bioinformatics curated conda packages.biocondachannel is meant to be used withconda-forge, you should not worried about using the two channels when installing your prefered packages.pip: only if a package is not otherwise available viaconda-forge(or some domain-specific channel likebioconda) should a package be installed into a conda environment from PyPI usingpip.
For example, Kaggle publishes a Python 3 API that can be used to interact with Kaggle datasets, kernels and competition submissions. You can search for the package on the defaults channels but you will not find it!
$ conda search kaggle
Loading channels: done
No match found for: kaggle. Search: *kaggle*
PackagesNotFoundError: The following packages are not available from current channels:
- kaggle
Current channels:
- https://repo.anaconda.com/pkgs/main/osx-64
- https://repo.anaconda.com/pkgs/main/noarch
- https://repo.anaconda.com/pkgs/free/osx-64
- https://repo.anaconda.com/pkgs/free/noarch
- https://repo.anaconda.com/pkgs/r/osx-64
- https://repo.anaconda.com/pkgs/r/noarch
To search for alternate channels that may provide the conda package you're
looking for, navigate to
https://anaconda.org
and use the search bar at the top of the page.
The official installation instructions suggest downloading
the kaggle package using pip. But since we are using conda we should check whether the
package exists on at least conda-forge channel before proceeding to use pip.
$ conda search --channel conda-forge kaggle
Loading channels: done
# Name Version Build Channel
kaggle 1.5.3 py27_1 conda-forge
kaggle 1.5.3 py36_1 conda-forge
kaggle 1.5.3 py37_1 conda-forge
kaggle 1.5.4 py27_0 conda-forge
kaggle 1.5.4 py36_0 conda-forge
kaggle 1.5.4 py37_0 conda-forge
.
.
.
Or you can also check online at https://anaconda.org/conda-forge/kaggle.
Once we know that the kaggle package is available via conda-forge we can go ahead and install
it.
$ conda install --channel conda-forge kaggle=1.5.10 --prefix ./env
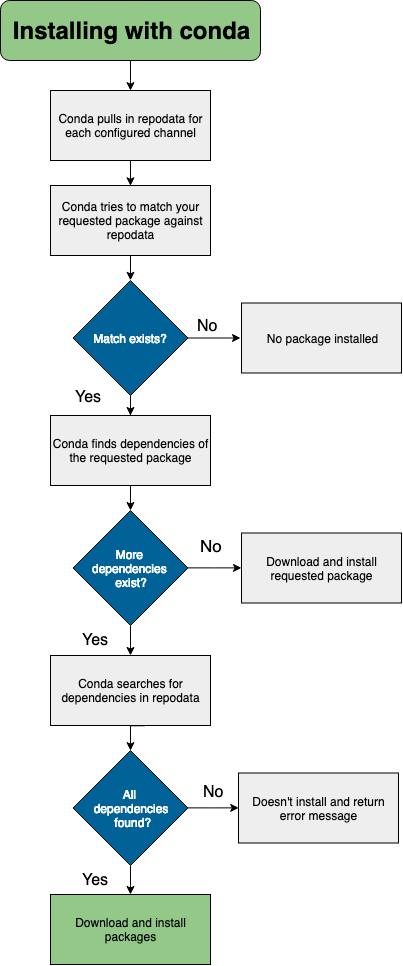
What actually happens when I install packages?
During the installation process, files are extracted into the specified environment (defaulting to the current environment if none is specified). Installing the files of a conda package into an environment can be thought of as changing the directory to an environment, and then downloading and extracting the package and its dependencies.
For example, when you conda install a package that exists in a channel and has no dependencies,
conda does the following.
- looks at your configured channels (in priority)
- reaches out to the repodata associated with your channels/platform
- parses repodata to search for the package
- once the package is found, conda pulls it down and installs
The [conda documentation][conda-install-docs] has a nice decision tree that describes the package installation process.
Specifying channels when installing packages
Like many projects, PyTorch has its own channel on Anaconda Cloud. This channel has several interesting packages, in particular
pytorch(PyTorch core) andtorchvision(datasets, transforms, and models specific to computer vision).Create a new directory called
my-computer-vision-projectand then create a Python 3.6 environment in a sub-directory calledenv/with the two packages listed above. Also include the most recent version ofjupyterlabin your environment (so you have a nice UI) andmatplotlib(so you can make plots).Solution
In order to create a new environment you use the
conda createcommand as follows.$ mkdir my-computer-vision-project $ cd my-computer-vision-project/ $ conda create --prefix ./env --channel pytorch \ python=3.6 \ jupyterlab=1.0 \ pytorch=1.1 \ torchvision=0.3 \ matplotlib=3.1Hint: For the lazy typers: the
--channelargument can also be shortened to-c, for more abbreviations, see also the Conda command reference .
Alternative syntax for installing packages from specific channels
There exists an alternative syntax for installing conda packages from specific channels that more explicitly links the channel being used to install a particular package.
$ conda install conda-forge::tensorflow --prefix ./envCreate a new folder
my-final-projectin~/Desktop/introduction-to-conda-for-data-scientistsand repeat the previous exercise using this alternative syntax to installpython,jupyterlab, andmatplotlibfrom theconda-forgechannel andpytorchandtorchvisionfrom thepytorchchannel.Solution
One possibility would be to use the
conda createcommand as follows.$ cd ~/Desktop/introduction-to-conda-for-data-scientists $ mkdir my-final-project $ cd my-final-project/ $ conda create --prefix ./env \ conda-forge::python=3.6 \ conda-forge::jupyterlab=1.0 \ conda-forge::matplotlib=3.1 \ pytorch::pytorch=1.1 \ pytorch::torchvision=0.3
A Python package isn’t available on any Conda channel! What should I do?
If a Python package that you need isn’t available on any Conda channel, then you can use the default Python package manager Pip to install this package from PyPI. However, there are a few potential issues that you should be aware of when using Pip to install Python packages when using Conda.
First, Pip is sometimes installed by default on operating systems where it is used to
manage any Python packages needed by your OS. You do not want to use this pip to
install Python packages when using Conda environments.
(base) $ conda deactivate
$ which python
/usr/bin/python
$ which pip # sometimes installed as pip3
/usr/bin/pip
Second, Pip is also included in the Miniconda installer where it is used to install and
manage OS specific Python packages required to setup your base Conda environment. You
do not want to use this pip to install Python packages when using Conda environments.
$ conda activate
(base) $ which python
~/miniconda3/bin/python
$ which pip
~/miniconda3/bin/pip
Another reaon to avoid installing packages into your
baseConda environmentIf your
baseConda environment becomes cluttered with a mix of Pip and Conda installed packages it may no longer function. Creating separate conda environments allows you to delete and recreate environments readily so you dont have to worry about risking your core Conda functionality when mixing packages installed with Conda and Pip.
If you find yourself needing to install a Python package that is only available via Pip, then
you should first install pip into your Conda environment and then use that pip to install
the desired package. Using the pip installed in your Conda environment to install Python packages
not available via Conda channels will help you avoid difficult to debug issues that frequently
arise when using Python packages installed via a pip that was not installed inside you Conda
environment.
Conda (+Pip): Conda wherever possible; Pip only when necessary
When using Conda to manage environments for your Python project it is a good idea to install packages available via both Conda and Pip using Conda; however there will always be cases where a package is only available via Pip in which case you will need to use Pip. Many of the common pitfalls of using Conda and Pip together can be avoided by adopting the following practices.
- Always explicitly install
pipin every Python-based Conda environment.- Always be sure your desired environment is active before installing anything using
pip.- Prefer
python -m pip installoverpip install; never usepipwith the--userargument.
Installing packages into Conda environments using
pipCombo is a comprehensive Python toolbox for combining machine learning models and scores. Model combination can be considered as a subtask of ensemble learning, and has been widely used in real-world tasks and data science competitions like Kaggle.
Activate the
machine-learning-envyou created in a previous challenge and usepipto installcombo.Solution
The following commands will activate the
basic-scipy-envand installcombo.$ conda install --name machine-learning-env pip $ conda activate machine-learning-env $ python -m pip install combo==0.1.*For more details on using
pipsee the official documentation.
Key Points
A package is a tarball containing system-level libraries, Python or other modules, executable programs and other components, and associated metadata.
A Conda channel is a URL to a directory containing a Conda package(s).
Explicitly including the channels (and their priority!) in a project’s environment file is necessary for another researcher to completely re-create that project’s software environment.
Understand how to use Conda and Pip together effectively.
Sharing Environments
Overview
Teaching: 30 min
Exercises: 15 minQuestions
Why should I share my Conda environment with others?
How do I share my Conda environment with others?
How do I create a custom kernel for my Conda environments inside JupyterLab?
Objectives
Create an environment from a YAML file that can be read by Windows, Mac OS, or Linux.
Create an environment based on exact package versions.
Create a custom kernel for a Conda environment for use inside JupyterLab and Jupyter notebooks.
Working with environment files
When working on a collaborative research project it is often the case that your operating system might differ from the operating systems used by your collaborators. Similarly, the operating system used on a remote cluster to which you have access will likely differ from the operating system that you use on your local machine. In these cases it is useful to create an operating system agnostic environment file which you can share with collaborators or use to re-create an environment on a remote cluster.
Creating an environment file
In order to make sure that your environment is truly shareable, you need to make sure that that the contents of your environment are described in such a way that the resulting environment file can be used to re-create your environment on Linux, Mac OS, and Windows. Conda uses YAML (“YAML Ain’t Markup Language”) for writing its environment files. YAML is a human-readable data-serialization language that is commonly used for configuration files and that uses Python-style indentation to indicate nesting.
Creating your project’s Conda environment from a single environment file is a Conda “best practice”. Not only do you have a file to share with collaborators but you also have a file that can be placed under version control which further enhancing the reproducibility of your research project and workflow.
Default
environment.ymlfileNote that by convention Conda environment files are called
environment.yml. As such if you use theconda env createsub-command without passing the--fileoption, thencondawill expect to find a file calledenvironment.ymlin the current working directory and will throw an error if a file with that name can not be found.
Let’s take a look at a few example environment.yml files to give you an idea of how to write
your own environment files.
name: machine-learning-env
dependencies:
- ipython
- matplotlib
- pandas
- pip
- python
- scikit-learn
This environment.yml file would create an environment called machine-learning-env with the
most current and mutually compatible versions of the listed packages (including all required
dependencies). The newly created environment would be installed inside the ~/miniconda3/envs/
directory, unless we specified a different path using --prefix.
Since explicit versions numbers for all packages should be preferred a better environment file would be the following.
name: machine-learning-env
dependencies:
- ipython=7.13
- matplotlib=3.1
- pandas=1.0
- pip=20.0
- python=3.6
- scikit-learn=0.22
Note that we are only specifying the major and minor version numbers and not the patch or build numbers. Defining the version number by fixing only the major and minor version numbers while allowing the patch version number to vary allows us to use our environment file to update our environment to get any bug fixes whilst still maintaining significant consistency of our Conda environment across updates.
Always version control your
environment.ymlfiles!While you should never version control the contents of your
env/environment sub-directory, you should always version control yourenvironment.ymlfiles. Version controlling yourenvironment.ymlfiles together with your project’s source code means that you always know which versions of which packages were used to generate your results at any particular point in time.
Let’s suppose that you want to use the environment.yml file defined above to create a Conda
environment in a sub-directory of some project directory. Here is how you would accomplish this
task.
$ cd ~/Desktop/introduction-to-conda-for-data-scientists
$ mkdir project-dir
$ cd project-dir
Once your project folder is created, create environment.yml using your favourite editor for instance nano.
Finally create a new conda environment:
$ conda env create --prefix ./env --file environment.yml
$ conda activate ./env
Note that the above sequence of commands assumes that the environment.yml file is stored within
your project-dir directory.
Automatically generate an environment.yml
To export the packages installed into the previously created machine-learning-env you can run the
following command:
$ conda env export --name machine-learning-env
When you run this command, you will see the resulting YAML formatted representation of your Conda
environment streamed to the terminal. Recall that we only listed five packages when we
originally created machine-learning-env yet from the output of the conda env export command
we see that these five packages result in an environment with roughly 80 dependencies!
To export this list into an environment.yml file, you can use --file option to directly save the
resulting YAML environment into a file.
$ conda env export --name machine-learning-env --file environment.yml
Make sure you do not have any other environment.yml file from before in the same directory when
running the above command.
This exported environment file will however not consistently produce environments that are reproducible across Mac OS, Windows, and Linux. The reason is, that it may include operating system specific low-level packages which cannot be used by other operating systems.
If you need an environment file that can produce environments that are reproducibile across Mac OS, Windows, and Linux, then you are better off just including those packages into the environment file that your have specifically installed.
$ conda env export --name machine-learning-env --from-history --file environment.yml
In short: to make sure others can reproduce your environment independent of the operating system they use,
make sure to add the --from-history argument to the conda env export command.
Create a new environment from a YAML file.
Create a new project directory and then create a new
environment.ymlfile inside your project directory with the following contents.name: scikit-learn-env dependencies: - ipython=7.13 - matplotlib=3.1 - pandas=1.0 - pip=20.0 - python=3.6 - scikit-learn=0.22Now use this file to create a new Conda environment. Where is this new environment created? Using the same
environment.ymlfile create a Conda environment as a sub-directory calledenv/inside a newly created project directory. Compare the contents of the two environments.Solution
To create a new environment from a YAML file use the
conda env createsub-command as follows.$ mkdir scikit-learn-project-dir $ cd scikit-learn-project-dir $ nano environment.yml $ conda env create --file environment.ymlThe above sequence of commands will create a new Conda environment inside the
~/miniconda3/envsdirectory. In order to create the Conda environment inside a sub-directory of the project directory you need to pass the--prefixto theconda env createcommand as follows.$ conda env create --file environment.yml --prefix ./envYou can now run the
conda env listcommand and see that these two environments have been created in different locations but contain the same packages.
Specifying channels in the environment.yml
We learned in the previous episode, that some packages may need to be installed from other than the defaults channel. We can also specify the channels, that conda should look for the packages within the environment.yml file:
name: pytorch-env

channels:
  - pytorch
  - defaults

dependencies:
  - pytorch=1.1
When the above file is used to create an environment, conda would first look in the
pytorchchannel for all packages mentioned underdependencies. If they exist in thepytorchchannel, conda would install them from there, and not look for them indefaultsat all.
Updating an environment
You are unlikely to know ahead of time which packages (and version numbers!) you will need to use for your research project. For example it may be the case that
- one of your core dependencies just released a new version (dependency version number update).
- you need an additional package for data analysis (add a new dependency).
- you have found a better visualization package and no longer need to old visualization package (add new dependency and remove old dependency).
If any of these occurs during the course of your research project, all you need to do is update
the contents of your environment.yml file accordingly and then run the following command.
$ conda env update --prefix ./env --file environment.yml --prune
Note that the --prune option tells Conda to remove any dependencies that are no longer required
from the environment.
Rebuilding a Conda environment from scratch
When working with
environment.ymlfiles it is often just as easy to rebuild the Conda environment from scratch whenever you need to add or remove dependencies. To rebuild a Conda environment from scratch you can pass the--forceoption to theconda env createcommand which will remove any existing environment directory before rebuilding it using the provided environment file.$ conda env create --prefix ./env --file environment.yml --force
Add Dask to the environment to scale up your analytics
Add to the
scikit-envenvironment file and update the environment. Dask provides advanced parallelism for data science workflows enabling performance at scale for the core Python data science tools such as Numpy Pandas, and Scikit-Learn.Solution
The
environment.ymlfile should now look as follows.name: scikit-learn-env dependencies: - dask=2.16 - dask-ml=1.4 - ipython=7.13 - matplotlib=3.1 - pandas=1.0 - pip=20.0 - python=3.6 - scikit-learn=0.22You could use the following command, that will rebuild the environment from scratch with the new Dask dependencies:
$ conda env create --prefix ./env --file environment.yml --forceOr, if you just want to update the environment in-place with the new Dask dependencies, you can use:
$ conda env update --prefix ./env --file environment.yml --prune
Installing via
pipinenvironment.ymlfilesSince you write
environment.ymlfiles for all of your projects, you might be wondering how to specify that packages should be installed usingpipin theenvironment.ymlfile. Here is an exampleenvironment.ymlfile that usespipto install thekaggleandyellowbrickpackages.name: example dependencies: - jupyterlab=1.0 - matplotlib=3.1 - pandas=0.24 - scikit-learn=0.21 - pip=19.1 - pip: - kaggle==1.5 - yellowbrick==0.9Note the double ‘==’ instead of ‘=’ for the pip installation and that you should include
pipitself as a dependency and then a subsection denoting those packages to be installed viapip. Also in case you are wondering, The Yellowbrick package is a suite of visual diagnostic tools called “Visualizers” that extend the Scikit-Learn API to allow human steering of the model selection process. Recent version of yellowbrick can also be installed usingcondafrom theconda-forgechannel.$ conda install --channel conda-forge yellowbrick=1.2 --prefix ./envAn alternative way of installing dependencies via
pipin your environment files is to store all the packages that you wish to install viapipin arequirements.txtfile and then add the following to yourenvironment.yml file.... - pip - pip: - -r file:requirements.txtConda will then install your
pipdependencies usingpython -m pip install -r requirements.txt(after creating the Conda environment and installing all Conda installable dependencies).
Making Jupyter aware of your Conda environments
Both JupyterLab and Jupyter Notebooks automatically ensure that the standard IPython kernel is always available by default. However, if you want to use a kernel based on a particular Conda environment from inside Jupyter (and Juptyer is not installed inside your environment) then will need to create a kernel spec file for your Conda environments manually.
Before you can create a custom kernel for you Conda environment you need to make sure that the
ipykernel package is installed in your Conda environment
as you will need to use this package to create the kernel spec file. Here is the updated xgboost-env
environment.yml file that includes the ipykernel package.
name: ml-env

dependencies:
  - ipykernel=5.3
  - ipython=7.13
  - matplotlib=3.1
  - pandas=1.0
  - pip=20.0
  - python=3.6
  - scikit-learn=0.22
Next, rebuild the Conda environment using the following command.
$ conda env create --prefix ./env --file environment.yml --force
Once the Conda environment has been re-built you can activate the environment and then create the custom kernel for the activated environment.
$ conda activate ./env
$ python -m ipykernel install --user --name xgboost-env --display-name "XGBoost"
The last command installs a kernel spec file for the current environment. Kernel spec files are
JSON files which can be viewed and changed with a normal text editor. The --name value is used
by Jupyter internally; --display-name is what you see in the JupyterLab launcher menu as well as
the Jupyter Notebook dropdown kernel menu. This command will overwrite any existing kernel with
the same name.
Create a kernel for a Conda environment
Create a custom kernel for the
machine-learning-envenvironment created in a previous challenge.Solution
In order to activate an existing environment by name you use the
conda activatecommand as follows.$ conda activate machine-learning-env $ python -m ipykernel install --user --name machine-learning-envNote that by leaving the
--display-nameunspecified, the display name will match the value provided to--name.
Key Points
Sharing Conda environments with other researchers facilitates the reprodicibility of your research.
Create an
environment.ymlfile that describes your project’s software environment.Creating custom kernels enables you to connect your Conda environments to an existing JupterLab install.
Managing GPU dependencies
Overview
Teaching: 45 min
Exercises: 15 minQuestions
Which NVIDIA libraries are available via Conda?
What do you do when you need the NVIDIA CUDA Compiler (NVCC) for your project?
Objectives
Show how to use Conda to manage key GPU dependencies for you next (data) science project.
Show how to identify which versions of CUDA packages are available via Conda.
Understand how to write a Conda environment file for a project with GPU dependencies.
Understand when you need the NVIDIA CUDA Compiler (NVCC) and how to handle this situation.
Getting familiar with NVIDIA CUDA libraries
Transitioning your (data) science projects from CPU to GPU can seem like a daunting task. In particular, there is quite a bit of unfamiliar additional software, such as NVIDIA CUDA Toolkit, NVIDIA Collective Communications Library (NCCL), and NVIDIA Deep Neural Network Library (cuDNN) to download and install.
If you go to the NVIDIA developer website you will find loads of documentation and instructions for how to install these libraries system wide. But then what do you do if you need different versions of these new libraries for different projects? You could install a bunch of different versions of NVIDIA CUDA Toolkit, NCCL, and cuDNN system wide and then use environment variables to control the “active” versions for each project but this is cumbersome and error prone. Fortunately there are better ways!
In this episode we are going to see how to manage project specific versions of the NVIDIA CUDA Toolkit, NCCL, and cuDNN using Conda.
Are NVIDIA libraries available via Conda?
Yep! The most important NVIDIA CUDA library that you will need is the NVIDIA CUDA Toolkit. The
NVIDIA CUDA Toolkit provides a development environment for creating high performance
GPU-accelerated applications. The toolkit includes GPU-accelerated libraries, debugging and
optimization tools and a runtime library. You can use the conda search command to see what
versions of the NVIDIA CUDA Toolkit are available from the default channels.
$ conda search cudatoolkit

Loading channels: done

# Name                       Version           Build  Channel
cudatoolkit                      9.0      h13b8566_0  pkgs/main
cudatoolkit                      9.2               0  pkgs/main
cudatoolkit                 10.0.130               0  pkgs/main
cudatoolkit                 10.1.168               0  pkgs/main
cudatoolkit                 10.1.243      h6bb024c_0  pkgs/main
cudatoolkit                  10.2.89      hfd86e86_0  pkgs/main
cudatoolkit                  10.2.89      hfd86e86_1  pkgs/main
NVIDIA actually maintains their own Conda channel and the versions of CUDA Toolkit available from the default channels are the same as those you will find on the NVIDIA channel. If you are interested in confirming this you can run the command
$ conda search --channel nvidia cudatoolkit
and then compare the build numbers with those listed above from the default channels.
The CUDA Toolkit packages available from defaults do not include NVCC
An important limitation of the versions of the NVIDIA CUDA Toolkit that are available from the either the default or NVIDIA Conda channels is that they do not include the NVIDIA CUDA Compiler (NVCC).
What about cuDNN?
The NVIDIA CUDA Deep Neural Network library (cuDNN) is a GPU-accelerated library of primitives for deep neural networks. cuDNN provides highly tuned implementations for standard routines such as forward and backward convolution, pooling, normalization, and activation layers.
If you are interested in deep learning, then you will need to get your hands on cuDNN. Various versions of cuDNN are available from the default channels.
$ conda search cudnn

Loading channels: done

# Name                       Version           Build  Channel
cudnn                          7.0.5       cuda8.0_0  pkgs/main
cudnn                          7.1.2       cuda9.0_0  pkgs/main
cudnn                          7.1.3       cuda8.0_0  pkgs/main
cudnn                          7.2.1       cuda9.2_0  pkgs/main
cudnn                          7.3.1      cuda10.0_0  pkgs/main
cudnn                          7.3.1       cuda9.0_0  pkgs/main
cudnn                          7.3.1       cuda9.2_0  pkgs/main
cudnn                          7.6.0      cuda10.0_0  pkgs/main
cudnn                          7.6.0      cuda10.1_0  pkgs/main
cudnn                          7.6.0       cuda9.0_0  pkgs/main
cudnn                          7.6.0       cuda9.2_0  pkgs/main
cudnn                          7.6.4      cuda10.0_0  pkgs/main
cudnn                          7.6.4      cuda10.1_0  pkgs/main
cudnn                          7.6.4       cuda9.0_0  pkgs/main
cudnn                          7.6.4       cuda9.2_0  pkgs/main
cudnn                          7.6.5      cuda10.0_0  pkgs/main
cudnn                          7.6.5      cuda10.1_0  pkgs/main
cudnn                          7.6.5      cuda10.2_0  pkgs/main
cudnn                          7.6.5       cuda9.0_0  pkgs/main
cudnn                          7.6.5       cuda9.2_0  pkgs/main
What about NCCL?
If you are already accelerating your (data) science workflows with a GPU, then in the near future you will probably be interested in using more than one GPU. The NVIDIA Collective Communications Library (NCCL) implements multi-GPU and multi-node collective communication primitives that are performance optimized for NVIDIA GPUs.
There are some older versions of NCCL available from the default channels but these versions will not be useful (unless, perhaps, you are forced to use very old versions of TensorFlow or similar).
$ conda search nccl

Loading channels: done

# Name                       Version           Build  Channel
nccl                           1.3.5      cuda10.0_0  pkgs/main
nccl                           1.3.5       cuda9.0_0  pkgs/main
nccl                           1.3.5       cuda9.2_0  pkgs/main
Not to worry: Conda Forge to the rescue! Conda Forge is a
community-led collection of recipes, build infrastructure and distributions for the Conda package
manager. I always check the conda-forge channel when I can’t find something I need available on
the default channels.
Which version of NCCL are available via Conda Forge?
Find out which versions of the NVIDIA Collective Communications Library (NCCL) are available via Conda Forge?
Solution
Use the
conda searchcommand with the--channel conda-forgeoption.$ conda search --channel conda-forge nccl Loading channels: done # Name Version Build Channel nccl 1.3.5 cuda10.0_0 pkgs/main nccl 1.3.5 cuda9.0_0 pkgs/main nccl 1.3.5 cuda9.2_0 pkgs/main nccl 2.4.6.1 h51cf6c1_0 conda-forge nccl 2.4.6.1 h7cc98d6_0 conda-forge nccl 2.4.6.1 hc6a2c23_0 conda-forge nccl 2.4.6.1 hd6f8bf8_0 conda-forge nccl 2.4.7.1 h51cf6c1_0 conda-forge nccl 2.4.7.1 h7cc98d6_0 conda-forge nccl 2.4.7.1 hd6f8bf8_0 conda-forge nccl 2.4.8.1 h51cf6c1_0 conda-forge nccl 2.4.8.1 h51cf6c1_1 conda-forge nccl 2.4.8.1 h7cc98d6_0 conda-forge nccl 2.4.8.1 h7cc98d6_1 conda-forge nccl 2.4.8.1 hd6f8bf8_0 conda-forge nccl 2.4.8.1 hd6f8bf8_1 conda-forge nccl 2.5.6.1 h51cf6c1_0 conda-forge nccl 2.5.6.1 h7cc98d6_0 conda-forge nccl 2.5.6.1 hc6a2c23_0 conda-forge nccl 2.5.6.1 hd6f8bf8_0 conda-forge nccl 2.5.7.1 h51cf6c1_0 conda-forge nccl 2.5.7.1 h7cc98d6_0 conda-forge nccl 2.5.7.1 hc6a2c23_0 conda-forge nccl 2.5.7.1 hd6f8bf8_0 conda-forge nccl 2.6.4.1 h51cf6c1_0 conda-forge nccl 2.6.4.1 h7cc98d6_0 conda-forge nccl 2.6.4.1 hc6a2c23_0 conda-forge nccl 2.6.4.1 hd6f8bf8_0 conda-forge
Some example Conda environment files
Now that you know how to figure out which versions of the various NVIDIA CUDA libraries are available on which channels you are ready to write your environment.yml file. In this section I will provide some example Conda environment files for PyTorch, TensorFlow, and NVIDIA RAPIDS to help get you started on your next GPU data science project.
PyTorch
PyTorch is an open source machine learning library based on the Torch
library, used for applications such as computer vision and natural language processing. It is
primarily developed by Facebook’s AI Research lab. Conda is actually the
recommended way to install PyTorch. The official
PyTorch binary ships with NCCL and cuDNN so it is not necessary to include these libraries in
your environment.yml file (unless some other package also needs these libraries!).
name: null

channels:
  - pytorch
  - conda-forge
  - defaults

dependencies:
  - cudatoolkit=10.1
  - pip=20.0
  - python=3.7
  - pytorch=1.5
  - torchvision=0.6
Check your channel priorities!
Also take note of the channel priorities: the official
pytorchchannel must be given priority overconda-forgein order to insure that the official PyTorch binaries (the ones that include NCCL and cuDNN) will be installed (otherwise you will get some unofficial version of PyTorch available onconda-forge).
TensorFlow
TensorFlow is a free, open-source software library for dataflow and
differentiable programming across a range of tasks. It is a symbolic math library, and is also used
for machine learning applications such as neural networks. There are lots of versions and builds of
TensorFlow available via Conda (the output of conda search tensorflow is too long to share here!).
How do you decide which version is the “correct” version? How to make sure that you get a build that includes GPU support? At this point you have seen all the Conda “tricks” required to solve this one yourself!
Create an
environment.ymlfile for TensorFlowIn this exercise you will create a Conda environment for TensorFlow. Important CUDA dependencies of TensorFlow are the CUDA Toolkit, cuDNN, and CUPTI. Don’t forget that if you want to train on more than one GPU, then your environment will also need NCCL and an MPI implementation.
Solution
Use the
tensorflow-gpumeta-package to select the appropriate version and build of TensorFlow for your OS; usempi4pyto get a CUDA-aware OpenMPI build.name: null channels: - conda-forge - defaults dependencies: - cudatoolkit=10.1 - cudnn=7.6 - cupti=10.1 - mpi4py=3.0 # installs cuda-aware openmpi - nccl=2.4 - pip=20.0 - python=3.7 - tensorflow-gpu=2.1 # installs tensorflow=2.1=gpu_py37h7a4bb67_0
NVIDIA RAPIDS (+BlazingSQL+Datashader)
As a final example let’s see how to get started with NVIDIA RAPIDS (and friends!). NVIDIA RAPIDS is a suite of open source software libraries and APIs gives you the ability to execute end-to-end data science and analytics pipelines entirely on GPUs (think Pandas + Scikit-learn but for GPUs instead of CPUs). In addition to RAPIDS we have also included BlazingSQL in this example environment file. BlazingSQL is an open-source SQL interface to extract-transform-load (ETL) massive datasets directly into GPU memory for analysis using NVIDIA RAPIDS. The environment also includes Datashader, a graphics pipeline system for creating meaningful representations of large datasets quickly and flexibly, that can be accelerated with GPUs. If you are going to do all of your data analysis on the GPU, then you might as well do your data visualization on the GPU too!
name: null

channels:
  - blazingsql
  - rapidsai
  - nvidia
  - conda-forge
  - defaults

dependencies:
  - blazingsql=0.13
  - cudatoolkit=10.1
  - datashader=0.10
  - pip=20.0
  - python=3.7
  - rapids=0.13
What exactly is installed when you install NVIDIA RAPIDS?
Create an NVIDIA RAPIDS environment using the Conda environment file above. Use Conda commands to inspect the complete list of packages that have been installed. Do you recognize any of the packages?
Solution
Use the following commands to create the environment.
$ mkdir nvidia-rapids-project
$ cd nvidia-rapids-project/
$ nano environment.yml # copy-paste the environment file contents
$ conda env create --prefix ./env --file environment.yml
Use the following commands to activate the environment and list all the packages installed.
$ conda activate ./env
$ conda list
But what if I need the NVIDIA CUDA Compiler?
Way up at the beginning of this lesson I mentioned that the versions of the NVIDIA CUDA Toolkit available via the default channels did not include the NVIDIA CUDA Compiler (NVCC). However, if your data science project has dependencies that require compiling custom CUDA extensions then you will almost surely need the NVIDIA CUDA Compiler (NVCC).
How do you know that your project dependencies need NVCC? Most likely you will try the standard approaches above and Conda will fail to successfully create the environment and perhaps throw a bunch of compiler errors. Once you know that you need NVCC, there are a couple of ways to get the NVCC compiler installed.
First, try the cudatoolkit-dev package…
The cudatoolkit-dev package available from the conda-forge channel includes GPU-accelerated libraries, debugging and optimization tools, a C/C++ compiler and a runtime library. This package consists of a post-install script that downloads and installs the full CUDA toolkit (NVCC compiler and libraries, but not the exception of CUDA drivers).
While the cudatoolkit-dev packages available from conda-forge do include NVCC, I have had difficulties getting these packages to consistently install properly.
- Some of the available builds require manual intervention to accept license agreements making these builds unsuitable for installing on remote systems (which is critical functionality).
- Some other builds seem to work on Ubuntu but not on other flavors of Linux such as CentOS.
- Other Conda packages that depend on CUDA will often install the cudatoolkit package even though everything included in this package will have already been installed via cudatoolkit-dev.
That said, it is always worth trying the cudatoolkit-dev approach first. Maybe it will work for
your use case. Here is an example that uses NVCC installed via the cudatoolkit-dev package to
compile custom extensions from PyTorch Cluster, a
small extension library of highly optimized graph cluster algorithms for the use with
PyTorch.
name: null

channels:
  - pytorch
  - conda-forge
  - defaults

dependencies:
  - cudatoolkit-dev=10.1
  - cxx-compiler=1.0
  - matplotlib=3.2
  - networkx=2.4
  - numba=0.48
  - pandas=1.0
  - pip=20.0
  - pip:
    - -r file:requirements.txt
  - python=3.7
  - pytorch=1.4
  - scikit-image=0.16
  - scikit-learn=0.22
  - tensorboard=2.1
  - torchvision=0.5
The requirements.txt file referenced above contains PyTorch Cluster and related packages such as
PyTorch Geometric. Here is what that file looks
like.
torch-scatter==2.0.*
torch-sparse==0.6.*
torch-spline-conv==1.2.*
torch-cluster==1.5.*
torch-geometric==1.4.*

# make sure the following are re-compiled if environment is re-built
--no-binary=torch-scatter
--no-binary=torch-sparse
--no-binary=torch-spline-conv
--no-binary=torch-cluster
--no-binary=torch-geometric
The use of the --no-binary option here insures that the packages with custom extensions will be
re-built whenever the environment is re-built which helps increase the reproducibility of the
environment build process when porting from workstations to remote clusters that might have
different OS.
…if that doesn’t work, then use the nvcc_linux-64 meta-package
The most robust approach to obtain NVCC and still use Conda to manage all the other dependencies
is to install the NVIDIA CUDA Toolkit on your system and then install a meta-package nvcc_linux-64
from conda-forge which configures your Conda environment to use the NVCC installed on your system
together with the other CUDA Toolkit components installed inside the Conda environment. While we
have found this approach to be more robust then relying on cudatoolkit-dev, this approach is more
involved as it requires installing a
particular version of the NVIDIA CUDA Toolkit
on your system first.
In order to demonstrate how to use the nvcc_linux-64 meta-package approach we will show how to
build a Conda environment for deep learning projects that use Horovod to enable distributed
training across multiple GPUs (either on the same node or spread across multiple nodes).
Horovod is an open-source distributed training framework for TensorFlow, Keras, PyTorch, and Apache MXNet. Originally developed by Uber for in-house use, Horovod was open sourced a couple of years ago and is now an official Linux Foundation AI (LFAI) project.
Typical environment.yml file
Let’s checkout the environment.yml file. You can find this environment.yml file on GitHub as a
part of a template repository to
help you get started with Horovod.
name: null

channels:
  - pytorch
  - conda-forge
  - defaults

dependencies:
  - bokeh=1.4
  - cmake=3.16 # insures that Gloo library extensions will be built
  - cudnn=7.6
  - cupti=10.1
  - cxx-compiler=1.0 # insures C and C++ compilers are available
  - jupyterlab=1.2
  - mpi4py=3.0 # installs cuda-aware openmpi
  - nccl=2.5
  - nodejs=13
  - nvcc_linux-64=10.1 # configures environment to be "cuda-aware"
  - pip=20.0
  - pip:
    - mxnet-cu101mkl==1.6.* # MXNET is installed prior to horovod
    - -r file:requirements.txt
  - python=3.7
  - pytorch=1.4
  - tensorboard=2.1
  - tensorflow-gpu=2.1
  - torchvision=0.5
Take note of the channel priorities: pytorch is given highest priority in order to insure that
the official PyTorch binary is installed (and not the binaries available on conda-forge). There
are also a few things worth noting about the dependencies. Even though you have installed the
NVIDIA CUDA Toolkit manually you can still use Conda to manage the other required CUDA components
such as cudnn and nccl (and the optional cupti).
- We use two meta-packages,
cxx-compilerandnvcc_linux-64, to make sure that suitable C, and C++ compilers are installed and that the resulting Conda environment is aware of the manually installed CUDA Toolkit. - Horovod requires some controller library to coordinate work between the various Horovod processes.
Typically this will be some MPI implementation such as OpenMPI. However, rather than specifying
the
openmpipackage directly, opt formpi4pyConda package which will install a CUDA-aware build of OpenMPI (assuming it is supported by your hardware). - Horovod also supports the Gloo collective communications library that can be used in place of MPI.
If you include
cmakein order to insure that the Horovod extensions for Gloo are built.
Typical requirements.txt file
The requirements.txt file is where all of the dependencies, including Horovod itself, are
listed for installation via pip. In addition to Horovod, it is recommended to use pip to install
JupyterLab extensions to enable GPU and CPU resource monitoring via
jupyterlab-nvdashboard and
Tensorboard support via
jupyter-tensorboard. Note the use of the
--no-binary option at the end of the file. Including this option insures that Horovod will be
re-built whenever the Conda environment is re-built.
horovod==0.19.*
jupyterlab-nvdashboard==0.2.*
jupyter-tensorboard==0.2.*

# make sure horovod is re-compiled if environment is re-built
--no-binary=horovod
Creating the Conda environment
You can create the Conda environment in a sub-directory env of your project directory by
running the following commands. By default Horovod will try and build extensions for all
detected frameworks. See the Horovod documentation on
for the details on additional environment variables that can be set prior to building Horovod.
export ENV_PREFIX=$PWD/env
export HOROVOD_CUDA_HOME=$CUDA_HOME
export HOROVOD_NCCL_HOME=$ENV_PREFIX
export HOROVOD_GPU_OPERATIONS=NCCL
conda env create --prefix $ENV_PREFIX --file environment.yml --force
Wrap complex Conda environment builds in a script!
In order to enhance reproducibility of your complex Conda build, I typically wrap commands into a shell script called
create-conda-env.sh. Running the shell script will set the Horovod build variables, create the Conda environment, activate the Conda environment, and build JupyterLab with any additional extensions as specified in apostBuildscript.#!/bin/bash --login set -e export ENV_PREFIX=$PWD/env export HOROVOD_CUDA_HOME=$CUDA_HOME export HOROVOD_NCCL_HOME=$ENV_PREFIX export HOROVOD_GPU_OPERATIONS=NCCL conda env create --prefix $ENV_PREFIX --file environment.yml --force conda activate $ENV_PREFIX . postBuildYou can put scripts inside a
bindirectory in my project root directory. The script should be run from the project root directory as follows.$ ./bin/create-conda-env.sh
We covered a lot of ground in this lesson! We showed you how to use conda search to see which
versions of the NVIDIA CUDA Toolkit and related libraries such as NCCL and cuDNN were available
via Conda. Then we walked you through example Conda environment files for several popular data
science frameworks that can use GPUs. We wrapped up with a discussion of two different approaches
for getting NVCC when your project requires compiler custom CUDA extensions. Hopefully these ideas
will help you make the jump from CPUs to GPUs on your next data science project!
Key Points
Conda can be used to manage your key GPU dependencies.
Use
conda searchto identify which version of CUDA libraries are available.For most projects you will not need NVCC and can use the
cudatoolkitpackage from default channels.If your project does need NVCC, try
cudatoolkit-devpackage ornvcc_linux-64meta-package (requires separate NVIDIA CUDA Toolkit install).