Automating Website Deployment
Last updated on 2025-01-30 | Edit this page
Overview
Questions
- What is Continuous Deployment and what does it mean in the context of our site?
- How do we enable GitHub Actions on our repository?
- What needs to go into a GitHub Actions workflow to enable Continuous Deployment of our site?
Objectives
- Understand what the concept of Continuous Deployment means for a website
- Understand the content of a GitHub Actions workflow file that enables Continuous Deployment to GitHub Pages
In this episode, we will use GitHub Actions to define a Continuous Deployment pipeline that will automatically update our webite when we merge Pull Requests in GitHub.
The concept of Continuous Deployment is as follows:
For every change we integrate or merge into our GitHub repo, a fresh version of our website should be created and deployed automatically for us.
- Let’s start by checking out a new branch in our local repo.
OUTPUT
Switched to a new branch 'add-cd'- GitHub Actions are automatically triggered by files that are stored
in a special folder called
.github/workflows. So let’s create that folder!
Note: the -p flag here means “If the
parent directory doesn’t already exist (i.e. .github/),
then please create that too.” Try running the above command without this
flag first and see what error message you get!
- Create a
cd.yml(cdis short for Continuous Deployment) file inside the.github/workflowsfolder. You can do this in the terminal with the below command.
Now open it in your favourite text editor. Here’s how you would open
the file with nano.
(Find out more about the YAML (.yml) file format in this blog post.)
- We have a workflow ready for us to use below which you should feel
free to copy and paste into your
cd.ymlfile, and then we’ll go through each section.
Whitespace in YAML
What does “whitespace matters” mean? Why is it important?
It means that the spaces in the file carry meaning. A bit like how in Python if you indent lines then it knows they’re part of a for loop. The way that a for loop ends is that you don’t indent the next line. Think about replacing the whitespace (either spaces or tabs) with characters, such as dots. 4 dots (….) which represent 4 spaces ( ) tells the file that this new information belongs to the line above. In some programming languages whitespace doesn’t matter - newlines might matter but where you put the words is only important for what it looks like, not what actually happens.
Python, Markdown, YAML all depend on whitespace to understand what the developer means - so be careful when you copy and paste!
YAML
name: Build and Deploy Site

on:
  push:
    branches:
      - main
  pull_request:
    branches:
      - main

jobs:
  build-and-deploy-site:
    runs-on: ubuntu-latest
    steps:
      - name: Checkout repo
        uses: actions/checkout@v2
        with:
          submodules: true
          fetch-depth: 0

      - name: Setup Hugo
        uses: peaceiris/actions-hugo@v2
        with:
          hugo-version: 'latest'

      - name: Build site with Hugo
        run: hugo --minify

      - name: Check HTML
        uses: chabad360/htmlproofer@master
        with:
          directory: "./public"
          arguments: --only-4xx --check-favicon --check-html --assume-extension --empty-alt-ignore --disable-external
        continue-on-error: true

      - name: Deploy to GitHub Pages
        if: github.event_name == 'push' && github.ref == 'refs/heads/main'
        uses: peaceiris/actions-gh-pages@v3
        with:
          github_token: ${{ secrets.GITHUB_TOKEN }}
publish_dir: ./public- The
nameparameter defines what our workflow should be called - The
onblock beginning defines what events should trigger our workflow to run. We have two defined here:-
on.push.branches = [main]: This tells GitHub Actions to run the workflow whenever a push is made to themainbranch. This is most commonly when a PR is merged. -
on.pull_request.branches = [main]: This tells GitHub Actions to run the workflow every time a PR intending to merge something into themainbranch is opened.
-
- The
jobssection defines which jobs the workflow will run when triggered. We have one job to run calledbuild-and-deploy-siteand we have requested the latest version of the Ubuntu Operating System to run this job on (Windows and Mac OSs are also available to execute jobs). - The
stepssection, underneathjobs.<job_name>, defines each step involving in running the job.- Step 1 is a checkout step. This clones the repo like we did manually
in step 3 of episode 2. The
fetch-depth: 0line asks GitHub to not download the full repo history, only the most recent commit, and thesubmodules: trueline asks GitHub to also checkout the submodules we depend on. Without this, ourthemesfolder won’t be populated with the info we need to build the site! - Step 2 installs the latest version of Hugo.
- Step 3 builds the site using Hugo. The
--minifyflag ensures that the output HTML files are compressed to take up the minimum amount of space required. The ouput files are stored in a folder calledpublic/. - Step 4 runs a tool called
htmlprooferover the generated HTML files inpublic. This tool checks for things like broken links across the site.- This step has the
continue-on-errorflag set totrueallowing the deployment process to continue even ifhtmlprooferdiscovers errors. This is because this step will fail since, for example, we do not setup favicons during this lesson and this is one of the properties the tool checks.
- This step has the
- Step 5 will commit the HTML files to a new branch on our repo called
gh-pages. It only publishes the HTML files contained in thepublicdirectory as they are the only ones required to create the site at this point.- Note this step has an
ifstatement that states this step should only be executed when the event that triggered the workflow was a push to themainbranch (most commonly a merged PR). This prevents the live website being redeployed by unreviewed/unapproved changes in a PR. - This step also requires a secret
GITHUB_TOKEN. You do not have to worry about creating and/or storing this token. It is a special token that is automatically generated by GitHub for every triggered workflow run and allows the workflow to commit and publish new branches. GitHub released a blog post discussing how to control the permissions of this token.
- Note this step has an
- Step 1 is a checkout step. This clones the repo like we did manually
in step 3 of episode 2. The
Add, commit and push the cd.yml file to GitHub as we did
in episode 3.
BASH
git add .github/workflows/cd.yml
git commit -m "Add a GitHub Actions workflow to build and deploy the site"
OUTPUT
[add-cd 92c9552] Add a GitHub Actions workflow to build and deploy the site
 1 file changed, 41 insertions(+)
create mode 100644 .github/workflows/cd.ymlOUTPUT
Enumerating objects: 6, done.
Counting objects: 100% (6/6), done.
Delta compression using up to 4 threads
Compressing objects: 100% (3/3), done.
Writing objects: 100% (5/5), 875 bytes | 875.00 KiB/s, done.
Total 5 (delta 1), reused 0 (delta 0), pack-reused 0
remote: Resolving deltas: 100% (1/1), completed with 1 local object.
remote:
remote: Create a pull request for 'add-cd' on GitHub by visiting:
remote:      https://github.com/HelmUpgradeBot/HelmUpgradeBot.github.io/pull/new/add-cd
remote:
To https://github.com/HelmUpgradeBot/HelmUpgradeBot.github.io.git
 * [new branch]      add-cd -> add-cd
Create another PR in GitHub’s browser interface as we did in episode 3. You should see the check now running and report a status at the bottom of the open PR page! Merge the PR once the test has passed. At any point, you can click the “Actions” tab at the top of the GitHub page to see the status of your GitHub Action workflows.
We now need to configure some more settings for the GitHub repo.
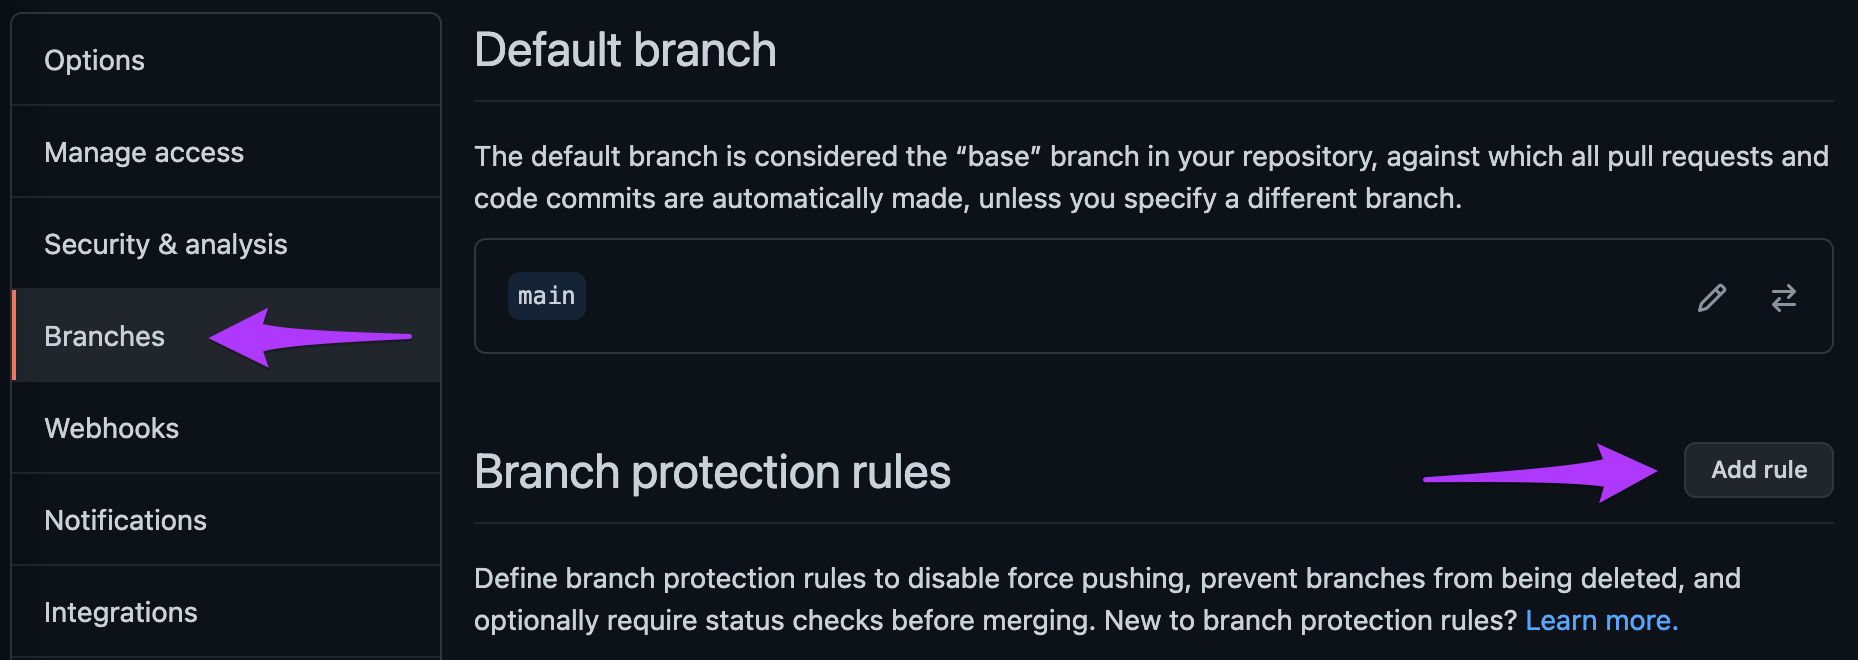
Click the “Settings” tab along the top of the GitHub webpage.
Select “Branches” from the menu on the left-hand-side (4th option from the top).
We will add a branch protection rule to prevent changes that could break our site from being deployed. Click “Add rule”.
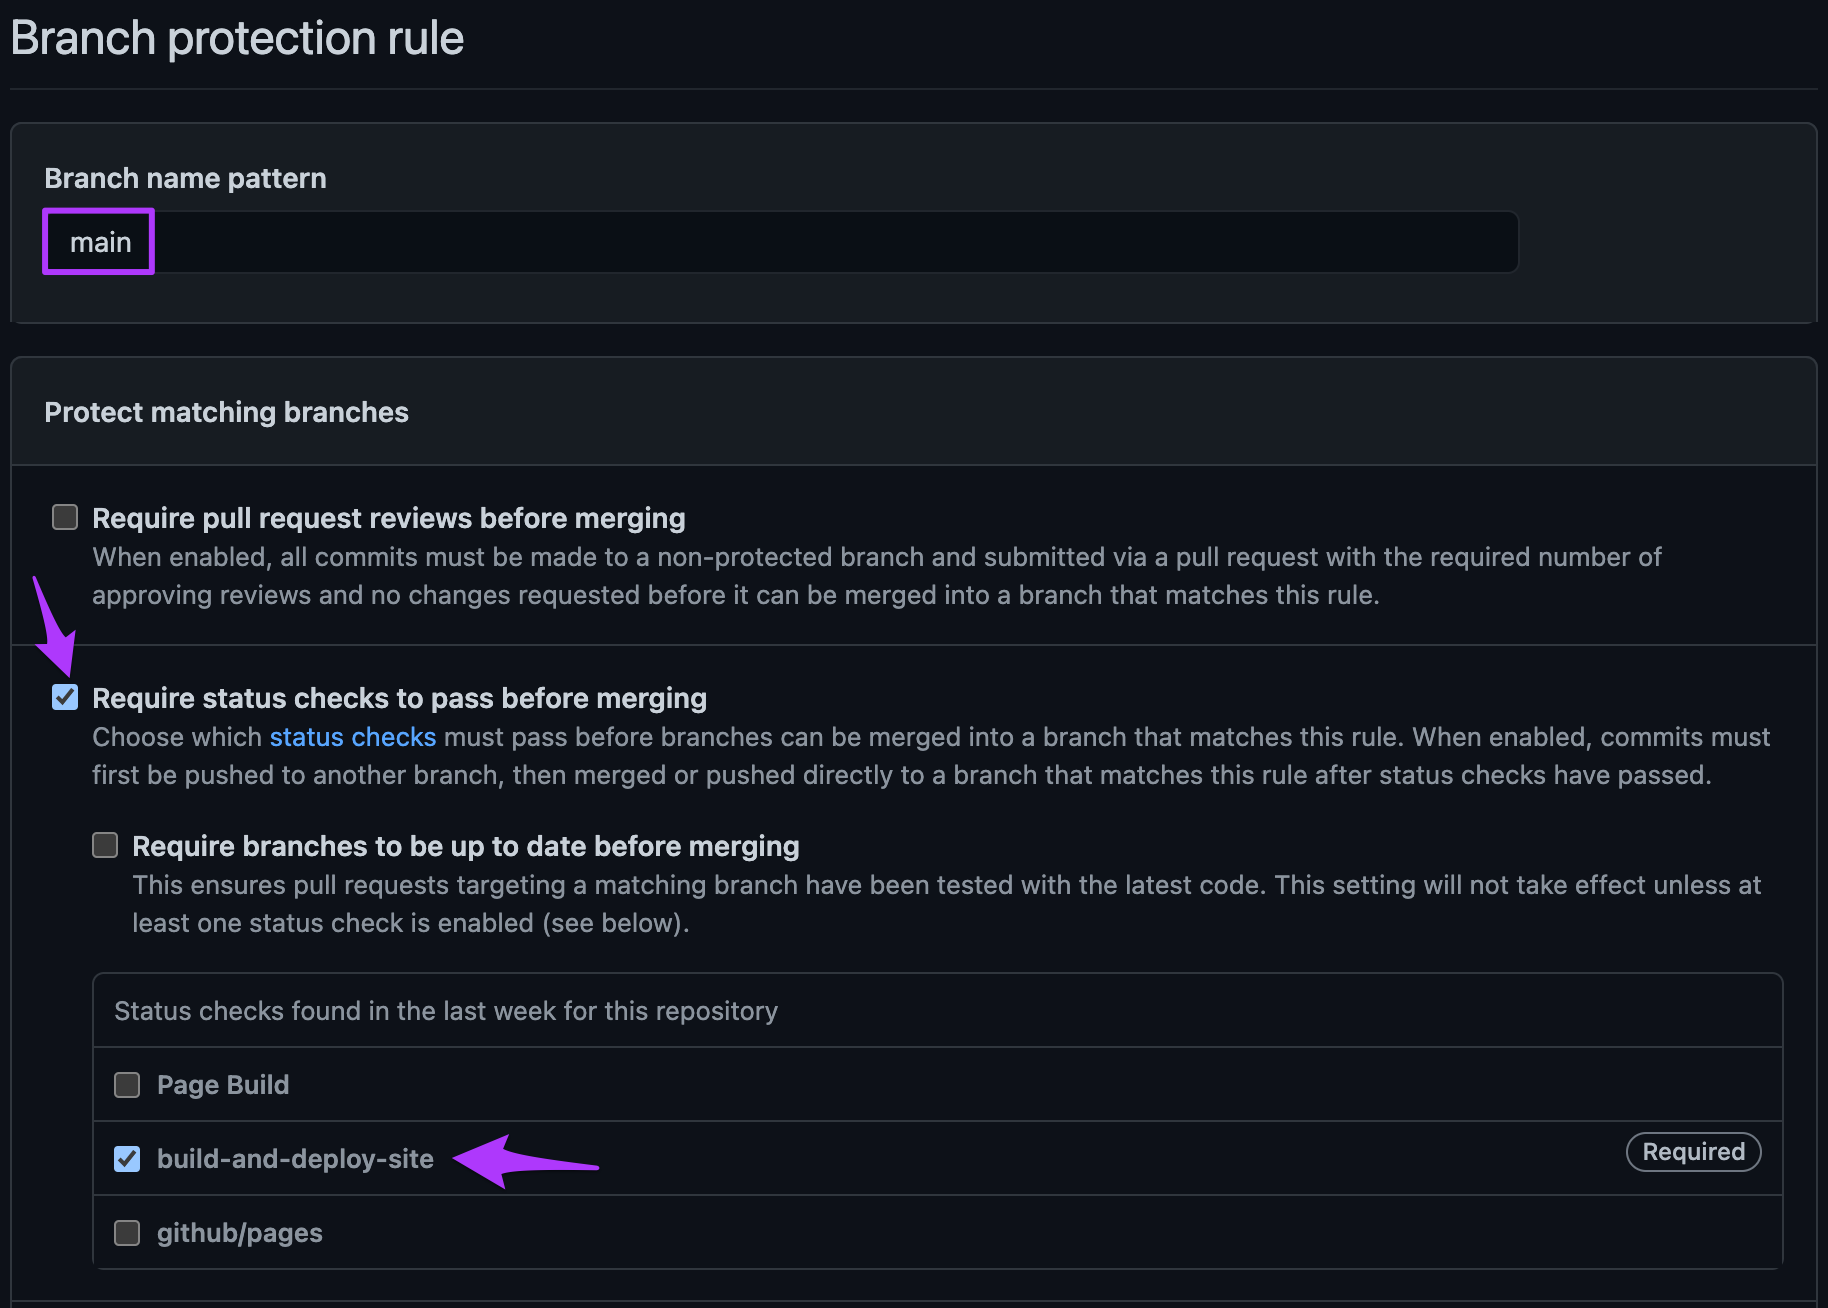
- In the “Branch pattern name” type
main, then select the “Require status checks to pass before merging” box. Finally select thebuild-and-deploy-sitestatus check from the list and click “Create” at the bottom of the page. (You may be asked to reenter your GitHub password.) This means that thebuild-and-deploy-sitejob MUST pass, otherwise merging the PR will be blocked.
Now select the “Pages” option from the left-hand-side menu (second option from the bottom). This is where we configure GitHub Pages to host the website.
In the “Source” section, select
gh-pagesfrom the “Branch” dropdown and leave the folder dropdown as/ (root). Then click “Save”.
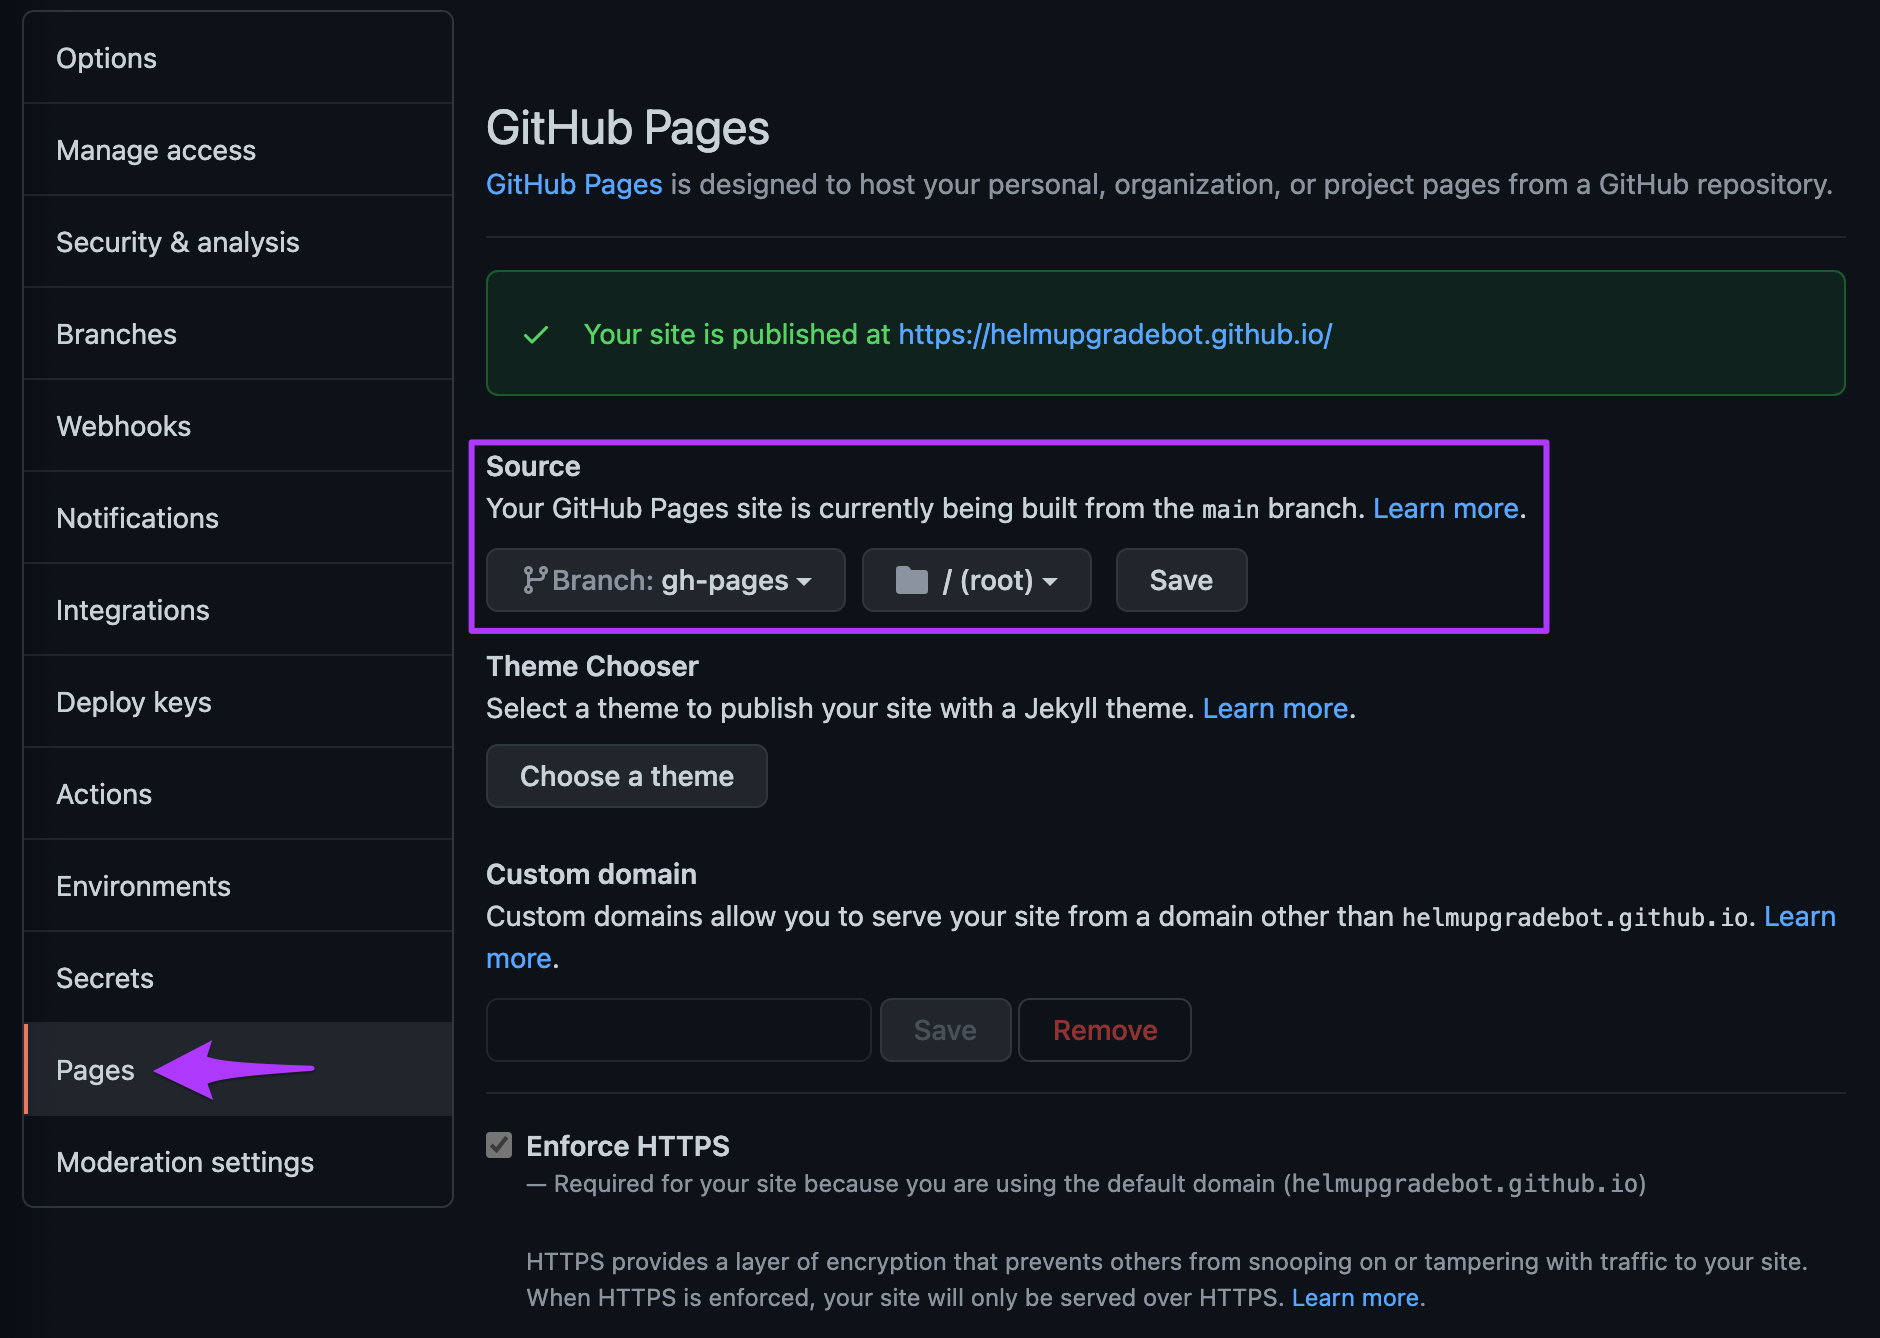
- After a few moments, refresh the page. The banner along the top
should now be green and read “Your site is published at
https://HelmUpgradeBot.github.io”. Click the link in the browser and see your site live!
Congratulations! Your site is now live on GitHub Pages!
It’s still a little bare though, so let’s update our local repo in our terminal and then add some content.
Close your browser window displaying your website and run Ctrl+C in your terminal to stop the hugo server command.
OUTPUT
Switched to branch 'main'
Your branch is up to date with 'origin/main'.OUTPUT
remote: Enumerating objects: 1, done.
remote: Counting objects: 100% (1/1), done.
remote: Total 1 (delta 0), reused 0 (delta 0), pack-reused 0
Unpacking objects: 100% (1/1), 654 bytes | 654.00 KiB/s, done.
From https://github.com/HelmUpgradeBot/HelmUpgradeBot.github.io
   cd19a8f..dfed2bc  main       -> origin/main
Updating cd19a8f..dfed2bc
Fast-forward
 .github/workflows/cd.yml | 41 +++++++++++++++++++++++++++++++++++++++++
 1 file changed, 41 insertions(+)
create mode 100644 .github/workflows/cd.yml- Continuous Deployment of a website involves rebuilding and republishing the site with every change
- GitHub Action workflows are YAML files that contain triggers, jobs
and steps that are performed automatically. GitHub automatically detects
these files in the
.github/workflowsfolder.