Introduction to Nextflow
Overview
Teaching: 40 min
Exercises: 20 minQuestions
What is Nextflow?
What are the components of Nextflow?
How can I use Nextflow to implement my workflow?
Objectives
What is Nextflow?
According to its website: “Nextflow enables scalable and reproducible scientific workflows using software containers. It allows the adaptation of pipelines written in the most common scripting languages. Its fluent DSL simplifies the implementation and the deployment of complex parallel and reactive workflows on clouds and clusters.”
Where to get help
The documentation for Nextflow can be found here and is an excellent resource. I have included links to the relevant sections of the documentation in the headers of this tutorial’s sections. There is also a basic patterns which has examples or basic pipeline problems which can be very useful for beginners. There is also some excellent training which also includes similar and more examples than what we will cover in this training. You can also ask for help on the Nextflow slack channel.
Testing Nextflow commands
In the following sections we will go through several examples and we encourage you to copy and paste the code and have a play with it.
You can do this by either putting into a file and running that file using nextflow run or using nextflow console.
nextflow console is an interactive console which is great for testing out channel manipulations.
You can write on or more lines of code and press Ctrl+r to run it and see the output like so:
The output does not clear the output or move you to the bottom of the output window.
To avoid confusion, it is best to clear the output window (using Ctrl+w) before rerunning the console.
Example files
We have created some (mostly empty) example files for you to play with as you try the channel manipulation. To download and untar the files in your current directory, use the following:
wget https://github.com/ADACS-Australia/Nextflow_Training_2022B/raw/gh-pages/data/example_files.tar -O - | tar -xv
If you run the commands from this episode in the same directory you download them to, you shouldn’t see any “files do not exist” errors.
The outputs of your commands will show the files in the directory you downloaded them to instead of /data/some/dir/.
Nextflow components
Pipelines can be described using flowcharts. Nextflow takes advantage of this by only requiring you to describe the parts of the flow chart, and Nextflow will put the pipeline together for you.
In the following sections, we shall describe the basic components of Nextflow to give you an understanding of the pipeline building blocks. The following is a simple example of how the components work together to create a pipeline.
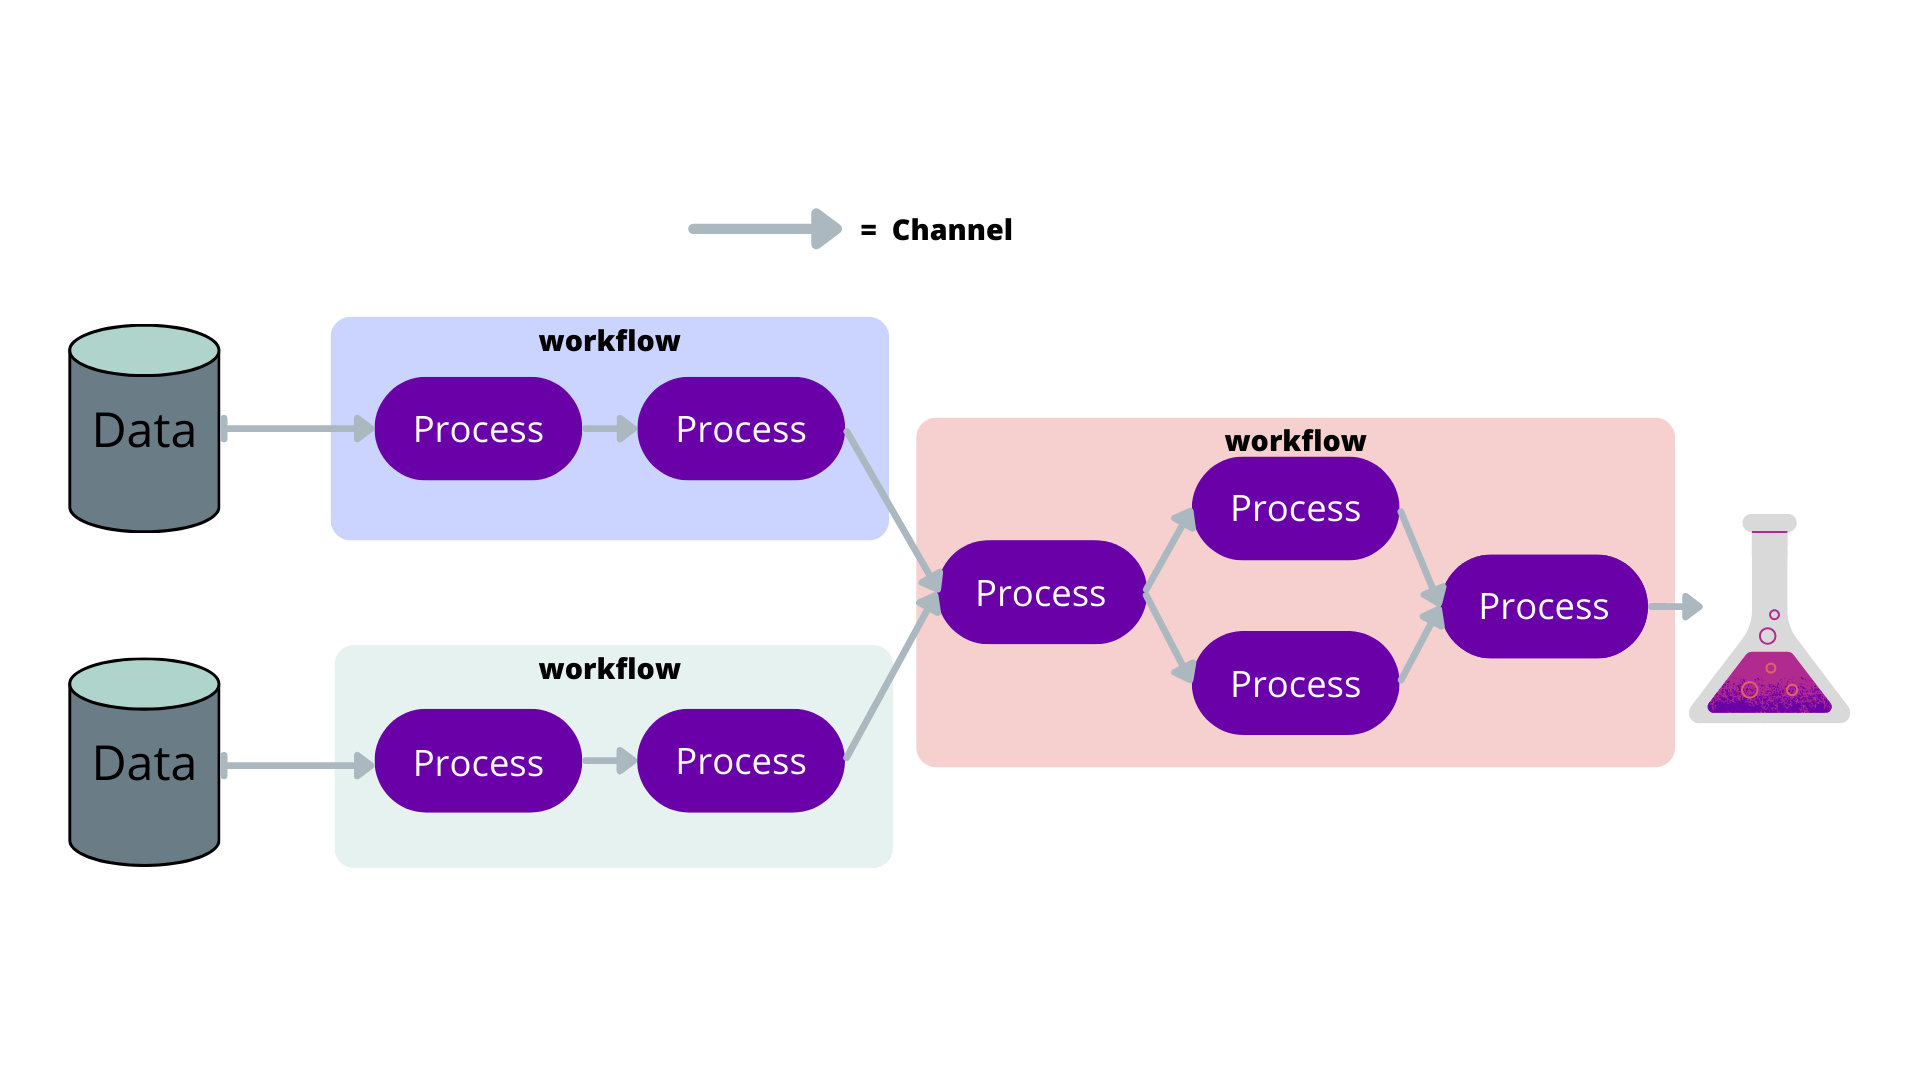
Channel
Often files or variables are handed to and from processes. Think of them as the arrows in a flow diagram.
Feel free to copy and paste these examples into the Nextflow console to follow along.
You can create channels of values using of:
ch = Channel.of( 1, 3, 5, 7 )
ch.view { "value: $it" }
which will output:
value: 1
value: 3
value: 5
value: 7
You can create channels of files using fromPath:
myFileChannel = Channel.fromPath( 'example_1.txt' )
myFileChannel.view()
which, as long as the file exists, will output:
/data/some/dir/example_1.txt
You can also use wildcards to collect files:
myFileChannel = Channel.fromPath( '/data/some/dir/example*.txt' ).view()
which could output someting like:
/data/some/dir/example_1.txt
/data/some/dir/example_2.txt
/data/some/dir/example_3.txt
Process
A process is a task you would like to include in your pipeline so it is the equivalent of a bubble in your flow chart. It is written in bash by default and can have inputs and outputs.
Here is the syntax:
process < name > {

    [ directives ]

    input:
        < process inputs >

    output:
        < process outputs >

    when:
        < condition >

    [script|shell|exec]:
    < user script to be executed >

}
The script is surrounded by triple quotes and will use script by default.
In the scripts you can use the $ notation do denote the input variables like you would with a bash script like so:
process script_example {
    input:
        path some_file
        val some_val

    script:
    """
    some_script --input $some_file --option ${some_val}
    """
}
Because bash also uses the $ notation to denote values, we have to use \$ to make Nextflow ignore the $
so it can still be used by bash. For example:
process script_example {
    input:
        path some_file
        val some_val

    script:
    """
    for bash_val in \$(seq 3); do
        some_script --input $some_file --option ${some_val} --other \${bash_val} --user \$USER
    done
    """
}
Because this can be confusing, you can instead use shell
which uses ! to denote Nextflow values. So the above can instead be written as:
process shell_example {
    input:
        path some_file
        val some_val

    shell:
    '''
    for bash_val in $(seq 3); do
        some_script --input !some_file --option !{some_val} --other ${bash_val} --user $USER
    done
    '''
}
Note that we also used triple single quotes to prevent any other bash string interpolation.
By default, the process will be executed as a bash script, but you can easily add the languages shebang to the first line of the script. For example, you could write a python process like so:
process pythonStuff {
    """
    #!/usr/bin/python

    x = 'Hello'
    y = 'world!'
    print(f"{x} {y}")
    """
}
Variables
Variables are easy to declare and similar to other languages. You should treat variables as constants as soon as the pipeline begins. If the variable is job-dependent, you should turn it into a channel.
You can use params.<some_variable> to define command line arguments.
This is very useful for specifying where input files are or other constants.
The equivalent command line argument uses two dashes like so --<some_variable>
(two dashes are for pipeline variables and single dashes are for Nextflow variables like -resume).
For example:
params.input_dir = "/data/some/dir"

myFileChannel = Channel.fromPath( '${params.input_dir}/*csv' )
This will create a channel of all the CSV files in /data/some/dir/ by default, but this can also be changed by using
nextflow run example.nf --input_dir /some/other/dir/
Will instead use the CSVs in /some/other/dir/
If something is constant throughout the pipeline, you can leave it as a variable. One example could be some sort of observation identifier or date:
params.observation_id = 'default1234'

process make_files {
    output:
    path "*.txt"

    """for i in \$(seq 3); do touch ${params.observation_id}_\${i}_s_one.txt; done"""
}
You can see we’re labelling the output files with the observation ID for all jobs.
Workflow
A workflow is a combination of processes that will include the entire workflow or a sub part of it (will be explained in a later section). This is where you will connect processes by their channels and and manipulate the channels so your pipeline runs in the required way.
workflow  {
    a_process( channel.from('/data/some//dir/example_1.txt') )
    another_process( a_process.out )
}
Note that we get output from processes with .out, if there are mutiple outputs from a process you can treat it like a list so if you want the first output channel grab it with .out[0].
Simple script
Let’s dive right in and make a simple pipeline that will make a file then print the contents. The flow chart for this pipeline will look like this:

Here is how we would turn it into a pipeline as a script called hello_world.nf
params.message = "hello world"

process make_file {
    output:
        path "message.txt"

    """
    echo "${params.message}" > message.txt
    """
}

process echo_file {
    input:
        path message_file
    output:
        stdout

    """
    cat ${message_file} | tr '[a-z]' '[A-Z]'
    """
}

workflow {
    make_file()
    echo_file(make_file.out).view()
}
This script has two simple processes. The first writes a variable to a file, then hands that file to the second process, which capitalises it and outputs it to the terminal. You can execute this script on the command line using:
nextflow run hello_world.nf
Which will output:
N E X T F L O W  ~  version 22.03.1-edge
Launching `hello_world.nf` [romantic_linnaeus] DSL2 - revision: 1298655152
executor >  local (2)
[8a/8f3033] process > make_file [100%] 1 of 1 ✔
[72/4df67e] process > echo_file [100%] 1 of 1 ✔
HELLO WORLD
Huzzah, we have run our first script!. The output can be a bit confusing so lets go through it line by line.
N E X T F L O W ~ version 22.03.1-edge
This is the Nextflow version you are using, you are likely using a more recent version than this.
Launching `hello_world.nf` [romantic_linnaeus] DSL2 - revision: 1298655152
This is the script you are running within the `, this will show you the full path to the script if you’re running it in a different directory.
[romantic_linnaeus] is a random name Nextflow gives to the run, it will change every time you run it.
DSL2 is a Nextflow syntax extension which is now the default as it simlifies writing complex pipelines.
The revision is a hex that nextflow gives your pipeline and will only change if you change the pipeline scripts.
executor > local (2)
This is a count of where the jobs where executed. In this example, two jobs were run locally.
[8a/8f3033] process > make_file [100%] 1 of 1 ✔
[8a/8f3033] is an identifier of the last job this processed launched (we will go into this in more detail later).
process > make_file this is the name of the process this line is describing.
[100%] 1 of 1 ✔ this describes how many of this process has been launched and how many have finished successfully.
[72/4df67e] process > echo_file [100%] 1 of 1 ✔
This is the same as the above but for the echo_file process.
HELLO WORLD
This is the output of our pipeline.
Normally we don’t output anything for our pipeline to the command line (outside of debugging) but we saw it because we used .view() on the output of echo_file.
If we want to view the message.txt file we have to do a little digging because it’s not in the directory in which we called NextFlow.
NextFlow runs each process in it’s own special directory so that concurrently running processes don’t interfere with each other.
We’ll describe this in more detail in the next lesson.
Simple script challenge
For this challenge we will use the simple script from before:
params.message = "hello world"

process make_file {
    output:
        path "message.txt"

    """
    echo "${params.message}" > message.txt
    """
}

process echo_file {
    input:
        path message_file
    output:
        stdout

    """
    cat ${message_file} | tr '[a-z]' '[A-Z]'
    """
}

workflow {
   make_file()
   echo_file(make_file.out).view()
}
Your challenge is to change the
echo_fileprocess so that it changes the message to lowercase (instead of uppercase). Then to confirm that it works, change the input message to “THIS SHOULD BE LOWERCASE” using the command line.Remember to use the etherpad to share your success or ask questions.
Soultion
This is the change to the
echo_fileprocessprocess echo_file { input: path message_file output: stdout """ cat ${message_file} | tr '[A-Z]' '[a-z]' """ }which when run like so:
nextflow run simple_script_challange.nf --message "THIS SHOULD BE LOWERCASE"will output
N E X T F L O W  ~  version 22.04.5
Launching `simple_script_challange.nf` [wise_davinci] DSL2 - revision: e1bf2b9b55
executor >  local (2)
[40/bbe0be] process > make_file [100%] 1 of 1 ✔
[d1/044ad5] process > echo_file [100%] 1 of 1 ✔
this should be lowercase
All about channels and why we manipulate them?
The format of your channels is very important as it dictates how your pipeline will run. Each row of a channel will spawn its own job for each process, so the shape of the channel informs Nextflow how many jobs to launch and what input each job has. Manipulating channels is the most difficult parts of Nextlflow but it allows us create any type of pipeline.
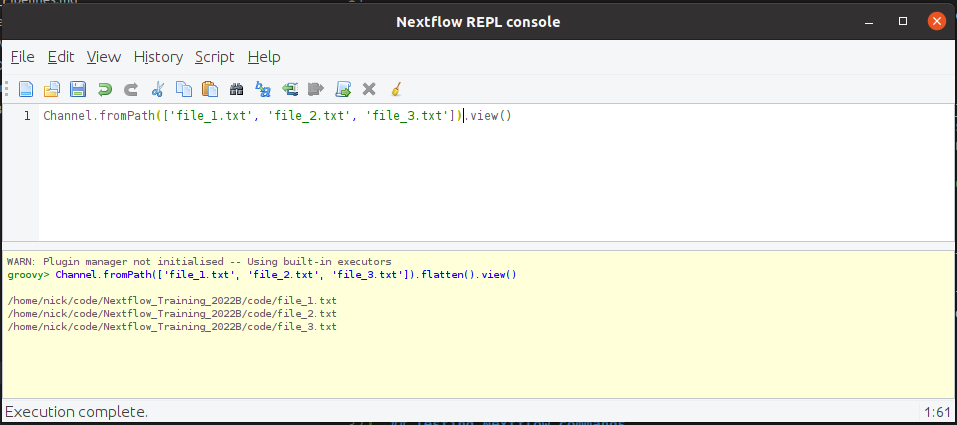
So we have a channel of three files like so:
Channel.fromPath(['example_1.txt', 'example_2.txt', 'example_3.txt']).view()
/data/some/dir/example_1.txt
/data/some/dir/example_2.txt
/data/some/dir/example_3.txt
We have three rows with one file each. So if we input this to a process it would create three jobs.
If we instead wanted to create a single job that has access to all three files we can use the collect operator like so:
Channel.fromPath(['example_1.txt', 'example_2.txt', 'example_3.txt']).collect().view()
[/data/some/dir/example1.txt, /data/some/dir/example2.txt, /data/some/dir/example3.txt]
So now we have a single row of files. Just for fun, we can even use flatten to “flatten” them back to one file per row:
Channel.fromPath(['example1.txt', 'example2.txt', 'example3.txt']).collect().flatten().view()
/data/some/dir/example1.txt
/data/some/dir/example2.txt
/data/some/dir/example3.txt
Channel Manipulation Example
Let’s see what this channel manipulation looks like in a full workflow:
process make_files {
   output:
   path "file*.txt"

   """for i in \$(seq 3); do touch file_\${i}.txt; done"""
}

process each_file {
   echo true

   input:
   path each_file

   """echo 'I have each file: ${each_file}'"""
}

process all_files {
   echo true

   input:
   path all_files

   """echo 'I have all files: ${all_files}'"""
}

workflow {
   make_files()
   // flatten channel to make the dimensions 3 rows x 1 column
   each_file(make_files.out.flatten())
   // collect channel to make the dimensions 1 row x 3 columns
   all_files(make_files.out.collect())
   // The above collect is redundant so you will get the same result from:
   // all_files(make_files.out)
}
Which will output:
N E X T F L O W  ~  version 22.03.1-edge
Launching `channels.nf` [boring_magritte] DSL2 - revision: d6c334a8a0
executor >  local (5)
[2d/daa992] process > make_files    [100%] 1 of 1 ✔
[b8/de87b0] process > each_file (3) [100%] 3 of 3 ✔
[9d/c5d625] process > all_files     [100%] 1 of 1 ✔
I have all files: file_1.txt file_2.txt file_3.txt

I have each file: file_1.txt

I have each file: file_2.txt

I have each file: file_3.txt
We can see from the process information that three instances of each_file was run:
[b8/de87b0] process > each_file (3) [100%] 3 of 3 ✔
Which had one file each:
I have each file: file_1.txt

I have each file: file_2.txt

I have each file: file_3.txt
And all_files ran once:
[9d/c5d625] process > all_files [100%] 1 of 1 ✔
With access to all three files:
I have all files: file_1.txt file_2.txt file_3.txt
Operators
Now that we know how to make simple pipelines, lets delve into Operators to manipulate channels to create your desired pipeline.
Channel manipulation is likely the most challenging part of Nextflow, so we will go through some of the most useful operators and use them for progressively more complicated examples.
map
Map is a useful transforming operator that you can use to apply a function to each item in a channel. Map functions are expressed using a closure which are curly brackets that allow us to pass code as arguments to a function. For example, you could square all numbers in a channel like so:
Channel
    .from( 1, 2, 3, 4, 5 )
    .map { it * it }
    .view()
where it (short for iterable) describes each item as map iterates over the channel. This will output:
1
4
9
16
25
You can use the following -> format if you would like to name the iterator as something different than the default it.
Channel
    .from( 1, 2, 3, 4, 5 )
    .map { this_row -> this_row * this_row }
    .view()
You can use map to manipulate multi column rows in different ways:
Channel
    .from( [1,'A_B'], [2,'B_C'], [3,'C_D'])
    .map { [ it[0], it[0] * it[0], it[1].split("_")[0], it[1].split("_")[1] ] }
    .view()
[1, 1, A, B]
[2, 4, B, C]
[3, 9, C, D]
To make it a bit more readable you could use the -> format.
Channel
    .from( [1,'A_B'], [2,'B_C'], [3,'C_D'])
    .map { key, character_string -> [ key, key * key, character_string.split("_")[0], character_string.split("_")[1] ] }
    .view()
groupTuple
groupTuple is used to group channel items with the same key, which is the first item by default.
For example:
Channel
    .from( [1,'A'], [1,'B'], [2,'C'], [3, 'B'], [1,'C'], [2, 'A'], [3, 'D'] )
    .groupTuple()
    .view()
[1, [A, B, C]]
[2, [C, A]]
[3, [B, D]]
This operator is often used to group files by their name.
We have created some example files for you in the format file_{i}_s_{j}.txt.
We can use map to create a key based on the file name and then use groupTuple to group them together in any way you want.
For example we can group them by the name before “s”:
Channel
    .fromPath("file_*_s_*.txt")
    // Create a prefix key and file pair
    .map{ it -> [it.baseName.split("_s_")[0], it ] }.view{"step 1: $it"}
    // Group the files by this prefix
    .groupTuple().view{"step 2: $it"}
    // Remove the key so it can be easily input into a process
    .map{ it -> it[1] }.view{"step 3: $it"}
step 1: [file_1, /data/some/dir/file_1_s_1.txt]
step 1: [file_3, /data/some/dir/file_3_s_3.txt]
step 1: [file_2, /data/some/dir/file_2_s_2.txt]
step 1: [file_2, /data/some/dir/file_2_s_3.txt]
step 1: [file_3, /data/some/dir/file_3_s_1.txt]
step 1: [file_1, /data/some/dir/file_1_s_3.txt]
step 1: [file_2, /data/some/dir/file_2_s_1.txt]
step 1: [file_1, /data/some/dir/file_1_s_2.txt]
step 1: [file_3, /data/some/dir/file_3_s_2.txt]
step 2: [file_1, [/data/some/dir/file_1_s_1.txt, /data/some/dir/file_1_s_3.txt, /data/some/dir/file_1_s_2.txt]]
step 2: [file_3, [/data/some/dir/file_3_s_3.txt, /data/some/dir/file_3_s_1.txt, /data/some/dir/file_3_s_2.txt]]
step 2: [file_2, [/data/some/dir/file_2_s_2.txt, /data/some/dir/file_2_s_3.txt, /data/some/dir/file_2_s_1.txt]]
step 3: [/data/some/dir/file_1_s_1.txt, /data/some/dir/file_1_s_3.txt, /data/some/dir/file_1_s_2.txt]
step 3: [/data/some/dir/file_3_s_3.txt, /data/some/dir/file_3_s_1.txt, /data/some/dir/file_3_s_2.txt]
step 3: [/data/some/dir/file_2_s_2.txt, /data/some/dir/file_2_s_3.txt, /data/some/dir/file_2_s_1.txt]
You can see that in the final steps we have grouped our files and this channel is ready to be given to a process that will create three jobs with three files each.
concat
The concat operator concatenates items from two or more channels to a new channel in the same order they were specified in.
For example:
a = Channel.from( 'a', 'b', 'c' )
b = Channel.from( 1, 2, 3 )
c = Channel.from( 'p', 'q' )

c.concat( b, a ).view()
p
q
1
2
3
a
b
c
Concat challenge
Here is an example of an incomplete pipeline that combines the output of two processes and grouping them by their filename.
process make_files_one {
   output:
   path "file*.txt"

   """for i in \$(seq 3); do touch file_\${i}_s_one.txt; done"""
}

process make_files_two {
   output:
   path "file*.txt"

   """for i in \$(seq 3); do touch file_\${i}_s_two.txt; done"""
}


process grouped_files {
   echo true

   input:
   tuple path(first_file), path(second_file)
   """echo 'I have ${first_file} and ${second_file}'"""
}

workflow {
   make_files_one()
   make_files_two()
   // Label the files with their prefix
   files_one = make_files_one.out.flatten().map{ it -> [it.baseName.split("_s_")[0], it ] }
   files_two = make_files_two.out.flatten().map{ it -> [it.baseName.split("_s_")[0], it ] }
   grouped_files(
       // Concat them with the other process
       // YOUR CODE HERE
       // Group the files by this prefix then remove the prefix
       // YOUR CODE HERE
    )
}
Your challenge is to complete the pipeline by combining the
files_oneandfiles_twochannels usingconcatand group them (usinggroupTupleandmap) so that the output of thegrouped_fileslooks similar to this:N E X T F L O W ~ version 21.04.3 Launching `channel_tuples.nf` [stoic_liskov] - revision: 79877921ac executor > local (5) [b2/7e78a1] process > make_files_one [100%] 1 of 1 ✔ [bc/285fad] process > make_files_two [100%] 1 of 1 ✔ [bc/da6cc3] process > grouped_files (1) [100%] 3 of 3 ✔ I have file_2_s_one.txt and file_2_s_two.txt I have file_3_s_one.txt and file_3_s_two.txt I have file_1_s_one.txt and file_1_s_two.txtUse the etherpad to let us know how you are going.
Soultion
workflow {
   make_files_one()
   make_files_two()
   // Label the files with their prefix
   files_one = make_files_one.out.flatten().map{ it -> [it.baseName.split("_s_")[0], it ] }
   files_two = make_files_two.out.flatten().map{ it -> [it.baseName.split("_s_")[0], it ] }
   grouped_files(
       // Concat them with the other process
       files_one.concat(files_two)
       // Group the files by this prefix then remove the prefix
       .groupTuple().map { it -> [ it[1][0], it[1][1] ] }
    )
}
splitCsv
CSVs are excellent ways to input data to your pipeline or even to hand data between processes.
splitCsv can handle text and parse it to several rows:
Channel
    .from( 'alpha,beta,gamma\n10,20,30\n70,80,90' )
    .splitCsv()
    .view()
[alpha, beta, gamma]
[10, 20, 30]
[70, 80, 90]
You can also hand csv files directly to splitCsv which makes handling these files easy.
We created an example csv file that you can use the following operators to parse the CSV file:
Channel
    .fromPath( 'test.csv' )
    .splitCsv()
    .view()
[alpha, beta, gamma]
[10, 20, 30]
[70, 80, 90]
cross
The cross operator allows you to combine the items of two channels in such a way that the items of the source channel are emitted along with the items emitted by the target channel for which they have a matching key.
An example of when this is useful is when you need to launch a job for each pair of data files and candidates found in those data files.
For example if you had two channels, the first the data files for each observation and a second channel with all of the candidates, we can combined them by using the observation ID as a common key:
source = Channel.from( ['obs1', 'obs1.dat'], ['obs2', 'obs2.dat'] )
target = Channel.from( ['obs1', 'obs1_cand1.dat'], ['obs1', 'obs1_cand2.dat'], ['obs1', 'obs1_cand3.dat'], ['obs2', 'obs2_cand1.dat'] , ['obs2', 'obs2_cand2.dat'] )

source.cross(target).view()
[[obs1, obs1.dat], [obs1, obs1_cand1.dat]]
[[obs1, obs1.dat], [obs1, obs1_cand2.dat]]
[[obs1, obs1.dat], [obs1, obs1_cand3.dat]]
[[obs2, obs2.dat], [obs2, obs2_cand1.dat]]
[[obs2, obs2.dat], [obs2, obs2_cand2.dat]]
This can easily be maped to a process that will launch a job for each observation data file and candidate information.
Cross Challange
Similar to the previous example, you have of your observation data files and the observation candidates:
data = Channel.fromPath( ['obs1.dat', 'obs2.dat'] )
candidates = Channel.fromPath( ['obs1_cand1.dat', 'obs1_cand2.dat', 'obs1_cand3.dat', 'obs2_cand1.dat', 'obs2_cand2.dat'] )
You want to
mapthe data so that the observation name can be used as a key,crossthem so each candidate has a observation data file, the reformat them so they’re in the format:[obsname, obs_data, obs_cand] eg: [obs1, /data/some/dir/obs1.dat, /data/some/dir/obs1_cand1.dat]Hint: use
.baseNameto remove the path and the file type from the path objects.Share your answer or ask questions via the etherpad.
Solution
// Use map to get an observation key
data = data.map { it -> [ it.baseName, it ] }
candiates = candiates.map { it -> [ it.baseName.split("_")[0], it ] }
// Cross the data
data.cross(candiates)
    // Reformat to desired output
    .map { it -> [ it[0][0], it[0][1], it[1][1] ] }.view()
transpose
The transpose operator transforms a channel in such a way that the emitted items are the result of a transposition of all tuple elements in each item.
This can be useful when you have a process that outputs an unknown number of files (candidate files, for example) and you want each row to have a single file while preserving the other information.
Channel.of(
    // [ id, frequency, list_of_candidate_files]
    [ 1, 20, [ 'file1.dat', 'file2.dat' ] ],
    [ 2, 20, [ 'file1.dat' ] ],
    [ 3, 30, [ 'file1.dat', 'file2.dat', 'file3.dat' ] ]
    )
    .transpose()
    .view()
[1, 20, file1.dat]
[1, 20, file2.dat]
[2, 20, file1.dat]
[3, 30, file1.dat]
[3, 30, file2.dat]
[3, 30, file3.dat]
This transposed channel format is much easier to hand to other processes or combine with other channels.
collate
The collate operator transforms a channel in such a way that the emitted values are grouped in tuples containing n items.
For example:
Channel
    .of( 'file1.dat', 'file2.dat', 'file3.dat', 'file4.dat', 'file5.dat', 'file6.dat', 'file7.dat' )
    .collate( 3 )
    .view()
[file1.dat, file2.dat, file3.dat]
[file4.dat, file5.dat, file6.dat]
[file7.dat]
This is an excellent operator for controlling the size of jobs. When running your jobs on a supercomputing cluster, you do not want to run hundreds of short (less than 5 minutes) jobs as it is inefficient for the job scheduler. Instead, you want to group your jobs so that they are large enough to run for more than ~1 hour and not so large that you run out of resources (time or memory).
Key Points
A Nextflow workflow contains channels and processes
Operators are used to manipulate channels