Content from Introduction
Last updated on 2022-06-15 | Edit this page
Overview
Questions
- How do you write a lesson using Markdown and sandpaper?
Objectives
- Explain how to use markdown with The Carpentries Workbench
- Demonstrate how to include pieces of code, figures, and nested challenge blocks
Introduction
This is a lesson created via The Carpentries Workbench. It is written in Pandoc-flavored Markdown for static files and R Markdown for dynamic files that can render code into output. Please refer to the Introduction to The Carpentries Workbench for full documentation.
What you need to know is that there are three sections required for a valid Carpentries lesson:
-
questionsare displayed at the beginning of the episode to prime the learner for the content. -
objectivesare the learning objectives for an episode displayed with the questions. -
keypointsare displayed at the end of the episode to reinforce the objectives.
Challenge 1: Can you do it?
What is the output of this command?
R
paste("This", "new", "lesson", "looks", "good")
OUTPUT
[1] "This new lesson looks good"Challenge 2: how do you nest solutions within challenge blocks?
You can add a line with at least three colons and a
solution tag.
Figures
You can use standard markdown for static figures with the following syntax:
{alt='alt text for accessibility purposes'}
Math
One of our episodes contains \(\LaTeX\) equations when describing how to create dynamic reports with {knitr}, so we now use mathjax to describe this:
$\alpha = \dfrac{1}{(1 - \beta)^2}$ becomes: \(\alpha = \dfrac{1}{(1 - \beta)^2}\)
Cool, right?
Key Points
- Use
.mdfiles for episodes when you want static content - Use
.Rmdfiles for episodes when you need to generate output - Run
sandpaper::check_lesson()to identify any issues with your lesson - Run
sandpaper::build_lesson()to preview your lesson locally
Content from Choosing your Hardware
Last updated on 2022-07-28 | Edit this page
Overview
Questions
- What is a raspberry Pi
- What hardware do I need to set up CarpentriesOffline?
- What specifications should the hardware meet?
Objectives
- Select an appropriate Raspberry Pi
- Select an appropriate SD card
- Understand alternative hardware
Introduction
In order to hold an offline workshop we need some way of allowing the learners to download lesson material, data, and relevant software. To do this we need a computer with this data to act as an access point. Any computer which can run Linux with a web server will do, but for CarpentriesOffline we will be using the Raspberry Pi, due to its portability. Also, by sticking to only using Raspberry Pis we can ensure the software we use can be pre-packaged and will work without having to worry about getting the correct versions to work on differing hardware.
Raspberry Pis (not to be confused with Raspberry Pies) are low cost credit card sized computers often used in education. Their small size makes them very portable, allowing them to be set up and used anywhere with a power socket with minimal effort.
Choosing a Raspberry Pi
A list of all the available Raspberry Pi devices can be found on the main Raspberry Pi website here: https://www.raspberrypi.com/products/. Not all of these devices will work however, since some lack the minimum hardware requirements to run our software. The devices which will work are as follows:
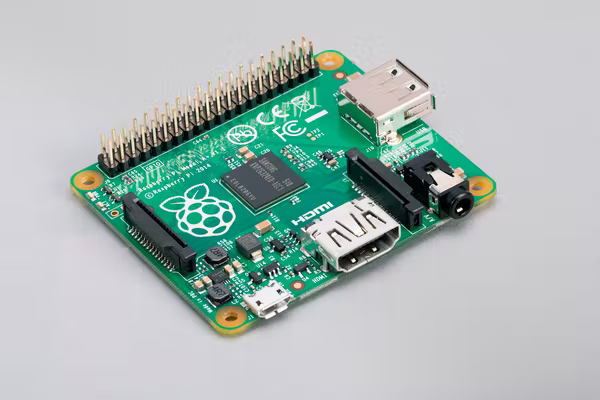
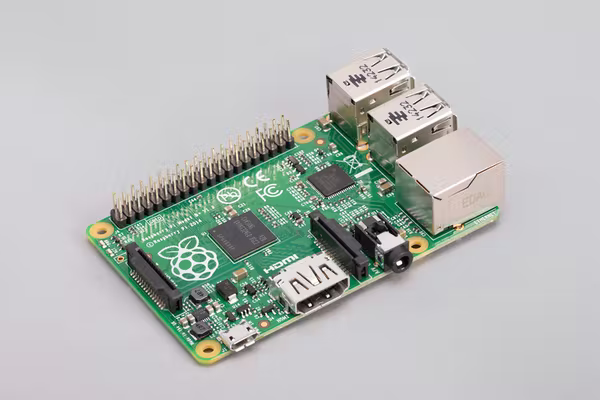
- Raspberry Pi 400
- Raspberry Pi 4 (all)
- Raspberry Pi 3 (all)
- Raspberry Pi zero (to be tested)
Raspberry Pis below version 3 are simply too low spec to run the required software, so we must use versions 3+. It should also be noted that since the Raspberry Pi 3 uses a 32 bit operating system, it cannot run software which requires 64 bit (such as CodiMD and JupyterHub). Despite this, all the afformentioned Pis can still function as servers and access points without issue.
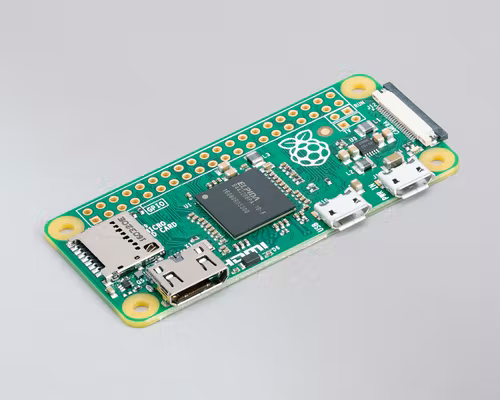 Raspberry Pi Zero
|
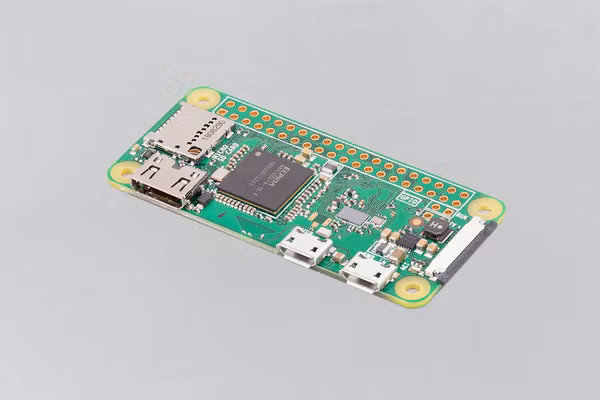 Raspberry Pi Zero W
|
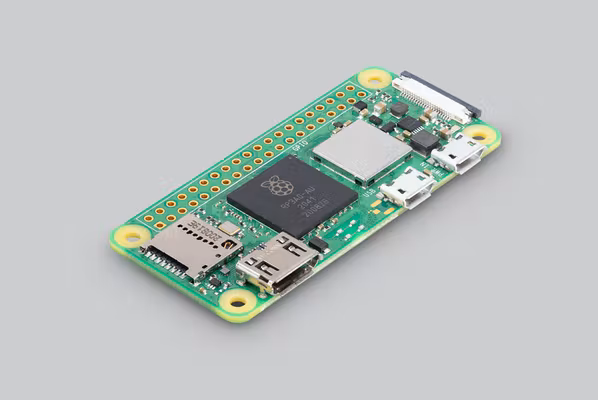 Raspberry Pi Zero 2W
|
 Raspberry Pi 3 model A+
|
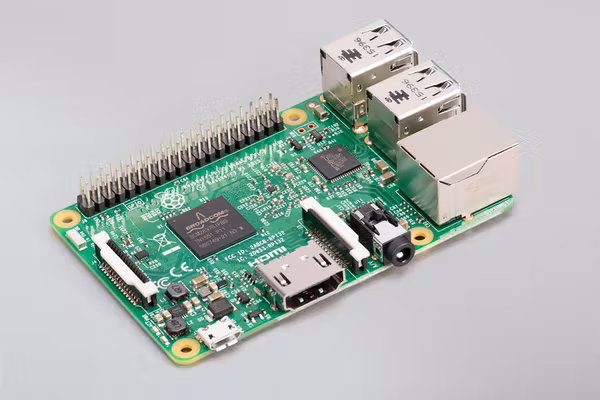 Raspberry Pi 3 model B
|
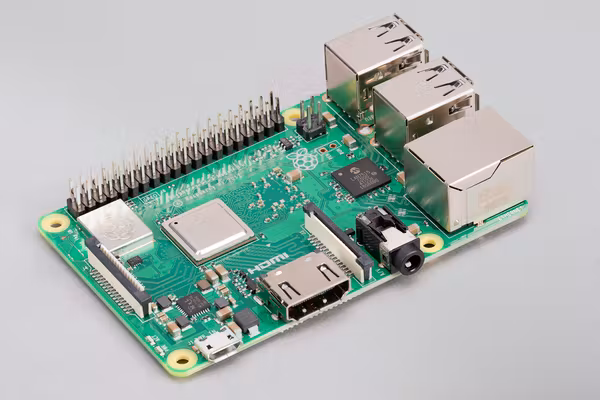 Raspberry Pi 3 model B+
|
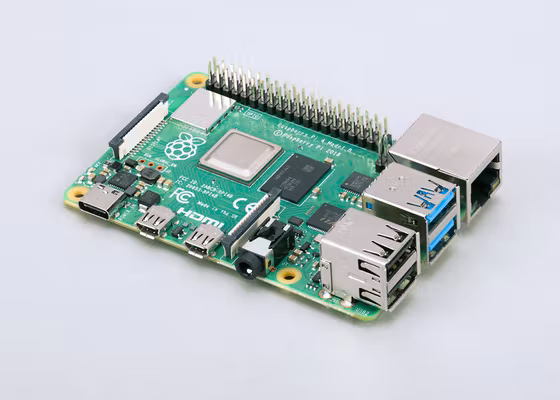 Raspberry Pi 4 model B
|
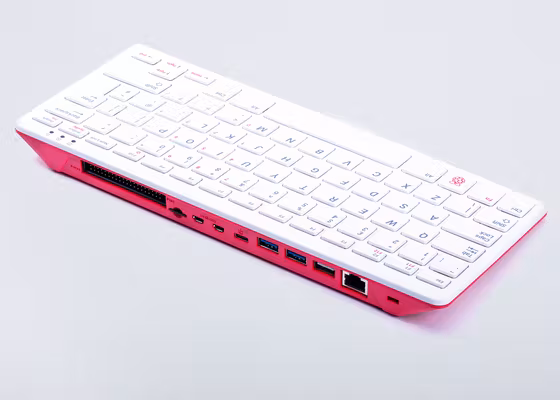 Raspberry Pi 400
|
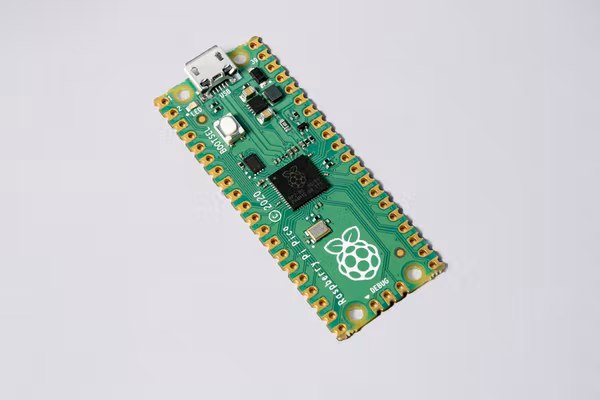 Raspberry Pi pico
|
 Raspberry Pi 1 model A+
|
 Raspberry Pi 1 model B+
|
Images sourced from: https://www.raspberrypi.com/products/
Choosing an SD card
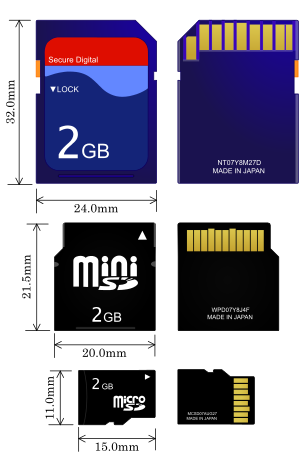
Just like any other computer, Raspberry Pis require a place to store data. Most Pis work with SD cards, of which there are multiple types. The specific type of SD card needed depends on which specific Raspberry Pi model you use (on the website you can see this for each model in the Specification section near the bottom of the page). The afformentioned Pis will use either a standard SD card, or a microSD card.
毛抜き,
CC BY-SA
3.0, via Wikimedia Commons
For CarpentriesOffline we need a minimum space of 5GB to store all of our software and data. Since SD cards come in sizes of incremental powers of two (2, 4, 8, 16, 32, etc.) we will need at minimum an 8GB SD card.
Challenge 1: What are the different Raspberry Pis that are available?
A list of these can be found here: https://www.raspberrypi.com/products/
- Raspberry Pi zero
- Raspberry Pi zero W
- Raspberry Pi zero 2W
- Raspberry Pi 1 model A+
- Raspberry Pi 1 model B+
- Raspberry Pi 3 model B
- Raspberry Pi 3 model B+
- Raspberry Pi 3 model A+
- Raspberry Pi 4 model B
- Raspberry Pi 400
- Raspberry Pi pico
Challenge 2: Which of the listed Raspberry Pis would be appropriate for this workshop?
- Raspberry Pi zero
- Raspberry Pi zero W
- Raspberry Pi zero 2W
- Raspberry Pi 1 model A+
- Raspberry Pi 1 model B+
- Raspberry Pi 3 model B
- Raspberry Pi 3 model B+
- Raspberry Pi 3 model A+
- Raspberry Pi 4 model B
- Raspberry Pi 400
- Raspberry Pi pico
- Raspberry Pi 400
- Raspberry Pi 4 (all)
- Raspberry Pi 3 (all)
- Raspberry Pi zero (to be tested)
Challenge 3: What is a Raspberry Pi? (MCQ, or text area)
- A credit card sized computer
- A delicious confectionary good
- Computer only used for educational purposes
- I don’t know
Correct Answer:
1. A credit card sized computerIncorrect Answers:
2. A delicious confectionary good (This would be a raspberry pie)
3. Computer only used for educational purposes (Raspberry Pis can be used for many things aside from just education)
Challenge 4: What is required to boot up a Raspberry Pi? (MCQ)
- A micro SD card
- A mini SD card
- A monitor and keyboard/mouse
- USB stick/flash-drive
Correct Answer:
1. A micro SD cardIncorrect Answers:
2. A mini SD card (these are the wrong format, they won't fit in a Raspberry Pi)
3. A monitor and keyboard/mouse (a computer does not necessarily need any input devices to function)
4. USB stick/flash-drive (by default the Raspberry Pi will boot from the micro SD card, not the USB)
Content from Preparing an SD Card
Last updated on 2022-08-02 | Edit this page
Overview
Questions
- Where do you download the Raspberry Pi Imager from?
- Where do you download the CarpentriesOffline image from?
- How do you install the Raspberry Pi imager on your computer?
- What is the CarpentriesOffline image?
- What is the Raspberry Pi Imager used for?
Objectives
- download and install the Raspberry Pi imager
- download and install the CarpentriesOffline image
- write the CarpentriesOffline image to the SD Card
Introduction
Every computer needs to load an operating system when you switch it on. Therefore it will usually have a default place where it will look for an operating system in the first place. The process of loading the operating system is called booting. In general, if someone tells you to reboot your computer it means to switch is off and switch it back on again so that the operating system can be loaded from scratch. In the case of your desktop or laptop computers you will have a hard drive built into the computer or alternatively you might be able to boot from a USB device.
In the case of the Raspberry Pi its default booting device is an SD card. Pre-RPi3 used a mini-SD card but RPi3 and RPi4 use micro-SD cards. SD cards are available in various capacities, ie. the amount of information that can be stored on it. A basic operating system for the Pi will probably take about 2GB but then you will also need space for all the Carpentries lesson files and other software that you want to make available to the learners.
Usually when you buy a RPi you can also buy an SD card with the operating system pre-loaded. Alternatively you can buy an empty SD card and prepare it yourself. Preparing the SD card involves downloading an image of the operating system (and there are various versions available), downloading the software, Raspberry Pi Imager, required for writing the image to the SD card and then using the software to write the image to the SD card.
The CarpentriesOffline team is building an image that can be written to the SD card that contains the operating system and all the required files. This image is about 5GB at the moment. So you will need an SD card that can hold at least that. The image is hosted on the CarpentriesOffline website and will be called CarpentriesOffline_vX.XX.img where X.XX is the version of the image. It might take a while to download this image so your instructor might choose to make the image available locally for this lesson, eg. on a USB memory stick. However, if you are going to download it, using your browser, make your way to https://github.com/carpentriesoffline/CarpentriesOffline.github.io. On the right hand side of the page, there should be a section with the heading Releases. Click on the release you wish to download and save the file to your computer.
Challenge 1: What software do you need to prepare an SD card?
- Word
- Excel
- Raspberry Pi Imager
- LibreOffice
- SonicPi
- Word cannot be used to prepare an SD card, it is a word processor
- Excel cannot be used to prepare an SD card, it is a spreadsheet
- The correct answer is 3
- LibreOffice is an office suite and connot be used to prepare an SD card
- SonicPi is a live coding environment to support computing and music lessons in schools.
Challenge 2: Where would you find the CarpentriesOffline image?
- On the Raspberry Pi website
- On The Carpentries website
- On the CarpentriesOffline website
- On the Microsoft website?
If you have not already done so you have to download and install the Raspberry Pi Imager. Using your browser, navigate to the Raspberry Pi download page. You should now be able to select the download for your operating system. Click on the approprate link and save the installation file to your computer. The web page will provide further information for installing the software on your computer.
Once the installation is complete you should be able to run the imager which will open with the following screen:
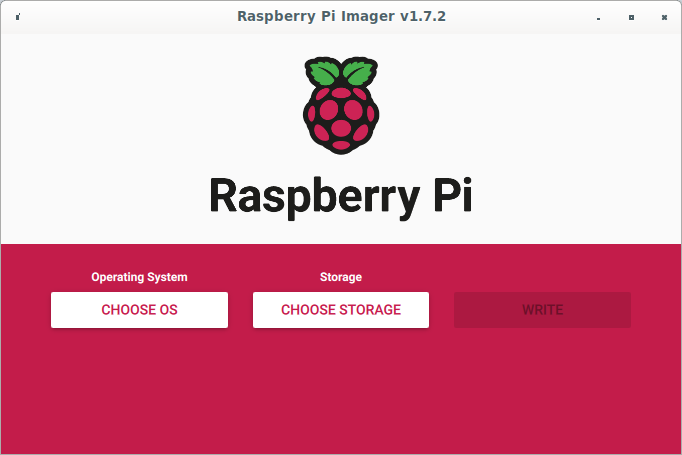
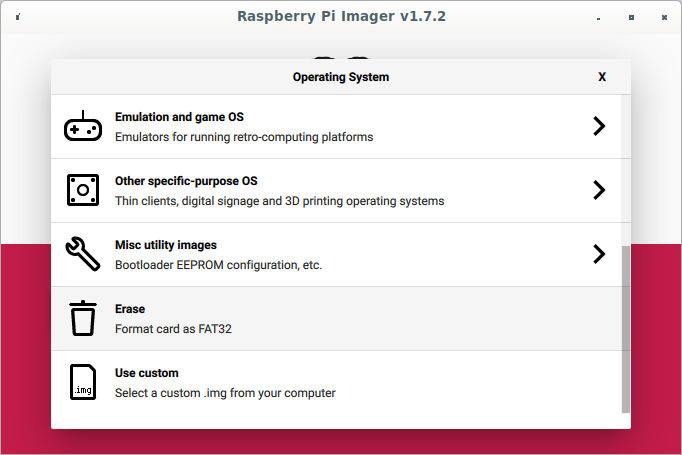
You can now click on the Choose OS button which will open a window for selecting the image you want to write to the SD card. Scroll down to the bottom where you should find an option Use custom. Click on that option:
Navigate to where you saved the CarpentriesOffline image and select it. Make sure you have inserted the SD card into your computer. Now click on the Choose Storage button and select the device you want to write the image to:
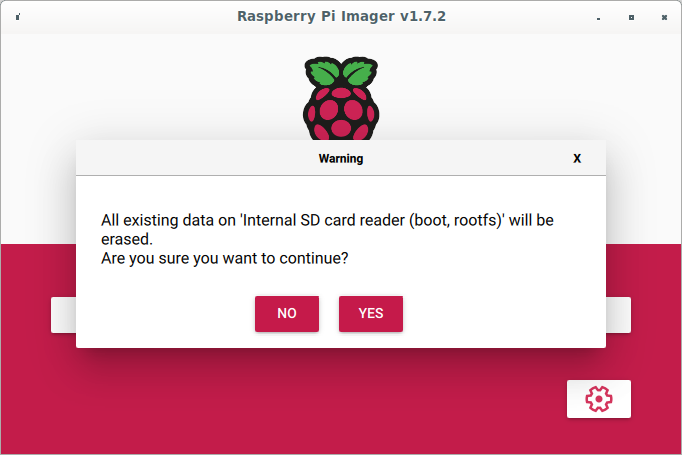
Once you have selected the Storage device, click the WRITE button. You will be prompted to overwrite the information on the SD card, click on YES to accept.
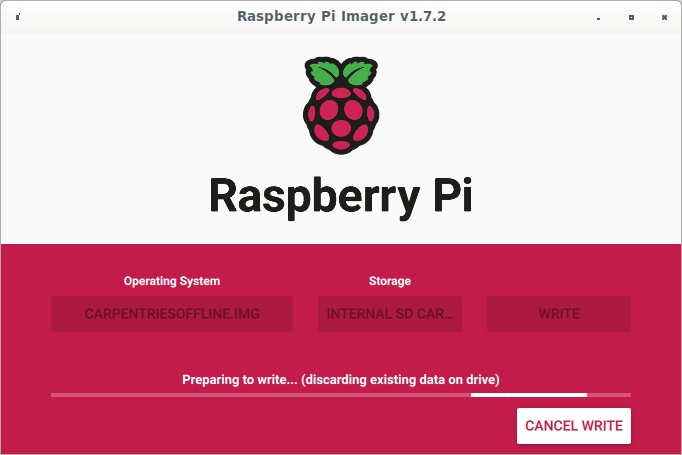
The image will now be written to the SD card.
Once the image has been written to the SD card a Write Successful message will be displayed.
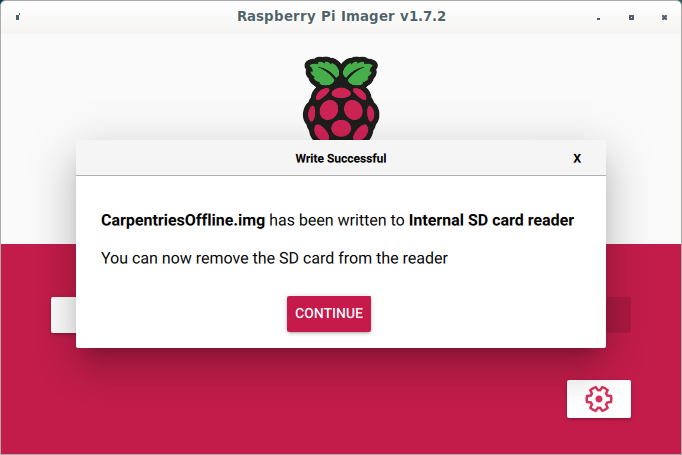
You can now remove the SD card from your computer and insert it into the Raspberry Pi.
Key Points
- Know where to download the Raspberry Pi Imager from
- Know how to install the Raspberry Pi Imager
- Know where to download the CarpentriesOffline RPi image
- Know how to write the CarpentriesOffline image to an SD card
Content from Booting and Connecting
Last updated on 2022-07-10 | Edit this page
Overview
Questions
- How do I boot the Raspberry Pi?
- How do I connect to the RPi as an access point
Objectives
- connect to the Raspberry Pi Access Point
Booting the Raspberry Pi from an SD Card
This is a lesson created via The Carpentries Workbench. It is written in Pandoc-flavored Markdown for static files and R Markdown for dynamic files that can render code into output. Please refer to the Introduction to The Carpentries Workbench for full documentation.
What you need to know is that there are three sections required for a valid Carpentries lesson:
-
questionsare displayed at the beginning of the episode to prime the learner for the content. -
objectivesare the learning objectives for an episode displayed with the questions. -
keypointsare displayed at the end of the episode to reinforce the objectives.
Challenge 1: Can you do it?
What is the output of this command?
R
paste("This", "new", "lesson", "looks", "good")
OUTPUT
[1] "This new lesson looks good"Challenge 2: how do you nest solutions within challenge blocks?
You can add a line with at least three colons and a
solution tag.
Figures
You can use standard markdown for static figures with the following syntax:
{alt='alt text for accessibility purposes'}
Math
One of our episodes contains \(\LaTeX\) equations when describing how to create dynamic reports with {knitr}, so we now use mathjax to describe this:
$\alpha = \dfrac{1}{(1 - \beta)^2}$ becomes: \(\alpha = \dfrac{1}{(1 - \beta)^2}\)
Cool, right?
Key Points
- Know how to start up the RPi as an Access Point and Server for learners to connect to.