All in One View
Content from Write Readable Code
Last updated on 2026-07-21 | Edit this page
Estimated time: 17 minutes
Overview
Questions
- What is readable code?
- Why invest effort in writing readable code?
Objectives
- Define readable code
- What is the difference between readable and unreadable code
- What to think when writing code for people to read
Introduction
The expression readable code might sound strange at first. Code is meant to be written and executed, right? Why should it be readable? After all, code is for a machine to perform, and a machine does not “read” as we do. So why bother?
The untold truth is that whenever someone wants to add a new feature or modify an existing one, they need to understand how the existing code works first, so they need to read the code to see how it works. That person might be another developer or collaborator, or it might be you months later. If a code is messy, unstructured and without documentation, reading and understanding it becomes more complicated and time-consuming. On the other hand, well-written code reads like a well-written novel: easy to follow and easy to understand.
So, writing readable code from scratch reduces the need for extensive explanations later.
Ask the learners about what they think about the following code. The point is to make them read it and tell how easy/difficult it is. The function visualizes a spiral, where the radius of each point increases linearly from the centre outward, and the points are positioned according to their respective angles in the given input array. To guide the discussion, use some of the following questions What do you think this code does? - Can you use it? - What do r, x, and y represent in this code? Are these names intuitive? What to point out: - There is no information about the input parameter: should it be a list? A single value? - The names of the function, variables are poorly chosen. - The function does not handle the output well. It creates points in polar coordinates, but it does not return them. It shows the plot without returning it or allowing for extra steps. d To run the function (if necessary):
Suggestion: Take note of the main points you might need for the following discussions.
Discussion: What do you think about the following code?
What is readable code?
A readable code is a code that clearly shows what it does and why without much effort. To make our code readable, we should focus on
- Clarity: Everything in the code, from variable names to functions, is straightforward and unambiguous.
- Simplicity: It should be as simple as possible.
- Structure: The code should be well organised into sections (e.g. functions, modules).
- Minimal redundancy: Reducing code duplications makes the code more efficient and easier to modify.
- Documentation: Writing clear code is the first step, but it does not always explain the “why” behind it. In-line comments or external documentation might explain the reasoning and intent.
Require Live coding The aim of the above discussion is to modify and improve the code together, focusing on the points identified in the previous discussion. The simpler solution might be just to focus on the names and add some comments.
PYTHON
#Plot a spiral in polar coordianate
#for a given list of theta values

def plot_spiral(theta):
  # Creates an array of evenly spaced radius values from 0 to 1.
  # The final array has the same number of element than theta
  radius = np.linspace(0,1,len(theta))
  # Converts polar coordinates to Cartesian
  x_coordinate = radius * np.cos(theta)
  y_coordinate = radius * np.sin(theta)
  plt.plot(x_coordinate,y_coordinate)
  plt.show()
The point is to show that simple modification can improve code readability.
A better version can be:
PYTHON
import numpy as np
import matplotlib.pyplot as plt

# Calculate polar coordinate for an array of angles.

def calculate_polarcoordinate(theta): #Meaningful names: changed names of the function and input argument

  # Creates an array of evenly spaced radius values from 0 to 1.
  # The final array has the same number of element than theta
  radius = np.linspace(0,1,len(theta))
  # Converts polar coordinates to Cartesian
  x_coordinate = radius * np.cos(theta)
  y_coordinate = radius * np.sin(theta)

  return x_coordinate, y_coordinate #Better output handling

#plot a spiral in polar coordinate
def visualise_spiral_polar_coordinates(x_coordinate,y_coordinate): #split data and visualisation

  plt.plot(x_coordinate, y_coordinate)
  plt.xlabel('x')
  plt.ylabel('y')
  plt.title('Spiral in Polar Coordinates')
  plt.show()
Focus on the change:
- Better variable and function names make the code self-explanatory
- Separation of Concern: The original function has been split in two so that it is clear what happens
- Let them focus on the fact that the
radiusdefinition depends on two magic numbers, 0 and 1. - This example can be used to introduce the DRY and SoC principles.
Why does structured code improve readability?
Imagine reading a document like the one below
This is a document that has no punctuation or structure it just keeps going on and on without any breaks or organization the words run together endlessly making it very difficult to understand what the author is trying to communicate the text flows continuously without any separation between ideas or concepts it becomes increasingly hard to follow the train of thought as the words keep flowing together in an endless stream of characters without any visual breaks or formatting to help guide the reader through the content The text is a continuous, unbroken sequence of words. It might contain the most deep considerations or be the most interesting document, but reading it is hard. The challenge is to find specific information, where one idea starts or ends. To modify this wall of words is even more complex: how can you be sure that changes will not affect another part?
This unstructured text is how unstructured code appears. Just as this text lacks punctuation, paragraphs, and formatting, unstructured code lacks modular organization, clear separation of functions, and logical flow control that makes structured code readable and maintainable.
Several coding design principles can help create structured code. These principles provide guidelines on what to consider and avoid when creating code. Among all, two shine for simplicity and effectiveness:
Separation of Concern (SoC): This design principle separates a program into distinct sections. Each section (e.g., function or module) does one thing only, and it should be able to work independently. SoC helps create a clear code structure, improving the code readability and reusability. Indeed, each component can be reused across different parts of the code and projects.
DRY: DRY stands for “Don’t Repeat Yourself”. The statement is clear: Each piece of code should only appear once. Code duplications are nightmares. Every time something needs to change, the changes must be applied in different parts of the codebase. When common logic is extracted into reusable components, any changes will only happen in one place, improving the maintainability of the code.
Let’s see an example of how applying these two principles improves the code.
From unstructured to structured code
The code below generate two datasets of points and apply linear regression.
PYTHON
import numpy as np
import matplotlib.pyplot as plt

# Dataset 1
X = np.array([1, 2, 3, 4, 5])
y = 2 * X + 1 + np.random.normal(0, 0.5, len(X))

# Calculate coefficients using np.linalg
A = np.vstack([X, np.ones(len(X))]).T
coefficients = np.linalg.lstsq(A, y, rcond=None)[0]
m, b = coefficients


# Dataset 2
X1 = np.array([1, 2, 3, 4, 5])
y1 = 1.5 * X1 + 0.5 + np.random.normal(0, 0.5, len(X))

A1 = np.vstack([X1, np.ones(len(X1))]).T
coefficients1 = np.linalg.lstsq(A1, y1, rcond=None)[0]
m1, b1 = coefficients1


# Verify all calculations give same result
print("Case 1: Slope: = ",round(m,4),"intercept =",round(b,4))
print("Case 2: Slope: = ",round(m1,4),"intercept =",round(b1,4))
The code works as expected and appears straightforward but violates both principles. Let us see why.
DRY Principle violations
The code that creates the two arrays X and
X1 is the same; this means that if we need to change one
array, we need to apply the changes twice. Similarly, the code that
calculates the slope and intercepts is repeated for both datasets.
SoC Principle violations
Although the operations appear sequentially, the code has no clear structure. They depend on the previous one, meaning that changing one part of the code will change everything else, so code blocks are not independent. Also, the concerns are mixed together with no clear separation.
These violations generate a lot of problems: what if you need to reuse the code? What if you need to apply to a different dataset? What if you need to repeat the same calculation for 100 datasets? Would any of these modifications be easy?
Below, a different version of the code that tries to correct these violations is presented.
PYTHON
import numpy as np
import matplotlib.pyplot as plt

# Generate Y data using linear equation y=mx+b with Gaussian noise
def generate_data(x_values, slope, intercept):

    y_values = slope * x_values + intercept + np.random.normal(0, 0.5, len(x_values))
    return y_values

# Get linear regression coefficient
def fit_linear_regression(x_values, y_values):
    A = np.vstack([X, np.ones(len(x_values))]).T
    coefficients = np.linalg.lstsq(A, y_values, rcond=None)[0]
    return

# Usage
base_X = np.array([1, 2, 3, 4, 5])
case1_y = generate_data(base_X, 2.0, 1.0)
case2_y = generate_data(base_X, 1.5, 0.5)

m, b = fit_linear_regression(base_X, case1_y)
verify_coefficients(m, b)

m1, b1 = fit_linear_regression(base_X, case2_y)
verify_coefficients(m1, b1)
This new version uses a single data generation function for both cases and a single linear regression function that can be applied to both datasets. These two functions fix all the DRY violations. At the same time, they also solve the SoC violations: each new function has one scope and clearly separates the data generations and model fittings.
This improved structure makes the code more maintainable, testable, and easier to extend while eliminating redundant calculations and mixed responsibilities.
Tips
By writing code for people to read, you improve the maintainability and usability of your code. This ensures that others (and your future self) can easily understand, modify, and extend the code.
Writing readable code requires a bit more effort, but there are a few tips that make it simpler like: - Be kind with your future self you will thereby also be kind to others who come to your code. - Use meaningful variable names. - Break down complex functions into smaller functions. - Add comments to explain the “why” behind your code.
- Clarity: Make sure your code is easy to understand.
- Simplicity: Keep the code simple and avoid unnecessary complexity.
- Structure: Organize your code well (e.g., use functions, classes, and modules appropriately).
- Minimal Redundancy: Avoid code duplication to improve efficiency.
- Documentation: Add comments to clarify the logic and intent behind your code.
Content from Write Elegant Code
Last updated on 2026-07-21 | Edit this page
Estimated time: 10 minutes
Overview
Questions
- Why is it important to choose meaningful names in your code?
- What are some good practices for naming variables and functions?
- How can meaningful names improve the maintainability and readability of code?
Objectives
- Understand the importance of choosing meaningful names in coding.
- Learn best practices for naming variables, functions, classes, and modules.
- Improve the readability and maintainability of your code by choosing clear and descriptive names.
Similarly to well-written prose, elegant code communicates its intent
clearly, making it easy to read and understand. Like writers who
carefully choose words to craft compelling prose, programmers should
select names for variables, functions, and classes to create readable
and maintainable code.
In this episode, we’ll explore the art of crafting meaningful names that
make your code functional and a pleasure to work with.
The importance of meaningful names
In coding, names are everywhere. We need to name variables, functions, classes and files, and we do that as soon as we open the editor. However, rarely do we invest time in choosing good names. We tend to choose names that make sense to us, following our intuition or understanding of the problem. But would these names make sense to someone else?
Variable names serve as the first indicator of what the code does, providing initial answers to key questions: what it does, how it works, and why it exists.
Consider the following code
Without context, you can only understand that c is the
ratio between the other variables (a and b).
Nothing tells you why c is defined this way, what the
code’s intention is, and so on. It can be anything.
One can argue that you can improve the code by adding comments. For example
On the other hand, by simply changing the names of the variables, you achieve the same goal without adding unnecessary comments.
In the code above, comments are used only to provide extra information that cannot be inferred by the code alone.
If a name requires a comment, it is not a good name
Guidelines to choose good names
There are only two hard things in Computer Science: cache invalidation and naming things. Phil Karlton
Choosing good names is hard, and sometimes, it is more difficult than writing code itself. It seems an extra layer of complication or even a blocker for your code project. However, remember that your aim is to write code everyone can read and understand to make it easier for the following user or developer to work with. So, the little effort you invest in naming will pay off in the long run. The good news is that there are guidelines to help you in the process.
Avoid abbreviation and single letter names, but be descriptive and specific
In science, we are used to having single letters to identify constants, for example, g for gravity, h for Planck’s constant, etc. It comes naturally to use the same convention for variables in our code. However, single-letter variables don’t always work well. The same letter might be used to indicate different variables in another field and, therefore, might generate confusion (it is hard to predict a user’s background).
They also add an extra, more practicable, problem: searching for a single letter in your code is hard. So, use single letters only as a loop variable or when their role and intent can be easily understood.
The same applies to abbreviations: they can easily be misinterpreted, creating ambiguity in the code.
The variable defines a relative velocity; the rlt stands
for relative. Try to spell the v_lrt aloud to
show how difficult it is.
Use nouns, verbs and questions to name different components
Common recommendations are:
Nouns are used for naming modules and classes. This is because modules and classes play a specific role in the structure of the code. For example, classes generally represent real-world objects or entities within a domain (like
ParticlesandSpecies), and using nouns makes it clear what kind of object the class represents. Similarly, modules group together different functionalities with a similar purpose and nouns can express what they are about.Verbs are used for function and methods. Functions are designed to perform an action, and using verbs in their name helps understand what action they perform (e.g.
calculate_velocity,visualise_data).Questions are used for boolean. A boolean variable can take only two values,
TrueandFalse, and questions naturally align with evaluating conditions, for example, is_evenandis_running.
Avoid magic numbers
A magic number is a value hard-coded directly in the source code. Essentially, magic numbers are unnamed variables that appear without an explanation. Usually, we use them when working with constant values, and the underlying assumption is that they will not change or we don’t expect to change. The problem arises when someone else reads our code: without extra information, it won’t be clear what they are, and they will look like some random code without significance. The big issue is when we need to change the numbers. If the code is simple enough and somehow it is clear what they represent, we could just replace them. However, the same number may be used somewhere else in the code, forcing us to check every line of the code. Even one magic number can increase the code’s complexity, making it difficult to understand and extend.
Instead of hard-coded numbers, defining them as constants with descriptive names is good practice.
Constants are generally defined using
capital letters with underscores separating words, like
THRESHOLD, PLANCK_CONSTANT and so on.
Challenge
Considering the code below - What do you think about the clarity of the code? - Are there any magic numbers? What problem could they cause? - Why is it beneficial to remove them?
The code uses consistent names for the two functions, which are self-explanatory. They have an explicit return statement and robust logic: take inputs, perform calculations, and return results.
They both have the same magic number, and it’s unclear what it represents without sufficient context or knowledge. It is difficult to maintain as changing the constant implies changing the value in different places.
A better version can be:
PYTHON
GRAVITATIONAL_CONSTANT = 6.67430e-11 # m^3/kg/s^2

def calculate_gravitational_force(mass1, mass2, distance):
  force = (GRAVITATIONAL_CONSTANT * mass1 * mass2) / (distance ** 2)
  return force

def calculate_gravitational_potential_energy(mass1, mass2, distance):
  potential_energy = (GRAVITATIONAL_CONSTANT * mass1 * mass2) / distance
  return potential_energy
Naming styles
Naming conventions are an important part of any programming language coding style. These conventions help to maintain consistency in the code. More information about naming conventions in Python can be found PEP8-Style Guide for Python code.
- Naming variables is an important step to improve code readability.
- A good name can explain the intent of the code without extra information.
- Some guidelines can help name variables, functions, and modules.
- Avoid single letters, ambiguous names and magic numbers in your code
- Be consistent.
Content from Write Robust Code
Last updated on 2026-07-21 | Edit this page
Estimated time: 23 minutes
Overview
Questions
- How to make code user-friendly?
- What practices can you adopt to ensure your Python code is robust and less prone to failures?
- Why is comprehensive error handling crucial for code reliability, and how can it be implemented effectively?
Objectives
- Write Python User-Friendly code using docstrings
- Implement robust coding practices using Assertions and Raising Exceptions
- Develop and Apply Effective Error Handling Techniques
Much like a carpenter uses the right tools to create sturdy and beautiful furniture, a programmer employs the right techniques to create robust code. This episode will equip you with the tools for building strong, error-resistant code.
Making Python code User-Friendly
Consider the following code
At a glance, we can understand the purpose and functionality of this
code. The function name calculate_rectangle_area is
descriptive and tells us exactly what the function is meant to do.
Similarly, the variables width and height are
intuitively named, so we know they represent the dimensions of a
rectangle. Even without deep programming knowledge, someone can infer
what this code does. While the code is well-written, is this level of
clarity sufficient for someone to run the code successfully?
One important aspect missing from the example is the information
about variable types. Without specifying that width and
height should be numerical values (integers or floats),
someone may inadvertently provide invalid inputs (e.g., strings) that
would cause the function to fail.
Challenge
Write a code that uses the function calculate_rectangle_area with the following values for width and height and observe the function’s behaviour. Call the function within a Python terminal and print the results.
- width = 5.2 and height = 4.3
- width = 5 and height = ‘4’
- width = ‘5’ and height = ‘4’
PYTHON
# Case 1. The code gives the right result
>>print("width = 5.2 and height = 4.3 (both numerical):\n area = ",calculate_rectangle_area(5.2, 4.3))
width = 5.2 and height = 4.3 (both numerical):
area =  22.36

# Case 2. The code multiplies the string (height) by 5, meaning that the string is repeated 5 times.
>> print("width = 5 and height = '4' (both numerical):\n area = ",calculate_rectangle_area(5, 4))
width = 5 and height = '4' (one numerical and one string)
area =  44444

# Case 3. The code raises a TypeError
>> print("width = '5' and height = '4' (one numerical and one string):\n area = ",calculate_rectangle_area('5', '4'))
[...]
TypeError: can't multiply sequence by non-int of type 'str'
What can go wrong?
Users who interact with code without fully understanding it may make errors, causing the code to behave unexpectedly. In the best-case scenario, the execution may be disrupted, prompting the user to identify and correct the mistake. In the worst-case scenario, the code may execute without any visible errors but produce incorrect results, a situation known as a silent failure. Such failures often go unnoticed and are difficult to diagnose and fix.
Although we cannot predict what errors might occur, we can add in-line documentation that explains how to use a function or a piece of code and control misuse by returning errors or messages that allert the user when something goes wrong.
Step 1: Tell how to use your code
It is impossible to predict how someone else will use our code. The best we can do is add extra information in the form of comments or, even better, docstrings. In Python, docstrings are string literals after defining a function, method, class, or module. They are used to document the specific segment of code they are associated with.
The advantage of using docstrings is that they are used by the Python
built-in function help to display the information without
having to navigate through the source code. A better version of the
function above can be:
PYTHON
def calculate_rectangle_area(width, height):
  """ Calculate the area of a rectangle, knowing its height and width

  Args:
      width (float): The width of a rectangle
      height (float): The height of a rectangle

  Returns:
      float: area of the rectangle
  """
  area = width * height
  return area
In the docstring, we briefly describe what the function does, the arguments and their types, and the type of the returning variables.
A user can then call the help function to understand how
to use it.
Step 2: Handle errors
The goal is to ensure that the code runs correctly and provides informative feedback to users when unexpected issues arise. Using comments and docstrings reduces the likelihood that code is used incorrectly. Sometimes, errors and bugs are somewhere else in the code, and they can be propagated without proper handling. These errors might be due to unexpected conditions, invalid inputs, hardware failures, or bugs in the code.
In such scenarios, error handling becomes essential. By applying error handling techniques, developers can catch and resolve issues as they occur, provide meaningful error messages to users, and take appropriate actions to maintain code integrity.
In Python, there are different techniques one can use to handle errors and exceptions properly. Here, we will focus on assertions and error raising.
Assertions
An assertion is a statement that check if a given condition is true. If this is not the case, it returns an error message. The syntax is
PYTHON
> x = -1
> assert x>0, 'x must be greater than 0' #check if the condition x>0 is true
----> 1assert x>0, 'x must be greater than 0'

AssertionError: x must be greater than 0
Assertions can check multiple statements using the and
and or operator
PYTHON
> x = 3
> assert x>0 and x<2 , 'x must be between 0 and 2'
----> 1assert x>0 and x<2, 'x must be between 0 and 2'

AssertionError: AssertionError: x must be between 0 and 2
Functions that return a boolean output (True or False) can also be
used. For example, a useful Python function that checks a variable type
is isinstance. This function returns True if
the type of a variable is of a given type or False
otherwise. For example:
The isistance function can be used together with
assert to check a variable is of the right type. For
example:
PYTHON
> x = "3.5"
> assert isinstance(x,float), "x must be of type float"
[...]
AssertionError: x must be of type float
Challenge
Add assertion to the following code to check that width
and height are of type float.
PYTHON
def calculate_rectangle_area(width, height):
  """ Calculate the area of a rectangle, knowing its height and width

  Args:
      width (float): The width of a rectangle
      height (float): The height of a rectangle

  Returns:
      float: area of the rectangle
  """
  area = width * height
  return area

print("width = 5.2 and height = 4.3 (both numerical): area = ",calculate_rectangle_area(5.2, 4.3))
print("width = 5 and height = '4' (both numerical): area = ",calculate_rectangle_area(5, 4))PYTHON
def calculate_rectangle_area(width, height):

  """ Calculate the area of a rectangle, knowing its height and width

  Args:
      width (float): The width of a rectangle
      height (float): The height of a rectangle

  Returns:
      float: area of the rectangle
  """
  assert isinstance(width, float) and isinstance(height, float), "Input must be of type float"
  area = width * height
  return area
Raise
Another way to throw exceptions and errors is to use the Python
raise keyword. With raise, you can trigger
both built-in and custom exceptions. It is similar to
assert, but it is used to signal runtime errors. The
raise keyword is generally used within an if-statement that
checks for a specific condition.
PYTHON
x = -1
if x < 0 : #make sure that x is always greater than 0

   raise Exception("x must be greater than 0")
     1 if x < 0 : #make sure that x is always greater than 0
---> 3    raise Exception("x must be greater than 0")

Exception: x must be greater than 0
The code raises a general Exception when the variable is
less than zero. Exception is a built-in Python error type
indicating a generic error. Python has different error types
that can be used in specific situations. The most common are:
| Error Type | Description |
|---|---|
TypeError |
Happens when an operation or function is applied to an object of inappropriate type. |
NameError |
Occurs when a local or global name is not found. |
ValueError |
Raised when a function receives an argument of the correct type but inappropriate value. |
IndexError |
Happens when trying to access an index that is out of the range of a list or tuple. |
KeyError |
Raised when trying to access a dictionary with a key that does not exist. |
ZeroDivisionError |
Raised when dividing by zero. |
FileNotFoundError |
Occurs when trying to open a file that does not exist. |
RuntimeError |
Raised when an error does not fall under any other category. |
Challenge
Let us consider the code below and modify it so that it raises an error if any of the input parameters are less than zero. What is the more appropriate error type?
PYTHON
def calculate_rectangle_area(width, height):
  """ Calculate the area of a rectangle, knowing its height and width

  Args:
      width (float): The width of a rectangle
      height (float): The height of a rectangle

  Returns:
      float: area of the rectangle
  """
  area = width * height
  return area

#you can test running the following code
area = calculate_rectangle_area(-5.1, 3.2)In this case, the code should raise a ValueError.
PYTHON
def calculate_rectangle_area(width, height):
  """ Calculate the area of a rectangle, knowing its height and width

  Args:
      width (float): The width of a rectangle
      height (float): The height of a rectangle

  Returns:
      float: area of the rectangle
  """
  if width < 0 or height < 0:
    raise ValueError("width and height must be positive values")
  area = width * height
return area- Docstrings provide clear documentation of your code and improve its readability and usability.
-
Error handling techniques help build robust code. The idea
is to anticipate potential errors and to implement mechanisms to handle
them gracefully.
- Assertions ensure that certain conditions are met during code execution.
- By raising specific exceptions
(e.g.
TypeError,ValueError), you can not only control the behaviour of your code when things go wrong but also inform the user that something is right.
Content from Write Reliable Code
Last updated on 2026-07-21 | Edit this page
Estimated time: 55 minutes
Overview
Questions
- What is reliable code?
- What is testing? Why do we care?
Objectives
- Understanding the importance of code testing
- Understanding basic unit testing concepts
- Learning Pytest syntax and structure
- Practicing test-driven development
Reliable code and the importance of testing
Reliable code consistently performs as expected, manages unexpected situations gracefully, and functions correctly over time. While error handling deals with managing failures, reliability provides assurance that your code consistently delivers expected results. In simple terms, reliable code is code that can be trusted. However, writing reliable code is not a one-time task; it often requires continuous revision and improvement.
The first step towards achieving reliable code is testing. Code testing ensures reliability by systematically checking the code under controlled conditions to identify any errors or weaknesses. This approach allows you to catch errors and bugs early in the development process, which contributes to writing more structured and maintainable code. Complex and unstructured code is always challenging to test and maintain. Think about unstructured code as a precariously set-up game of dominoes. Each domino represents a piece of code, and they are arranged haphazardly. If you inadvertently knock over one domino while attempting to adjust another, the entire arrangement is affected, causing a cascade of errors. In contrast, structured and well-organised code is like a carefully planned domino setup where each piece is meticulously placed. Adjusting one piece does not lead to a domino effect, ensuring the system remains stable and reliable.
Testing helps you to organise pieces of code together, making sure that each of them is stable and can be replaced or modified without destroying anything else.
What is testing?
Testing in software development is a systematic process aimed at evaluating and verifying that a piece of software functions as intended. Testing aims to identify bugs, ensure the software’s reliability and performance, and validate that the software meets all specified requirements. There are several types of testing, each pertinent to different scenarios. For instance, integration testing assesses the interactions between various pieces of code, while system testing evaluates the software as a whole. Reference testing compares the results produced by your software against those generated by another existing software.
Unit testing is often the first level of testing. A “unit” refers to the smallest component that can be tested in your code, a function, a class, or module. Unit testing aims to ensure that each component behaves as expected.
Test Driven Development
There are two general approaches to writing code and its tests. The traditional one must first write the code and then write testing functions to validate its functionality. Alternatively, one can write tests and then write code that passes these tests. This is called Test Driven Development, or TDD. Although it seems counterintuitive, this approach helps to develop code alongside testing, leading to a robust code base. Also, when a project has precise requirements, this approach helps to ensure that the code satisfies them, as each requirement can be used as a test case.
In this tutorial, we will develop code using the TDD approach.
How does it work?
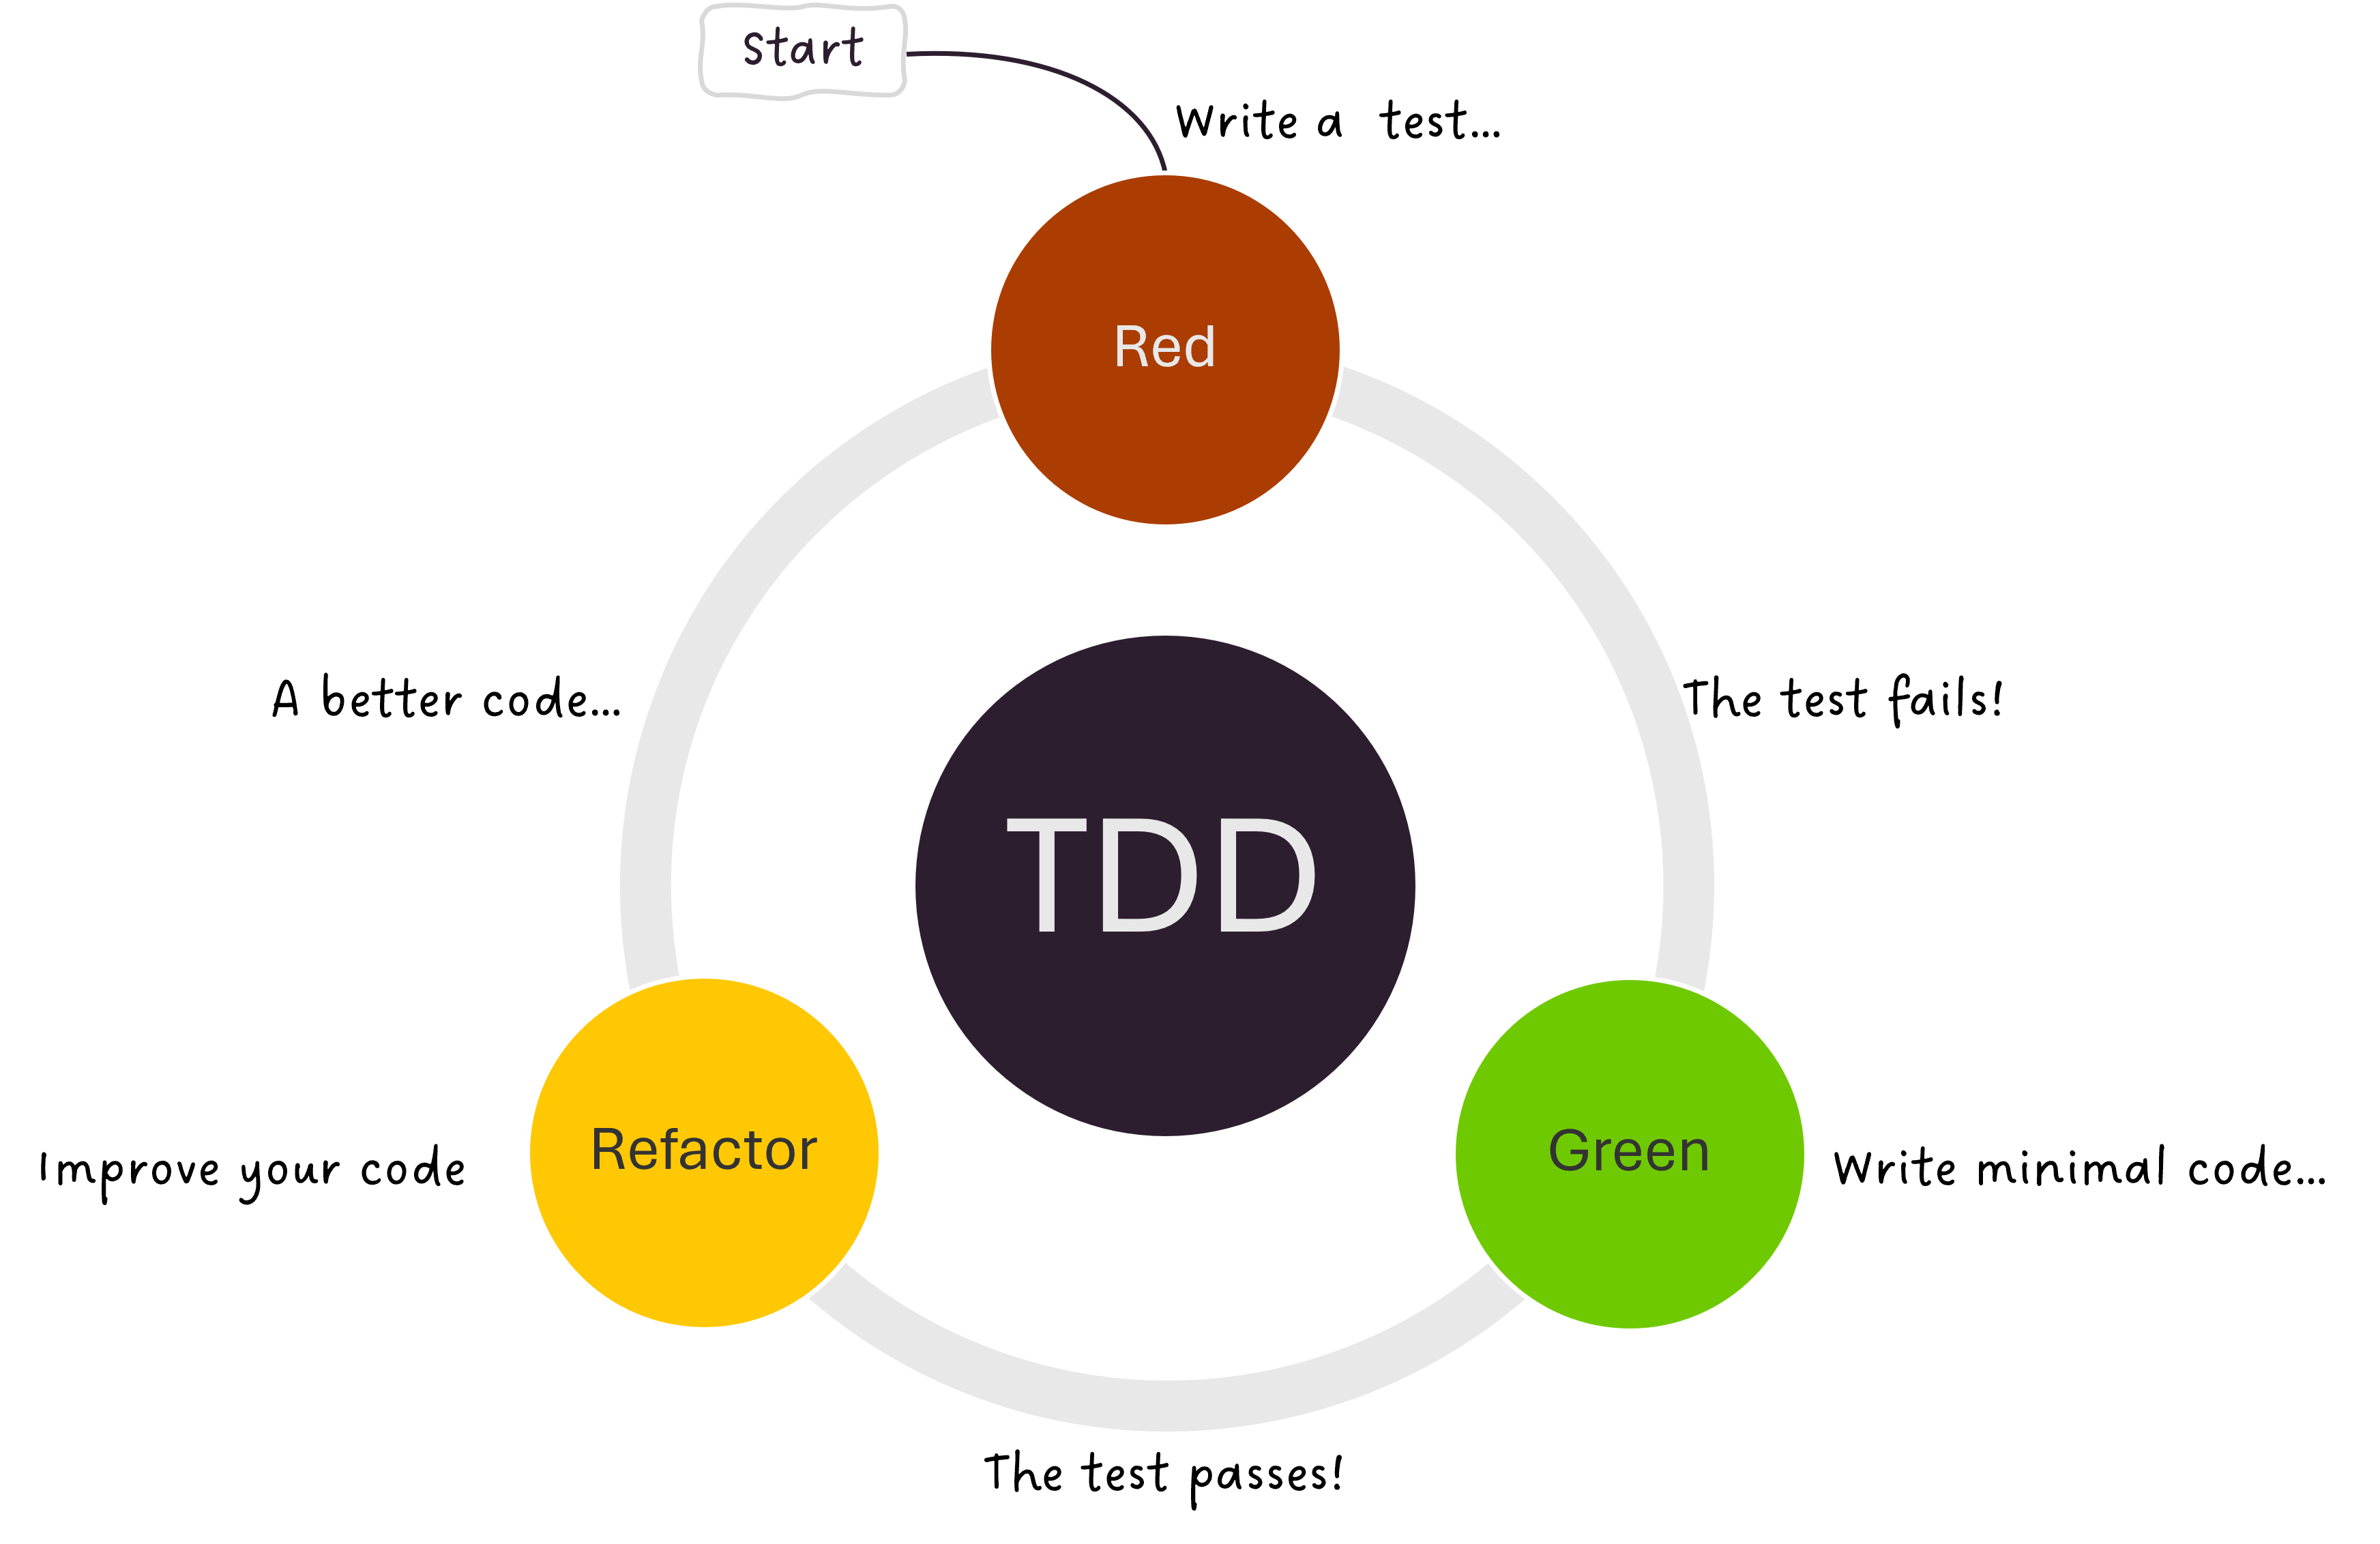
TDD is based on an iterative cycle known as “Red-Green-Refactor” (see figure)
- Write a test to verify the functionality of the code.
- Red: Run the test and see if it fails. Remember, the code does not exist yet.
- Green: Write minimal code that passes the test
- Refactor: Improve your code
The above steps can be repeated for adding a new feature or functionality.
Install Pytest
Before going any further, we need to ensure that we have the necessary package. In a Python shell, check if Pytest is installed. You can do this simply by importing the Pytest library:
If the command returns a
ModuleNotFoundError message, then you can
run:
Challenge: a rolling dice game
Let us write code to simulate a rolling dice game. The dice game’s goal is to precisely reach the target score, for example, 21 points, by rolling dice without going over. Each roll adds to the player total score, and if they exceed 21, they lose. The player who reaches 21 in the fewest number of rolls wins!
Before proceeding to the code, we need to define and understand the requirements. Requirements serve as clear guidelines that define what the code should do and how it should behave. By implementing these requirements into the code, we can ensure it meets all specified needs and constraints. Requirements also provide clear criteria for what to test to ensure code functionality and verify that the code behaves as expected.
Let us define the requirements.
-
Core Requirements
-
Dice Rolling Function:
- Requirement 1: The function must generate random numbers between 1 and the number of dice sides. The number of sides must be six by default, but a user can create custom dice.
- Requirement 2: - The dice rolling system must be fair and unbiased.
-
Game logic
- Requirement 3: The users can change the target score.
- Requirement 4: Track the total score and count the number of rolls.
- Requirement 5 : Implement the target score. The code should stop when the target score is reached, or the total score exceeds the target score.
-
Dice Rolling Function:
The requirements above define and regulate the behaviour of the code. However, as the authors of the code, we should define some implementation requirements, which helps us write good code from the start.
-
Implementation Requirements
- Every function should check for valid input.
- The code should handle errors gracefully.
- The code must use meaningful names.
- The code must include docstrings and comments.
We can use the above requirements as guidelines to write our code.
The following activities help us write the code step by step, using a
Test-Driven Development (TDD) approach. We will use the Pytest package.
The general idea is to use each requirement as a guideline, write
relevant tests to check each one, and then develop code. You should
develop two Python files: dice_game.py, which contains all
the core functions, and test_dice_game.py, which contains
all the unit tests.
Make sure that the two files are in the same location
Requirement 1: The dice rolling function
Step1: Write a test and see it fails.
Let’s start by considering the following requirement:
Dice Rolling Function: Must generate random numbers between 1 and the number of die sides. The number of sides must be six by default, but a user can create custom dice.
So the first step is to write a function roll_die that
takes the number of sides as input. By default, the number of sides must
be six.
Open the file dice_game.py in the editor and type the
following function:
PYTHON
def roll_die(sides=6):
"""Roll a die with the specified number of sides.

    Args:
        sides (int, optional): Number of sides. Defaults to 6.
"""
pass
The pass statement defines a null operation; it is a
placeholder for future code.
The next step in TDD is to design a unit test for this function. Note
that as it is, roll_die() is designed to fail all the
tests.
Open the file test_dice_game.py and import the following
modules:
The first import statement tells Python to use the Pytest framework, while the second explicitly says what function (or unit) to use for testing.
When the number of sides is six, the function roll_die
should return a value between 1 (lowest score) and 6 (highest score).
This requirement helps to write the first test. Keep working on the file
test_dice_game.py and add the following test.
Save the file, and in a command-line terminal, run:
:>pytestThe output should be similar to the one below.
test_dice_game.py F
================================== FAILURES ====================================
__________________________________ test_roll_die________________________________

    def test_roll_die():
        result = roll_die(sides=6)
>       assert 1 <= result <= 6
E       TypeError: '<=' not supported between instances of 'int' and 'NoneType'

test_dice_game.py:8: TypeError
============================short test summary info=============================
FAILED test_dice_game.py::test_roll_die - TypeError: '<=' not supported between instances of 'int' and 'NoneType'
==============================1 failed in 0.43s=================================
As expected, the test failed.
Step2 : write minimal code to pass the test.
Once the test_roll_dice() is in place, it is time to
develop the actual function. Remember that this function must generate a
random integer number (score) between 1 and the number of
sides. Therefore, the code must use a random number generator, like the
Numpy Random module. So modify the file dice_game.py to
import numpy (using np as an alias) and change
the function roll_dice to return the score.
PYTHON
def roll_die(sides=6):
  """Roll a die with the specified number of sides.

    Args:
        sides (int, optional): Number of sides. Defaults to 6.
    Returns:
          int: Rolling score
  """
  score = np.random.randint(1, sides+1)
  return score
And run pytest again.
test_dice_game.py .                           [100%]

=============================1 passed in 0.19s================================== Point to the use of sides+1 in the code. This ensures
the random numbers are generated within [1, sides] (inclusive).
Challenge
The function roll_die()should work for custom dice, or
rather, when the user decides to use a die with a different number of
sides. Add a test to the test_dice_game.py that checks this
requirement as well.
Run pytest to check your code. The test should pass
smoothly.
The above challenge is designed as a pure exercise to check student
understanding. It can be used to discuss the similarity with the
previous code and to introduce the
pytest.mark.parametrize.
Testing function with multiple arguments
Often, you need to verify the same behaviour with different inputs.
You could use multiple assertions in the same function or repeat the
same function multiple times but change the testing condition. This
approach leads to several problems, such as code duplication. The best
approach is to use pytest.mark.parametrize,
which enables the parametrisation of arguments for a test.
The pytest.mark.parametrize takes the argument’s name
defined in the function to test (“sides” in the example) as input and
passes different values as a list. When running the test, Pytest runs
the test function using each value, checking that the given input leads
to the expected results.
To show how it works, let’s say we want to test the
roll_dice function by passing different values for the
variable sides. We can change test_roll_die
function to
Using Pytest to test exception
So far, we used Pytest to check that the code produced the expected results. However, an essential part of testing is checking that the code manages exceptions correctly. For example, we need to ensure that the code can handle errors smoothly or that the correct exception type is raised when the code is not used correctly.
In Pytest, we can use the pytest.raise to check the type
of exceptions and the error message ( read
more about pytest.raise). For example, let’s say we
create a function to divide two numbers like the one below
PYTHON
def divide_number(numerator,denominator):

  if denominator == 0 :
    raise ZeroDivisionError("Cannot divide by zero")

  return numerator/denominator
We can use pytest.raises to check the expected behaviour
when the denominator is zero. If the correct exception is raised, the
test passes; if no exception is raised or a different type is raised,
the test fails.
Step3 : Incorporate input validation
One of the requirements is to handle errors gracefully. Currently,
the function roll_die does not check its input. Clearly,
the number of sides should not be less than 0, and since it is a game,
it is unreasonable to think about a die of only two sides. So, let us
add another test to test_dice_game.py to check the error
handling when the number of sides is incorrect.
The test will fail because we have not yet changed the
roll_die function. Can you modify the function to pass the
test?
PYTHON
def roll_die(sides=6):
    """Roll a die with the specified number of sides.

    Args:
        slide (int, optional): Number of sides. Defaults to 6.

    Returns:
        int: Rolling score

    Raise:
      ValueError: When the number of sides is less than 2.
    """

    if sides <=2:
        raise ValueError('Number of sides must be greater than 2')
    score = np.random.randint(1, sides+1)
return scoreHighlight the fact that the docstrings should change as the code changes.
Requirement 2: The dice rolling system must be fair and unbiased.
Checking if a die-rolling system is fair involves understanding theoretical expectations and practical verification methods. For a die with N sides to be fair, we expect that
- Each number has the same probability of appearing ( \(\rm{p}_{i} = \frac{1}{N}\))
- Average roll value to converge to the theoretical mean (\(\frac{1}{N}\sum_i^N X_i\), where \(N\) is the number of sides, and \(X_i\) is the individual score).
- The distribution becomes uniform over a large number of rolls.
Considering this expectation, we can create tests to verify that our die is unbiased.
A possible approach is to use the average roll value and compare it
with the theoretical mean. This approach requires writing code in
dice_game.py that calculates the mean score for a given
number of rolls and then compares it to the expected values. The test
function in test_dice_game.py will check that the two
values are equal.
The caveat in this approach is that comparing two non-integer values is not straightforward, as there are often numerical errors and approximations. For example, have a look at the output below
This is a common problem in testing and usually requires asserting that two floating-point numbers are equal within some tolerance, something like
where the tolerance is \(1\times10^{-6}\). Writing this type of
tests is tedious and usually requires code repetition. However, Pytest
has a built-in method that can help solve this problem: pytest.approx.
By default, pytest.approx uses a \(1\times10^{-6}\) tolerance. There might be
situations where this value is not adequate. For example, let us say
that the expected value is 0.62, but the function might return 0.6199
instead. Then
PYTHON
result = 0.6199
assert result == pytest.approx(0.62), "Results don't match"
[...]
AssertionError: Results don't match
A better check therefore might be
where we changed the tolerance to \(1\times10^{-3}\). An alternative solution
might be to use the round() function to approximate the
solution to a given number of decimals.
Write test_average_roll
Let’s start by writing the calculate_average_function in
dice_game.py
PYTHON
def calculate_average_rolls(sides, number_of_rolls):
    """Calculate average roll over multiple trials.

    Args:
        sides (int): Number of die sides.
        number_of_rolls (int): number of rolls

    """
    pass
Then, add the corresponding test function in
test_dice_game.py.
Remember to import the new function calculate_average_rolls
PYTHON
def test_average_roll():
    """Test the die is unbiased.
    Assert that the average score over a number of rolls is equal to the expected average
    """
    average = calculate_average_rolls(sides=6, num_of_rolls=1000)
    EXPECTED_AVERAGE = 3.5 #expected average for a 6-sided die.
    assert  round(average,1) == pytest.approx(EXPECTED_AVERAGE)
Now, modify the code
calculate_average_rolls(sides, number_of_rolls). An example
can be:
PYTHON
def calculate_average_rolls(sides, number_of_rolls):
    """Calculate average roll over multiple trials.

    Args:
        sides (int): Number of die sides.
        number_of_rolls (int): number of rolls

    Raises:
        ValueError: When the number of rolls is less than or equal to 1.

    Returns:
        float: Average total score

    """

    if number_of_rolls <=1:
        raise ValueError("""Number of rolls should be greater than 1.
                        For better results, it should be at least 1e3""")
    total_score =[roll_die(sides) for n in range(number_of_rolls)]
    average = np.mean(total_score)
return averageTake some time to read and explain the code to the students. Things
to focus on: - The EXPECTED_AVERAGE is calculated for a six-sided die.
The code can be extended to test other values, for example, by combining
it with pytest.mark.parametrize:
PYTHON
@Pytest.mark.parametrize("sides, num_rolls", [
    (6, 10000),(10, 10000)
])
def test_average_roll(sides, num_rolls):
    """Test the die is unbiased.
    Assert that the average score over a number of rolls is equal to the expected average for different dice.
    """
    average = calculate_average_rolls(sides, num_rolls)
    EXPECTED_AVERAGE = sum(range(1,sides+1)) / sides
assert round(average,1) == pytest.approx(EXPECTED_AVERAGE)- The use of
roundis to fix approximation errors, especially when the number of rolls is small. - Discuss that the test should not take too long to run. So using a very large number of rolls can provide better results, but it might also take too long to run. For real-life case, you want to balance execution time and accuracy.
To test your code, you can run pytest as before.
Simulate the game
We developed and tested code to simulate a die’s rolling and ensured the system was unbiased. For this challenge, you need to write code that simulates the game. As for the previous case, you can focus on the following requirements and develop code and tests to complete the challenge. The requirements are
-
Game logic
- Requirement 3: The users can change the target score.
- Requirement 4: Track the total score and count the number of rolls.
- Requirement 5 : Implement the target score. The code should stop when the target score is reached or the total score exceeds the target score.
You can call your game function play_game.
In test_dice_game.py
PYTHON
def test_game_completition():
    """ Test that the game returns a reasonable number of rolls
    """
    rolls_needed, total = play_game(target_score=6)
    assert rolls_needed > 0
In dice_game.py
PYTHON
def play_game(target_score = 21):
    """Roll the die until total score reaches or overcome the total score

    Args:
        target_score (int, optional): The target score. Defaults to 21.
    Returns:
        tuple (int, int): Number of rolls and total score
    """
    total = 0
    number_of_rolls = 0
    while total<target_score:
        roll = roll_die()
        total = total + roll
        number_of_rolls = number_of_rolls +1

return number_of_rolls, total- Testing increases trust in code and its results.
- Test Driven Development helps to write tests alongside code
- Pytest offers a powerful testing framework from Python code,
offering different built-in functions and methods to test various
aspects of the code:
-
@pytest.mark.parametrize: To test different input values -
pytest.raises: To test error handling
-