2.4 Diagnosing Issues and Improving Robustness
Last updated on 2025-01-28 | Edit this page
Estimated time: 50 minutes
Overview
Questions
- Once we know our program has errors, how can we locate them in the code?
- How can we make our programs more resilient to failure?
Objectives
- Use a debugger to explore behaviour of a running program
- Describe and identify edge and corner test cases and explain why they are important
- Apply error handling and defensive programming techniques to improve robustness of a program
- Integrate linting tool style checking into a continuous integration job
Introduction
Unit testing can tell us something is wrong in our code and give a rough idea of where the error is by which test(s) are failing. But it does not tell us exactly where the problem is (i.e. what line of code), or how it came about. To give us a better idea of what is going on, we can:
- output program state at various points, e.g. by using print statements to output the contents of variables,
- use a logging capability to output the state of everything as the program progresses, or
- look at intermediately generated files.
But such approaches are often time consuming and sometimes not enough to fully pinpoint the issue. In complex programs, like simulation codes, we often need to get inside the code while it is running and explore. This is where using a debugger can be useful.
Setting the Scene
Let us add a new function called data_normalise() to our
catchment example to normalise a given measurement data array so that
all entries fall between 0 and 1. (Make sure you create a new feature
branch for this work off your develop branch.) To normalise
each set of measurement data we need to divide it by the maximum
measurement value taken. To do so, we can add the following code to
catchment/models.py:
PYTHON
import numpy as np
...
def data_normalise(data):
    """Normalise any given 2D data array"""
    max = np.array(np.max(data, axis=1))
    return data / max[np.newaxis, :]
Note: there are intentional mistakes in the above code, which will be detected by further testing and code style checking below so bear with us for the moment.
For this work we will make use of the NumPy library. Pandas dataframes are built on top of NumPy arrays, which means that we can make use of the NumPy toolkit for manipulating Pandas data if we find that this would be more appropriate than using a Pandas tool.
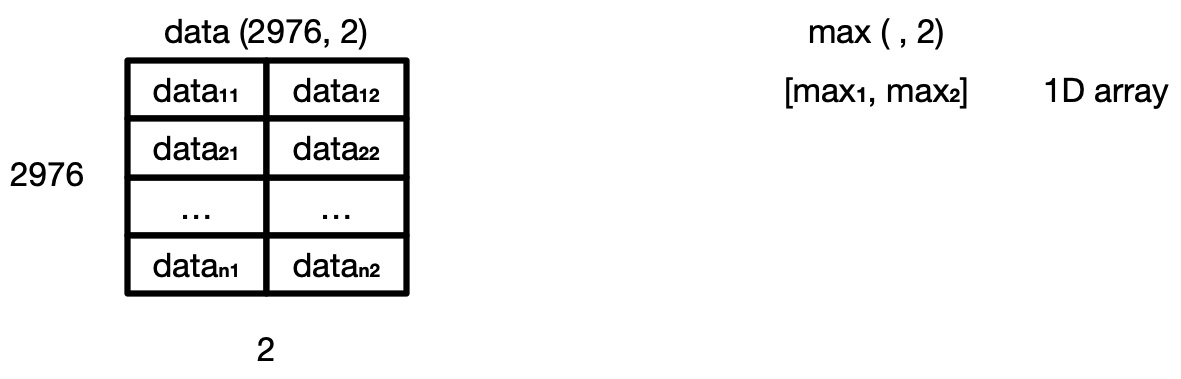
In the code above, we first go column by column and find the maximum
data value for each measurement site and store these values in a
1-dimensional NumPy array max. We then want to use NumPy’s
element-wise division, to divide each value in every column of
measurement data (belonging to the same site) by the maximum value for
that site stored in the 1D array max. However, we cannot do
that division automatically as data is a 2D array (of shape
(2976, 2)) and max is a 1D array (of shape
(, 2)), which means that their shapes are not
compatible.
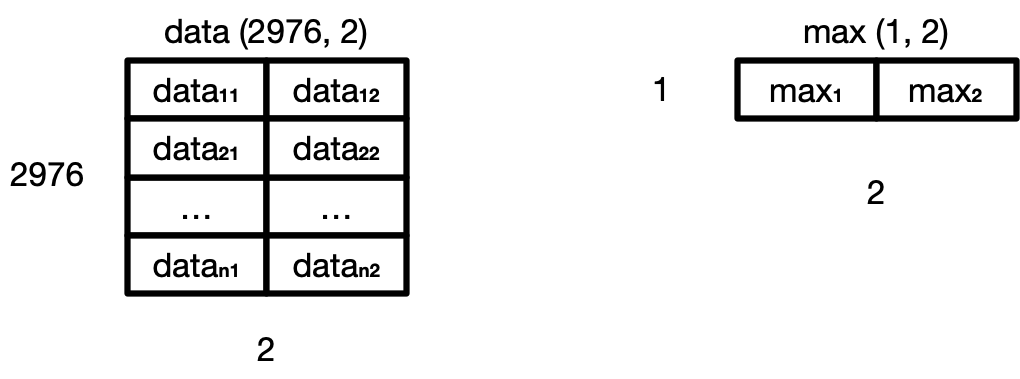
Hence, to make sure that we can perform this division and get the
expected result, we need to convert max to be a 2D array by
using the newaxis index operator to insert a new axis into
max, making it a 2D array of shape (1, 2).
Now the division will give us the expected result. Even though the
shapes are not identical, NumPy’s automatic broadcasting
(adjustment of shapes) will make sure that the shape of the 2D
max array is now “stretched” (“broadcast”) to match that of
data - i.e. (2976, 2), and element-wise
division can be performed.
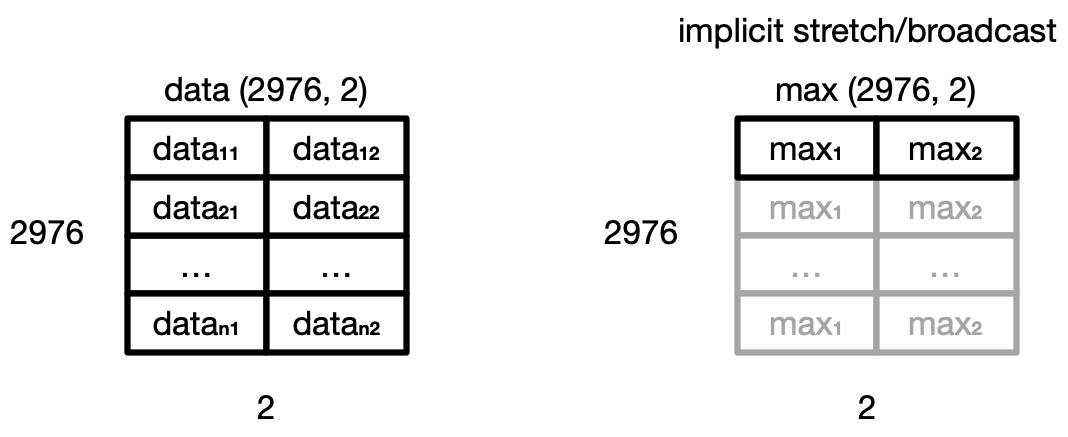
Broadcasting
The term broadcasting describes how NumPy treats arrays with different shapes during arithmetic operations. Subject to certain constraints, the smaller array is “broadcast” across the larger array so that they have compatible shapes. Be careful, though, to understand how the arrays get stretched to avoid getting unexpected results.
Note there is an assumption in this calculation that the minimum value we want is always zero. This is a sensible assumption for this particular application, since the zero value is a special case indicating that a patient experienced no inflammation on a particular day.
Let us now add a new test in tests/test_models.py to
check that the normalisation function is correct for some test data.
PYTHON
@pytest.mark.parametrize(
    "test_data, test_index, test_columns, expected_data, expected_index, expected_columns",
    [
        (
            [[1, 2, 3], [4, 5, 6], [7, 8, 9]],
            [pd.to_datetime('2000-01-01 01:00'),
                pd.to_datetime('2000-01-01 02:00'),
                pd.to_datetime('2000-01-01 03:00')],
            ['A', 'B', 'C'],
            [[0.14, 0.25, 0.33], [0.57, 0.63, 0.66], [1.0, 1.0, 1.0]],
            [pd.to_datetime('2000-01-01 01:00'),
                pd.to_datetime('2000-01-01 02:00'),
                pd.to_datetime('2000-01-01 03:00')],
            ['A', 'B', 'C']
        ),
    ])
def test_normalise(test_data, test_index, test_columns, expected_data, expected_index, expected_columns):
    """Test normalisation works for arrays of one and positive integers.
       Assumption that test accuracy of two decimal places is sufficient."""
    from catchment.models import data_normalise
    pdt.assert_frame_equal(data_normalise(pd.DataFrame(data=test_data, index=test_index, columns=test_columns)),
                           pd.DataFrame(data=expected_data, index=expected_index, columns=expected_columns),
                           atol=1e-2)
Note another assumption made here that a test accuracy of two decimal
places is sufficient - so we state this explicitly by setting the
absolute tolerance of the tests using atol=1e-2, and have
rounded our expected values up accordingly. The
assert_frame_equal Pandas testing function allows the
setting of absolute (atol) and relative (rtol)
tolerances to enable testing against values that are almost
equal: very useful when we have numbers with arbitrary decimal places
and are only concerned with a certain degree of precision, like the test
case above.
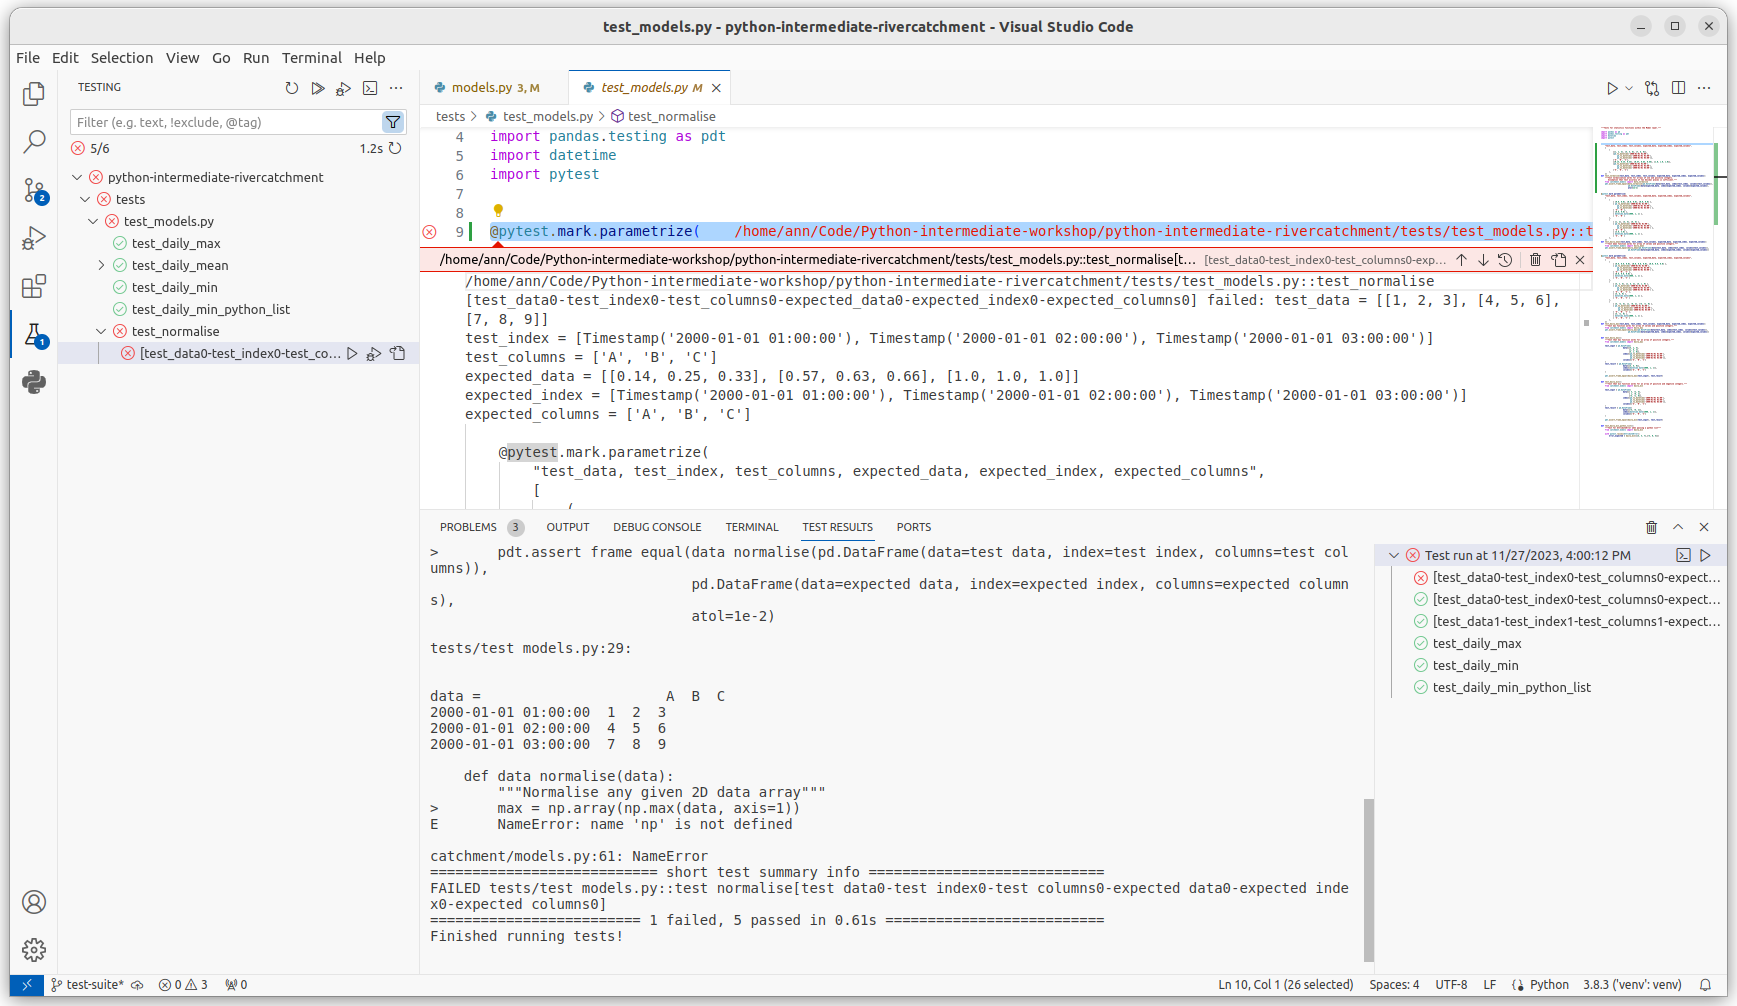
Run the tests again using
python -m pytest tests/test_models.py and you will note
that the new test is failing, with an error message that does not give
many clues as to what went wrong.
OUTPUT
tests/test_models.py:142:
_ _ _ _ _ _ _ _ _ _ _ _ _ _ _ _ _ _ _ _ _ _ _ _ _ _ _ _ _ _ _ _ _ _ _ _ _ _ _ _ _ _ _ _ _ _ _ _ _ _ _ _ _ _ _ _ _ _ _ _ _ _ _ _ _ _ _ _ _ _ _ _ _ _ _ _ _ _ _ _ _ _
pandas/_libs/testing.pyx:52: in pandas._libs.testing.assert_almost_equal
    ???
_ _ _ _ _ _ _ _ _ _ _ _ _ _ _ _ _ _ _ _ _ _ _ _ _ _ _ _ _ _ _ _ _ _ _ _ _ _ _ _ _ _ _ _ _ _ _ _ _ _ _ _ _ _ _ _ _ _ _ _ _ _ _ _ _ _ _ _ _ _ _ _ _ _ _ _ _ _ _ _ _ _

>   ???
E   AssertionError: DataFrame.iloc[:, 0] (column name="A") are different
E
E   DataFrame.iloc[:, 0] (column name="A") values are different (100.0 %)
E   [index]: [2000-01-01T01:00:00.000000000, 2000-01-01T02:00:00.000000000, 2000-01-01T03:00:00.000000000]
E   [left]:  [0.3333333333333333, 1.3333333333333333, 2.3333333333333335]
E   [right]: [0.14, 0.57, 1.0]
Let us use a debugger at this point to see what is going on and why the function failed.
Debugging in VS Code
Think of debugging like performing exploratory surgery - on code! Debuggers allow us to peer at the internal workings of a program, such as variables and other state, as it performs its functions.
Running Tests Within VS Code
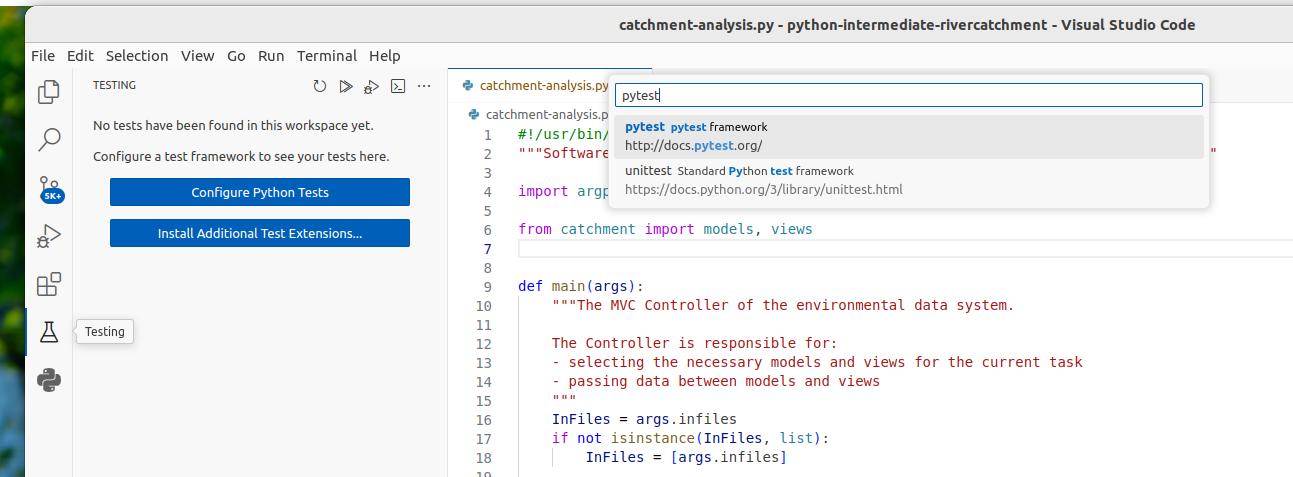
Firstly, to make it easier to track what’s going on, we can set up VS Code to run and debug our tests instead of running them from the command line. If you have not done so already, you will first need to enable the Pytest framework in VS Code. You can do this by:
- In VS Code, select the ‘Testing’ tab on the Activity Bar on the left
side of the window (icon resembles a chemistry flask/beaker). If you
have not yet configured any tests, you will see a blue
Configure Python Testsbutton. If tests have already been configured and are incorrect, or you wish to review this process, open the Command Palette (Command+Shift+P for Mac, Control+Shift+P for Windows) and search forPython: Configure Tests(keeping the>character at the start of the search string). - Then, in the text search box that appears at the top of the edit
window, type
pytestand selectpytest pytest frameworkfrom the drop-down list. - You will be asked for the root directory of your tests. Select the
testsfolder in our project folder. - The left hand panel will then display the
testsfolder with each of the files it contains.
We can now run pytest over our tests in VS Code,
similarly to how we ran our catchment-analysis.py script
before. In the Testing panel, right-click the
test_models.py file in the tests folder. under
the tests directory in the file navigation window on the
left, and select Run test. You’ll see the results of the
tests appear in VS Code in a bottom panel. If you scroll down in that
panel you should see the failed test_normalise() test
result looking something like the following:
We can also run our test functions individually. Click on a green
check next to a test function in our test_models.py script
in VS Code, (or right click it and select Run test), we can
run just that test:
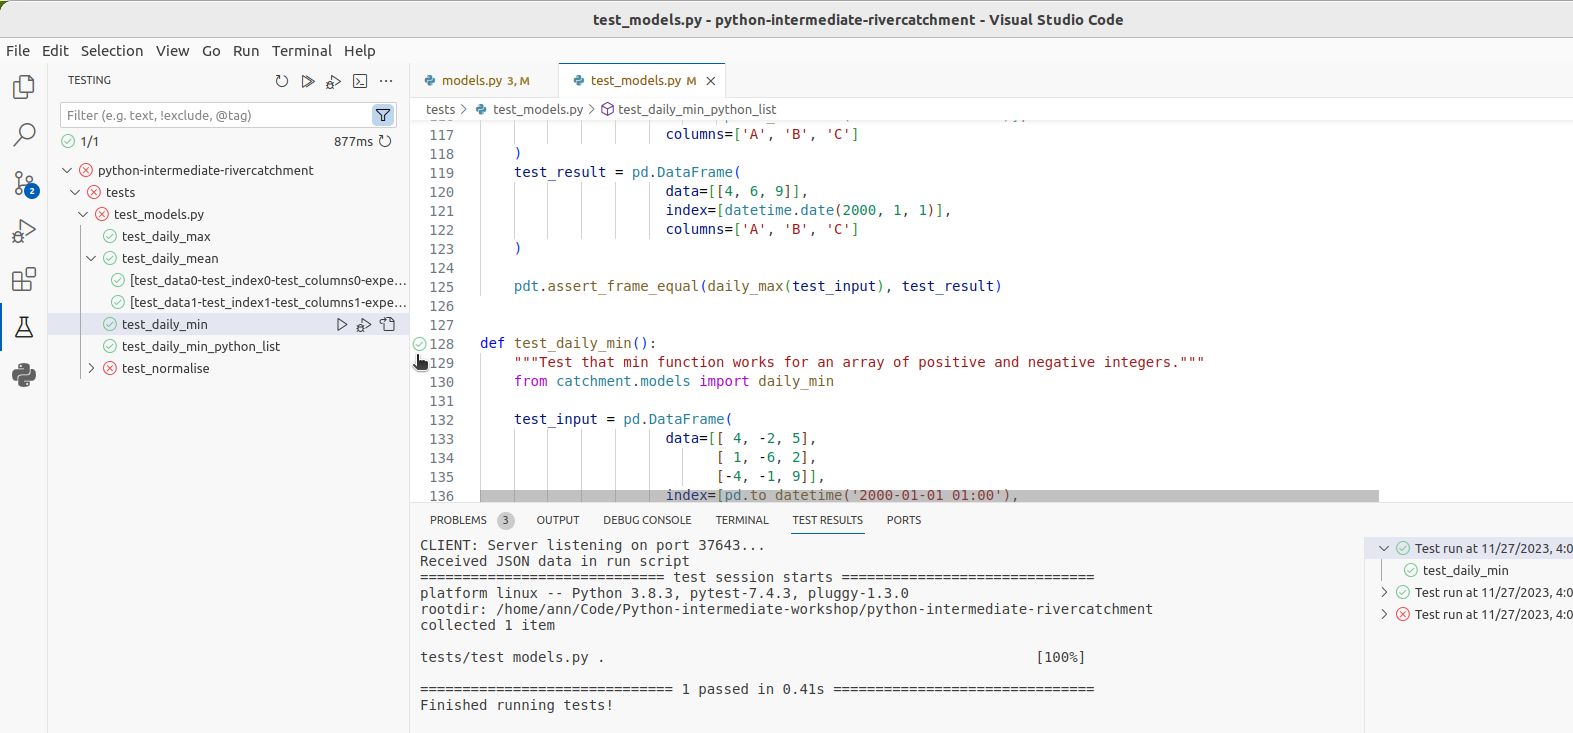
Click on the Run Test button next to
test_normalise, and you will be able to see that VS Code
runs just that test function, and we see the same
AssertionError that we saw before.
Running the Debugger
Now we want to use the debugger to investigate what is happening
inside the data_normalise function. To do this we will add
a breakpoint in the code. A breakpoint will pause execution at
that point allowing us to explore the state of the program.
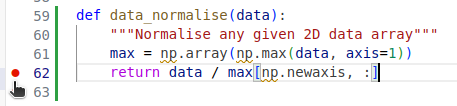
To set a breakpoint, navigate to the models.py file and
move your mouse to the return statement of the
data_normalise function. Click on just to the right of the
line number for that line and a small red dot will appear, indicating
that you have placed a breakpoint on that line.
Now if you find test_models.py in the Testing panel, and
locate the green play/right-arrow marker for the test_normalise function
(in VS Code this appears next to the decorator function @pytest.mark.parameterize that we recently added
to test_normalise). Right click on that arrow and select
Debug Test from the drop down menu. You will notice that
execution will be paused at the return statement of
data_normalise, where we placed our breakpoint. In the
debug panel that appears below, we can now investigate the exact state
of the program prior to it executing this line of code.
In the debug panel on the left hand side, you will be able to see three sections that looks something like the following:

- The
Variablessection at the top, which displays the local and global variables currently in memory. You will be able to see thedataarray that is input to thedata_normalisefunction, as well as themaxlocal array that was created to hold the maximum inflammation values for each patient. - The
Watchsection in the middle where we can add/remove expressions that we need to evaluate. - The
Call Stacksection at the bottom, which shows the chain of functions that have been executed to lead to this point. We can traverse this chain of functions if we wish, to observe the state of each function.
We also have the ability run any Python code we wish at this point to explore the state of the program even further! This is useful if you want to view a particular combination of variables, or perhaps a single element or slice of an array to see what went wrong.
Select the Debug Console tab in the bottom panel, and
you’ll be presented with a Python prompt. Try putting in the expression
max[np.newaxis, :] into the console, and you will be able
to see the row vector that we are dividing data by in the
return line of the function.
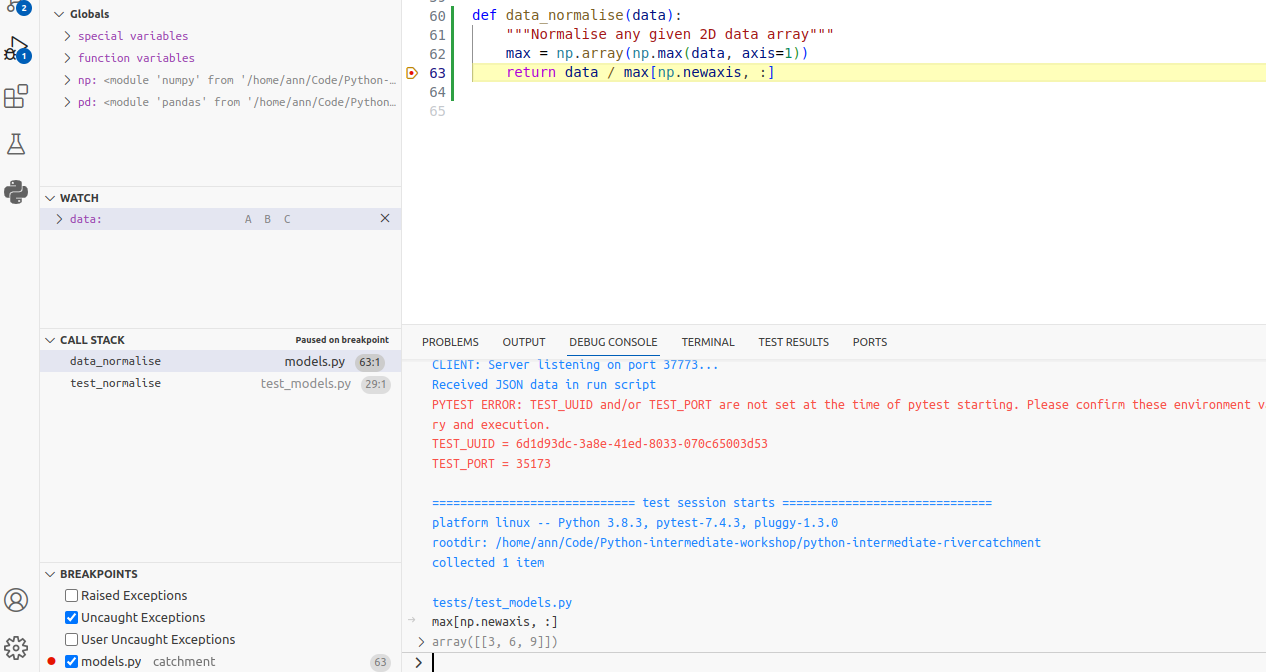
Now, looking at the max variable, we can see that
something looks wrong, as the maximum values for each patient do not
correspond to the data array. Recall that the input
data array we are using for the function is
So the maximum value for each measurement set (column) should be
[7, 8, 9], whereas the debugger shows
[3, 6, 9]. You can see that the latter corresponds exactly
to the last row of data, and we can immediately conclude
that we took the maximum along the wrong axis of data. Now
we have our answer, stop the debugging process by selecting the red
square at the top centre of the main VS Code editor window.
So to fix the data_normalise function in
models.py, change axis=1 in the first line of
the function to axis=0. With this fix in place, running all
the tests again should result in all tests passing. Navigate back to the
Testing tab (chemistry flask/beaker icon) on the left hand
vertical bar and click on the arrow next to test_models.py
You should be rewarded with:

NumPy Axis
Getting the axes right in NumPy is not trivial - the following tutorial offers a good explanation on how axes work when applying NumPy functions to arrays.
NumPy vs Pandas: Reducing Test Complexity
So far we have used Pandas testing functions, because the functions
we have been testing make use of Pandas Dataframe functionality.
However, even though we will be using the data_normalise
function on Pandas dataframes, the function itself does not actually
require Pandas functionality. The test above demonstrates that the
data_normalise function does not change the input dataframe
in any unexpected way; the returned Dataframe has the same indices and
columns as the input Dataframe. Because we know this, we can simplify
the rest of our tests for this function, by using NumPy arrays and
testing functions, instead of the Pandas equivalents. Reducing
complexity like this, where you can, helps you understand what is being
tested, and avoid possible confusions.
Before we carry on with new tests, we will reproduce the test above
using NumPy, so that you can compare the two testing frameworks. Add an
import statement for numpy.testing, and the
test test_numpy_normalise, as shown below, to your
test_models.py script. Then run the test to confirm it
works as expected.
PYTHON
import numpy.testing as npt
...
@pytest.mark.parametrize(
"test, expected",
[
(
[[1, 2, 3], [4, 5, 6], [7, 8, 9]],
[[0.14, 0.25, 0.33], [0.57, 0.63, 0.66], [1.0, 1.0, 1.0]]
)
])
def test_numpy_normalise(test, expected):
"""Test normalisation works for numpy arrays"""
from catchment.models import data_normalise
npt.assert_almost_equal(data_normalise(np.array(test)), np.array(expected), decimal=2)Note here that we are using the Numpy testing function
npt.assert_almost_equal, which allows us to set a relevant
test accuracy, using decimal=2. This is equivalent to the
atol=1e-2 tolerance setting that we used for the equivalent
Pandas test pdt.assert_frame_equal. Numpy also has a
testing function npt.assert_array_equal, which tests for
exact array matches. The functionality of this test is closely
replicated by the default tolerance settings in
pd.assert_frame_equal (atol=1e-8 and
rtol=1e-5), and can be fully replicated by setting the
option check_exact=True when using this function.
Corner or Edge Cases
The test case that we have currently written for
data_normalise is parameterised with a fairly standard data
array. However, when writing your test cases, it is important to
consider parameterising them by unusual or extreme values, in order to
test all the edge or corner cases that your code could be exposed to in
practice. Generally speaking, it is at these extreme cases that you will
find your code failing, so it’s beneficial to test them beforehand.
What is considered an “edge case” for a given component depends on
what that component is meant to do. In the case of
data_normalise function, the goal is to normalise a numeric
array of numbers. For numerical values, extreme cases could be zeros,
very large or small values, not-a-number (NaN) or infinity
values. Since we are specifically considering an array of
values, an edge case could be that all the numbers of the array are
equal.
For all the given edge cases you might come up with, you should also
consider their likelihood of occurrence. It is often too much effort to
exhaustively test a given function against every possible input, so you
should prioritise edge cases that are likely to occur. For our
data_normalise function, some common edge cases might be
the occurrence of zeros, and the case where all the values of the array
are the same.
When you are considering edge cases to test for, try also to think
about what might break your code. For data_normalise we can
see that there is a division by the maximum measurement value for each
site, so this will clearly break if we are dividing by zero here,
resulting in NaN values in the normalised array.
With all this in mind, let us add a few edge cases to our
parametrisation of test_numpy_normalise. We will add two
extra tests, corresponding to an input array of all 0, and an input
array of all 1.
PYTHON
@pytest.mark.parametrize(
    "test, expected",
    [
        (
            [[0.0, 0.0, 0.0], [0.0, 0.0, 0.0], [0.0, 0.0, 0.0]],
            [[0.0, 0.0, 0.0], [0.0, 0.0, 0.0], [0.0, 0.0, 0.0]]
        ),
        (
            [[1.0, 1.0, 1.0], [1.0, 1.0, 1.0], [1.0, 1.0, 1.0]],
            [[1.0, 1.0, 1.0], [1.0, 1.0, 1.0], [1.0, 1.0, 1.0]]
        ),
        (
            [[1, 2, 3], [4, 5, 6], [7, 8, 9]],
            [[0.14, 0.25, 0.33], [0.57, 0.63, 0.66], [1.0, 1.0, 1.0]]
        )
    ])
def test_numpy_normalise(test, expected):
    """Test normalisation works for numpy arrays"""
    from catchment.models import data_normalise
    npt.assert_almost_equal(data_normalise(np.array(test)), np.array(expected), decimal=2)
Running the tests now from the command line results in the following assertion error, due to the division by zero as we predicted.
OUTPUT
E       AssertionError:
E       Arrays are not almost equal to 2 decimals
E
E       x and y nan location mismatch:
E        x: array([[nan, nan, nan],
E              [nan, nan, nan],
E              [nan, nan, nan]])
E        y: array([[0., 0., 0.],
E              [0., 0., 0.],
E              [0., 0., 0.]])

tests/test_models.py:160: AssertionError
How can we fix this? Luckily, there is a NumPy function that is
useful here, np.isnan(),
which we can use to replace all the NaN’s with our desired result, which
is 0. We can also silence the run-time warning using np.errstate:
PYTHON
...
def data_normalise(data):
    """
    Normalise any given 2D data array

    NaN values are replaced with a value of 0
    """
    max = np.array(np.max(data, axis=0))
    with np.errstate(invalid='ignore', divide='ignore'):
        normalised = data / max[np.newaxis, :]
    normalised[np.isnan(normalised)] = 0.0
    return normalised
...Exercise: Exploring Tests for Edge Cases
Think of some more suitable edge cases to test our
data_normalise() function and add them to the parametrised
tests. Remember to build tests for the functionality we want from the
function - it does not matter at the moment if some of the tests fail.
After you have finished remember to commit your changes.
One possible solution is presented below.
PYTHON
@pytest.mark.parametrize(
    "test, expected",
    [
        (
            [[0, 0, 0], [0, 0, 0], [0, 0, 0]],
            [[0, 0, 0], [0, 0, 0], [0, 0, 0]],
        ),
        (
            [[1, 1, 1], [1, 1, 1], [1, 1, 1]],
            [[1, 1, 1], [1, 1, 1], [1, 1, 1]],
        ),
        (
            [[float('nan'), 1, 1], [1, 1, 1], [1, 1, 1]],
            [[0, 1, 1], [1, 1, 1], [1, 1, 1]],
        ),
        (
            [[1, 2, 3], [4, 5, float('nan')], [7, 8, 9]],
            [[0.14, 0.25, 0.33], [0.57, 0.63, 0.0], [1.0, 1.0, 1.0]],
        ),
        (
            [[-1, 2, 3], [4, 5, 6], [7, 8, 9]],
            [[0.0, 0.67, 1], [0.67, 0.83, 1], [0.78, 0.89, 1]],
        ),
        (
            [[1, 2, 3], [4, 5, 6], [7, 8, 9]],
            [[0.33, 0.67, 1], [0.67, 0.83, 1], [0.78, 0.89, 1]],
        )
    ])
def test_numpy_normalise(test, expected):
    """Test normalisation works for numpy arrays of one and positive integers."""
    from catchment.models import data_normalise
    npt.assert_almost_equal(data_normalise(np.array(test)), np.array(expected), decimal=2)
...
You could also, for example, test and handle the case of a whole row of NaNs.
Defensive Programming
In the previous section, we made a few design choices for our
data_normalise function:
- We are implicitly converting any
NaN, - Normalising a constant 0 array of inflammation results in an identical array of 0s,
- We don’t warn the user of any of these situations.
This could have be handled differently. We might decide that we do not want to silently make these changes to the data, but instead to explicitly check that the input data satisfies a given set of assumptions (e.g. no strings) and raise an error if this is not the case. Then we can proceed with the normalisation, confident that our normalisation function will work correctly.
Checking that input to a function is valid via a set of preconditions
is one of the simplest forms of defensive programming
which is used as a way of avoiding potential errors. Preconditions are
checked at the beginning of the function to make sure that all
assumptions are satisfied. These assumptions are often based on the
value of the arguments, like we have already discussed.
However, in a dynamic language like Python one of the more common
preconditions is to check that the arguments of a function are of the
correct type. Currently there is nothing stopping someone from
calling data_normalise with a string, a dictionary, or
another object that is not a pandas.DataFrame or
numpy.ndarray.
As an example, let us change the behaviour of the
data_normalise() function to raise an error on negative
inflammation values. Edit the catchment/models.py file, and
add a precondition check to the beginning of the
data_normalise() function like so:
We can then modify our test function in
tests/test_models.py to check that the function raises the
correct exception - a ValueError - when input to the test
contains negative values (i.e. input case
[[-1, 2, 3], [4, 5, 6], [7, 8, 9]]). The ValueError
exception is part of the standard Python library and is used to indicate
that the function received an argument of the right type, but of an
inappropriate value.
PYTHON
@pytest.mark.parametrize(
    "test, expected, expect_raises",
    [
        ... # previous test cases here, with None for expect_raises, except for the next one - add ValueError
        ... # as an expected exception (since it has a negative input value)
        (
            [[-1, 2, 3], [4, 5, 6], [7, 8, 9]],
            [[0, 0.67, 1], [0.67, 0.83, 1], [0.78, 0.89, 1]],
            ValueError,
        ),
        (
            [[1, 2, 3], [4, 5, 6], [7, 8, 9]],
            [[0.33, 0.67, 1], [0.67, 0.83, 1], [0.78, 0.89, 1]],
            None,
        ),
    ])
def test_normalise(test, expected, expect_raises):
    """Test normalisation works for arrays of one and positive integers."""
    from catchment.models import data_normalise
    if expect_raises is not None:
        with pytest.raises(expect_raises):
            npt.assert_almost_equal(data_normalise(np.array(test)), np.array(expected), decimal=2)
    else:
        npt.assert_almost_equal(data_normalise(np.array(test)), np.array(expected), decimal=2)
Be sure to commit your changes so far and push them to GitHub.
Optional Exercise: Add a Precondition to Check the Correct Type and Shape of Data
Add preconditions to check that data is a DataFrame or
ndarray object and that it is of the correct shape. Add
corresponding tests to check that the function raises the correct
exception. You will find the Python function isinstance
useful here, as well as the Python exception TypeError.
Once you are done, commit your new files, and push the new commits to
your remote repository on GitHub.
In inflammation/models.py:
...
def data_normalise(data):
    """
    Normalise any given 2D data array

    NaN values are replaced with a value of 0

    :param data: 2D array of inflammation data
    :type data: ndarray

    """
    if not isinstance(data, np.ndarray) or not isinstance(data, pd.DataFrame):
        raise TypeError('data input should be DataFrame or ndarray')
    if len(data.shape) != 2:
        raise ValueError('data array should be 2-dimensional')
    if np.any(data < 0):
        raise ValueError('Measurement values should be non-negative')
    max = np.nanmax(data, axis=0)
    with np.errstate(invalid='ignore', divide='ignore'):
        normalised = data / max[np.newaxis, :]
    normalised[np.isnan(normalised)] = 0
    return normalised
...
In test/test_models.py:
PYTHON
...
@pytest.mark.parametrize(
    "test, expected, expect_raises",
    [
        ...
        (
            'hello',
            None,
            TypeError,
        ),
        (
            3,
            None,
            TypeError,
        ),
        (
            [[1, 2, 3], [4, 5, 6], [7, 8, 9]],
            [[0.33, 0.67, 1], [0.67, 0.83, 1], [0.78, 0.89, 1]],
            None,
        )
    ])
def test_data_normalise(test, expected, expect_raises):
    """Test normalisation works for arrays of one and positive integers."""
    from catchment.models import data_normalise
    if isinstance(test, list):
        test = np.array(test)
    if expect_raises is not None:
        with pytest.raises(expect_raises):
            npt.assert_almost_equal(data_normalise(test), np.array(expected), decimal=2)
    else:
        npt.assert_almost_equal(data_normalise(test), np.array(expected), decimal=2)
...
Note the conversion from list to np.array
has been moved out of the call to npt.assert_almost_equal()
within the test function, and is now only applied to list items (rather
than all items). This allows for greater flexibility with our test
inputs, since this wouldn’t work in the test case that uses a
string.
If you do the challenge, again, be sure to commit your changes and push them to GitHub.
You should not take it too far by trying to code preconditions for
every conceivable eventuality. You should aim to strike a balance
between making sure you secure your function against incorrect use, and
writing an overly complicated and expensive function that handles cases
that are likely never going to occur. For example, it would be sensible
to validate the shape of your measurement data array when it is actually
read from the csv file (in load_csv), and therefore there
is no reason to test this again in data_normalise. You can
also decide against adding explicit preconditions in your code, and
instead state the assumptions and limitations of your code for users of
your code in the docstring and rely on them to invoke your code
correctly. This approach is useful when explicitly checking the
precondition is too costly.
Improving Robustness with Automated Code Style Checks
Let’s re-run Pylint over our project after having added some more code to it. From the project root do:
You may see something like the following in Pylint’s output:
BASH
************* Module catchment.models
...
catchment/models.py:60:4: W0622: Redefining built-in 'max' (redefined-builtin)
...
The above output indicates that by using the local variable called
max in the data_normalise function, we have
redefined a built-in Python function called max. This isn’t
a good idea and may have some undesired effects (e.g. if you redefine a
built-in name in a global scope you may cause yourself some trouble
which may be difficult to trace).
Exercise: Fix Code Style Errors
Rename our local variable max to something else
(e.g. call it max_data), then rerun your tests and commit
these latest changes and push them to GitHub using our usual feature
branch workflow. Make sure your develop and
main branches are up to date.
It may be hard to remember to run linter tools every now and then.
Luckily, we can now add this Pylint execution to our continuous
integration builds as one of the extra tasks. Since we’re adding an
extra feature to our CI workflow, let’s start this from a new feature
branch from the develop branch:
BASH
$ git switch -c pylint-ci develop # note a shorthand for creating a branch from another and switching to itThen to add Pylint to our CI workflow, we can add the following step
to our steps in
.github/workflows/main.yml:
BASH
...
    - name: Check style with Pylint
      run: |
        python3 -m pylint --fail-under=0 --reports=y catchment
...
Note we need to add --fail-under=0 otherwise the builds
will fail if we don’t get a ‘perfect’ score of 10! This seems unlikely,
so let’s be more pessimistic. We’ve also added --reports=y
which will give us a more detailed report of the code analysis.
Then we can just add this to our repo and trigger a build:
Then once complete, under the build(s) reports you should see an entry with the output from Pylint as before, but with an extended breakdown of the infractions by category as well as other metrics for the code, such as the number and line percentages of code, docstrings, comments, and empty lines.
So we specified a score of 0 as a minimum which is very low. If we decide as a team on a suitable minimum score for our codebase, we can specify this instead. There are also ways to specify specific style rules that shouldn’t be broken which will cause Pylint to fail, which could be even more useful if we want to mandate a consistent style.
We can specify overrides to Pylint’s rules in a file called
.pylintrc which Pylint can helpfully generate for us. In
our repository root directory:
Looking at this file, you’ll see it’s already pre-populated. No
behaviour is currently changed from the default by generating this file,
but we can amend it to suit our team’s coding style. For example, a
typical rule to customise - favoured by many projects - is the one
involving line length. You’ll see it’s set to 100, so let’s set that to
a more reasonable 120. While we’re at it, let’s also set our
fail-under in this file:
BASH
...
# Specify a score threshold to be exceeded before program exits with error.
fail-under=0
...
# Maximum number of characters on a single line.
max-line-length=120
...
Don’t forget to remove the --fail-under argument to
Pytest in our GitHub Actions configuration file too, since we don’t need
it anymore.
Now when we run Pylint we won’t be penalised for having a reasonable line length. For some further hints and tips on how to approach using Pylint for a project, see this article.
Before moving on, be sure to commit all your changes and then merge
to the develop and main branches in the usual
manner, and push them all to GitHub.
- Unit testing can show us what does not work, but does not help us locate problems in code.
- Use a debugger to help you locate problems in code.
- A debugger allows us to pause code execution and examine its state by adding breakpoints to lines in code.
- Use preconditions to ensure correct behaviour of code.
- Ensure that unit tests check for edge and corner cases too.
- Using linting tools to automatically flag suspicious programming language constructs and stylistic errors can help improve code robustness.