Documenting your package
Last updated on 2026-02-10 | Edit this page
Estimated time: 60 minutes
Overview
Questions
- How can I make my package understandable and reusable?
Objectives
- Write a readme
- Use roxygen2 for creating documentation
- Use roxygen2 for managing the NAMESPACE file
Why documenting?
Your code is going to be read by people, for instance:
- People interested in your research.
- Potential users of your code.
- Colleagues and collaborators.
- Yourself, in the future, after you forgot all the tiny details.
For this and other reasons, it is a very good idea to invest some time in writing good documentation.
The README
The first, and perhaps most important document of any coding project
is the readme file. This file typically has the name
README.md and is located at the root folder, just at the
same level as DESCRIPTION or NAMESPACE.
The readme file provides the very first contact with your code to potential users.
What do you want to tell your potential users?
Try to put yourself in the shoes of your potential users. They can be collaborators, people who found you code on the internet, …
What do you think they would like to know?
Now, take a look at the README from github.com/PabRod/kinematics.
What subjects are addressed in this README? As a potential user, is there anything that you miss?
With the results of this discussion, write a short README file for our package.
Get started with usethis::use_readme_md() to generate a
default README.md file.
(Optional) Readme rendering
One of the advantages of having a README.md is that most
code repositories render this file as a nicely-formatted reader-friendly
text. See, for instance, the “main page” of the kinematics
package on GitHub (link). In GitHub, you
can even create a readme about
yourself!
If you want to know more about GitHub, please take a look at the Software Carpentries’ lesson on Version Control.
Documenting your functions with roxygen2
As we saw, the purpose of the readme is to welcome whoever
happens to be looking at your project. This means that it is rarely the
place for very technical information, such as the one describing the way
your functions work. The most practical way of documenting your
functions is by integrating the documents as part of the functions. This
is exactly what the package roxygen2 helps us with.
roxygen2 is a package that makes writing packages much
easier. In particular, roxygen2 takes care of your
functions’ documentation. As a bonus, it also takes care of the
NAMESPACE file. If you don’t have it installed (you can
check by trying library(roxygen2)), please do it now
(install.packages("roxygen2")).
Unfortunately, using it requires manually configuring a few things. Please follow these steps:
Using roxygen2 for the first
time
- Delete
NAMESPACE.roxygen2will create a new one for you. - Delete the
man/folder.roxygen2will create a new one for you. - In the upper right panel, go to
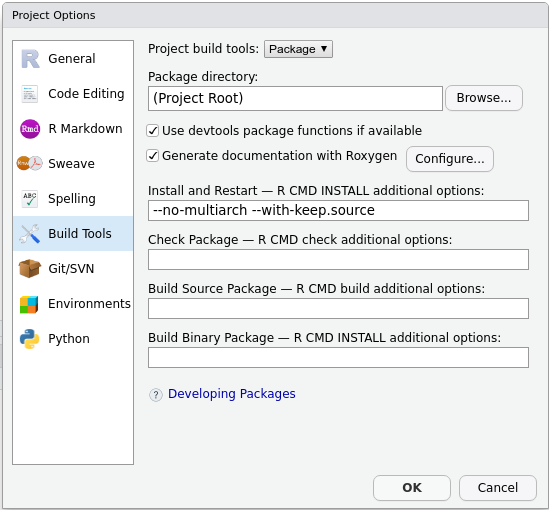
Build More Configure Build Tools. You’ll see a menu like this:
- Tick
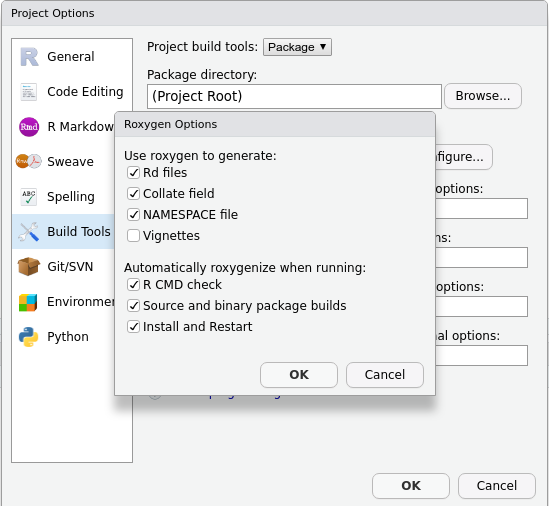
Generate documentation with Roxygen. A new menu will appear:
- Tick
Install and restart.
And you are all set!
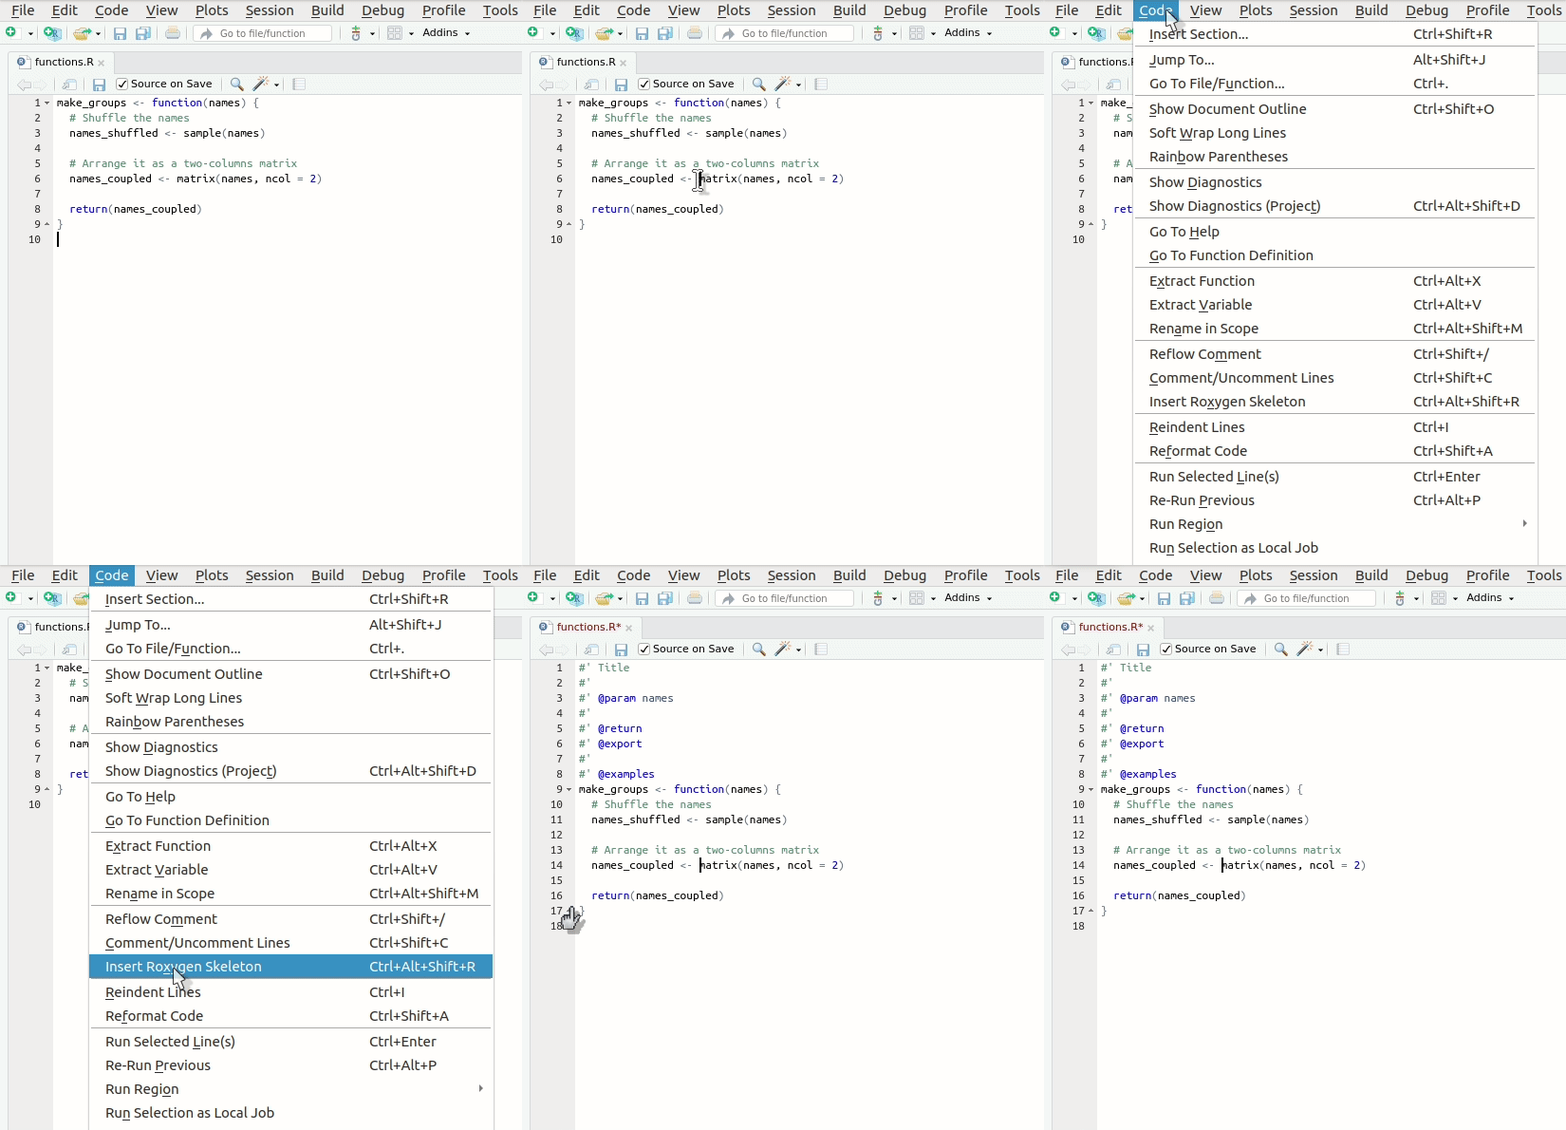
Let’s create our first roxygen skeleton. You can follow
the steps in the animation below. Please note that, before pressing
Code > Insert Roxygen skeleton your cursor has to be
inside the function’s body.

Let’s take a look at the skeleton. It contains:
- A
Titlesection, where you can write what your function does. You can use add more comment lines below for a long description. - The
returnfield refers to the function’s output. - The
paramsfield(s) refer to each of the function’s input(s). - The
exportfield means that this function should be exported to theNAMESPACE. We’ll discuss it further later. - The
examplesfield is used, as you can guess, for adding examples to the documentation. We’ll not use it now, so we can delete it. If you are interested in this or other optional parameters, please refer toroxygen2documentation.
Write the docs
Take 5 minutes to edit the skeleton with real documentation. In particular:
- Add a title.
- Describe, below the title, what the function does.
- Describe the parameter
names. - Describe the output that is returned.
- Ignore
@export. - Delete
@examples.
The documentation should look approximately like this:
R
#' Make groups of 2 persons
#'
#' Randomly arranges a vector of names into a matrix with 2 columns and
#' whatever number of columns is required
#'
#' @param names The vector of names
#'
#' @return The re-arranged matrix of names
#' @export
#'
make_groups <- function(names) {
  # Shuffle the names
  names_shuffled <- sample(names)

  # Arrange it as a two-columns matrix
  names_coupled <- matrix(names, ncol = 2)

  return(names_coupled)
Please note that the documentation is even longer than the code. There is nothing wrong about this, to the contrary. If you have to choose between too few and too much documentation, go for too much without hesitation.
The export field
In case you don’t want your function to be directly accessible for
users of your package, you just have to delete the @export
keyword from the function documentation. But, why would you want that?
Can you think of an example where hiding a function can be a good
idea?
Sometimes packages use auxiliary functions that perform intermediate operations. Writing functions for these operations can be very useful for the developer, but confusing for potential users. If that’s the case, it can be a good idea to not export those functions keeping them only internally available.
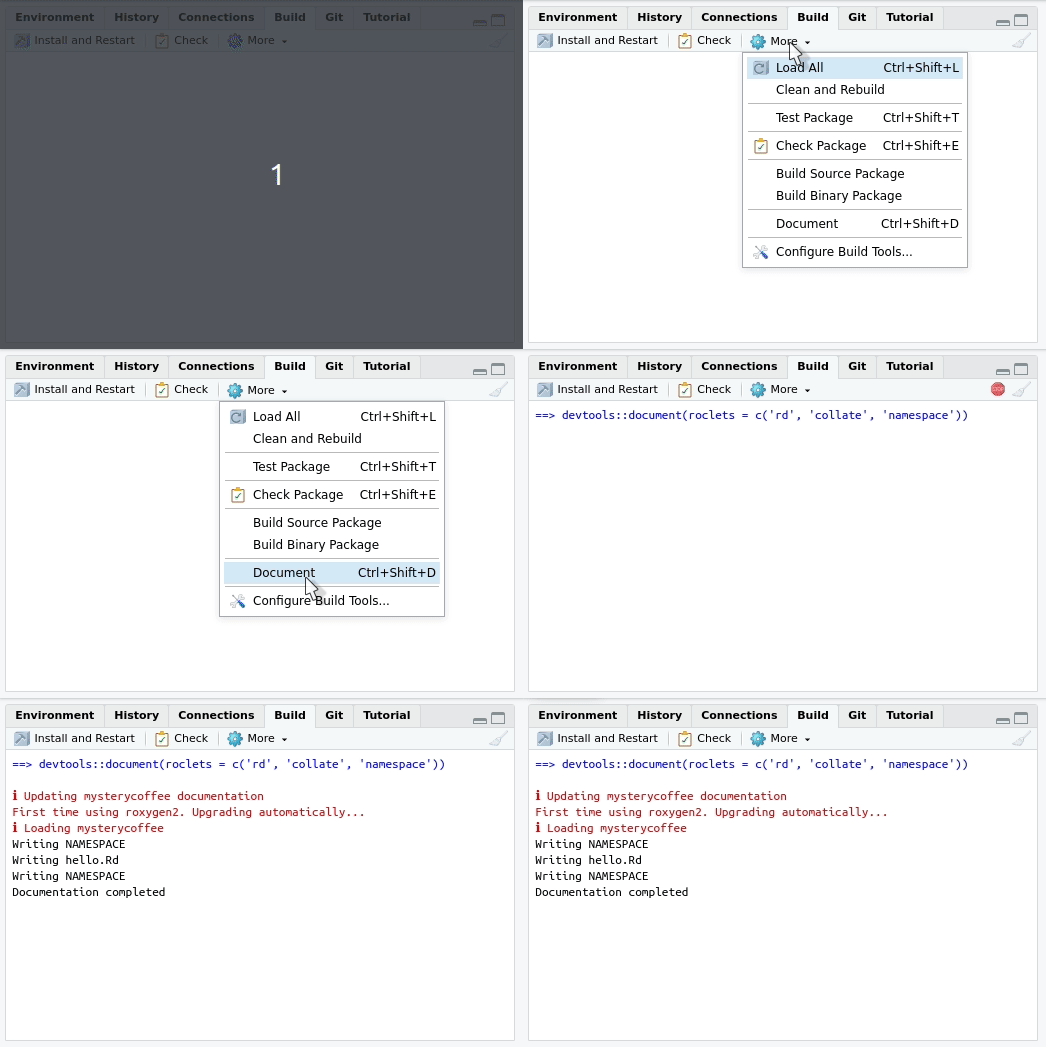
Now that we have written the documentation, we are ready to build it. As you will see, the process is quite automatic.
Building the documentation
If you configured roxygen2 as we suggested in section
“Using roxygen2 for the first time”, the
documentation will be generated every time you press “Install and
restart” in the “Build” menu at the upper right side of
RStudio. The tab will also contain a “Document”
only:

Writing the NAMESPACE
The documentation build also created the NAMESPACE file.
Can you open it and describe what do you see? What does it mean?
The NAMESPACE file should look like:
The export command guarantees that the function
make_groups will be available for the final users of the
package.
The comment is also worth noting: you don’t have to edit this file by
hand; roxygen2 will take care of it.
Reading the documentation
After generating the documentation and installing the package, the
documentation generated by roxygen2 can be accessed as
usual in R using a question mark and the name of the
function we are interested in:
R
?make_groups
The help menu will open and show something like this:

- Documentation is not optional
- All coding projects need a readme file
- roxygen2 helps us with the otherwise tedious process of documenting
- roxygen2 also takes care of NAMESPACE
