Connecting the first sensor
Last updated on 2022-09-12 | Edit this page
Overview
Questions
- Can you identify a DHT11 and DHT22 temperature/humidity sensor?
- Can you identify the pins on the DHT sensor?
- Can you identify the pins on the ESP that we will need to use?
- Can you explain what the code will do?
Objectives
- Connect a DHT11 or DHT22 to the microcontroller using a breadboard and connectors
- Write the code required to read the temperature and print it to the serial monitor
Connecting the temperature sensor
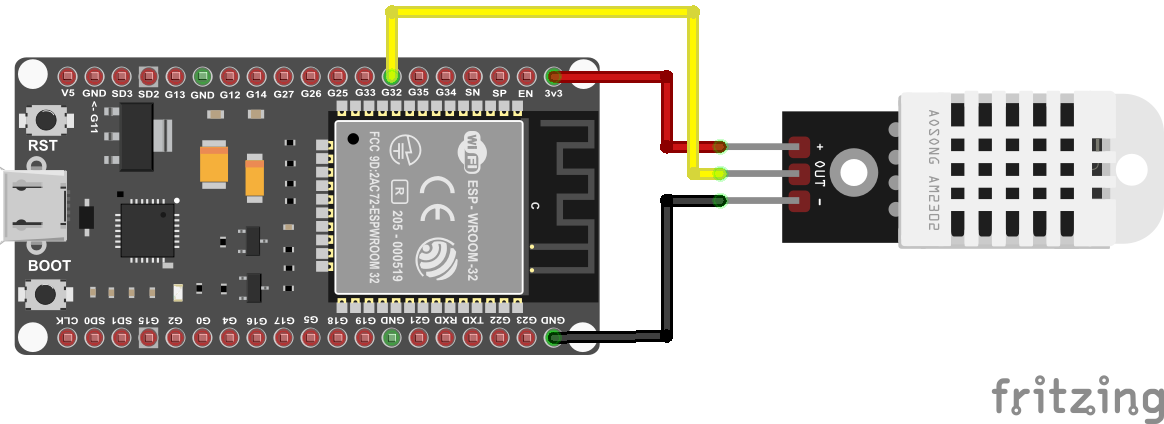
The sensor that we will be using is a DHT11 or a DHT22. The easiest is to use a “module” which is the sensor soldered to a little circuit board. The circuit board includes a resistor which is a tiny component that you might be able to see on the board. If you don’t have the module, but you have the sensor, then you need to obtain a 10K Ohm resister. The first diagram below show how to wire up the module. The second diagram shows how to wire up the sensor using a resistor.

Before entering our code we need to install a special library that is required for the temperature sensor. Without the library the code that we will need to write to get the sensor to work will be much more complicated. Fortunately there are many people around the world the write the difficult code and make it available as libraries for us to make our lives easier.
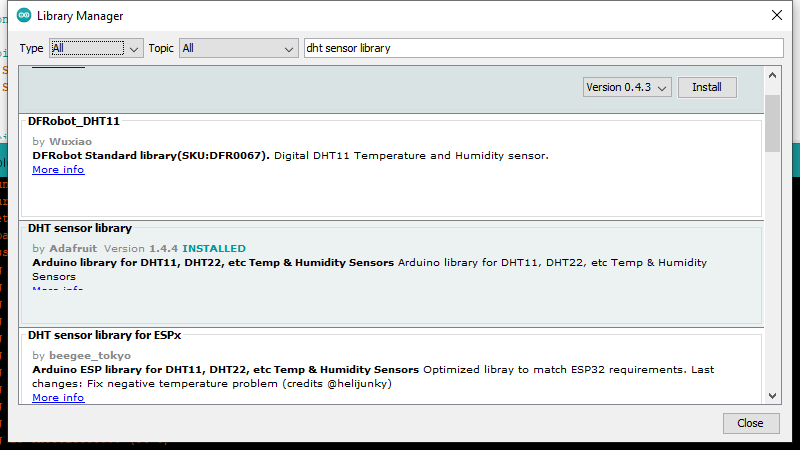
To install the library click on the Tools menu item and
then select Manage libraries.... The Library Manager window
should pop up. In the text field type dht sensor library
and press enter to search for the library. Look for the entry
“DHT sensor library by Adafruit” and
then click on the Install button.
Close the library manager by clicking on the Close
button. Next we want to create a new sketch. Click on File
and then New. A new instance of the Arduino IDE should
open. You can now enter the code below in the editor
C
#include <DHT.h>

#define DHT_SENSOR_TYPE DHT22
#define DHT_SENSOR_PIN 32 // ESP32 pin connected to DHT sensor

const int readingdelay = 3000;

DHT dht_sensor(DHT_SENSOR_PIN, DHT_SENSOR_TYPE);

void setup() {
  Serial.begin(9600); // initialize serial
  Serial.println(F("Starting ..."));
  dht_sensor.begin(); // initialize the DHT sensor
}

void loop() {

  float temperature = dht_sensor.readTemperature();   // read temperature in Celsius


  if (isnan(temperature)) {
    Serial.println("Failed to read from DHT sensor!");
  } else {
    char tempString[8];
    dtostrf(temperature, 1, 2, tempString);
    Serial.print("Temperature: ");
    Serial.println(temperature);
  }

  // wait a 3 seconds between readings
  delay(readingdelay);
}
Once you have entered the code you can press the Upload
button again. The code should compile and then upload to the
microcontroller board. Don’t forget to press and hold down the
BOOT button until the uploading starts.
Explanation of the code
- Identified the DHT11/22 humidity and temperature sensor
- Identified the three pins on the sensor
- Identified the three required pins on the ESP32
- Connected the DHT sensor to the ESP32
- Added the required code to the Arduino IDE to read the temperature from the sensor and display it in the serial monitor.