Version control
Last updated on 2025-05-22 | Edit this page
Overview
Questions
- What is a version control system?
- How can a version control system help make my work reproducible?
- What does a standard version control workflow look like?
Objectives
After completing this episode, participants should be able to:
- Create self-contained commits using Git to incrementally save work
- Inspect logs to review the history of work
- Push new work from a local machine to a remote server
In this episode, we’ll cover the basics of version control, and explore how it can help us produce reproducible and sustainable scientific projects. We’ll create a new software project from our existing code, ake some changes to it (tracking them with version control), and then store those changes remotely – both for safe-keeping, and to make them easier to share.
What is a version control system?
Version control systems are tools that let you track changes in files over time, and use that information. They keep track of every modification to the files in a special database that allows users to “travel through time”, and compare earlier versions of the files with the current state. Think of a version control system like turning on ‘Track Changes’ on Microsoft Word/Google Docs, but for any files you want, and a lot more powerful and flexible.
Why use a version control system?
As scientists, our main motivation for using version control is reproducibility. By tracking and storing every change we make, we can restore our project to the state it was at any point in time. This is incredibly useful for reproducing results from a specific version of the code, or tracking down which changes we (or others!) made introduced bugs or changed our results.
The other benefit of version control is it provides us with a history of our development. As we make each change, we record what it was, and why we made it. This helps make our development process transparent, and auditable – good scientific practice.
Later on in the course, we’ll see how version control makes it easier for multiple collaborators to work together on the same project, and easily combine their contributions.
Git version control system
Git is the most popular version control system, and
the one we’ll be using. Git is used mostly for managing code when
developing software, but it can track any files – and is
particularly effective with text-based files (e.g. source code like
.py, .c, .r, but also
.csv, .tex and more).
Git stores files in repositories - directories where changes to the files can be tracked. The diagram below shows the different parts of a repository, and the most common commands used to work with one. We’ll cover these commands in more detail – this is just a high-level overview.

-
Working directory - a local directory (including
any subdirectories) where your project files live, and where you are
currently working. It is also known as the “untracked” area of Git. Any
changes to files will be marked by Git in the working directory. Git
will only save changes that you explicitly tell it to. Using
git add FILENAMEcommand, can you tell Git to start tracking changes to fileFILENAMEin your working directory. -
Staging area (index) - once you tell Git to start
tracking changes to files (with
git add FILENAMEcommand), Git saves those changes in the staging area on your local machine. Each subsequent change to the same file needs to be followed by anothergit add FILENAMEcommand to tell Git to update it in the staging area. To see what is in your working directory and staging area at any moment (i.e. what changes is Git tracking), you can run the commandgit status. The staging area lets you bundle together groups of changes to save to your repository. -
Local repository - stored within the
.gitdirectory of your project locally, this is where Git wraps together all your changes from the staging area and puts them using thegit commitcommand. Each commit is a new, permanent snapshot (checkpoint, record) of your project in time, which you can share or revert to. -
Remote repository - this is a version of your
project that is hosted somewhere on the Internet (e.g., on GitHub,
GitLab or somewhere else). While your project is nicely
version-controlled in your local repository, and you have snapshots of
its versions from the past, if your machine crashes you still may lose
all your work. Plus, sharing or collaborating on local work with others
requires lots of emailing back and forth. Working with a remote
repository involves ‘pushing’ your local changes to it (using
git push), and pulling other people’s changes back to your local copy (usinggit fetchorgit pull). This keeps the two in sync in order to collaborate, with a bonus that your work also gets backed up to another machine. Best practice when collaborating with others on a shared repository is to always do agit pullbefore agit push, to ensure you have any latest changes before you push your own.
Git is a distributed version control system allowing for multiple people to be working on the same project (even the same file) at the same time. Initially, we will use Git to start tracking changes to files on our local machines; later on we will start sharing our work on GitHub allowing other people to see and contribute to our work.
Create a new repository
We’ll demo Git using the command line, so open VS Code and start a new terminal via Terminal -> New Terminal.
Before we start, if you forgot to do it during setup, tell Git to use
main as the default branch. More modern versions of Git use
main, but older ones still use master. They
work the same, but we want to keep things consistent for clarity.
We’ll start by creating a new empty folder on our desktop, called
spacewalks, and moving to it:
Then, we tell Git to make spacewalks a repository – a
directory where Git can track changes to our files:
We can check everything is set up correctly by asking Git to tell us the status of our project:
OUTPUT
On branch main

No commits yet

nothing to commit (create/copy files and use "git add" to track)
The exact wording of this output may be slightly different if you are using a different version of Git.
Now, we’ll open the directory in VS Code – go to File -> Open Folder and find Desktop / spacewalks. You might need to open a new terminal afterwards!
Add initial files into our repository
As part of our setup, we
downloaded or received via email spacewalks.zip archive
which, when unzipped, contains two files we will be using in this
course:
my code v2.pydata.json
We want to move these files into the folder we just have set up. You
can either drag and drop the files from a file explorer window into the
left pane of the VS Code, or you can use the mv
command in the command line terminal.
BASH
mv /path/where/you/saved/the/file/my\ code\ v2.py ~/Desktop/spacewalks/
mv /path/where/you/saved/the/file/data.json ~/Desktop/spacewalks/
We can see what happened to our repository by running
git status again:
OUTPUT
On branch main

No commits yet

Untracked files:
  (use "git add <file>..." to include in what will be committed)
	data.json
	my code v2.py

nothing added to commit but untracked files present (use "git add" to track)
This tells us that Git has noticed the new files, but unlike something like Dropbox or OneDrive, it does not automatically track them. Helpful, as scientific code can have vast inputs or outputs we might not want to store (for example, 10s of GB of space telescope data), or require sensitive information we cannot share (for example, medical records).
We can tell Git to track a file using git add:
and then check the right thing happened:
OUTPUT
On branch main

No commits yet

Changes to be committed:
  (use "git rm --cached <file>..." to unstage)
	new file:   data.json
	new file:   my code v2.py
Git now knows that should track the changes to
my code v2.py and data.json, but it has not
‘committed’ those changes to the record yet. A commit is a snapshot of
how your tracked files have changed at a stage in time. To create a
commit that records we added two new files, we need to run one more
command:
OUTPUT
[main (root-commit) bf55eb7] Add and example script and dataset to work on
 2 files changed, 437 insertions(+)
 create mode 100644 data.json
 create mode 100644 my code v2.py
Now, Git has taken everything we have told it to save by using
git add and stored a copy in a special, hidden
.git directory. This is called a commit (or revision).
The -m option means message, and records a short,
descriptive, and specific comment that will help us remember later on
what we did and why. If we run git commit without
-m , Git will still expect a message – and will launch a
text editor so that we can write a longer one.
Good commit messages start with a brief (<50 characters) statement about the changes made in the commit. Generally, the message should complete the sentence “If applied, this commit will…”. If you want to go into more detail, add a blank line between the summary line and your additional notes. Use this additional space to explain why you made changes and/or what their impact will be.
If we run git status now, we see:
OUTPUT
On branch main
nothing to commit, working tree clean
This tells us that everything is up to date.
Where are my changes?
If we run ls at this point, we’ll still only see two
files – our script, and our dataset. Git saves information about our
files’ history in the special .git directory mentioned
earlier. This both stops our folders being cluttered with old versions,
and also stops us accidentally deleting them!
You can see the hidden Git directory using the -a flag
to show all files and folders:
OUTPUT
.
..
.git
If you delete it, your directory will stop being a repository, and it
will lose your history of changes. You never need to look into
.git yourself – Git adds useful commands to do that, which
are covered later on.
Make a change
Did you notice how when we were typing the Python script into the
terminal, we had to add a slash before the space like this:
my\ code\ v2.py? Using a backslash in this way is called
‘escaping’. It lets the terminal know to treat the space as part of the
filename, and not a separate argument. It is a bit inconvenient and can
cause problems if you forget, so best practise is to avoid spaces in
filenames. The simplest fix is to replace the spaces with underscores
_ instead. You can use the mv command to
rename files:
If you run git status again, you’ll see Git has noticed
the change in the filename.
OUTPUT
On branch main
Changes not staged for commit:
  (use "git add/rm <file>..." to update what will be committed)
  (use "git restore <file>..." to discard changes in working directory)
	deleted:    my code v2.py

Untracked files:
  (use "git add <file>..." to include in what will be committed)
	my_code_v2.py

no changes added to commit (use "git add" and/or "git commit -a")
Add and commit the changed file
Using the Git commands demonstrated so far, save the change you just made to the Python script.
Remember, commit messages should be descriptive and complete the
sentence “If applied, this commit will…”. You can also use
git status to check the status of your project at any
time.
To save the changes to the renamed Python file, use the following Git commands:
OUTPUT
On branch main
Changes to be committed:
  (use "git restore --staged <file>..." to unstage)
renamed: my code v2.py -> my_code_v2.pyOUTPUT
[main 8ea2a0b] Replace spaces in Python filename with underscores
 1 file changed, 0 insertions(+), 0 deletions(-)
 rename my code v2.py => my_code_v2.py (100%)
Advanced solution
We initially renamed the Python file using the mv
command, and we than had to git add both
my_code_v2.py and my\ code\ v2.py.
Alternatively, we could have used Git’s own mv command:
OUTPUT
On branch main
Changes to be committed:
  (use "git restore --staged <file>..." to unstage)
	renamed:    my code v2.py -> my_code_v2.py
git mv <old> <new> is the equivalent of
running mv <old> <new> immediately followed by
git add <new>, so the changes have been staged
automatically. We just need to commit them.
OUTPUT
[main 6499bd7] Replace spaces in Python filename with underscores
 1 file changed, 0 insertions(+), 0 deletions(-)
 rename my code v2.py => my_code_v2.py (100%)
Rename our data and output files
Now that we know how to rename files in Git, we can use it to make our files and code a bit easier to understand.
We want to:
- Give our input data file and script more meaningful names.
- Choose informative file names for our output data file and plot.
First we need to update the file names in our script using VS Code:
PYTHON
data_f = open('./eva-data.json', 'r')
data_t = open('./eva-data.csv','w')
g_file = './cumulative_eva_graph.png'
Now we need to rename our files on the file system using Git:
BASH
git mv data.json eva-data.json
git mv my_code_v2.py eva_data_analysis.py
git add eva_data_analysis.py
git status
OUTPUT
On branch main
Changes to be committed:
  (use "git restore --staged <file>..." to unstage)
	renamed:    data.json -> eva-data.json
	renamed:    my_code_v2.py -> eva_data_analysis.py
Finally, we can commit our changes:
Commit messages
We have already written one commit message, but we’ll go into them in a bit more depth. Commit messages are short descriptions of what a commit does, and why you did it. It is important to make sure they’re helpful and descriptive, as they give you context when you or a collaborator look back at your code. This can make tracking down specific changes in commits much easier, compared to having to trawl through all the previous versions of your files to figure out what change altered your code’s behaviour.
Generally, commit messages should complete the sentence “If applied, this commit will…”. Usualy a short, 50 character (ish) summary is enough, but if you would like to give more detail you can leave a blank line then write a long-form description. There are a range of conventions for commit messages, that range from very structured (such as conventional commits) to the friendly (such as gitmoji). The most important thing is that the message is clear to the reader. If a project is using a specific commit message convention, this will usually be described in their contributing guidelines.
Good commit messages
Read the two commit messages below. In pairs or small groups, discuss which messages help you understand more about what the commit author did. What about the commit messages do you find helpful or not?
OUTPUT
   [main 7cf85f6] Change variable
     1 file changed, 1 insertion(+), 1 deletion(-)
OUTPUT
   [main 8baf69d] Change variable name from columns to column_headers
    1 file changed, 1 insertion(+), 1 deletion(-)
Commit message (2) is pretty clearly better, as it actually tells you what the author did. If a section of your code that depended on this code broke after this change, you could easily tell why, and how to fix it. The message could be improved further by adding a blank line then some detail on why this change was made. Not every change needs more than 50 characters, but a few extra seconds of writing can save you hours of bug-hunting!
Self-contained commits
If we want our commit messages to be descriptive and helpful, then we have to make very self-contained commits. Each one should only change one logical thing, to completion – for example, adding documentation, or renaming a function. This does not mean that changes are committed line-by-line! This is partly why Git has the staging area, rather than automatically saving changes file-by-file like Dropbox or OneDrive. If a change requires modifying multiple files to make sense, like when we renamed the input data file, then you can commit all the edits required for it in one go, so your code is consistent.
Equally, avoid committing code until you have totally finished. Most changes can be broken down into smaller steps, which can be completed. It is better to have part-finished code in a repository, with clear commit messages saying what still needs doing, than code that never gets committed and can be lost in a hard drive crash!
See the “Things to avoid when creating commits” section of Openstack’s “Git Commit Good Practice” documentation for examples of logical, self-contained commits, and commits that are not!
Self-contained commits are important as: * Reviewing changes is easier when each commit tackles one step * Tracking down changes that broke functionality is simpler * Unwanted changes can be undone in small increments, without losing a lot of unrelated work.
Understanding commit contents
Below are the diffs of two commits. A diff
shows what changed in one or more file(s) between two commits. Lines
starting with +s are additions, while lines starting with
-s are deletions. Compare the two diffs - can
you understand what the commit author was trying to achieve in each
commit? How many changes have they tried to make in each commit? Discuss
in pairs or small groups.
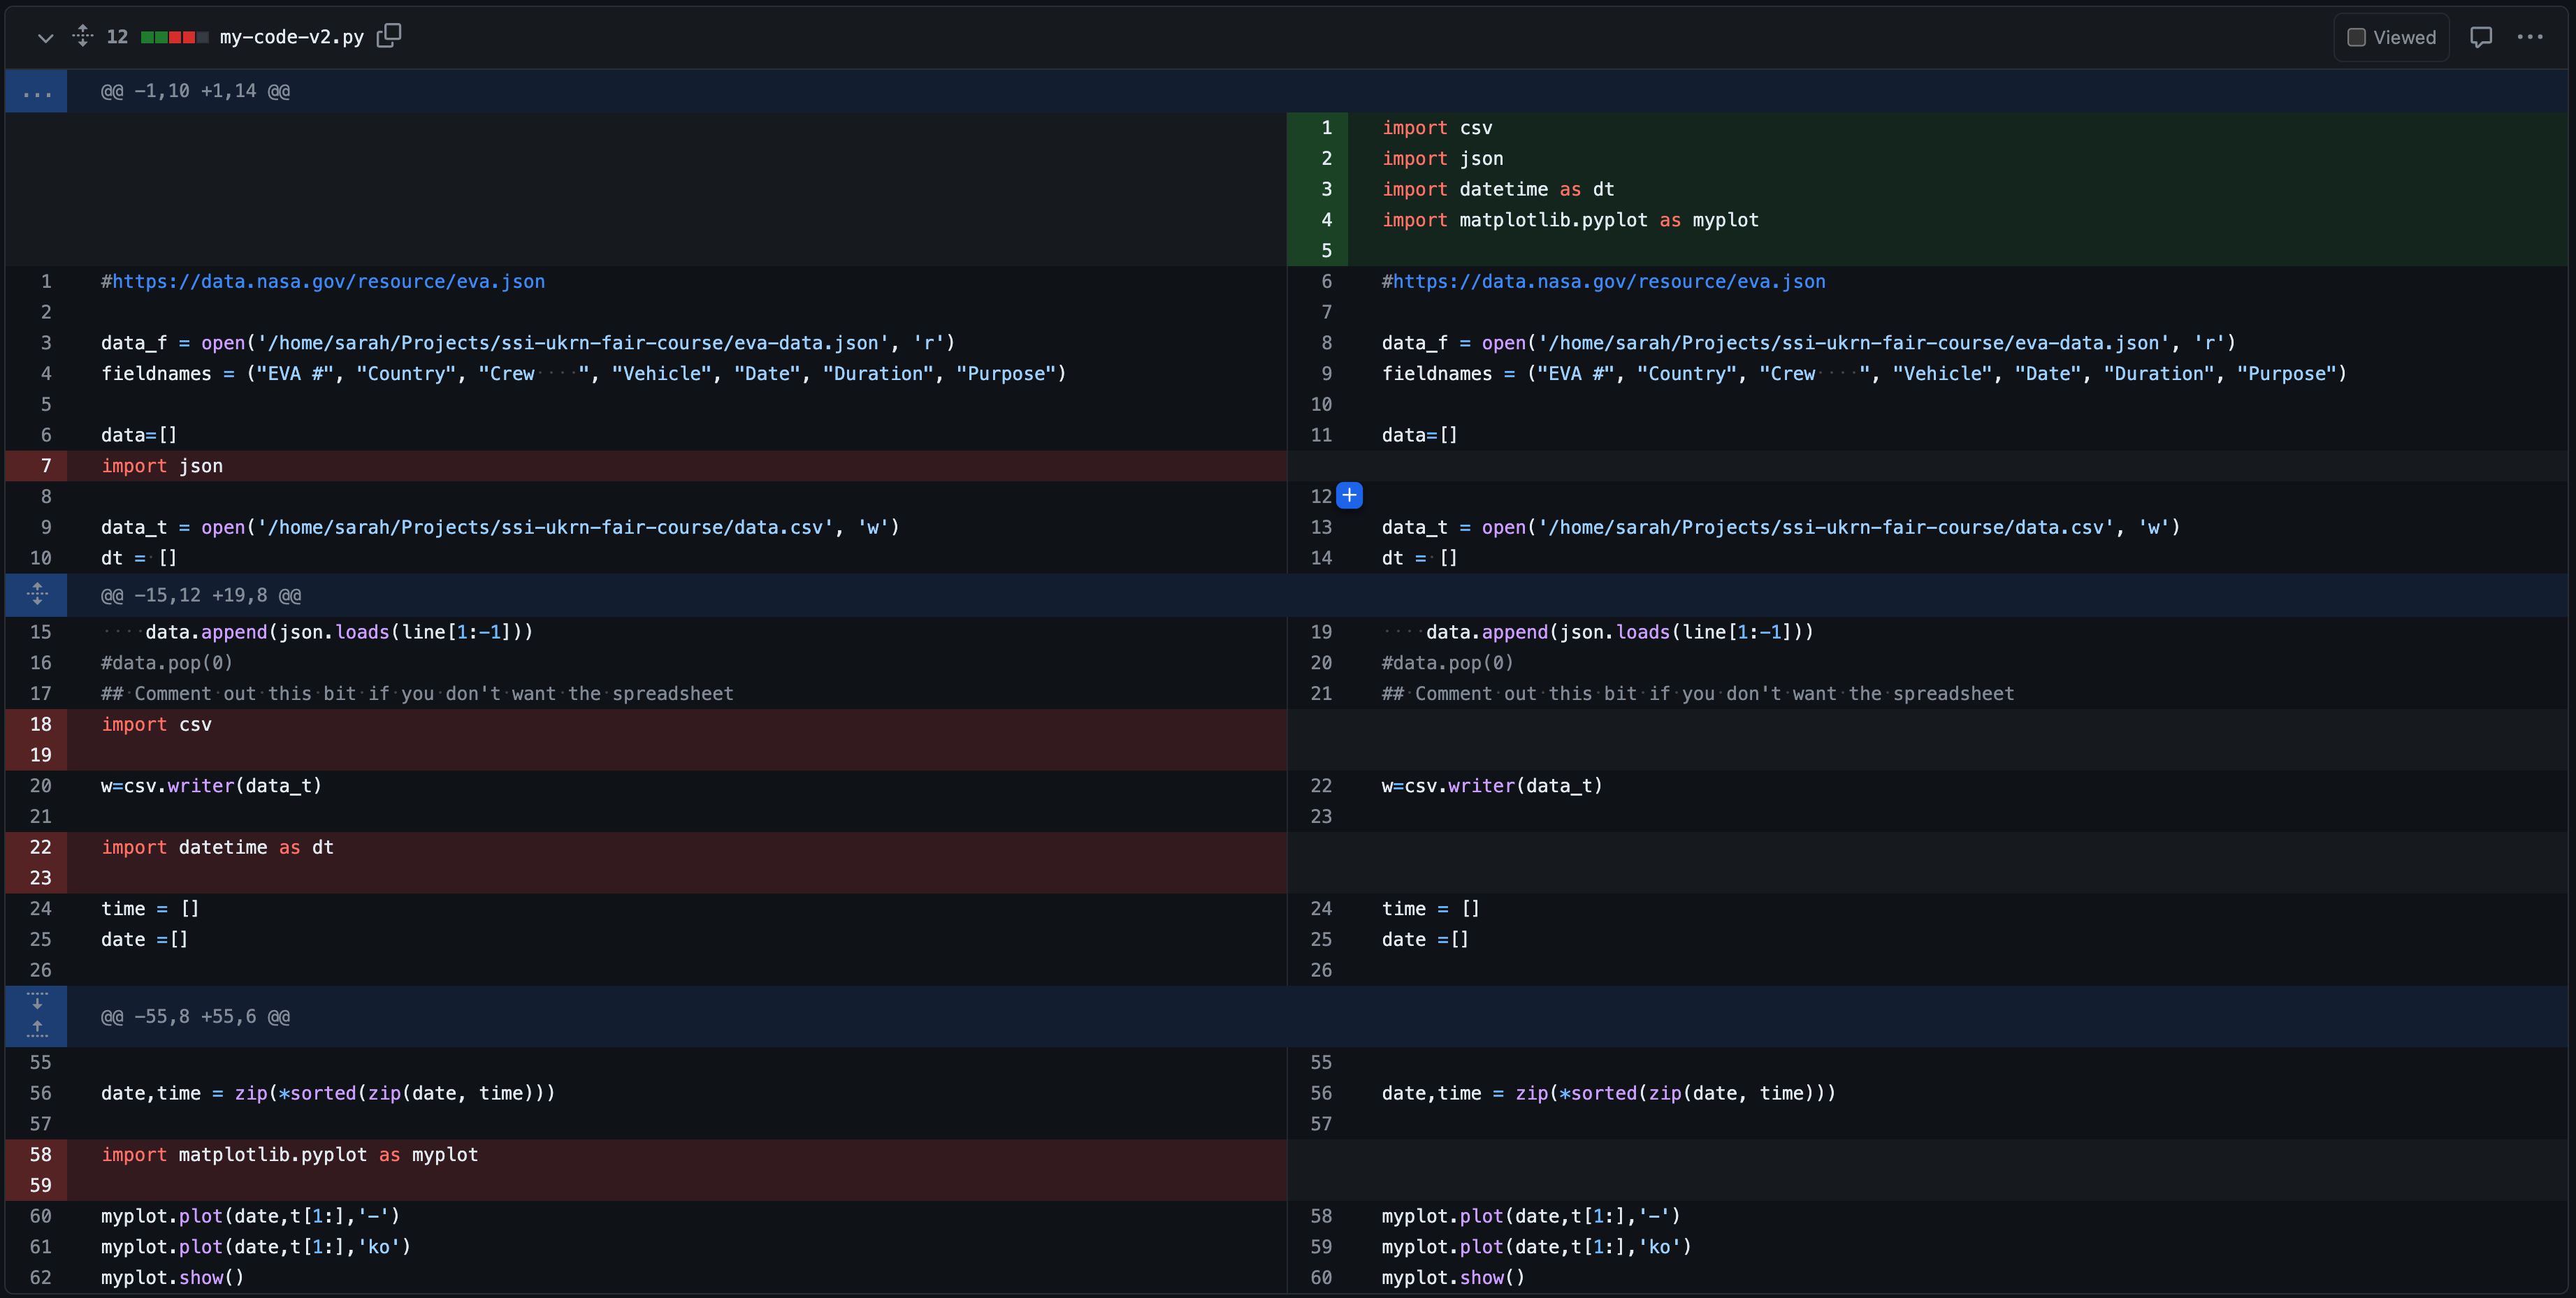 Example Diff 1
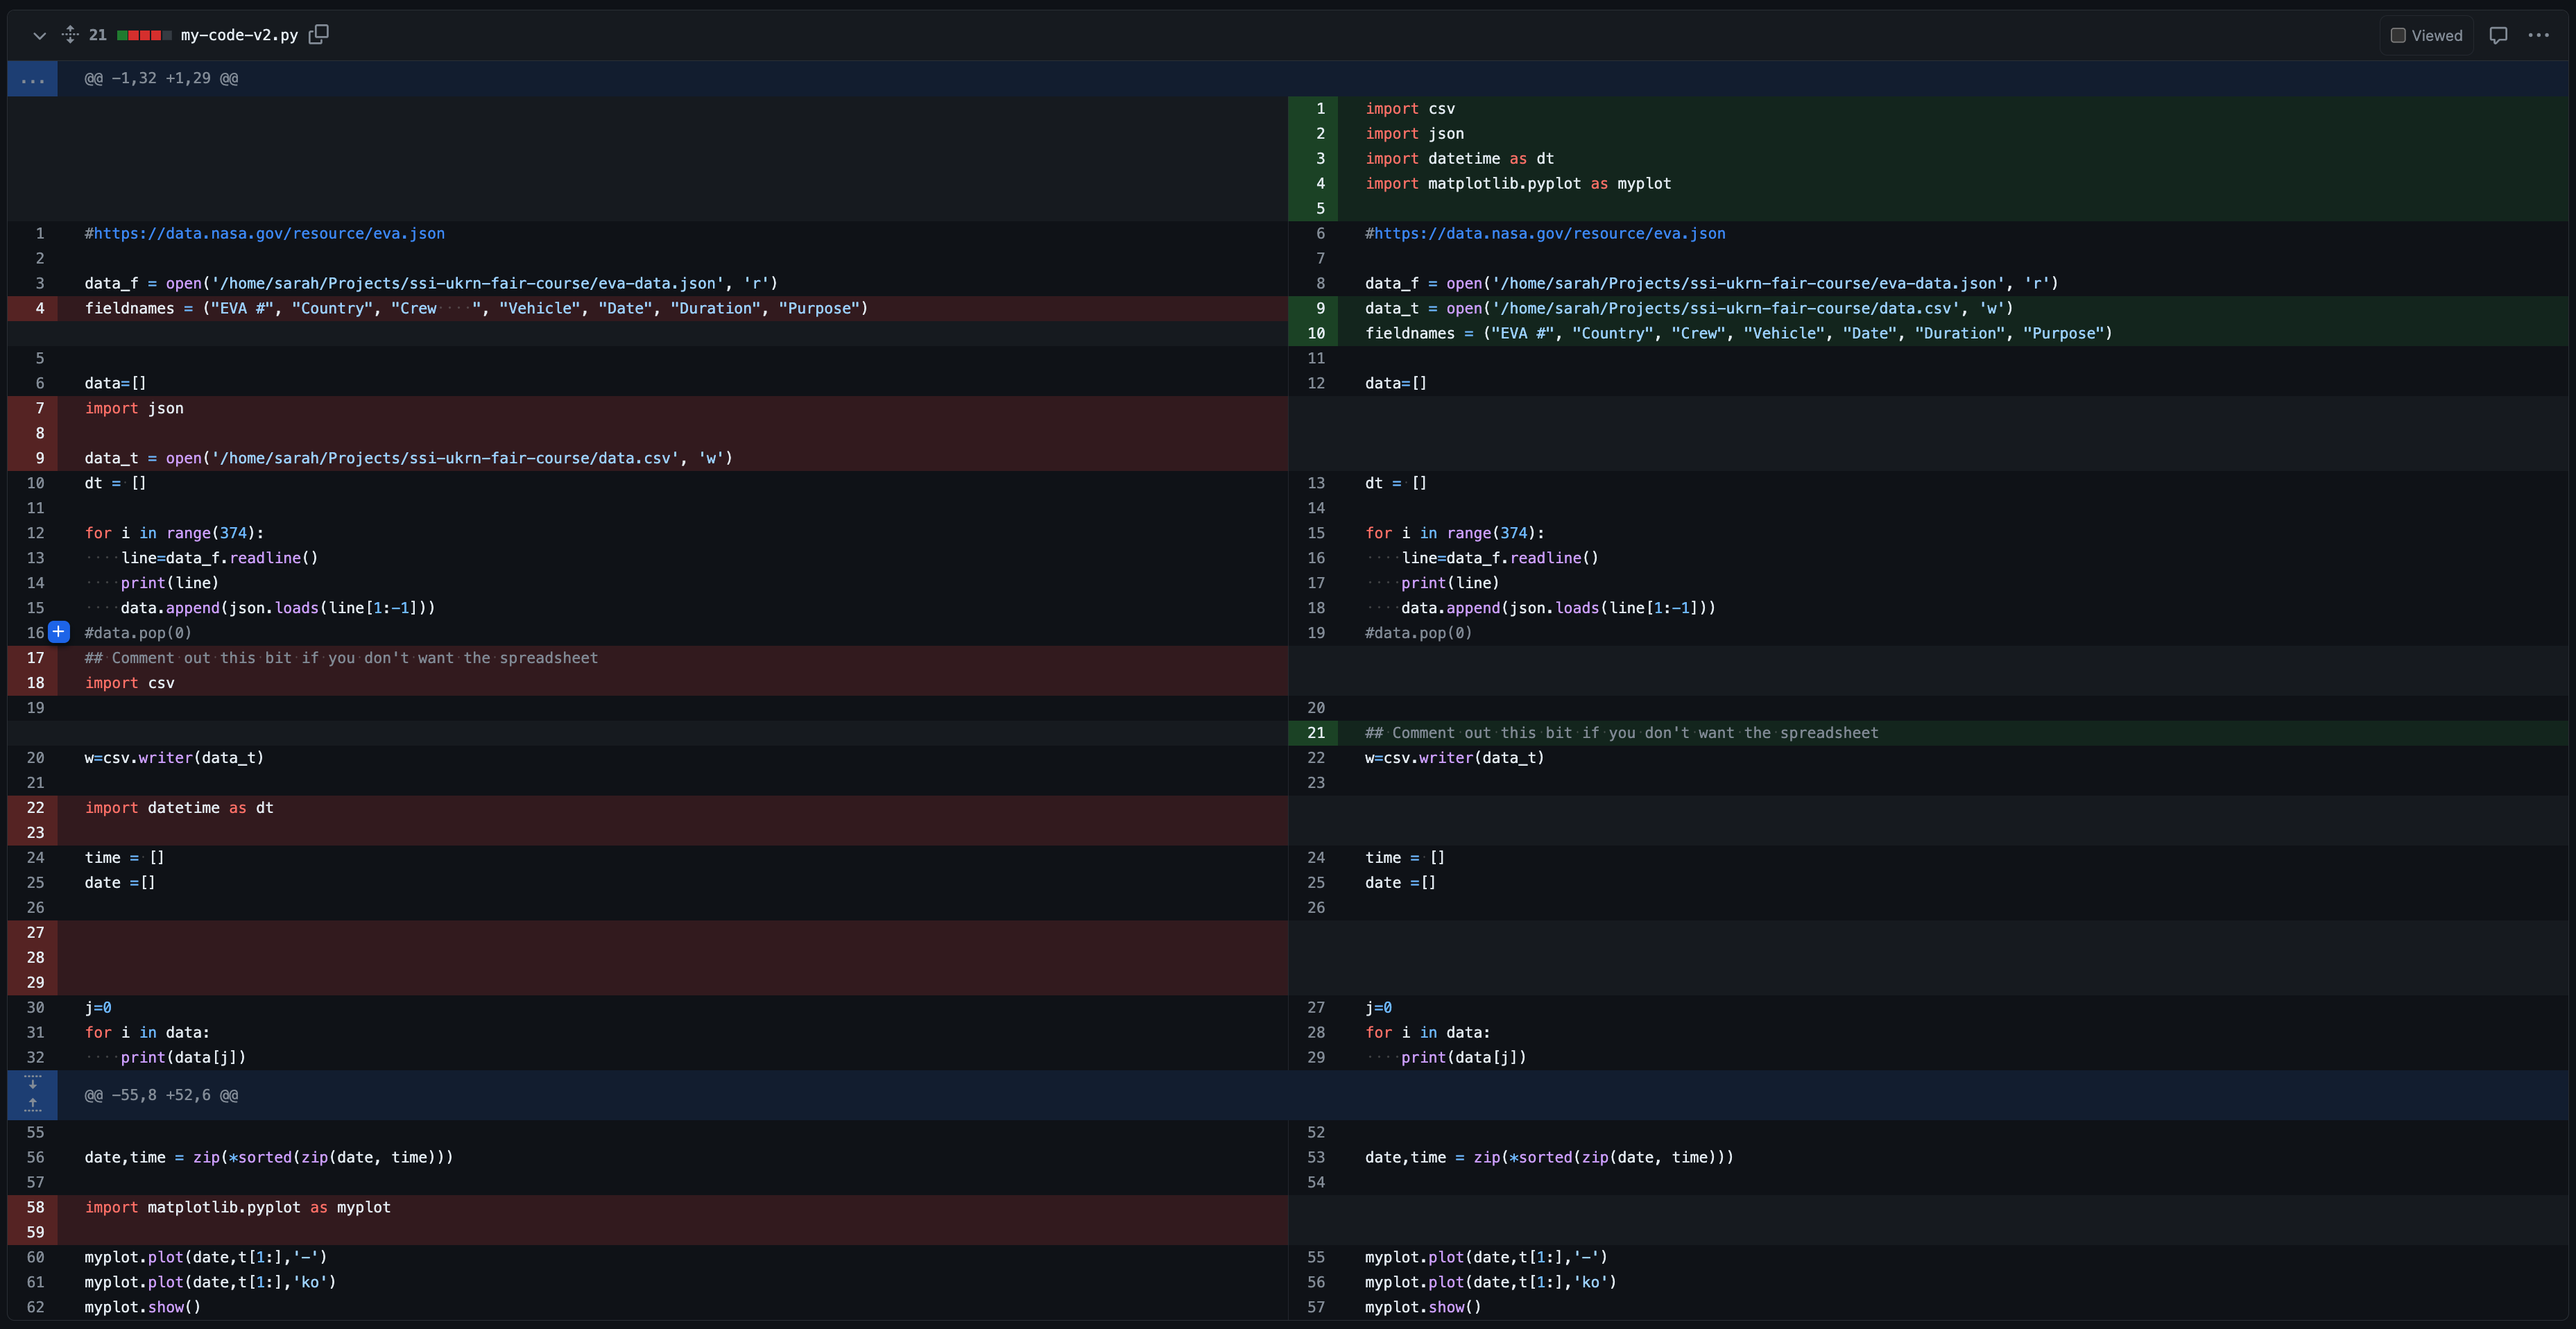 Example Diff 2
To find out more about how to generate diffs, you can
read the Git documentation or the Tracking
Changes episode from the Software Carpentry
Version control with Git lesson.
The git diff presented in option (1) is cleaner. The
author has only tackled one thing: placing the import statements at the
top of the file. This kind of commit is much easier to review in
isolation, and will be easier to track down if git bisect
is required.
Git logs
If we want to know what we did recently, we can ask Git to show us
the project’s history using git log:
OUTPUT
commit 6499bd731ab50fde2731ce2642f143cea86450b6 (HEAD -> main)
Author: Sarah Gibson <drsarahlgibson@gmail.com>
Date:   Mon Jun 17 11:55:17 2024 +0100

    Replace spaces in Python filename with underscores

commit bf55eb7639a6508658aaa1bfeaeb9f115d1bcc40
Author: Sarah Gibson <drsarahlgibson@gmail.com>
Date:   Mon Jun 17 11:52:02 2024 +0100

    Add and example script and dataset to work on
This output demonstrates why we should write meaningful and descriptive commit messages. Without them, we only have the commit hashes (the strings of letters and numbers after “commit”) to identify each one, which is realistically impossible.
We might need to inspect our recent commits to establish where a bug was introduced, or because we realised we made a mistake and want to go back to an older, working version of the code. Once we have identified the last commit we want to keep, we can revert the state of our project back to that commit with a few different methods:
-
git revert: This command reverts a commit by creating a new commit that undoes the changes in the supplied commit (or list of commits). Because this command creates new commits, your history is more complete, and tells the story of exactly what work you did, i.e., deciding to discard some work. -
git reset: This command will recover the state of the project at the specified commit. What happens to the commits you had made since then is defined by some optional flags:-
--soft: Changes since that commit are kept, but left as “Changes to be committed”. -
--mixed: Changes since that commit are kept, but not marked for commit (the default). -
--hard: All changes since that commit are thrown away.
-
Using git reset command produces a “cleaner” history,
but hides the full story of your work. Generally,
git revert is the best choice. It avoids you accidentally
deleting changes you wanted to keep, and keeps a record of what you
tried but was not successful. You can then avoid doing it in future!
Interacting with a remote Git server
Git is also a distributed version control system, and lets us synchronise work between multiple copies of the same repository - including ones that are not on your machine (‘remote repositories’). So far, we have used a local repository on our machine and, even though we have been incrementally saving our work in a way that is recoverable (version control), if we lost our machine then we would lose all our code along with it,
Fortunately, we can easily upload our local repository, with all our code and the history of our development, to a remote server so that it can be recovered in future.
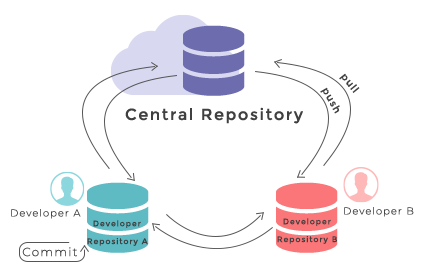
GitHub is an online software development platform that can act as a central remote server. It uses Git, and provides facilities for storing, tracking, and collaborating on software projects. Other Git hosting services are available, such as GitLab and Bitbucket.
Putting our projects on GitHub helps protect them against deletion, and also makes it easy to collaborate and share them. Our collaborators can access the project, download their own copy, and even contribute work back to us.
We’ll now go through how to push a local repository to GitHub and share it publicly.
In your browser, navigate to https://github.com and sign into your account.
-
In the top right hand corner of the screen, there is a menu labelled “+” with a dropdown. Click the dropdown and select “New repository” from the options:
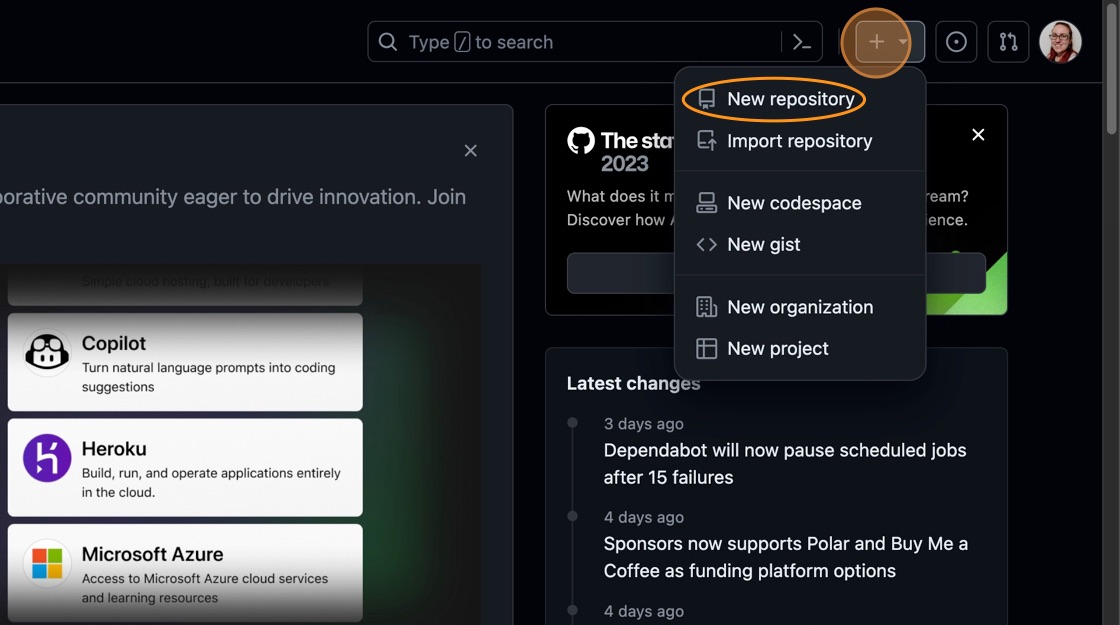 Creating a new GitHub repository
 -
You will be presented with some options to fill in or select while creating your repository. In the “Repository Name” field, type “spacewalks”. This is the name of your project and matches the name of your local folder:
 Naming the GitHub repository
Ensure the visibility of the repository is “Public” and leave all other options blank. Since this repository will be connected to a local repository, it needs to be empty which is why we chose not to initialise with a README or add a license or
.gitignorefile. Click “Create repository” at the bottom of the page: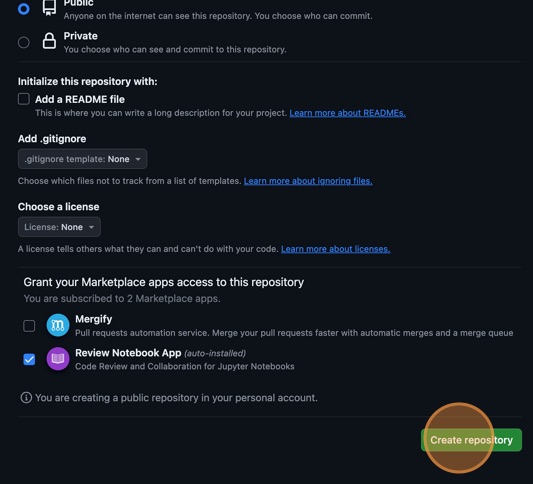 Complete GitHub repository creation
 -
Now we have a remote repository on GitHub’s servers, you need to send it the files and history from your local repository. GitHub provides some instructions on how to do that for different scenarios. Change the toggle on the right side from “HTTPS” to “SSH”, then look at the heading “…or push an existing repository from the command line”. You should see instructions that look like this:
BASH
git remote add origin git@github.com/<YOUR_GITHUB_HANDLE>/spacewalks.git
git branch -M main
git push -u origin main
It is very important you make sure you switch from “HTTPS” to “SSH”. In the setup, we configured our GitHub account and our local machine for SSH. If you select HTTPS, you will not be able to upload your files.
You can copy these commands using the button that looks like two overlapping squares to the right-hand side of the commands. Paste them into your terminal and run them.
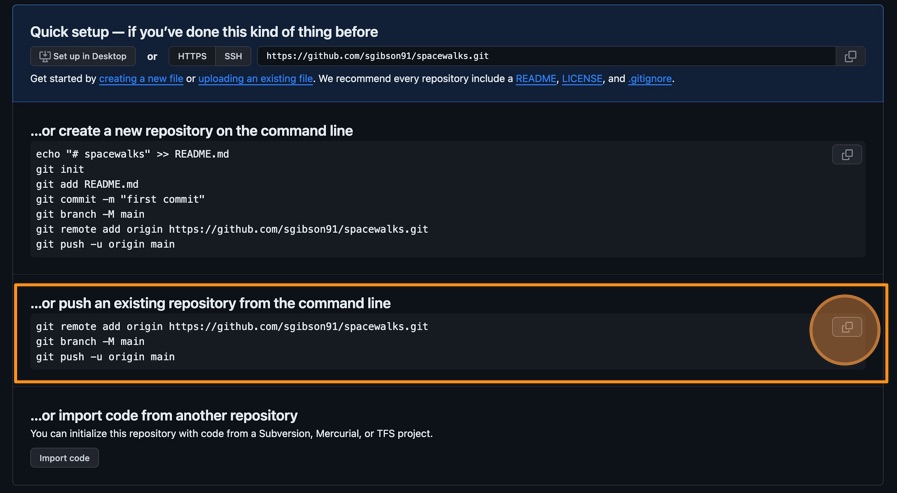
- If you refresh your browser window, you should now see the two files
my-code-v2.pyandeva-data.jsonvisible in the GitHub repository, matching what you have locally on your machine.
If you were wondering about what those commands did…
This command tells Git to create a remote called
“origin” and link it to the URL of your GitHub repository. A
remote is a version control concept where two (or more)
repositories are connected to each other, in such a way that they can be
kept in sync by exchanging commits. “origin” is a name used to refer to
the remote repository. It could be called anything, but “origin” is a
common convention for Git since it shows which is considered the “source
of truth”. This is particularly useful when many people are
collaborating on the same repository.
git branch is a command used to manage branches. We’ll
discuss branches later on in the course. This command ensures the branch
we are working on is called “main”. This will be the default branch of
the project for everyone working on it.
The git push command is used to update a remote
repository with changes from your local repository. This command tells
Git to update the “main” branch on the “origin” remote. The
-u flag (short for --set-upstream) sets the
‘tracking reference’ for the current branch, so that in future
git push will default to sending to
origin main.
Terminology
In pairs or small groups, discuss the difference between the terms
remote and origin. What is the definition of
each term?
-
remote: a version control concept where two (or more) repositories are linked together in such a way that they can be kept in sync by exchanging commits -
origin: a common Git/GitHub naming convention for the remote repository to designate the source of truth for collaborators
Summary
We covered the basics of using version control to track changes to our projects. We created a new project and used it to log our changes as ‘commits’, with informative messages. From this information we looked back at our work, compared different versions, and even recovered past states. Finally we published our work to a remote server, where it is both secure and shareable.
These skills are critical to reproducible and sustainable science. Software is science, and being able to share the specific version of code used in a paper is required for reproducibility. But we, as researchers, also benefit from having a clear, self-documented record of what we did, when and why. It makes it much easier to track down and fix our bugs, return to work on projects we took a break from, and even for other people to pick up our work.
Version control is a vast topic and this brief introduction has only covered the absolute basics. If you would like a deeper and more complete dive into it, look in our Further Reading section.
Further reading
We recommend the following resources for some additional reading on the topic of this episode:
- Software Carpentry’s Git Novice lesson
- The Turing Way’s “Guide to Version Control”
- “How Git Works” course on Pluralsight
- How to Write a Good Commit Message
- Git Commit Good Practice
Also check the full reference set for the course.
Key Points
- Version control systems are software that tracks and manages changes to a project over time
- Using version control aids reproducibility since the exact state of the software that produced an output can be recovered
- A commit represents the smallest unit of change to a project
- Commit messages describe what each commit contains and should be descriptive
- Logs can be used to overview the history of a project