Getting Started
Last updated on 2026-04-14 | Edit this page
Estimated time: 50 minutes
Overview
Questions
- Why should I use Julia?
- How do I get started with Julia?
Objectives
- Start a REPL
- Run lines from VS Code
Julia is easy to get into because it centers around a few easy to
understand core concepts: functions, multiple-dispatch, array
polymorphism. It is easy to get needlessly stranded into complications
that hinder the pacing of this lesson. For example: when explaining
for loops you may spend ten minutes explaining all the
finesse of break and continue, but most people
will either know or don’t care. There are several ways to fill these
gaps in the material:
- Explain these concepts when they naturally arise in an example or exercise.
- Point to their existence in a call-out, but refer interested readers to the relevant section in the Julia manual, to study in their own time.
- Give them as part of an exercise: let participants read a section of the manual before solving the exercise. This should empower them to look for the manual when solving their own problems.
This way, you can move on in a natural pacing, only showing the core concepts relevant to the Julia language, and get to interesting (and motivating) challenges earlier in the lesson.
You may want to explain this general strategy to participants before starting on the main content. This will build both patience and trust with your audience.
Overview of the Workshop
It is not feasible to teach all of Julia in just two days. We’ll try to get you on your journey with Julia by showing lots of real world examples. During this workshow you will be:
- (3h) getting started with Julia by simulating gravity: the three body problem. You’ll get familiar with the basic syntax of Julia and the little nooks and crannies that set this language appart from Python or MATLAB.
- (3h) learning to work with Julia’s packaging system and best practices.
- (4h) benchmarking, profiling, type stability and allocations. We will work with many different examples here. You’ll learn the most important tools and concepts that matter when you want to write Julia code that runs efficiently.
- (2h) parallel and GPU programming: computing the Julia fractal.
Some of the examples may be a bit hard to grasp. For example, we’ll see a very difficult to understand algorithm to compute \(\pi\). In these cases we’ll treat the given code as black boxes that we can poke at. The power of a good computer program is often that we don’t need to know everything to be able to work with it.
Why Julia
Most of the participants will be coming from Python, MATLAB or a lower level language like C/C++ or Fortran. Why should you be interested in learning Julia?
Performance and usability
Julia promises:
- Native performance: close to or sometimes even exceeding C++ or Fortran.
- Solve the multiple language issue: one language for everything (including GPU).
- As easy to get into as Python or R.
- Designed for parallel computing.
These promises seem tantalizing and are in part what draws people to Julia, but in practice getting into Julia and writing performant code are two different things. Julia has its own idiosyncrasies that need to be understood to really squeeze every erg of performance out of your system.
Julia obtains its performance from being a just-in-time (JIT) compiler, on top of the LLVM compiler stack (similar to how Python’s Numba operates).
Language intrinsics
Next to being performant, it turns out that Julia is a very nice language that does some things a bit different from what you may be used to:
- First-class arrays and Broadcasting: arrays, slicing and operating on arrays have dedicated syntax, similar to MATLAB.
- Multiple dispatch: Julia functions can be specialized on the entire call signature (not just its first argument like in Object Oriented Programming).
- Macros and Meta-programming: The just-in-time nature of the Julia compiler exposes a wide range of meta-programming capabilities, ranging from small macros to enhance the expressibility of the language to full-on code generation.
Meta-programming, while very powerful, is also very easy to abuse, often leading to unreadable non-idiomatic code. So tread with care! We’ll see some examples where macros are indispensable though, and the SciML stack relies deeply on on-the-fly code-generation.
Why are you interested in Julia? What is your current go-to for efficient computing?
Recommended materials
If you want to learn more about computer programming in general, a great place to start is Structure and Interpretation of Computer Programs, including the Lectures on Youtube. These are old but wonderful and really teach some wisdom around designing complex software systems. Also, this might cure any latent adiction to object oriented programming.
If you want to learn about efficient programming in Julia, check out Parallel Computing and Scientific Machine Learning. These go in much more detail than we can do in this lecture.
The materials in this lesson are aimed somewhere in between SICP and PCSML. We’ll look at real scientific examples to dive into computational concepts.
Running Julia
When working in Julia it is very common to do so from the REPL (Read-Eval-Print Loop). Please open the Julia REPL on your system
$ juliaOUTPUT
               _
   _       _ _(_)_     |  Documentation: https://docs.julialang.org
  (_)     | (_) (_)    |
   _ _   _| |_  __ _   |  Type "?" for help, "]?" for Pkg help.
  | | | | | | |/ _` |  |
  | | |_| | | | (_| |  |  Version 1.10.3 (2024-04-30)
 _/ |\__'_|_|_|\__'_|  |  Official https://julialang.org/ release
|__/                   |

julia>
The REPL needs a small introduction since it has several modes.
| Key | Prompt | Mode |
|---|---|---|
| None | julia> |
Standard Julia input. |
] |
pkg> |
Pkg mode. Commands entered here are functions in
the Pkg module. |
; |
shell> |
Shell mode. |
? |
help?> |
Help mode. Type the name of any entity to look up its documentation. |
To switch back to the standard Julia input from another mode, press
Ctrl+C
Play with the REPL (5min)
-
Pkgmode has ahelpcommand to help you along. Find out what theaddcommand does. - Check the contents of the folder in which you are running your REPL
(
lson Unix,diron Windows). - Find out what the
printmethod does in Julia.
-
]help add, theaddcommand installs packages ;ls?print
Pluto
Pluto is the notebook environment from which we will teach much of this workshop. We can run it from the Julia REPL.
OUTPUT
pkg> add Pluto
... quite a bit of output ...

julia> using Pluto

julia> Pluto.run()
[ Info: Loading...
┌ Info:
└ Opening http://localhost:1235/?secret=xyzxyzxyz in your default browser... ~ have fun!
┌ Info:
│ Press Ctrl+C in this terminal to stop Pluto
└
Editor support
Julia is supported in many editors through
LanguageServer.jl. The main focus of development lies in
having VS Code as the main IDE. If you’re unsure about a choice of
editor, VS Code is a good place to start, although for some people it is
a little feature rich.
VS Code
VS Code is the editor for which Julia has the best support. We’ll be
needing to run Julia in multiple threads later on, so we’ll set some
arguments for the REPL in settings.json (press
Ctrl+Shift+P and search for
Open User Settings (JSON)).
Now when you start a new REPL (Ctrl+Shift+P, search
“Julia REPL”), you can query the number of threads available:
Zed
A more light-weight alternative to VS Code, but still packing most of the features you’d want to have. Check it out at zed.dev. This does not provide the same level of integration as VS Code (no Ctrl-Enter to evaluate expressions in the editor, and no IDE integration with the REPL). However, Zed gives a much smoother user experience.
(Neo)Vim, Emacs and others
We encourage power users to use their favourite environment, but we can’t help out if things like LaTeX/Unicode completion don’t quite work out of the box.
The goal of the following exercise is not only to make people familiar with Julia syntax. It is also to get them find their way in the documentation.
Julia as a calculator (5min)
Try to play around in the VS Code REPL to use Julia as a calculator.
- What do you find is the operator for exponentiation?
- How do you assign a variable? Does the assignment take on a value by itself?
- What happens when you divide any two integers? Use the
typeoffunction to inspect the type of the result. Can you figure out how to integer division (search the documentation!)? - Try to operate on a range of numbers using dotted operators:
(1:5) .* 3. Try to square the range1:5. What’s the difference?
- In Julia exponentiation is
^. - Just like you’re used to
x = 3. The assignment is also an expression for the value being assigned. We might say(x = 6) * 7,xstill becomes6, but the expression returns42. - The
/operator always returns a floating point value. To get to integer division, we want the÷operator, which can be typed using\divand then press TAB. Or you can use the equivalentdivfunction. - Multiplying a range is still expressible as a range, while squaring the numbers forces the range to convert to an array.
- In Julia, the REPL is much more important than in some other languages.
- Pluto is a reactive environment
- VS Code has the best editor integration for Julia
Activate the Workshop Environment
For this workshop, we prepared an environment. Press ]
in the REPL to activate Pkg mode. Make sure that you are in
the path where you prepared your environment (see Setup
Instructions).
(v1.12) pkg> activate .
(EfficientJulia) pkg>
Alternatively, check the little “Julia env” message at the bottom of VS Code, and make sure that the correct environment is there.
You should now be able to generate a plot using GLMakie
(that one dependency that made you wait)
JULIA
using GLMakie
x = -3.0:0.1:3.0
z = sinc.(sqrt.(x.^2 .+ x'.^2))
surface(x, x, z, alpha=0.5)
wireframe!(x, x, z, color=:black, linewidth=0.5)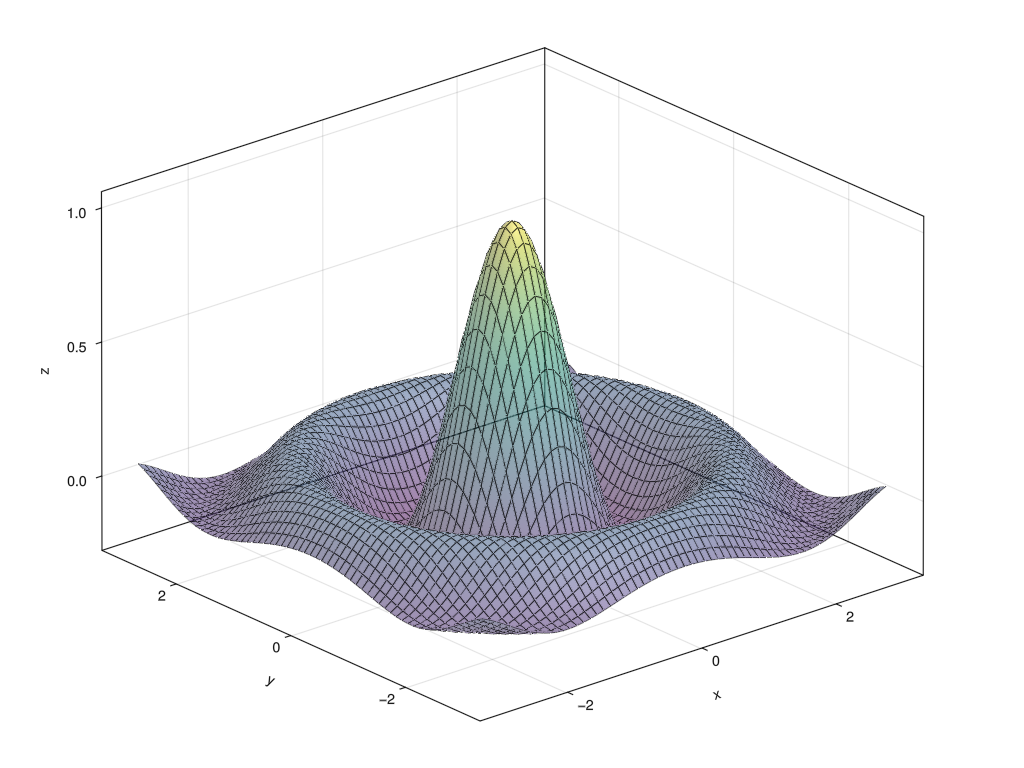
To create the above figure:
JULIA
#| classes: ["task"]
#| creates: episodes/fig/getting-started-makie.png
#| collect: figures

module Script
using GLMakie

function main()
    x = -3.0:0.1:3.0
    z = sinc.(sqrt.(x.^2 .+ x'.^2))

    fig = Figure(size=(1024, 768))
    ax = Axis3(fig[1,1])
    surface!(ax, x, x, z, alpha=0.5)
    wireframe!(ax, x, x, z, color=:black, linewidth=0.5)
    save("episodes/fig/getting-started-makie.png", fig)
end
end

Script.main()