All in One View
Content from Introduction
Last updated on 2025-11-11 | Edit this page
Estimated time: 15 minutes
Overview
Questions
- What is an Integrated Development Environment (IDE) and what role does it play in software development?
- What are the common features of IDEs?
- Why is debugging important?
- What are the main techniques developers use to debug their code?
Objectives
- Describe different roles of IDEs in the software development process
- Identify common features of IDEs, such as syntax checking, code completion, reference/documentation lookup, debugging, etc.
- Explain the importance of debugging and list common debugging techniques
- Recognise the benefits of using an IDE for improving code quality, reducing errors, and accelerating software development
This session provides an introduction to Integrated Development Environments (IDEs), powerful tools for software development. We will explore how various features built into IDEs can streamline your software development workflow, especially through their built-in debugging tools — which allow you to identify and fix issues with your code efficiently.
What is an Integrated Development Environment (IDE)?
An Integrated Development Environment (IDE) is a graphical application that provides a comprehensive workspace for writing, editing, testing, and debugging code—all in one place. At the core of an IDE is a code editor, and it combines several tools that developers need into a single interface to streamline the code development process. IDEs are extremely useful and modern software development would be very hard without them.
Historically, developers typically wrote code using simple text editors, often terminal-based with no graphical interface or syntax checking support. They had to rely on separate tools outside the editor to compile, debug, and manage their code, making development a much more fragmented experience. It is worth noting that popular terminal-based editors such as Emacs and Vim may appear deceptively simple at first glance - but they are, in fact, highly powerful and customisable frameworks for coding and automating development workflows.
Today, although some IDEs are designed for specific programming languages, many modern IDEs can support multiple languages through a wide variety of plugins — often created and maintained by the developer community.
Why use an IDE?
An IDE brings everything you need to write, test, and debug code into one place — saving time by helping you write better code faster. IDEs help by:
- reducing setup and development time - everything you need for editing, running, and debugging code is in one place and the need to switch between different tools/applications/windows is significantly reduced
- offering helpful tools like syntax checking, code suggestions and autocomplete, and error checking leading to fewer errors thanks to real-time feedback and intelligent suggestions
- making it easier to debug and test code leading to easier issue detection and fixing
- providing a consistent environment across projects
For beginners, IDEs lower the barrier to entry by making it easier to spot mistakes and understand code structure. For experienced developers, IDEs boost productivity and streamline complex workflows.
Common IDE Features
Let’s look at what most IDEs offer - these features all work together to make your life easier when coding:
- Code editor with syntax highlighting and automatic code formatting for better readability and consistency
- Intelligent code completion that suggests syntactically correct options as you type to speed up development
- Powerful search tools to quickly locate functions, classes, or variables
- Inline documentation and reference lookup to understand symbols (functions, parameters, classes, fields, and methods) and variables definitions and usage without leaving your code
- Built-in support for running and managing tests through integrated testing frameworks
- Seamless integration with version control systems (like Git) for tracking changes and collaboration
- Debugging tools for setting breakpoints, stepping through code, and inspecting variables during runtime
- An integrated terminal for executing commands directly within the IDE
- A project/file explorer for easy navigation and management of your software project
- Viewing various files in different file formats (CSV, JSON, YAML, images, HTML, etc.) that are part of your software project
Some IDEs also offer:
- Deployment tools to package and release your code efficiently
- Basic project and issue tracking features to support task management
Popular IDEs
Here are a few widely used IDEs across different languages and fields:
- Visual Studio Code (VS Code) – lightweight and highly customisable; supports many languages
- PyCharm – great for Python development
- RStudio – tailored for R programming but allows users to mix (R Markdown) text with code in R, Python, Julia, shell scripts, SQL, Stan, JavaScript, C, C++, Fortran, and others, similar to Jupyter Notebooks.
- Eclipse – often used for Java and other compiled languages
- JupyterLab – interactive environment for Python and data science
- Spyder – popular among scientists using Python
What is Code Debugging?
Now, what happens when your code does not work as expected? That is where code debugging comes in. Debugging means finding, understanding, and fixing errors in your code — which can manifest as unexpected behavior, crashes, or incorrect outputs. Debugging is an essential step in software development, ensuring that your code runs as intended and meets its requirements (and quality standards).
Why Debugging Matters?
Debugging ensures your code behaves as it should and helps you find the root cause of problems — not just guess - when it does not. Even small mistakes in code can cause unexpected behavior or crashes. Debugging helps with:
- code correctness - to ensure your program works as expected and meets requirements
- error resolution - to help you understand why your code is not performing correctly, allowing you to find and fix issues that make your program behave incorrectly
- improving code quality - regular debugging leads to cleaner, more reliable and performant code and reduces the risk of problems in production
- efficient code development - familiarity with debugging tools and techniques can significantly reduce the time spent on troubleshooting and enhance overall productivity.
Debugging is a normal part of the code development process - it is not just about fixing mistakes — it is about understanding your code better.
Common Debugging Techniques
Let’s be real — everyone’s code breaks sometimes. Debugging is just part of the game. For starters, you can try rubber duck debugging - a technique where you explain your code, line by line, out loud — to a colleague or to an inanimate object like a rubber duck. The idea is that by forcing yourself to verbalise what your code is supposed to do, you slow down and think more clearly about each part, which often helps you spot mistakes or logical errors you might have missed when just reading the code silently.
In addition to talking to a rubber duck (which is surprisingly effective), one of the simplest tricks is adding print statements to your code: just printing out variable values or messages at key points can quickly show you where things start to go wrong.
Logging is another smart move, especially for bigger projects, because it helps you track what your program is doing over time and help diagnose issues that occur in specific runtime conditions. A variant of logging is to use assert statements in your code -
But if you want to level up, using a built-in debugger (like the one in VS Code) is a game-changer — you can set breakpoints, step through your code line by line, and actually see what is happening in real time.
And if you really want to catch problems early, writing tests to check that your code behaves properly can save you from bigger headaches later.
Practical Work
In the rest of this session, we will walk you through how to use a debugger in VS Code, focusing on practical steps and tips to help you find and fix errors more efficiently in your code. It is easier than you think and can really save you time.
- Integrated Development Environments (IDEs) are all-in-one tools for writing, editing, testing, and debugging code, improving developer efficiency by reducing the need to switch between different applications.
- Common IDE features include code editing, syntax highlighting, code completion, version control integration, debugging tools, project navigation, and built-in terminals.
- Debugging is the process of finding and fixing bugs in code to ensure it behaves as intended, improving code quality and reliability.
- Common debugging techniques include adding print statements, using built-in debuggers to set breakpoints and inspect variables, writing tests, and using logging.
- Using an IDE for debugging allows developers to step through their code interactively, making error detection and resolution much faster and more effective.
Content from Getting Started with VSCode
Last updated on 2025-11-07 | Edit this page
Estimated time: 10 minutes
Overview
Questions
- How do I access the key features of Microsoft Visual Studio (VS) Code?
- How do I open a software project in VSCode?
- What are VSCode extensions, and how do I use them?
Objectives
- Describe the general layout of the VSCode interface
- Download or clone an existing remote GitHub repository
- Open a code folder in VSCode using the explorer feature
- Install and configure an extension to VSCode that helps with Python code development
Running VSCode
Let’s start by running VSCode now on our machines, so run it now. How you run VSCode will differ depending on which operating system you have installed.
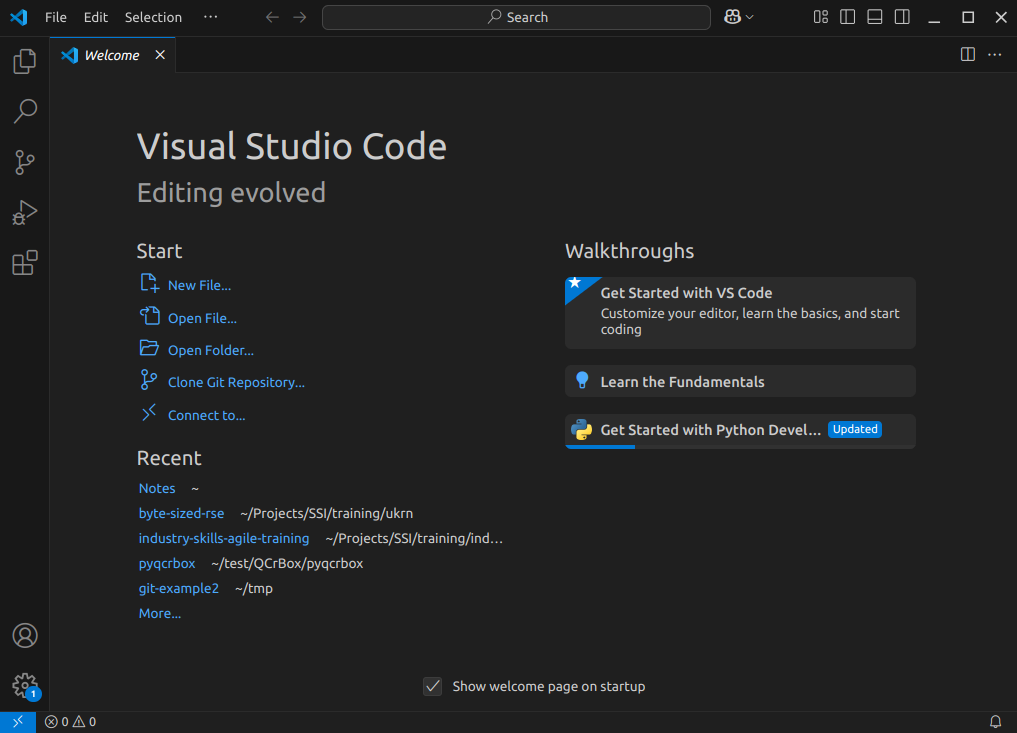
The first thing you’ll likely see is a welcome-style page with links to features for opening files, and creating or opening a project. You may find it asks you which kind of theme you’d like - you can select from either a dark or light theme.
Navigating Around VSCode
So let’s take a look at the application. You’ll see some icons on the left side, which give you access to its key features. Hovering your mouse over each one will show a tooltip that names that feature:
Explorer- the top one is a file navigator, or explorer - we can use this to open existing folders containing program files.Search- the next one down is a search capability, so you can search for things (and replace them with other text) over your code files.-
Source control- this gives you access to source code control, which includes Git version control functionality. This feature means you can do things like clone Git repositories (for example, from GitHub), add and commit files to a repository, things like that.CalloutIf you’re not familiar with Git, that’s totally fine - you don’t have to use this feature, although it’s worth looking into using version control for writing your code. Version control Systems like Git allow you to manage your code by storing it - and all the changes you make to it - within a repository hosted elsewhere, for example, on GitHub.
Run and Debug- this allows you to run programs you write in a special way with a debugger, which allows you to check the state of your program as it is running, which is very useful and we’ll look into later.Extensions- which we’ll look into right now, allows you to install extensions to VSCode to extend its functionality in some way.
There are many other features and ways to access them, and we’ll cover key ones throughout this lesson.
Installing Extensions
Extensions are a major strength of VSCode. Whilst VSCode appears quite lightweight, and presents a simple interface (particularly compared to many other IDEs!), this is quite deceptive. You can extend its functionality in many different ways. For example, installing support for other languages, greater support for version control, there’s even support for working with databases, and so on. There are literally tens of thousands of possible extensions now.
Now VSCode already comes with built-in support for JavaScript, including TypeScript and node.js, but also has extensions for other languages too (C++, C#, Java, PHP, Go, and many others). Installing a language extension will allow you to do more things with that particular language in VSCode, as we’ll see now.
Let’s install an extension now:
- Firstly, select the extensions icon, then type in “Python” into the search box at the top, and it’ll give you a list of all Python-related extensions.
- Select the one which says
Pythonfrom Microsoft. This is the Microsoft official Python extension. - Then select
Install.
It might take a minute - you can see a sliding blue line in the top left to indicate it’s working.
Who’s successfully managed to install the Python extension?
Once complete, you should see a couple of “Welcome” windows introducing you to two of its key features - support for Python and Jupyter notebooks. If you use Jupyter notebooks, which is a way of writing Python programs that you can run line by line from within an editor as you write the program, you may find this useful.
For now, let’s configure this extension for our Python development, and to do that, we need to tell VSCode which Python installation on our machine we’d like it to use. VSCode has a sophisticated method to access it’s inner functionality known as the Command Palette, which we’ll use to address this.
- Select
ViewandCommand Palettefrom the VSCode menu - Begin typing
Python: Select Interpreter, and then select it when it appears - A list of available Python installations should appear. You may find you have many installations of Python, or only have one. Try to select the version later than 3.8 if you can.
Once selected, the default Python interpreter for VSCode will be configured.
Who’s configured the Python extension?
A Sample Project
Next, let’s obtain some example Python and edit it from within
VSCode. First, download the example code we’ll use from https://github.com/UNIVERSE-HPC/code-style-example/releases/tag/v1.0.0,
either as a .zip or .tar.gz compressed archive
file. If you’re unsure, download the .zip file. Then,
extract all the files from the archive into a convenient location. You
should see files contained within a new directory named
code-style-example-1.0.0.
Now we need to load the code into VSCode to see it. You can do this in a couple of ways, either:
- Select the
Source controlicon from the middle of the icons on the left navigation bar. You should see anOpen Folderoption, so select that. - Select the
Fileoption from the top menu bar, and selectOpen Folder....
In either case, you should then be able to use the file browser to
locate the directory with the files you just extracted, and then select
Open. Note that we’re looking for the folder that
contains the files, not a specific file.
What about using Git Version Control?
If your system has the Git version control system installed, you may
see a Clone Repository option here too. If you are familiar
with Git and wish to use this option instead, select it and enter the
repository’s location as
https://github.com/UNIVERSE-HPC/code-style-example. Then
use the file browser that is presented to find a convenient location to
store the cloned code and click on
Select as Repository Destination, then select
Open when ‘Would you like to open the cloned repository?’
popup appears.
Who’s been able to download the code and open it within VSCode?
You may be presented with a window asking whether you trust the authors of this code. In general, it’s a good idea to be at least a little wary, since you’re obtaining code from the internet, so be sure to check your sources! Be careful here - I found on Windows the “Trust” option appears on the left, whilst on Mac, it appears on the right! In this case, feel free to trust the repository! You’ll then see the explorer present you with some files in a small window (or pane) on the left you can use to navigate and find files.
So far within VSCode we have downloaded some code from a repository and opened a folder. Whenever we open a folder in VSCode, this is referred to as a “Workspace” - essentially, a collection of a project’s files and directories. So within this workspace, you’ll see the following:
- A
datafolder, containing a single data file (click on it to see the data file within it). - Two files, a
climate_analysis.pyPython file, and aLICENSE.mdfile
So next, let’s look at editing code.
- Key VSCode features are accessible via the left navigation bar and the menu
- VSCode’s capabilities can be increased by installing extensions
- Language-specific support is available via extensions
- A VSCode “workspace” is a project that consists of a collection of folder and files
- Git source code repositories on GitHub can be cloned locally and opened from within VSCode
Content from Using the Code Editor
Last updated on 2025-11-07 | Edit this page
Estimated time: 10 minutes
Overview
Questions
- How do I open a source code file in VSCode?
- What editing features will help me when writing code?
Objectives
- Use syntax highlighting to identify code styling issues and common coding mistakes
- Use code completion to automate finishing an incomplete code statement
- Use an extension to help with writing Python docstrings
- Describe how VSCode highlights the status of files managed under version control
Now we’ve acquainted ourselves with running VSCode, let’s take a look
at our example code. Select the climate_analysis.py file in
the explorer window, which will bring up the contents of the file in the
code editor.
The File Explorer has Disappeared!
You may find, perhaps on reopening VSCode, that the explorer is no
longer visible. In this case, you can select Explorer from
the sidebar to bring it back up again, and if you don’t currently have a
workspace loaded, you can select Open Folder to select the
code folder.
Note that as an example, the code is deliberately written to have flaws. Things like the line spacing is inconsistent, there are no code comments, there’s a variable that’s not used, and you may spot other issues too. But in essence, the code is designed to do the following:
- Open a file in the CSV (comma separated value) format
- Go through the file line by line, and:
- If the line begins with a
#symbol, ignore it. - Otherwise, extract the fourth column (which contains temperature in Fahrenheit), convert it to Celsius and Kelvin, and output those readings.
- If the line begins with a
Let’s take a look at some of what the code editor gives us.
Syntax Highlighting
You’ll notice that the Python syntax is being highlighted for us, which helps readability.
Here, it uses colour to distinguish the various parts of our program. Functions are yellow, Python statements are purple, variables are light blue, and strings are this reddy-orange, and so on. Which, perhaps unsurprisingly, is a feature known as Syntax Highlighting, and it’s possible to edit the colour scheme to your liking for a particular language if you like, although we won’t go into that now.
This is really handy to give you immediate feedback on what you are
typing, and can help you to identify common syntax mistakes. For
example, deleting the closing parenthesis on open - the
opening one goes red, with a squiggly line underneath, indicating an
issue.
So this is great, and helps us understand what we are writing, and highlights some mistakes.
Code Completion
Something that’s also useful is VSCode’s ability (via the Python and Pylance extensions) to help you write and format your code whilst you’re typing.
For example, on a blank line somewhere, enter
for x in something:, and press the enter (or return)
key.
On the next line, we can see that it’s automatically indented it for us, knowing that we’re inside a loop.
Another really helpful feature is something known as code completion
(in VSCode, this is referred to as IntelliSense). This is a great time
saver, and a really useful feature of IDEs. Essentially, as you type, it
works out the context of what you are doing, and gives you hints. For
example, if we start typing a variable we’ve already defined, for
example climate_data, we can see that it’s zeroing in as we
type on the options for what we might be trying to type. When we see
climate_data, we can press Tab to complete it
for us. As another example, if we wanted to open another file, we might
type new_file = open(. In this case, it provides
information on the file open function and its arguments,
along with a description of what it does. This is really handy to we
don’t have to take the time to look up all this information up on the
web, for example.
Need a Thing? Install an Extension!
A great feature of VSCode is the ease with which we can add new extensions when we need them. For example, if we want to write good Python code, we should be adding code comments, including docstrings for our functions, methods, and modules.
Let’s try and find an extension that might help us with writing
docstrings. Select the Extensions icon, and type
docstring - you should see an autoDocstring
extension by Nils Werner at the top. Select that, and you’ll see a page
outlining what it is Also note via the number of downloads that it’s
very widely used.
What’s really handy is the little video that shows us what it does
This looks exactly like what we’re after! Select
Install.
Who’s been able to install the autoDocstring extension?
Now, when we go to a function for example FahrToCelsius,
go to the next line, and add """, we’ll see a small pop-up
to add a docstring. Press Tab to do so.
It does all the hard work of adding in the structure of a docstring for us, so we just need to fill in the blanks. This is another good example of us realising it would be nice to have something to help us, searching for an extension, and trying it out. +For example, filling in the blanks for our generated docstring:
PYTHON
    """Convert Fahrenheit to Celsius.

    Args:
        fahr (int): temperature in Fahrenheit

    Returns:
        int: temperature in Celsius
"""Who’s been able to fill in the blanks in their docstring?
Using a Git Code Repository?
For those of you familiar with version control and who retrieved the example code via cloning its repository instead of downloading it, there are some other editor features that help with using version control. One of these is that the filename changes colours in the file explorer depending on its status within version control:
- White - an existing file is unchanged from the copy in the local repository).
- Orange - the content of an existing file has changed, and the change(s) have not been tracked by version control yet.
- Green - a new file has been added and is unknown to version control.
So at a glance, you can get an idea of what’s changed since your last commit.
Summary
So in summary, many of these editing features are typical of IDEs in general, and the great thing is that they are really helpful at saving us time. Things like syntax highlighting, code completion, automatic code formatting and inserting docstrings, may not seem like much, but it all adds up!
- IDEs typically have a host of features that help save time when writing code
- Syntax highlighting gives you immediate feedback of potential issues as you write code
- Code completion helps to automatically finish incomplete code statements and names
Content from Running and Debugging Code
Last updated on 2025-11-07 | Edit this page
Estimated time: 10 minutes
Overview
Questions
- How do I run code in VSCode?
- How do I use a debugger to locate the source of a problem in my code?
- How does debugging fit within the broader process of development?
Objectives
- Use VSCode to run a Python script and have any text output displayed within a terminal
- Add a debugging breakpoint to a Python script
- Run a debugger so it pauses program execution at a breakpoint
- Use the debugger to step through our code statement by statement
- Use debugging information to identify the cause of a problem in our code
Running Python in VSCode
Now let’s try running a Python script. First, make sure your Python code doesn’t have any errors! Then, select the “Play”-looking icon at the top right of the code editor.
You should see the program run, and output displayed in a pop-up terminal window at the bottom:
OUTPUT
steve@laptop:~/code-style-example$ /bin/python3 /home/steve/code-style-example/climate_analysis.py
Max temperature in Celsius 14.73888888888889 Kelvin 287.88888888888886
Max temperature in Celsius 14.777777777777779 Kelvin 287.92777777777775
Max temperature in Celsius 14.61111111111111 Kelvin 287.76111111111106
Max temperature in Celsius 13.838888888888887 Kelvin 286.9888888888889
Max temperature in Celsius 15.477777777777778 Kelvin 288.62777777777774
Max temperature in Celsius 14.972222222222225 Kelvin 288.1222222222222
Max temperature in Celsius 14.85 Kelvin 288.0
Max temperature in Celsius 16.33888888888889 Kelvin 289.4888888888889
Max temperature in Celsius 16.261111111111113 Kelvin 289.4111111111111
Max temperature in Celsius 16.33888888888889 Kelvin 289.4888888888889
steve@laptop:~/code-style-example$ Who’s run their Python progran and seen some output in a pop-up window?
Error:
the term conda is not recognised
If you’re running an Anaconda distribution of Python on Windows, if you see this error it means that VSCode is not looking in the right place for Anaconda’s installation. In this case, you may need to configure VSCode accordingly:
- Activate the Command Palette, either by selecting
ViewandCommand Palettein the menu, or by pressingCtrl+Shift+Psimultaneously - then type
Terminal: Select Default Profile - From the options, select the entry that’s something like
Command Prompt C:\WINDOWS\...
Hopefully that should resolve the issue.
If you’re using Conda and encountered this error, did it fix it?
The pop-up window is known as the “Console” or “Terminal”, and
essentially is a terminal, or command prompt, where the program is run.
You’ll notice that the directory where the console runs is the current
VSCode project’s workspace location, and that we can also type in
commands here too. For example in Windows, you could type
dir, on Mac or Linux you could type ls - to
get a listing of files, for example.
We can also close this terminal/console at any time by selecting the
x icon on the right, and start a new one by selecting
Terminal from the menu and selecting
New Terminal. So when we write and run our code, we have
the option of never having to leave VSCode at all for most things.
Debugging Code
Now finally, let’s look at a feature with IDEs which is often overlooked, that of the debugger.
A debugger is a bit like performing exploratory surgery on a patient. You know there’s something wrong, but you don’t know exactly where the problem resides. What’s useful with debuggers is that you go looking within the codebase as it’s actually running to find the source of the problem.
In order to run a debugging session we first need to tell the IDE where we’d like to examine the code. Then you run the code in a special way, using a debugger, and it pauses the execution of the code at that point. You then have the freedom to take a look around and examine the state of variables, which functions have been called up until this point, and so on, and hopefully identify the cause of the issue.
Now, many people when starting out with coding disregard debuggers as complicated and tough to understand. And 30 or 40 years ago, debuggers were indeed quite complicated to set up and use. But these days, debuggers are perhaps a little more straightforward, with IDEs doing a lot of complex stuff for us.
Introducing a Problem
Let’s assume we have a problem with our code - by introducing one. In
our climate_analysis.py code, where it says
if data[0][0] != comment, replace comment with
'!'. We perhaps might assume one of our colleagues
erroneously made this change, but we haven’t spotted it yet. We try to
run the code as before, and now it doesn’t work. We get a
ValueError, which informs us it couldn’t perform a
conversion of a value extracted from the data file to a float as part of
its temperature conversion.
Who’s added this error into their code and sees a
ValueError in the terminal output?
Adding a Debugging Breakpoint
Now we know where the error is occurring but we don’t know the source
of the problem, which may not be in the same place. So let’s add in what
is known as a breakpoint to our code. This is where the
debugger will stop running the code and pause for us Let’s add it at the
start of the for line in climate_data: line. We do that by
clicking in the left margin for that line. By hovering in the margin,
you’ll see a faded red dot appear. Select it on that line and this sets
the breakpoint.
Who’s set a breakpoint in their code?
Using the Debugger
Let’s run the code using the debugger. Select the
Run and Debug icon on the left, and select
Run and Debug. Then it will likely ask two questions in
pop-up pane near the top:
- It asks you to
Select debugger, so select the suggestedPython Debugger. - Then it asks you to
Select a debug configuration, so selectPython Fileto debug the current file.
Now the Python script is running in debug mode. You’ll see the execution has paused on the line we entered the breakpoint, which is now highlighted. Some new information is now displayed in various panes on the left of the code editor.
Who’s run the code in debug mode and and seen their code paused at the breakpoint?
In particular:
-
VARIABLES- on the left, we can see a list of variables, and their current state, at this point in the script’s execution, such ascommentandshift, andclimate_data(which is a reference to our open data file). We don’t have many at the moment. It also distinguishes between local variables and global variables - this is to do with the “scope” of the variables, as to how they are accessible from this point in the running of the code. Global variables can be seen from anywhere in the script. And local variables are those that are visible from this point of the program. If we were within a function here, we would see variables that are defined and only used within that function as local variables only. For example, if we set a breakpoint within theFahrToKelvinfunction, we would seekelvinas a local variable, but it wouldn’t be listed as a global variable. -
CALL STACK- this is a record of the journey the script has taken, in terms of functions called, to get to this position in its execution. It shows us that we are at the top level of our script, which makes sense, since our breakpoint is at the top level of script, and not within any function. If it were within theFahrToKelvinfunction, for example, we’d see that added to the call stack. It also shows us the line number where execution has paused at this level of the call stack.
Now, we can also see some new icons at the top to do with debugging:
- The first one is continue, which allows the script to keep running until the next breakpoint (if there is one)
- The next one allows us to step over - or through - the script one statement at a time
- The next two allow us to choose to step into or out of a function call, which is interesting
If we want to examine the inner workings of a function during this debug session, we can do that.
- The green cycle one is to restart the debug process
- The red cross stops debugging completely
So let’s step through our code by selecting the second icon and see
what happens. As we do so, we can see the variable state changing. By
looking in the variables section, we can see that the line
variable contains the first line read from the data file. On the next
step, we’ve reached the if statement. If we step again, and
then again, our program halts because it’s run into the problem we saw
before.
This tells us something useful - that the problem occurs in the first iteration of the loop. So, this implies, the problem might be with the first line of data being processed, since the Python code is going through the data file line by line. Let’s now stop the debugger by selecting the red square icon.
If we re-run the debugger, we can go through this process again. And
we can see something interesting when we get to the if
statement. From the code, we know that the if statement is looking for
an exclamation mark at the beginning of the line to indicate a comment.
However, the data variable contains a ‘#’ as the first character
instead. Therefore, in this case, the code will assume it’s a data line
and attempt to process it as such. And then it will fail with the
exception we saw before.
Fixing the Issue
So now we’ve identified the problem, we can fix it.
Firstly, stop the debug process by selecting the red square. Then
edit the if line to search for comment
instead, reverting the code to what it was before. We can then rerun the
debugger if we wish, to check our understanding. And as we step through
the code, we can see if correctly identifies the first line as a
comment, and ignores it, continuing to the iteration of the for loop,
and the next line of data. Now we have our solution fixed, we can stop
the debugger again.
We’ve now solved our problem, so we should remove the breakpoint. Running our code again as normal, we can see it now works as expected.
Who’s fixed their problem and successfully re-run their code?
Debugging in Context
Typically, we’d use debugging when we’ve discovered a problem. Other techniques, such as testing, are great at identifying that there are problems, but not always the root cause and location of the actual problem. Debugging is the next step of that process. Sometimes, we discover a problem - perhaps our code testing show us there’s an issue, or maybe we find out some other way. If we’re lucky, we can identify and fix the problem quickly. Where we can’t, debugging is there to help us. With particularly complex programs, it can be very difficult to reason about how they work, and where the problem are, and debugging allows us to pick apart that process, and step by step, help us find the source of those issues.
- Run a script by selecting the “Play” icon in VSCode
- Debugging allows us to pause and inspect the internal state of a program while it is running
- Specify the points a debugger should pause by adding breakpoints to specific lines of code
- When a breakpoint is reached, a debugger typically shows you the current variables and their values and the stack of functions called to reach the current state
- Debuggers typically allow us to: step through the code a statement at a time, step into or out of a function call if we need further debugging information regarding that function, and continue execution until another breakpoint is reached or the end of the program
- Testing is used to identify the existence of a problem, whilst we use debugging to locate the source of a problem