Summary and Schedule
Welcome
This lesson teaches the fundamentals of Natural Language Processing (NLP) in Python. It will equip you with the foundational skills and knowledge needed to carry over text-based research projects. The lesson is designed with researchers in the Humanities and Social Sciences in mind, but is also applicable to other fields of research.
On the first day we will dive in to text preprocessing and word embeddings while epxloring semantic shifts in various words over multiple decades. The second day begins with an introduction to transformers, and we will work on classification and named entity recognition with the BERT model. In the afternoon, we willl cover large language language models, and you will learn how to build your own agents.
Prerequisites
Before joining this course, participants should have:
- Basic Python programming skills
Do you want to teach this lesson? Find more help in the README Feel free to reach out to us with any questions that you have. Just open a new issue. We also value any feedback on the lesson!
| Setup Instructions | Download files required for the lesson | |
| Duration: 00h 00m | 1. Introduction |
What is Natural Language Processing? Why should we learn NLP fundamentals? How is text different from other data? How can we extract structure from text? ::: |
| Duration: 01h 30m | 2. A Primer on Linguistics |
How is language approached from a Machine Learning perspective? What does it mean to do Language Modeling? What linguistic properties should we consider when dealing with texts? ::: |
| Duration: 02h 30m | 3. From words to vectors |
What are the steps that matter for defining an NLP task? How can words be represented as numbers that capture meaning? What kinds of semantic relationships can word embeddings encode? What are the limitations of static word representations like Word2Vec? How can we train our own Word2Vec model? How can we automatically discover hidden topics in a collection of texts? |
| Duration: 04h 30m | 4. Transformers: BERT and Beyond |
What are some drawbacks of static word embeddings? What are Transformers? What is BERT and how does it work? How can I use BERT to solve supervised NLP tasks? How should I evaluate my classifiers? ::: |
| Duration: 06h 30m | 5. Using large language models |
What makes Large Language Models different from other Transformer-based
models? What should we consider when choosing between open-source and proprietary LLMs? How can we run and interact with an LLM programmatically? How can a generative model be used to solve classification tasks? Can we trust the outputs of an LLM? What kind of systematic weaknesses do they have? ::: |
| Duration: 08h 30m | Finish |
The actual schedule may vary slightly depending on the topics and exercises chosen by the instructor.
Software Setup
1. Install Python
Python is a popular language for scientific computing, and a frequent choice for Natural Language Processing as well.
To install Python, follow the Beginner’s Guide or head straight to the download page.
Note: We will support Python 3.10 - 3.12 for this workshop.
Please set up your Python environment at least a day in advance of the workshop.
If you encounter problems with the installation procedure, ask your workshop organizers via e-mail for assistance so you are ready to go as soon as the workshop begins.
2. Download the workshop materials
Follow these steps to download all the workshop materials:
Navigate to https://github.com/carpentries-incubator/Natural-language-processing in your browser.
Click on the large green button at the top right of the page called “Code”. Make sure you are on the “Local” tab and click on the “Download ZIP” link at the bottom of the tab. This will download all the workshop materials in a ZIP archive.
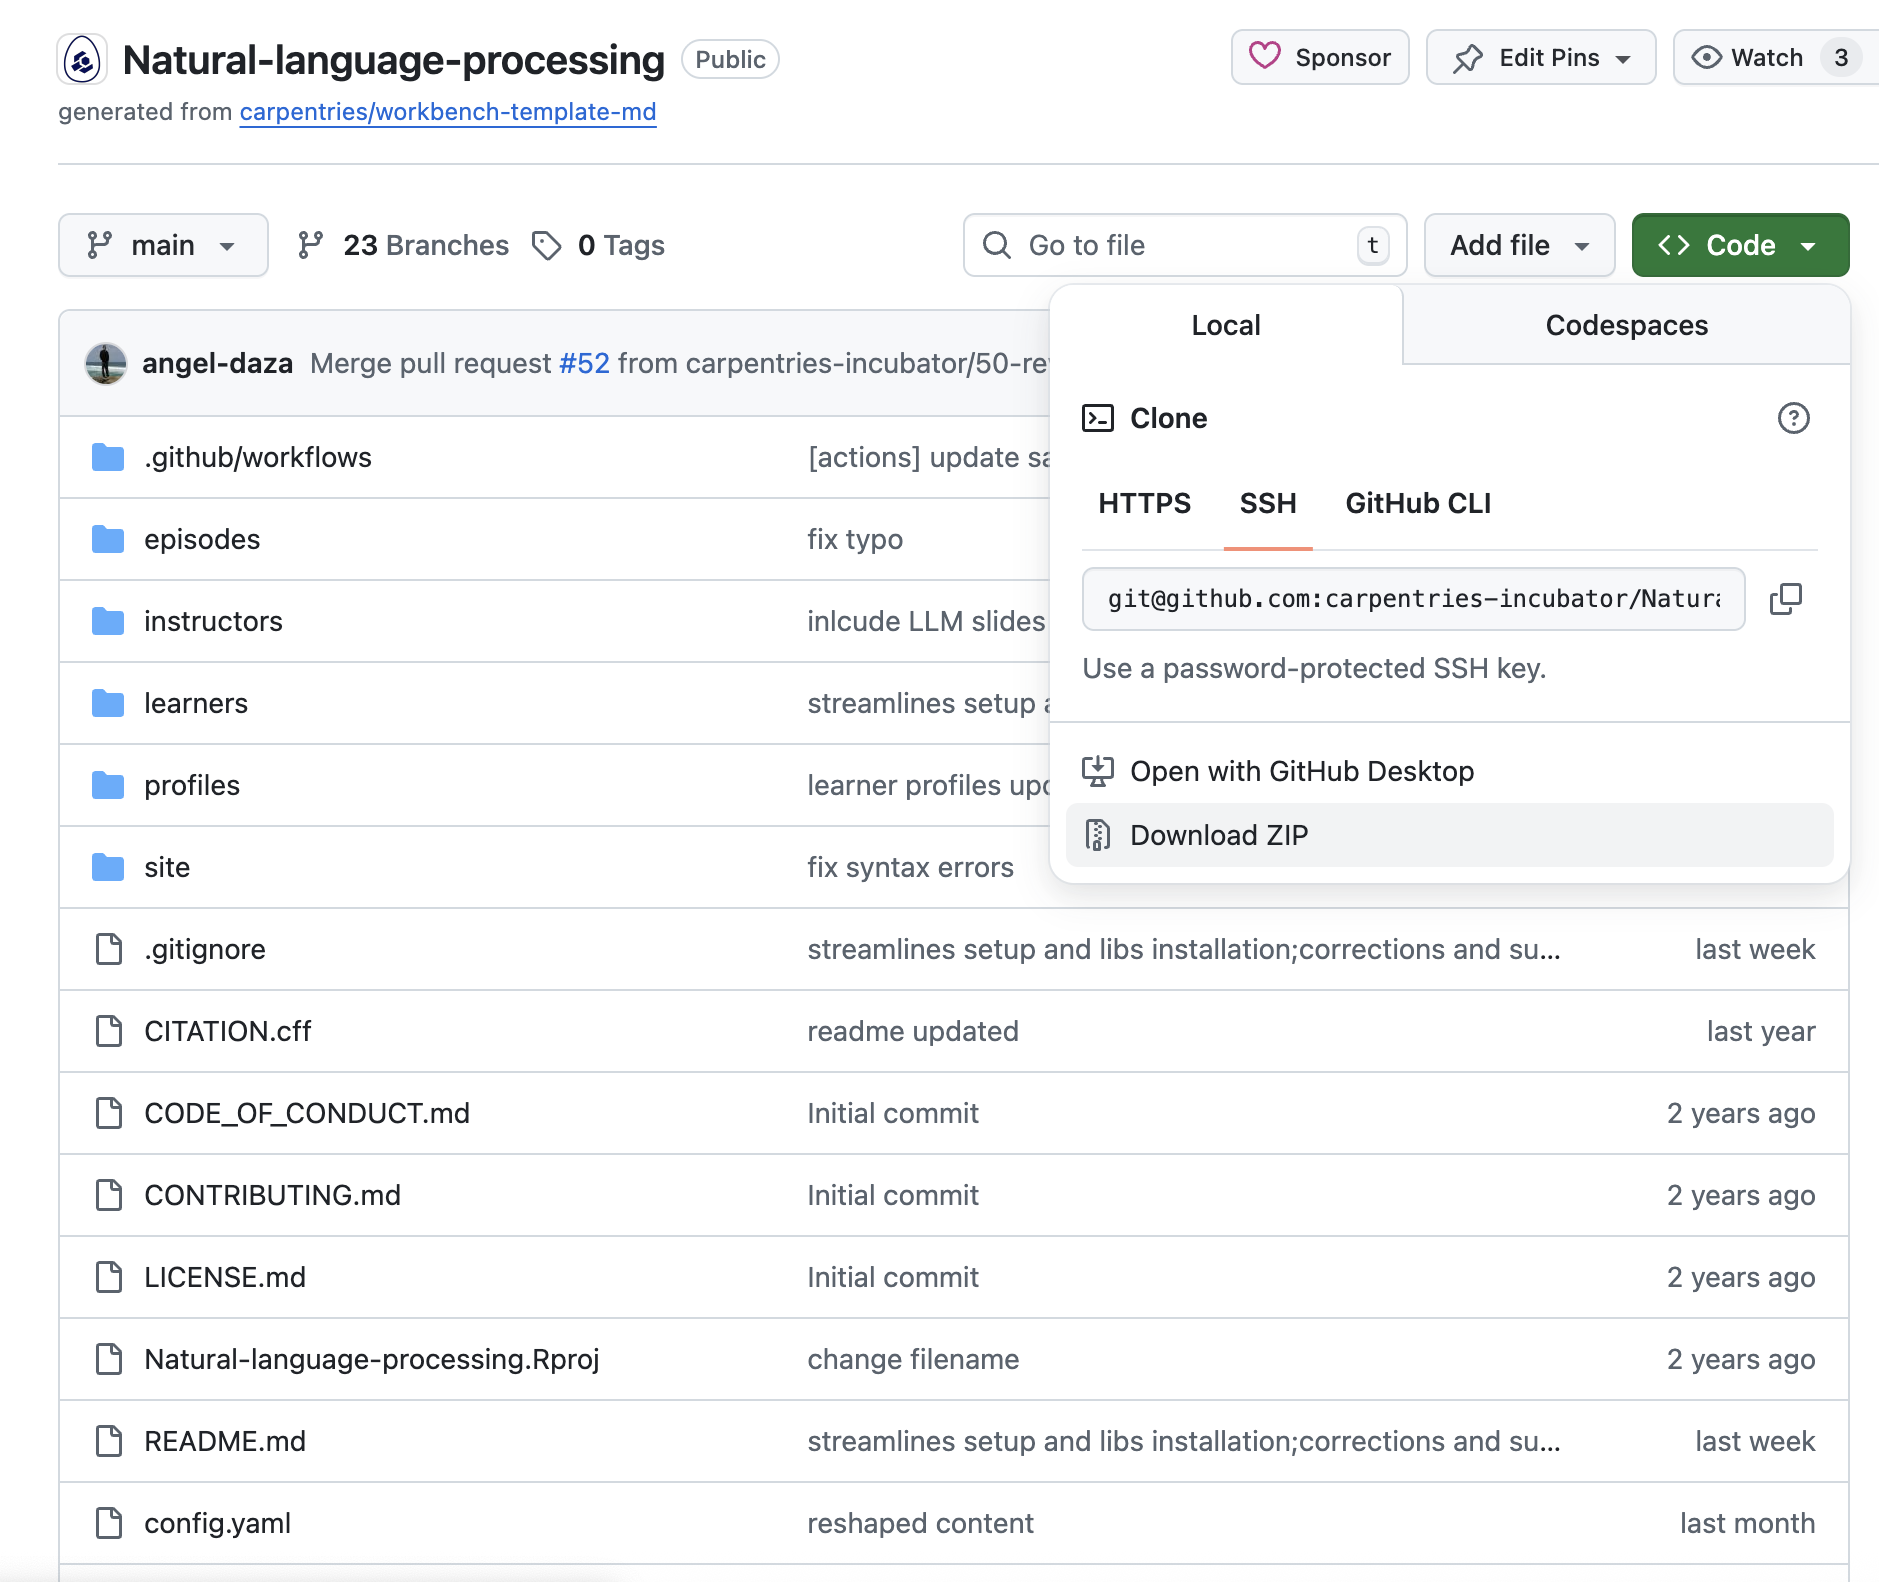
Place the ZIP archive in a chosen location in your file system and extract its contents. A directory with the name “Natural-language-processing-main” will be extracted from the archive.
Open a terminal (Mac/Linux) or Command Prompt (Windows) and navigate to the newly extracted directory “Natural-language-processing-main” in the terminal or command prompt.
3. Create a Python Virtual Environment
Pip is the package management system built into Python. We will use this to install all required packages for the workshop. Pip should be available in your system once you installed Python successfully. Please note: installing the packages can take some time, in particular on Windows.
- Create a virtual
environment called
nlp_workshop:
python3 -m venv nlp_workshoppy -m venv nlp_workshop- Activate the newly created virtual environment:
source nlp_workshop/bin/activatenlp_workshop\Scripts\activateNote: you need to activate your environment every time you restart your terminal!
4. Install the required Python packages
Ensure that in your terminal or command prompt that your working directory is the newly extracted “Natural-language-processing-main”. Then execute the following command:
python3 -m pip install -r requirements.txtpy -m pip install -r requirements.txt5. Download the required NLP models
To download models required for the workshop with one simple platform-independent command:
invoke init-modelsIf this command fails for whatever reason, download them separately as follows. Download the Word2Vec model first:
python3 -m gensim.downloader --download word2vec-google-news-300py -m gensim.downloader --download word2vec-google-news-300Then, download the trained pipelines for English from Spacy:
python3 -m spacy download en_core_web_smpy -m spacy download en_core_web_smWe will use Ollama to run large language models in Episode 4 of the workshop. The installer (available for Linux/Windows/Mac OS) can be downloaded here:
Run the installer and follow the instructions on screen.
Next, download the model that we will be using from a terminal (Mac/Linux) or Command Prompt (Windows) by typing the command:
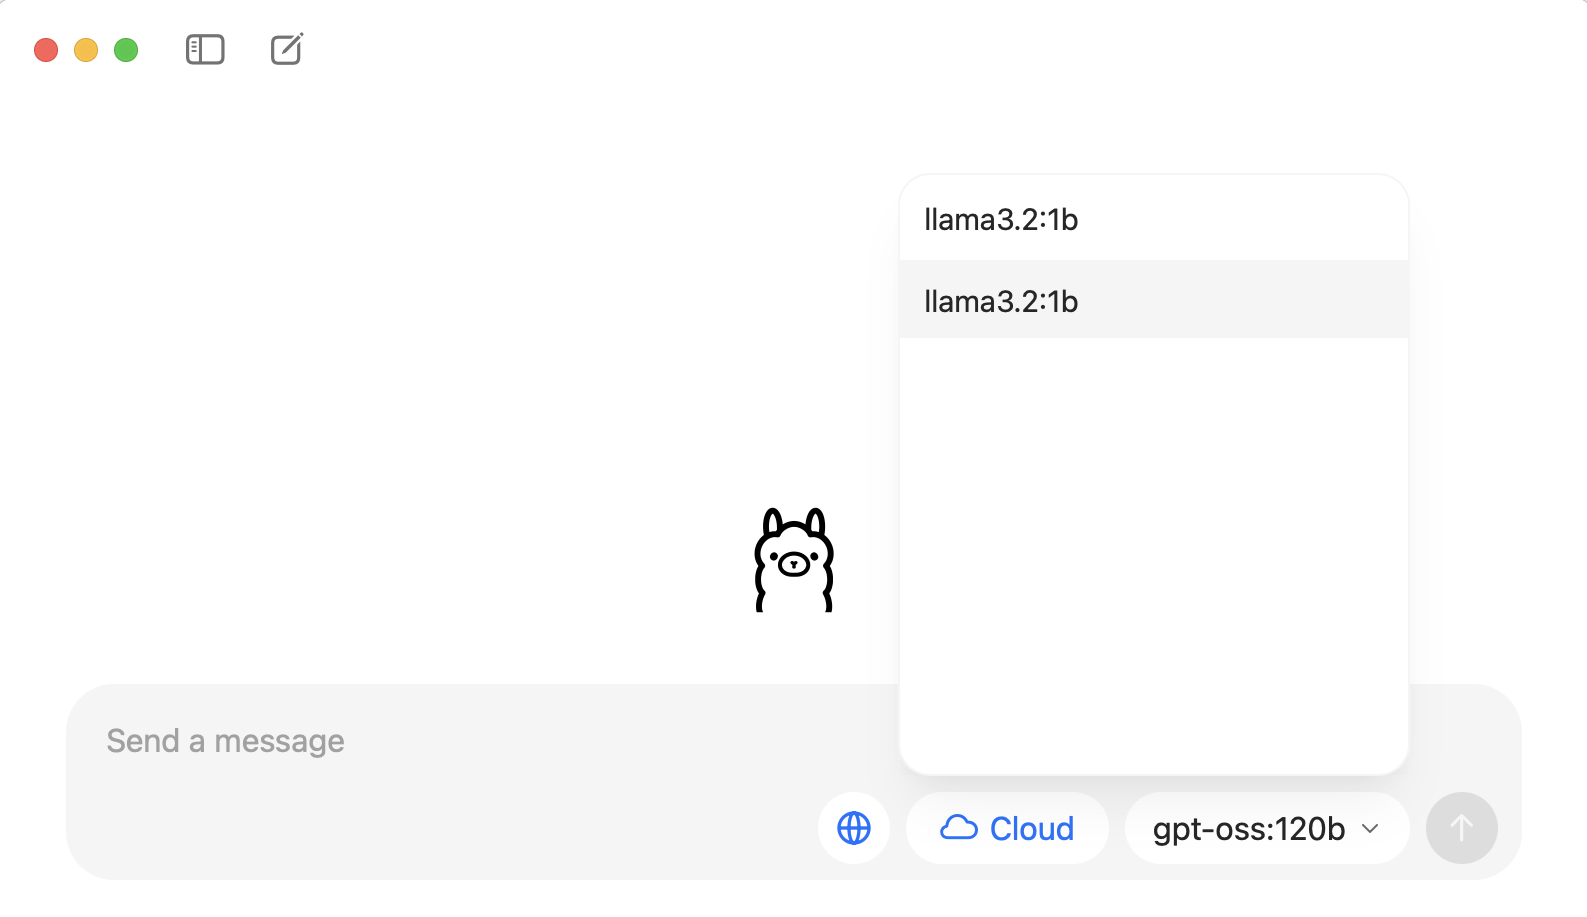
ollama pull llama3.2:1bNote: if the previous command fails, you can download the model manually inside the Ollama graphic interface. Open Ollama and on the right side of the “Send a message” prompt you will see a dropdown. Type “llama3.2:1b” there and send any message so Ollama can download (pull) the model for you.
6. Download the LitBank corpus
In the section about training Word2Vec, we will use the
LitBank repository,
which contains preprocessed versions of 100 royalty-free books. This
would produce richer representations than using a single source as it
provides more diverse contexts in which words could be found. Use the
following command to download the LitBank corpus under
data/litbank (the directory will be created if it doesn’t
exist):
invoke download-litbank7. Start Jupyter Lab
We will teach using Python in Jupyter Lab, a programming environment that runs in a web browser.
Jupyter Lab is compatible with Firefox, Chrome, Safari and Chromium-based browsers. Note that Internet Explorer and Edge are not supported.
See the Jupyter Lab documentation for an up-to-date list of supported browsers.
To start Jupyter Lab, navigate to the “Natural-language-processing-main” directory you just extracted in a terminal (Mac/Linux) or Command Prompt (Windows). Then type the command:
jupyter lab