Notebooks as Controllers
Last updated on 2025-10-09 | Edit this page
Overview
Questions
- How do you set up and use SageMaker notebooks for machine learning tasks?
- How can you manage compute resources efficiently using SageMaker’s controller notebook approach?
Objectives
- Describe how to use SageMaker notebooks for ML workflows.
- Set up a Jupyter notebook instance as a controller to manage compute tasks.
- Use SageMaker SDK to launch training and tuning jobs on scalable instances.
Setting up our notebook environment
Amazon SageMaker provides a managed environment to simplify the process of building, training, and deploying machine learning models. In this episode, we’ll set up a SageMaker notebook instance—a Jupyter notebook hosted on AWS for managing SageMaker workflows.
Using the notebook as a controller
In this setup, the notebook instance functions as a
controller to manage more resource-intensive compute tasks. By
selecting a minimal instance (e.g., ml.t3.medium), you can
perform lightweight operations while leveraging the SageMaker
Python SDK to launch scalable compute instances for model
training, batch processing, and hyperparameter tuning. This approach
minimizes costs while accessing the full power of SageMaker for
demanding tasks.
We’ll follow these steps to create our first “SageMaker notebook instance”.
1. Navigate to SageMaker
- In the AWS Console, search for SageMaker.
- Recommended: Select the star icon next to Amazon SageMaker AI to save SageMaker as a bookmark in your AWS toolbar
- Select Amazon SageMaker AI
2. Create a new notebook instance
- In the SageMaker left-side menu, click on Notebooks, then click Create notebook instance.
- Notebook name: To easily track this resource in our shared account, please use the following naming convention: “TeamName-LastnameFirstname-NotebookPurpose”. For example, “sinkorswin-DoeJohn-TrainClassifier”. Can include hyphens, but not spaces.
-
Instance type: SageMaker notebooks run on AWS EC2
instances. The instance type determines the compute resources allocated
to the notebook. Since our notebook will act as a low-resource
“controller”, we’ll select a small instance such as
ml.t3.medium(4 GB RAM, $0.04/hour)- This keeps costs low while allowing us to launch separate
training/tuning jobs on more powerful instances when needed.
- For guidance on common instances for ML procedures, refer to our
supplemental Instances
for ML webpage.
- This keeps costs low while allowing us to launch separate
training/tuning jobs on more powerful instances when needed.
- Platform identifier: This is an internal AWS setting related to the environment version and underlying platform. You can leave this as the default.
-
Permissions and encryption:
-
IAM role: For this workshop, we have pre-configured
the “ml-sagemmaker-use” role to enable access to AWS services like
SageMaker, with some restrictions to prevent overuse/misuse of
resources. Select the “ml-sagemmaker-use” role. Outside of the workshop,
you create/select a role that includes the
AmazonSageMakerFullAccesspolicy. -
Root access: Determines whether the user can run
administrative commands within the notebook instance. You should
Enable root access to allow installing additional
packages if/when needed.
- Encryption key (skip): While we won’t use this feature for the workshop, it is possible to specify a KMS key for encrypting data at rest if needed.
-
IAM role: For this workshop, we have pre-configured
the “ml-sagemmaker-use” role to enable access to AWS services like
SageMaker, with some restrictions to prevent overuse/misuse of
resources. Select the “ml-sagemmaker-use” role. Outside of the workshop,
you create/select a role that includes the
- Network (skip): Networking settings are optional. Configure them if you’re working within a specific VPC or need network customization.
- Git repositories configuration (skip): You don’t need to complete this configuration. Instead, we’ll run a clone command from our notebook later to get our repo setup. This approach is a common strategy (allowing some flexiblity in which repo you use for the notebook).
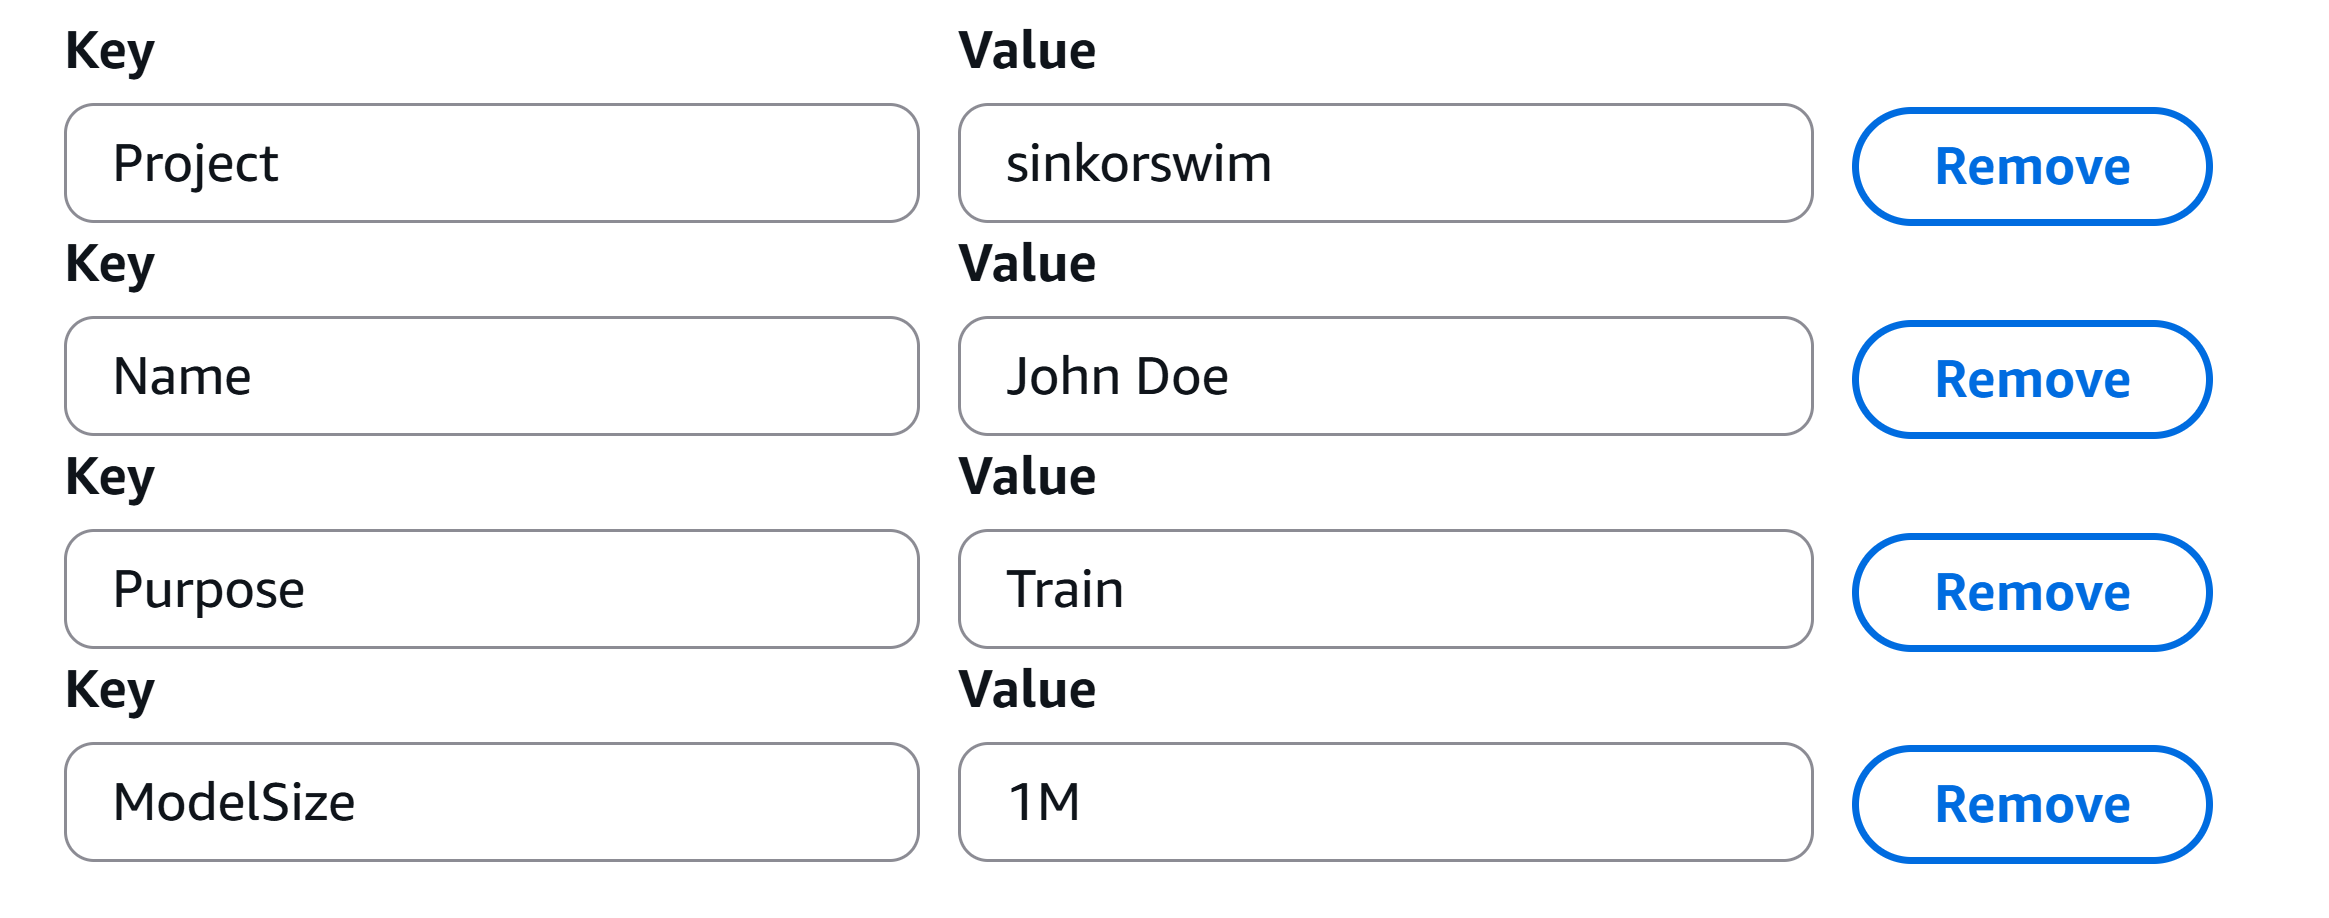
- Tags (NOT OPTIONAL): Adding tags helps track and organize resources for billing and management. This is particularly useful when you need to break down expenses by project, task, or team. To help track costs on our shared account, please use the tags found in the below image.
- Click Create notebook instance. It may take a few minutes for the instance to start. Once its status is InService, you can open the notebook instance and start coding.
Load pre-filled Jupyter notebooks
Once your newly created instance shows as
InService, open the instance in Jupyter Lab. From there, we
can create as many Jupyter notebooks as we would like within the
instance environment.
We will then select the standard python3 environment (conda_python3) to start our first .ipynb notebook (Jupyter notebook). We can use the standard conda_python3 environment since we aren’t doing any training/tuning just yet.
Load pre-filled Jupyter notebooks
Within the Jupyter notebook, run the following command to clone the lesson repo into our Jupyter environment:
Then, navigate to
/ML_with_AWS_SageMaker/notebooks/Accessing-S3-via-SageMaker-notebooks.ipynb
to begin the first notebook.
- Use a minimal SageMaker notebook instance as a controller to manage larger, resource-intensive tasks.
- Launch training and tuning jobs on scalable instances using the SageMaker SDK.
- Tags can help track costs effectively, especially in multi-project or team settings.
- Use the SageMaker SDK documentation to explore additional options for managing compute resources in AWS.