Getting started
Last updated on 2026-07-21 | Edit this page
Overview
Questions
- “I want to write a package. Where should I start?”
Objectives
- “Create a minimal package”
What does a package look like?
The minimal folder structure of a package looks like this
.
├── R
│   └── <R functions>
├── README.md
├── LICENSE
├── DESCRIPTION
└── NAMESPACE
where:
- The folder
Rcontains all theRcode (more on this in Writing our own functions). - The
README.mdfile contains human-readable information about the package (more on this in the Documentation episode). - The
LICENSEcontains information about who and how can use this package (more below). - The
DESCRIPTIONfile contains information about the package itself (more information in the episode on Dependencies). - The
NAMESPACEfile is automatically generated and tells R which functions can be accessed (more in the Documentation episode).
A minimal package
The menus in RStudio will help us in creating the most
minimal of packages. Let’s open RStudio and look at the
upper left corner. We will press
File > New project > New directory, and see a menu
like this:
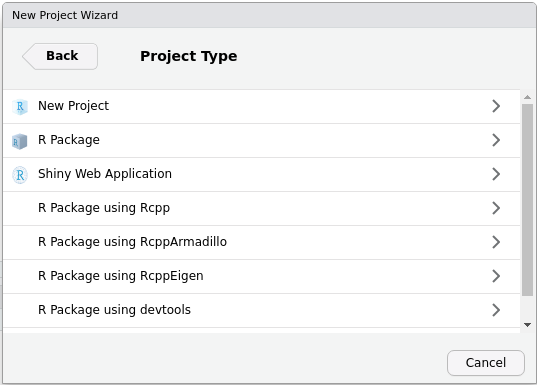
As you can guess, we will now press R package. The new
menu asks us to fill in some information. For the moment, bear with me
and fill in the following:
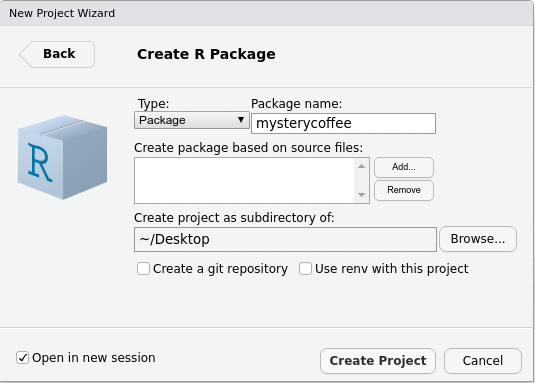
Notice that:
- We gave the package a name:
mysterycoffee. - I created my package on my
~/Desktopfolder, but you can use another location if you prefer. - We left
Create git repositoryunticked. If you want to know more aboutgit, please refer to our courses on Version control. Integrating packages with Git is very useful, but we will not talk about it in this lesson. - We left
Use renv with this project unticked. - We ticked
Open in new session.
Now we are ready to press Create Project.
What just happened?
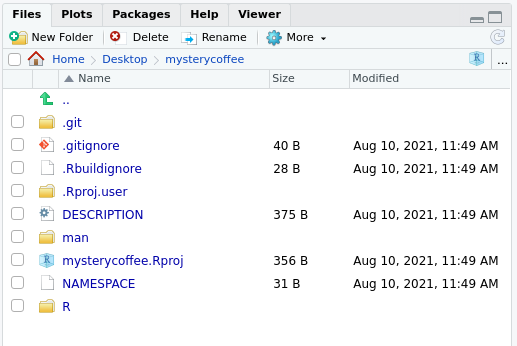
After pressing Create Project, a new
RStudio window should have appeared. The working folder
should be mysterycoffee, and it should already have some
contents:
Also, the file ./R/hello.R would appear open in the
editor. This is an example file that contains a toy function. Its only
functionality is to, well, to say “hello”. This may sound
silly, but it will help you writing your first packaged R functions.
The hello.R file
Let’s take a look at the hello.R file. You’ll see that
it contains a tiny function and some comments. The comments are actually
more important than the function itself. They contain very useful tips
about how to install, check and test the package.
As a rule of thumb: always read the contents of the example files RStudio creates for you.
Play with the package
Believe it or not, this package is ready to be installed. Just go to
the upper right corner and press
Build > Install and Restart (or, in newer versions of
RStudio, press
Build > Install > Clean and install).
This will install and attach the package. The package contains only
one function so far: hello().
Try out the hello() function.
Edit it, and reload the package.
- What does it print?
- Change this function to generate a different output. (Have fun with it, perhaps add an argument or two!)
- Build and install the package, and call the function again to see that it works differently.
R
mysterycoffee::hello()
OUTPUT
[1] Hello, world!We can add an argument like this:
R
hello <- function(name) {
   print(paste0("Hello, ", name, "!"))
}
To use the updated function available in RStudio, we can use either
R
devtools::load_all() # then call with hello("Luke")
devtools::install() # then call with mysterycoffee::hello("Luke")
Alternatively, we can also use the graphical user interface as above:
Build Install and Restart.
Note: load_all() simulates installing and
attaching the package. In larger projects, it allows us to iterate more
quickly between changing functions and testing them in the console.
Tell me how you load your functions
There are many ways of using functions, but all of them involve loading them into the workspace. We just learned how to do that using a package.
How do you usually work with functions? Perhaps you source them from an external file? Do you usually work on a single, long script?
Can you think of any advantage of using packages instead? Don’t worry if the answer is no. This is actually a difficult question at this stage. We’ll show the full power of packages along the course.
More advanced folder structures
In this course we will show you how to unleash the full power of packaging. In order to do so, we will use some optional folders. You can see an overview below
.
├── R
│   └── <R functions>
├── data (optional)
│   └── <data>
├── tests (optional)
│   ├── testthat.R
│   └── testthat
│       └── <tests>
├── vignettes (optional)
│   └── <Rmd vignettes>
├── inst (optional)
│   └── <any other files>
├── README.md
├── LICENSE
├── DESCRIPTION
└── NAMESPACE
where:
- The
datafolder contains, as the name suggests, data (more in the Data episode). - The
testsfolder contains unit tests, that will be very useful for making our package robust and mantainable (more in the episode on Testing). - The
vignettesfolder contains documentation inRmdformat. As we’ll see, this is a very suitable format for your reports and publications (more in the Vignette episode). - The
instfolder contains any extra file you may want to include (more in the Data episode).
- “A package is no more and no less than a folder structure”
- “RStudio can help you”