
Connecting Securely to an HPC Cluster
Last updated on 2026-10-05 | Edit this page
Estimated time: 35 minutes
Overview
Questions
- Why is SSH used to access HPC systems securely?
- How do I authenticate and connect to an HPC login node?
Objectives
- Explain why secure remote access is required for HPC systems.
- Configure SSH key-based authentication for an HPC cluster.
- Connect securely to the login node of an HPC cluster.
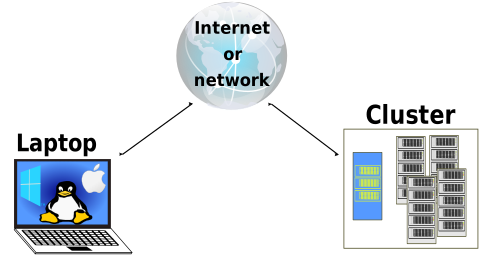
An HPC cluster is a collection of computers that users access remotely. Your laptop is not part of the cluster; it is the computer from which you connect. To begin working on the HPC cluster, you must first establish a secure connection to the system. Because HPC clusters are shared resources accessed over institutional or public networks, authentication and encrypted communication are fundamental components of every HPC workflow.
Secure Connections
The first step in using an HPC cluster is to establish a secure connection from your local computer. When we interact with a computer, we often use a graphical user interface, or GUI, with windows, icons, menus, and other visual elements. Because HPC systems are administered remotely, the command-line interface (CLI) remains the standard method for interacting with HPC environments. CLI-based workflows are lightweight, reproducible, and well suited to automation, allowing users to manage files, compile software, execute applications, and administer remote systems efficiently. Compared with graphical desktop environments, the CLI also consumes very little network bandwidth.
If you have ever opened the Windows Command Prompt or macOS Terminal, you have seen a CLI. If you have already taken “The Carpentries” courses on the UNIX Shell or Version Control, you have used the CLI on your local machine extensively. The main new concept is opening a CLI session on the remote HPC cluster while taking appropriate precautions so that other people on the network cannot see (or modify) the commands you run or the results returned by the remote HPC system. We will use the Secure Shell protocol (or SSH) to open an encrypted network connection between two machines, allowing commands, files, and other data to be exchanged securely.
SSH clients are usually command-line tools that require only the
remote system address as a mandatory argument. If your username on the
remote system differs from what you use locally, you must provide that
as well. If your SSH client has a graphical front-end, such as PuTTY or
MobaXterm, you will set these arguments before clicking “connect”. From
the terminal, you’ll write something like
ssh username@hostname, where the argument is similar to an
email address: the @ separates the remote username from the
remote host. In this lesson, yourUsername represents the
username on the remote system, and cluster.hpc-carpentry.org
represents the cluster’s login address (hostname), which
identifies the cluster’s login node on the network.
When logging in to a laptop, tablet, or other personal device, a
username, password, or pattern are normally required to prevent
unauthorized access. In these situations, the likelihood of somebody
else intercepting your password is low, since logging your keystrokes
requires a malicious exploit or physical access. For systems like
login1 running an SSH server, anyone on the network can
attempt to log in to the system. Since usernames are often public or
easy to guess, your password is often the weakest link in the security
chain. Many HPC centres disable password authentication for SSH and
instead require or prefer public-key authentication. Authentication
policies may vary between HPC centres, and some systems also use
institutional identity services or multi-factor authentication. The
private key should also be protected by a strong passphrase. Even if
your cluster does not require it, the next section will guide you
through the use of SSH keys and an SSH agent to both strengthen your
security and make it more convenient to log in to remote systems.
Better Security With SSH Keys
The Lesson Setup provides instructions for installing a shell application with SSH. If you have not done so already, please open that shell application with a Unix-like command line interface to your system.
SSH authenticates users using public-key cryptography. A public key is registered with the HPC centre’s authentication system, while the corresponding private key remains securely stored on your local computer. SSH keys provide an alternative authentication mechanism for accessing remote computing systems. They can also be used for authentication when transferring files or for accessing remote version control systems (such as GitHub). In this section you will create a pair of SSH keys:
- a private key which you keep on your own computer, and
- a public key which can be placed on any remote system you will access.
SSH public-key authentication can replace password-based SSH authentication during login. Instead of proving your identity with your account password, SSH proves that you possess the private key corresponding to the public key stored on the cluster. However, your private key should itself be protected by a passphrase. The passphrase protects your private key while it is stored on your computer. After you enter the passphrase, the private-key identity can be loaded into the SSH agent. The agent can then use that identity for subsequent SSH authentication.
An SSH agent is optional. It is a convenience mechanism that holds a private-key identity for authentication, so you do not need to enter the key’s passphrase for every SSH connection.
Private keys are your secure digital passport
If someone else obtains your private key, treat it as compromised. Stop using it, remove its corresponding public key from systems where it is authorized, and generate a new key pair. This includes cases where the key (or a copy) is stored in a directory with improper permissions, is transmitted over an unencrypted network, is sent as an attachment via unencrypted email, or is even displayed on your terminal window.
Protect this key as if it unlocks your front door. In many ways, it does.
Regardless of the software or operating system you use, please choose a strong passphrase to act as another layer of protection for your private SSH key.
Considerations for SSH Key Passphrases
When prompted, enter a strong passphrase that you will remember. There are two common approaches to this:
- Create a memorable passphrase with some punctuation and number-for-letter substitutions, 32 characters or longer. Street addresses work well; just be careful of social engineering or public records attacks.
- Use a password manager and its built-in password generator with all character classes, 25 characters or longer. KeePass and BitWarden are two good options.
- Nothing is less secure than a private key with no passphrase. If you skip passphrase entry by accident, go back and generate a new key pair with a strong passphrase.
SSH Keys on Linux, Mac, MobaXterm, and Windows Subsystem for Linux
Once you have opened a terminal, check for existing SSH keys before generating a new key pair, since files with the same name may be overwritten.
If ~/.ssh/id_ed25519 already exists, you will need to
specify a different name for the new key pair.
Generate a new public-private key pair using the following command,
which will produce a stronger key than the ssh-keygen
default by invoking these flags:
-
-a(default is 16): number of rounds of passphrase derivation; increase to slow down brute force attacks. -
-t(default is Ed25519): specifies the key “type” or cryptographic algorithm.ed25519specifies the EdDSA public-key algorithm. -
-f(default is /home/user/.ssh/id_algorithm): filename to store your private key. The public key filename will be identical, with a.pubextension added.
When prompted, enter a strong passphrase with the above considerations in mind. Note that the terminal will not appear to change while you type the passphrase: this is deliberate, for your security. You will be prompted to type it again, so don’t worry too much about typos.
Take a look in ~/.ssh (use ls ~/.ssh). You
should see two new files:
- your private key (
~/.ssh/id_ed25519): do not share with anyone! - the shareable public key (
~/.ssh/id_ed25519.pub): if a system administrator asks for a key, this is the one to send. It is also safe to upload to websites such as GitHub: it is meant to be seen.
If ed25519 is not Supported on
Your Local Computer (Use RSA for Older Systems)
If key generation failed because ed25519 is not available, try using the older (but still strong and trustworthy) RSA cryptosystem. Again, first check for an existing key:
If ~/.ssh/id_rsa already exists, you will need to
specify a different filename for the new key pair. Generate it as above,
with the following extra flags:
-
-bsets the number of bits in the key. For RSA keys, the default is 3072 bits. Ed25519 uses a fixed key size, so the-boption does not apply to Ed25519 keys. -
-o(no default): use the OpenSSH key format, rather than PEM.
When prompted, enter a strong passphrase with the above considerations in mind.
Take a look in ~/.ssh (use ls ~/.ssh). You
should see two new files:
- your private key (
~/.ssh/id_rsa): do not share with anyone! - the shareable public key (
~/.ssh/id_rsa.pub): if a system administrator asks for a key, this is the one to send. It is also safe to upload to websites such as GitHub: it is meant to be seen.
SSH Keys on PuTTY
If you are using PuTTY on Windows, download and use
puttygen to generate the key pair. See the PuTTY
documentation for details.
- Select
ed25519as the key type. - If PuTTYgen asks for a key size, use
255bits. - Click on the “Generate” button.
- You do not need to enter a comment.
- When prompted, enter a strong passphrase with the above considerations in mind.
- Save the keys in a folder no other users of the system can read.
Take a look in the folder you specified. You should see two new files:
- your private key (
id_ed25519): do not share with anyone! - the shareable public key (
id_ed25519.pub): if a system administrator asks for a key, this is the one to send. It is also safe to upload to websites such as GitHub: it is meant to be seen.
SSH Agent for Easier Key Handling
A private SSH key is only as secure as the passphrase used to protect or unlock it. Entering the passphrase every time you establish an SSH connection can become tedious. This is where the SSH agent comes in.
Using an SSH agent, you can enter your private key’s passphrase once. The agent keeps the loaded private-key identity available for subsequent SSH connections until the identity lifetime expires or the identity is removed from the agent. This removes the need to enter the passphrase for every new SSH connection.
SSH Passphrase
Just remember your passphrase, because once it expires in the agent, you have to type it in again.
SSH Agents on Linux, macOS, and Windows
Open your terminal application and check if an agent is running:
-
If you get an error like this one,
ERROR
Error connecting to agent: No such file or directory… then you need to launch the agent as follows:
CalloutWhat’s in a
$(...)?The syntax of this SSH agent command is unusual, based on what we’ve seen in the UNIX Shell lesson. This is because the
ssh-agentcommand starts an authentication agent and prints a series of shell commands that allow your current shell to communicate with it – but does not execute them automatically.OUTPUT
SSH_AUTH_SOCK=/tmp/ssh-Zvvga2Y8kQZN/agent.131521;
export SSH_AUTH_SOCK;
SSH_AGENT_PID=131522;
export SSH_AGENT_PID;
echo Agent pid 131522;
The
evalcommand interprets this text output as commands and allows you to access the SSH agent connection you just created.You could run each line of the
ssh-agentoutput yourself, and achieve the same result. Usingevaljust makes this easier. Otherwise, your agent is already running: don’t mess with it.
Add your key to the agent, with session expiration after 8 hours:
OUTPUT
Enter passphrase for .ssh/id_ed25519:
Identity added: .ssh/id_ed25519
Lifetime set to 28800 seconds
For the next eight hours, the SSH agent can use the loaded private-key identity whenever it is needed, so you don’t have to enter its passphrase again.
SSH Agent on PuTTY
If you are using PuTTY on Windows, download and use
pageant as the SSH agent. See the PuTTY
documentation.
Uploading Your Public Key
Visit https://mokey.cluster.hpc-carpentry.org
to upload your SSH public key. (Remember, it’s the one ending in
.pub!)
Log In to the Cluster
Go ahead and open your terminal or graphical SSH client, then log in
to the cluster. Replace yourUsername with your username or
the one supplied by the instructors.
Depending on your cluster configuration, SSH may prompt you for
either your account password or your private key’s passphrase. Watch
out: characters typed at either prompt are not displayed on the screen.
Normal output will resume once you press Enter.
You may have noticed that the prompt changed when you logged into the
remote system using the terminal (if you logged in using PuTTY this will
not apply because it does not offer a local terminal). This change is
important because it can help you distinguish on which system the
commands you type will be run when you pass them into the terminal. This
change is also a small complication that we will need to navigate
throughout the workshop. Exactly what is displayed as the prompt (which
conventionally ends in $) in the terminal when it is
connected to the local system and the remote system will typically be
different for every user. We still need to indicate which system we are
entering commands on though so we will adopt the following
convention:
-
[you@laptop:~]$when the command is to be entered on a terminal connected to your local computer -
[yourUsername@login1 ~]$when the command is to be entered on a terminal connected to the remote system -
$when it really doesn’t matter which system the terminal is connected to.
Looking Around Your Remote Home
Very often, many users are tempted to think of a high-performance
computing installation as one giant, magical machine. Sometimes, people
will assume that the computer they’ve logged onto is the entire
computing cluster. So what’s really happening? What computer have we
logged on to? The name of the current computer we are logged onto can be
checked with the hostname command. (You may also notice
that the current hostname is also part of our prompt!)
OUTPUT
login1The hostname identifies the computer to which you are
currently connected. In most HPC systems, this computer is known as the
login node. The login node provides an interactive environment
where users authenticate, manage files, compile applications (where
permitted by local policy), and prepare computational work. Later in the
course, you will learn how different types of jobs are submitted from
the login node for execution.
Login Nodes
A login node is typically one of the primary entry points to an HPC cluster. Use it to:
- authenticate;
- inspect and manage files;
- configure your environment;
- prepare your work;
- submit jobs;
- monitor jobs.
It is not recommended to run long-running or resource-intensive scientific workloads directly on a login node unless the cluster documentation explicitly permits it.
Next, let’s find out where we are by running pwd to
print the working
directory.
OUTPUT
/home/yourUsernameThe output shows your current working directory on the HPC system. By default, your SSH session begins in your home directory, where your personal files, shell configuration files, and other user-specific configurations may be stored.
OUTPUT
The system administrators may have configured your home directory with some helpful files, directories (or folders), and symbolic links (shortcuts) to space reserved for you on other filesystems. If they did not, your home directory may appear empty. To double-check, include hidden files in your directory listing:
OUTPUT
  .            .bashrc
  ..           .ssh
In the first column, . is a reference to the current
directory and .. a reference to its parent
(/home). You may or may not see the other files, or files
like them: .bashrc is a shell configuration file, which you
can edit with your preferences; and .ssh is a directory
containing user-specific SSH configurations and authentication-related
files. Its contents differ between your local computer and your HPC
account.
Verify Your SSH Key Registration
SSH Key Registration Depends on the HPC Centre
Policies and practices for handling SSH keys vary between HPC clusters: follow any guidance provided by the cluster administrators or documentation. In particular, if there is an online portal for managing SSH keys, use that instead of the directions outlined here.
If you uploaded your SSH public key through the cluster’s web portal, the key has
been registered with the authentication system used by the cluster. On
systems that use a conventional ~/.ssh/authorized_keys
file, you may see the registered key there.
OUTPUT
authorized_keysHPC centres may store and manage SSH public keys in different ways.
Your centre may use a web portal, a local authorized_keys
file, or another authentication service. Do not be surprised if your HPC
account does not contain a ~/.ssh directory or an
authorized_keys file.
The contents of ~/.ssh vary between systems and can
contain additional files such as known_hosts or
config.
If your HPC centre uses ~/.ssh/authorized_keys, you can
inspect the file with:
Each line in authorized_keys contains a public key that
the SSH server may accept for public-key authentication to this account.
If you access the cluster from multiple computers, this file may contain
multiple entries.
OUTPUT
ssh-ed25519 AAAAC3NzaC1lZDI1NTE5AAAAIJC/bo0gZHk+8/kl8DNFd8hUrUqaGdL7o+TisQe/uQlp you@laptopNote that the output shown above can vary from person to person and location to location.
If your HPC centre does not provide a portal for registering SSH
keys, follow the key-registration method documented by the centre. On
systems that permit direct shell-based registration,
ssh-copy-id or an scp-based workflow may be
available. These are alternative bootstrap workflows for HPC centres
that permit users to register SSH keys directly from the command line.
Use them only when the centre’s documentation permits this workflow.
ssh-copy-id is a bootstrap mechanism: it normally uses
an authentication method that is already available to install the public
key for future public-key authentication.
ssh-copy-id uses ssh to connect to the
remote system and, by default, attempts to authenticate using the
available authentication mechanisms. In the usual case, this means using
the remote account’s login password, so password authentication must be
enabled on the SSH server.
The command examines the keys available to the local SSH client and determines which keys are already authorized on the remote system. When an SSH agent is available, its keys can be used during this process.
With the -i ~/.ssh/id_ed25519.pub option, we explicitly
select the public key that should be installed. This prevents
ssh-copy-id from selecting other identities that may be
available through the SSH agent or default identity files.
ssh-copy-id normally installs the selected public key in
the remote account’s authorized-key configuration, commonly
~/.ssh/authorized_keys. If the ~/.ssh
directory or authorized_keys file does not yet exist,
ssh-copy-id can create them as necessary.
Some SSH servers require restrictive permissions on the
.ssh directory and the authorized_keys file
before key-based authentication is accepted.
BASH
[yourUsername@login1 ~]$ chmod 700 ~/.ssh
[yourUsername@login1 ~]$ chmod 640 ~/.ssh/authorized_keysDepending on the SSH server configuration, overly permissive ownership or permissions on these files can cause the server to reject public-key authentication.
If the authorized_keys file does not exist: You need to
“register” the public-key: it must be listed in a file named
authorized_keys, under the .ssh folder.
If the .ssh folder was not listed on the remote cluster,
then it does not yet exist: create it.
From your local computer, transfer only the public key, whose
filename ends in .pub, to your HPC home directory.
List the hidden files in the directory:
OUTPUT
  .            .bashrc           id_ed25519.pub
  ..           .ssh
Now, use cat to print your public key, but redirect the
output, appending it to the authorized_keys file:
Some SSH servers require restrictive permissions on the
.ssh directory and the authorized_keys file
before key-based authentication is accepted.
BASH
[yourUsername@login1 ~]$ chmod 700 ~/.ssh
[yourUsername@login1 ~]$ chmod 640 ~/.ssh/authorized_keysDepending on the SSH server configuration, overly permissive ownership or permissions on these files can cause the server to reject public-key authentication.
To verify that key-based authentication works for a new SSH session, disconnect from the cluster and connect again:
If your private key is loaded in the SSH agent, you normally will not need to enter its passphrase again while that identity remains available to the agent.
- HPC clusters are shared computational resources that users access remotely.
- Secure Shell (SSH) provides encrypted communication between your local computer and an HPC cluster.
- SSH public-private key pairs provide a secure method for authenticating to remote systems.
- A private key remains on your local computer and should be protected with a strong passphrase.
- An SSH agent can temporarily retain a private-key identity so that its passphrase does not need to be entered on every connection.
- Users typically connect to an HPC system through a login node, where they authenticate, manage files, configure their environment, and prepare their work.